Healthy Peanut Butter Cups
When it comes to satisfying that sweet tooth without the guilt, I have just the remedy you need: Healthy Peanut Butter Cups. Oh, these little beauties are not just a treat; they’re an experience wrapped in nostalgia and innovation. Imagine sinking your teeth into creamy peanut butter, perfectly balanced with a touch of sweetness and enveloped in silky chocolate. It’s like a cozy hug for your taste buds! This homemade version is a delightful alternative to those store-bought treats we all know and love—minus the unnecessary additives and refined sugars. With only six simple ingredients, let this recipe be your new go-to whenever that candy craving hits at an unexpected hour.
As I think back to my childhood, I can’t help but remember those moments when my friends and I would gather around, eagerly anticipating the arrival of dessert. Each bite of those indulgent peanut butter cups was a moment of pure bliss. That’s what makes this recipe so special—it bridges those cherished memories with today’s focus on health and well-being. By whipping up these Healthy Peanut Butter Cups, you’re not just treating yourself; you’re creating new memories with family or friends, perhaps even sharing them during movie nights or casual gatherings. Trust me when I say that everyone will be begging for seconds!
Healthy Peanut Butter Cups: A Guilt-Free Indulgence
Welcome to your new favorite dessert! These Healthy Peanut Butter Cups are so easy to make and incredibly satisfying. They offer the perfect balance of sweet and salty, making them utterly irresistible. I can’t wait for you to experience how simple yet delightful these treats are while knowing you’re nourishing your body at the same time.
Ingredients:
Embarking on this culinary adventure requires just six ingredients that come together beautifully to create something truly special. Let’s dive into what you’ll need!
- 1/2 cup peanut butter. The star of our show! Opt for natural peanut butter without added sugars or oils—this ensures a rich, creamy texture that’s absolutely essential for our cups. The nutty flavor of peanut butter isn’t just delicious; it also provides healthy fats and protein that will keep you feeling satisfied long after indulging in these treats. If you’re looking for alternatives, almond butter works wonderfully too, lending its own unique flavor profile.
- 2 tbsp maple syrup. This liquid gold adds just the right amount of sweetness without being overpowering. Maple syrup has a rich flavor that complements the nutty essence of the peanut butter and helps bind everything together beautifully—it’s like a warm embrace in a bottle! When choosing maple syrup, go for pure or organic varieties if possible; they contain more nutrients than imitation syrups.
- 1/2 tsp vanilla. This is where things get fragrant! Vanilla extract elevates our cups from ordinary to extraordinary with its complex aroma that dances harmoniously with our other ingredients. It’s not just about adding sweetness; vanilla brings depth and warmth that rounds out the flavors perfectly. Always opt for pure vanilla extract over imitation for the best results—your taste buds will thank you!
- 10 tbsp oat flour. Oat flour acts as our binding agent while contributing fiber and a subtle nuttiness to our cups. Making it yourself is super easy—just blend rolled oats until fine! It’s important because it helps absorb moisture while keeping our mixture from becoming too dry or crumbly, creating that perfect creamy texture we desire.
- 1 tsp coconut oil. The addition of coconut oil brings richness while also helping smooth out our chocolate topping later on—it’s really quite magical! Not only does it add another layer of flavor, but it also ensures our chocolate melts easily, resulting in a glossy finish that’s simply divine.
- 1/3 cup chocolate chips (use Enjoy Life if vegan). For a dairy-free option, choose high-quality vegan chocolate chips like Enjoy Life—they melt beautifully and maintain their shape when cooled again! Chocolate isn’t just about sweetness; it adds an indulgent element to our Healthy Peanut Butter Cups that makes them feel luxurious without any guilt attached.
Equipment You’ll Need:
Before we get into the fun part—actually making these delicious cups—you’ll want to gather some essential tools that will help make your kitchen experience smooth and enjoyable.
- Mini muffin tin – This is crucial for shaping our cups into perfect little bites! A mini muffin tin allows us to create portions that are not only cute but also manageable when it comes time to enjoy them.
- Muffin liners – These handy little papers ensure easy removal of your peanut butter cups from the tin without sticking—a non-negotiable step for keeping your creations intact and presentable!
- Mixing bowls – You’ll need at least two bowls: one for mixing your peanut butter base and another for melting your chocolate chips with coconut oil. Having separate bowls keeps things organized and helps prevent any messes as you whip up your delightful treats.
- Microwave-safe bowl or double boiler – To melt your chocolate seamlessly without burning it, using either method is key here! A microwave-safe bowl allows for quick melting in increments while stirring regularly—or if you prefer old-school methods, use a double boiler setup to gently melt your chocolate over simmering water.
With all these essentials gathered, we’re ready to dive into preparing these scrumptious Healthy Peanut Butter Cups!
Step 1: Crafting the Peanut Butter Base
First things first: let’s bring our creamy goodness together! In a mixing bowl, combine the peanut butter, oat flour, maple syrup, and vanilla extract until it’s well blended—this process is known as creaming. Take your time here; don’t rush this step because it’s crucial for achieving that smooth consistency we’re after. You want everything mixed evenly so each bite bursts with flavor—a glorious symphony of tastes! Once fully combined, scoop out twelve small portions into your lined mini muffin tin using a tablespoon or cookie scoop. Press down gently but firmly so they hold their shape once frozen—a delicate balance between firm enough yet still soft enough to enjoy later.
Step 2: Melting Chocolate Bliss
Now comes the exciting part—the chocolate layer! In another microwave-safe bowl (or double boiler), combine the chocolate chips with coconut oil before placing it in the microwave in 30-second increments—this slow melting method prevents burning which can ruin this beautiful mixture! Stir between increments until smooth; trust me—it’s worth waiting those extra seconds instead of risking scorched chocolate (which can happen faster than you’d think!). The melted mixture should resemble silky liquid gold gleaming under soft light—a sight that’ll make anyone eager to dive into what’s next!
Step 3: Uniting Layers
Once you’ve achieved that glorious melted chocolate consistency, carefully spoon or pour this decadent topping over each peanut butter layer until they’re generously coated—don’t be shy here! This is where we transform simple flavors into something truly extraordinary by layering textures together harmoniously. After evenly distributing the chocolate across all twelve cups (you might even find yourself sneaking tastes!), place them in the freezer for about ten minutes—you want them solid enough yet slightly soft so they don’t break apart when biting into them later.
Step 4: The Big Reveal
After patiently waiting through those ten minutes (I promise it’s worth it!), carefully remove them from the freezer—and behold your creations! They’ll look stunningly inviting with their glossy tops glistening under kitchen lights like jewels waiting to be showcased at an event—the anticipation is palpable now! Gently peel away each muffin liner before enjoying one (or three)—each bite bursts forth with flavors that’ll transport you back home amidst laughter shared over childhood favorites transformed into healthier versions—all while keeping satisfaction at forefront without compromising on taste!
And there you have it—your very own Healthy Peanut Butter Cups made right at home with love! Enjoy every moment as you savor each bite; trust me when I say there’s nothing quite like indulging in something homemade that warms both heart and soul alike.
Step 5: Melting the Chocolate Bliss
Now, let’s create that delightful chocolate layer that will crown our Healthy Peanut Butter Cups with a touch of indulgence. Begin by measuring out your chocolate chips—1/3 cup should be just about perfect for this recipe. I absolutely adore using Enjoy Life chocolate chips because they melt beautifully and are free from common allergens, making them an excellent choice for almost everyone. Place these chocolate chips into a microwave-safe bowl, and here’s where we’ll incorporate the coconut oil—a mere teaspoon of liquid gold that enhances the smoothness and richness of our chocolate. The coconut oil not only helps the chocolate to melt evenly but also lends a subtle coconut flavor that pairs wonderfully with peanut butter.
Now, pop your bowl into the microwave and set it on high for 30 seconds. This is where we exercise a little patience! When you take it out, give it a good stir with a spatula; you’ll notice that not all the chips may have melted at this point, and that’s perfectly normal. Return them to the microwave for another 30 seconds, then stir again. It’s crucial to do this in increments to avoid scorching your chocolate—burnt chocolate has an unpleasant bitterness and will ruin our treat! Trust me on this; we want silky-smooth chocolate that flows like lava when drizzled over our peanut butter base. Continue this process until the chocolate is completely melted and glossy, which should take about 1 to 1.5 minutes in total.
Step 6: Assembling Your Layers of Joy
With your peanut butter mixture pressed firmly into those tiny muffin liners and your melted chocolate waiting expectantly, it’s time for assembly! Take a spoon or a small ladle—whatever makes you feel comfortable—and carefully pour a thin layer of that luscious melted chocolate over each peanut butter scoop in the muffin tin. You want just enough to cover the top completely; think of it as giving each cup its cozy blanket of chocolate goodness. As you pour, don’t rush! Allow yourself to savor this part of the process because honestly, what could be more satisfying than watching your creation transform before your very eyes?
Once each cup has received its decadent drizzle, gently tap the muffin tin on your countertop a couple of times. This step is non-negotiable! Tapping helps settle the layers so they meld together perfectly as they chill. It’s like giving them a little nudge into harmony! With everything layered beautifully, now we’re heading towards one of my favorite moments—the chilling phase. Pop your muffin tin into the freezer for about 10-15 minutes. This brief but essential freezing time allows the layers to solidify together beautifully while maintaining their divine textures.
Step 7: The Moment of Truth—Unmolding Your Creations
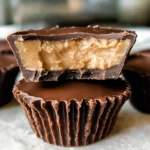
After anxiously counting down those precious minutes (I know how hard it can be!), take your muffin tin out of the freezer with excitement bubbling inside you like soda fizzing over! This is such a pivotal moment because it’s where all your hard work comes together in glorious form. Gently peel away the muffin liners from around each Healthy Peanut Butter Cup—this part feels like unwrapping little presents after putting so much love into them! If you find any resistance (sometimes things can get sticky), just give them a moment longer in the freezer; they need that cold embrace to hold their shape perfectly.
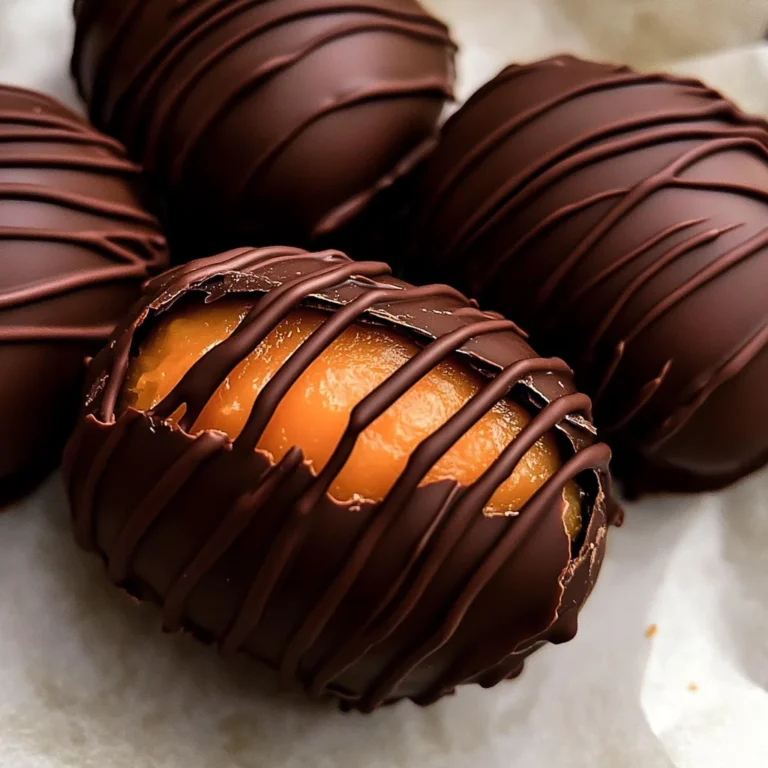
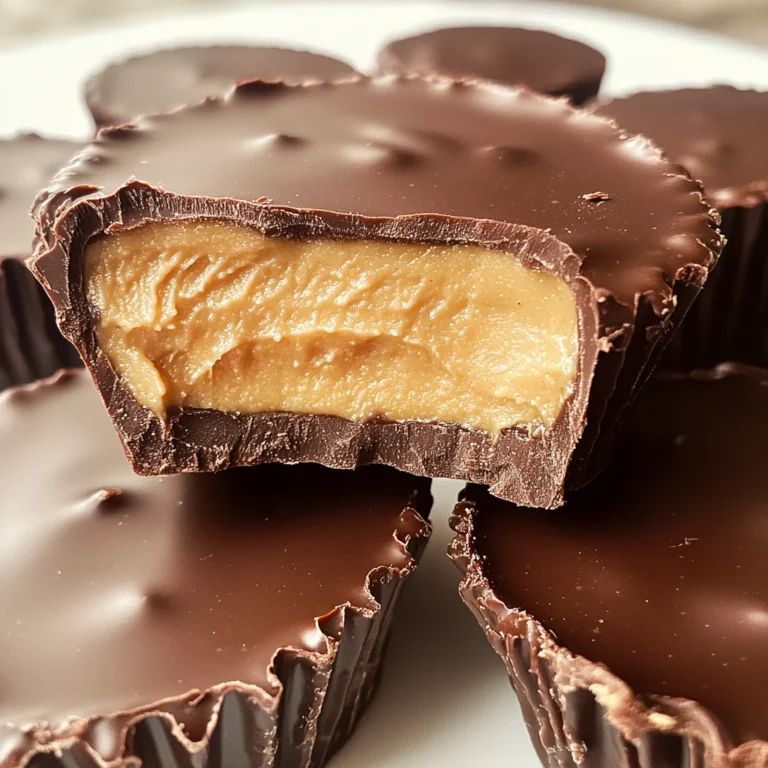
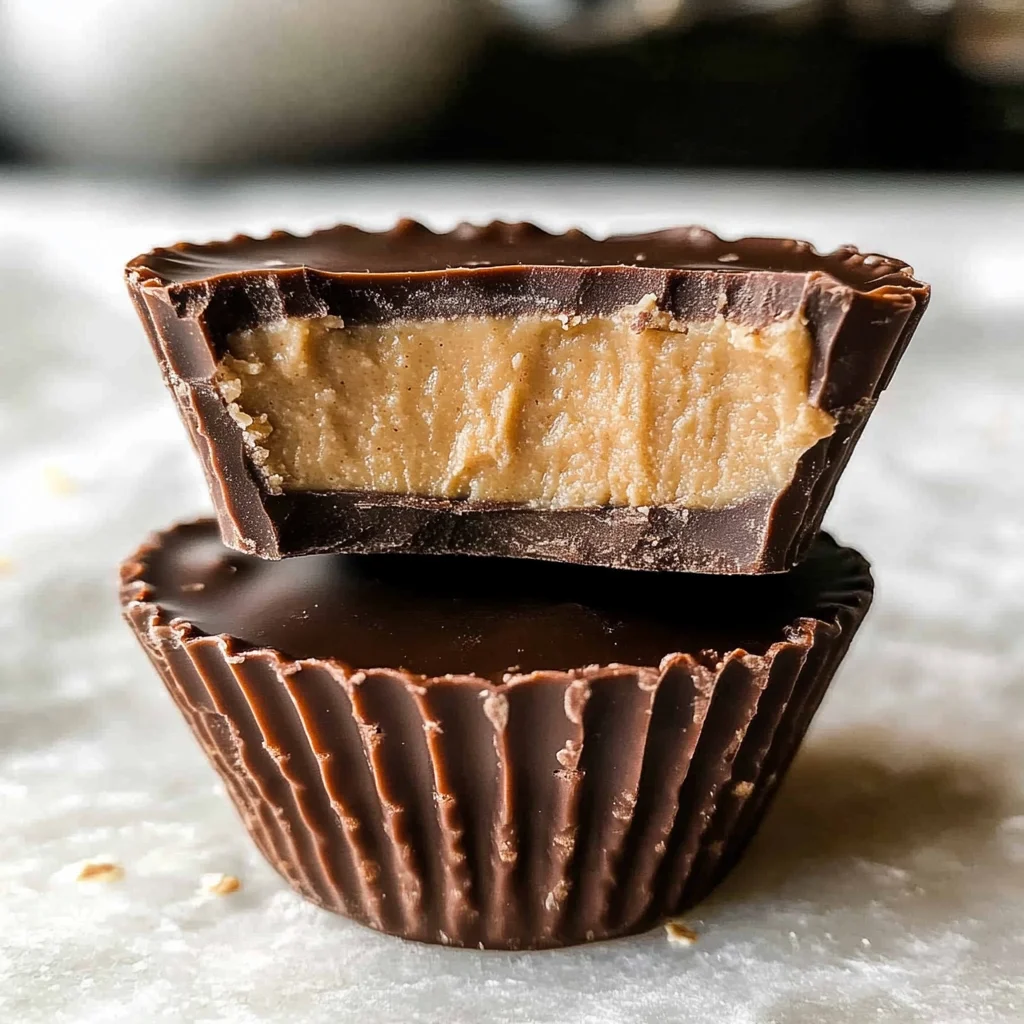
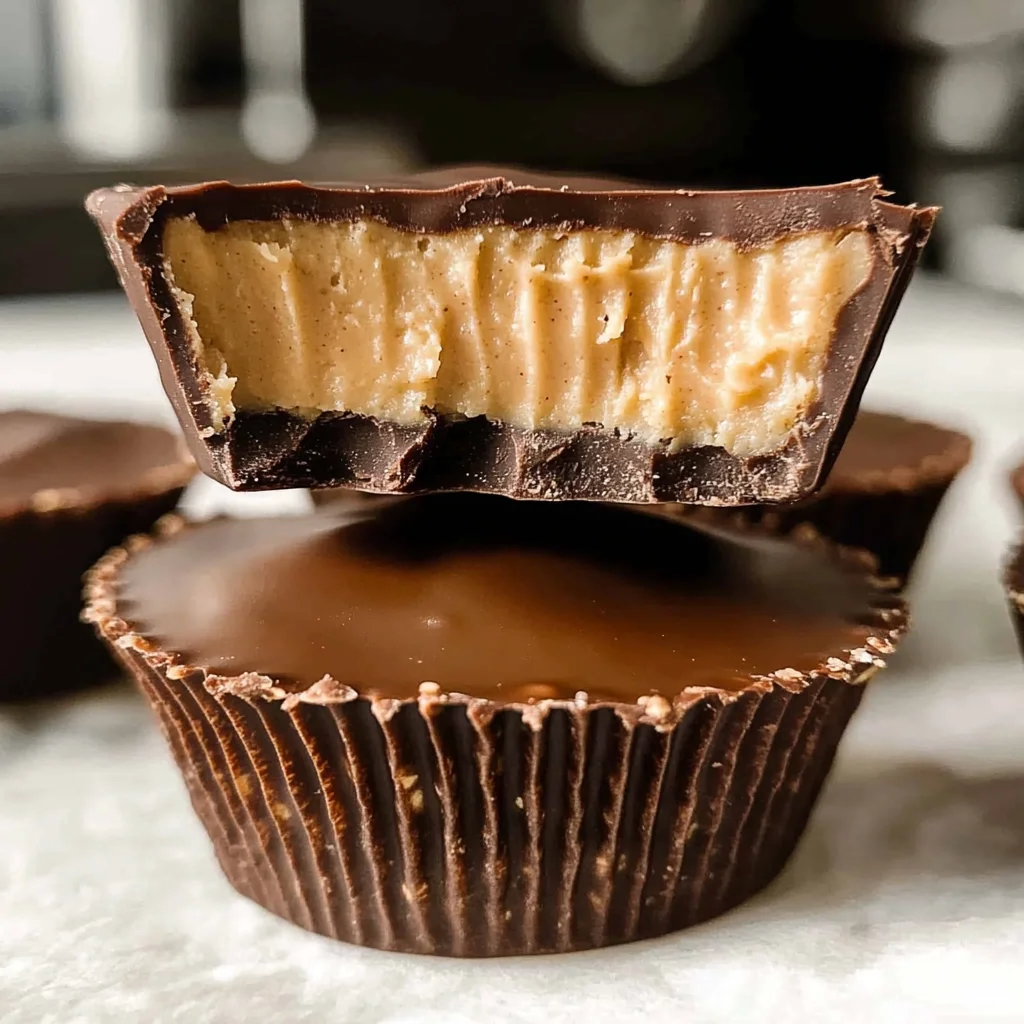
As you unveil these delightful treats, take a moment to appreciate their beauty—the smooth tops glistening with melted chocolate contrasting against that creamy peanut butter filling beneath. Each one should look like an absolute dream come true—a testament to how simple ingredients can yield something truly extraordinary when crafted with care.
Step 8: The Final Touch—Savor Every Bite!
At last, we arrive at the ultimate step: indulging in your homemade Healthy Peanut Butter Cups! But before you dive straight in (and trust me, I completely understand if you want to!), let them sit at room temperature for just a few moments after removing them from their chilly abode. This allows those flavors to bloom even more brilliantly and prevents any unfortunate jaw workouts from biting into something too cold!
I encourage you to take this time for appreciation—feel free to grab one or two (or three!) cups as you gather friends or family around; there’s something profoundly satisfying about sharing homemade treats with loved ones. Each bite should deliver an exquisite symphony of flavors—the nutty creaminess of peanut butter enveloped by rich dark chocolate creating that comforting hug we all crave during dessert time.
And remember, these Healthy Peanut Butter Cups aren’t merely an indulgence—they’re proof that healthy snacks can be utterly divine without sacrificing flavor or joy! So go ahead, enjoy every single morsel without guilt because you’ve created something wholesome yet incredibly decadent right from your own kitchen!
Conclusion: Embrace Your Sweet Tooth!
As we wrap up this delightful adventure in creating Healthy Peanut Butter Cups together, I hope you feel inspired and empowered by how easy it is to whip up these treats anytime a sweet craving strikes! With only six simple ingredients and minimal effort involved, there’s no reason not to keep these on hand as an everyday delight or special occasion treat.
So grab those ingredients again soon—share them with friends or keep some stashed away just for yourself (I won’t tell!). Remember: cooking is all about love and creativity, so don’t hesitate to make these uniquely yours by adding extra toppings like crushed nuts or sprinkles if you’d like! Happy cooking—and more importantly—happy indulging!
Storage and Enjoyment Tips for Your Healthy Peanut Butter Cups
Now that you’ve crafted these delightful Healthy Peanut Butter Cups, it’s time to revel in the satisfaction of your creation! But before you indulge in every last morsel, let’s chat about how to preserve these little gems for future enjoyment. Trust me when I say that having a stash of these on hand is a game-changer for those sweet cravings that strike at the most unexpected moments.
Storing Leftover Healthy Peanut Butter Cups
To keep your Healthy Peanut Butter Cups fresh and scrumptious, store them in an airtight container. This is absolutely paramount, as it prevents any unwanted moisture from sneaking in and affecting their delightful texture. A simple glass or plastic container will do the trick beautifully; just make sure it’s sealed well! These treats will stay delicious for up to a week when stored at room temperature, making them perfect for a quick grab-and-go snack throughout the week. If you want to elevate your storage game even more, consider placing a slice of bread inside the container—this clever trick helps maintain moisture levels and keeps your cups tasting fresh like they were just made! Even after a few days, you’ll find that they still have that creamy peanut butter richness paired with the silky chocolate topping. If you’re feeling indulgent, try popping one in the microwave for about 10 seconds before enjoying—it melts the chocolate slightly and makes each bite utterly intoxicating!
Freezing Healthy Peanut Butter Cups for Later
If you’re anything like me, sometimes there’s just not enough time to enjoy all your creations right away. That’s where freezing comes in! To properly freeze your Healthy Peanut Butter Cups, simply place them on a baking sheet lined with parchment paper until they are completely frozen—about an hour should do. Once solid, transfer them into a freezer-safe bag or container and label it with the date; they’ll be good for up to three months! This is such a fantastic option because it means you can always have a sweet treat waiting for you, ready to be savored on those busy days or surprising cravings. When you’re ready to indulge, just take out as many as you’d like and let them thaw at room temperature for about 10 minutes. The convenience factor here is incredible; imagine opening your freezer door and being greeted by these decadent delights whenever you desire them!
Healthy Peanut Butter Cups
Indulge guilt-free with these Healthy Peanut Butter Cups! Quick and easy to make—satisfy your sweet tooth today!
- Prep Time: 15 minutes
- Cook Time: 10 minutes
- Total Time: 25 minutes
- Yield: Approximately 12 servings 1x
- Category: Dessert
- Method: No-bake
- Cuisine: American
Ingredients
- 1/2 cup natural peanut butter
- 2 tbsp maple syrup
- 1/2 tsp pure vanilla extract
- 10 tbsp oat flour
- 1 tsp coconut oil
- 1/3 cup dairy-free chocolate chips
Instructions
- In a mixing bowl, combine peanut butter, oat flour, maple syrup, and vanilla extract until smooth.
- Scoop the mixture into a lined mini muffin tin, pressing down firmly to hold shape.
- In another bowl, melt chocolate chips with coconut oil in the microwave, stirring every 30 seconds until smooth.
- Pour melted chocolate over each peanut butter layer in the muffin tin.
- Freeze for about 10 minutes or until solid, then gently remove from liners.
Nutrition
- Serving Size: 1 cup (30g)
- Calories: 100
- Sugar: 6g
- Sodium: 50mg
- Fat: 7g
- Saturated Fat: 2g
- Unsaturated Fat: 5g
- Trans Fat: 0g
- Carbohydrates: 8g
- Fiber: 2g
- Protein: 3g
- Cholesterol: 0mg