Chocolate Peanut Butter Valentine’s Heart
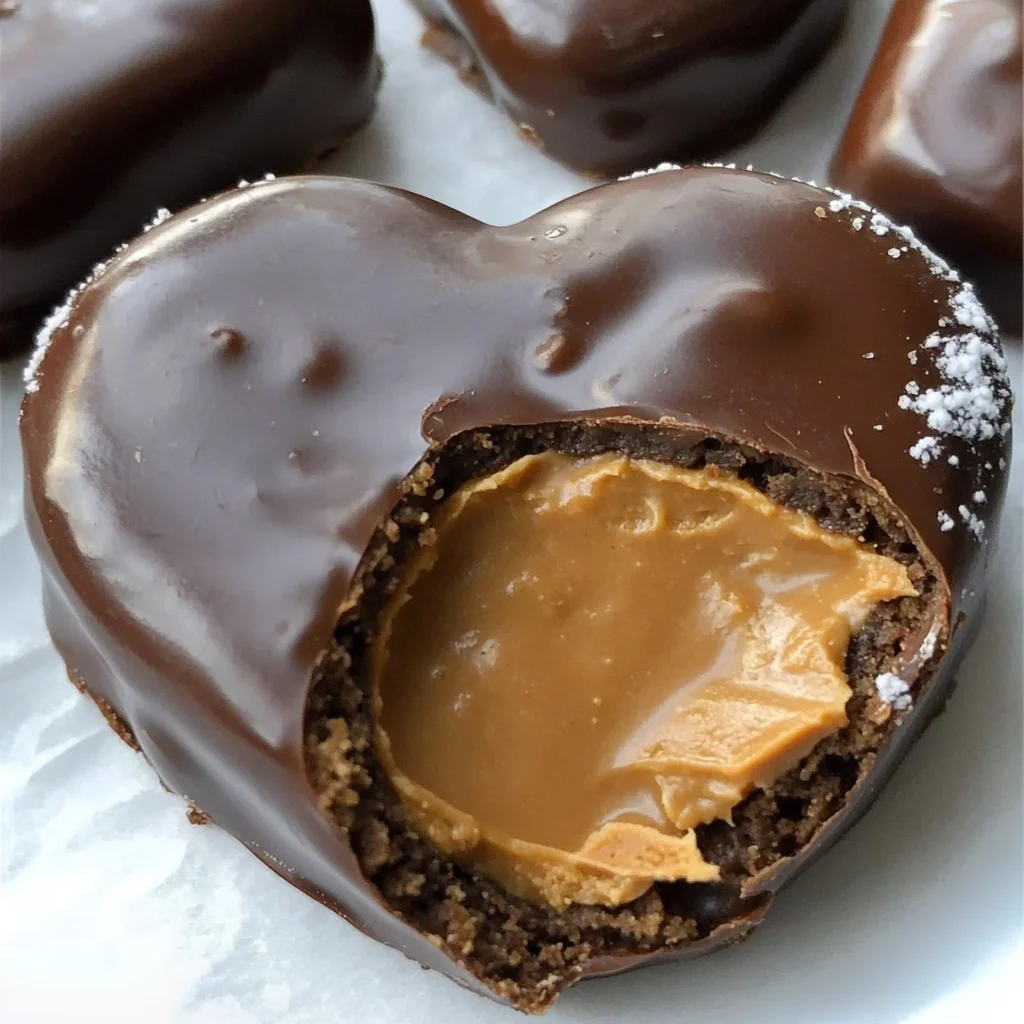
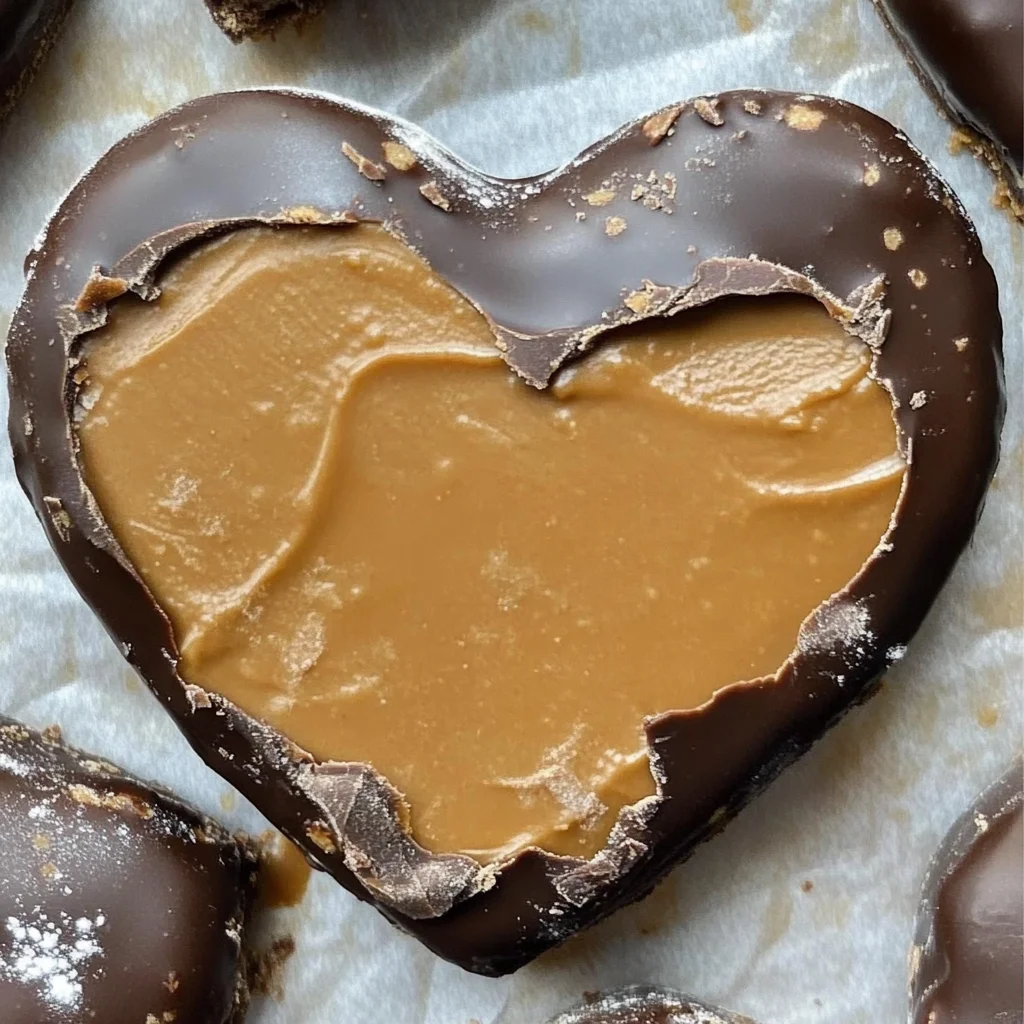
Valentine’s Day is just around the corner, and I can already feel the excitement buzzing in the air! The heart-shaped decorations, sweet gestures, and of course, the delectable treats that come along with this day of love truly make it special. If you’re like me, you probably find joy in crafting something delightful from scratch to share with your loved ones. Let me tell you about a recipe that has completely captured my heart – the Chocolate Peanut Butter Valentine’s Heart. These little gems are not just desserts; they represent pure happiness wrapped in chocolatey goodness and creamy peanut butter bliss. Imagine cutting into one of these heart-shaped delights; they are so soft and decadent that they practically melt in your mouth, leaving behind a rich flavor that’s utterly intoxicating!
What’s more enchanting about this recipe is how effortlessly simple it is to prepare. You don’t need to be a seasoned baker to whip these up! With just a handful of ingredients that you might already have on hand, you’ll create something that not only looks beautiful but also tastes extraordinary. Each bite combines the salty richness of peanut butter with the sweet embrace of chocolate – it’s a match made in heaven! The moment you serve these adorable hearts to your friends or family, their eyes will light up with joy, and trust me when I say this: there’s nothing quite like witnessing someone savoring a treat you’ve crafted with love.
Ingredients:
As we embark on this culinary journey together, let’s gather our ingredients for the Chocolate Peanut Butter Valentine’s Heart. Each component plays a significant role in creating that perfect harmony of flavors and textures.
- 1 cup creamy peanut butter (room temperature). This ingredient is at the heart of our recipe—pun intended! Creamy peanut butter adds that wonderful nutty flavor while providing richness to each bite. Make sure it’s at room temperature because this helps it blend seamlessly with other ingredients. If you’re seeking alternatives due to dietary preferences, feel free to use almond or cashew butter; they will lend their distinct flavors beautifully as well!
- ¼ cup unsalted butter (melted). This golden liquid gold brings moisture and richness to our mixture. Unsalted butter allows us to control the saltiness of the final dessert, which is absolutely paramount for achieving balance in flavor. When melted, it blends smoothly with peanut butter and helps create that velvety texture we all crave.
- 2 tablespoons brown sugar. Adding just the right amount of sweetness, brown sugar also introduces a subtle hint of caramelized flavor thanks to its molasses content. This depth enhances our hearts beautifully! If you’re looking for alternatives here, coconut sugar can provide a similar depth without compromising flavor.
- 2 teaspoons vanilla extract. Ahh, vanilla—the magical ingredient that elevates any dessert! Its warm aroma and flavor are especially comforting in this recipe, making every bite even more inviting. Always opt for pure vanilla extract if possible; artificial versions can lack complexity and depth.
- ¼ teaspoon salt. This might seem small but adding salt is truly essential; it balances sweetness and enhances all those lovely flavors we’ve mixed together! It helps elevate the chocolate and peanut butter combination into something truly extraordinary.
- 2 cups powdered sugar. Sweetness intensifies with powdered sugar while providing structure to our mixture once pressed into shape. You could also use confectioner’s sugar made from coconut if you’re looking for an alternative—just keep in mind that it may alter the texture slightly.
- 10-12 oz. chocolate (chopped into small pieces). The crowning glory of our hearts! Whether you choose semi-sweet or milk chocolate—or even good quality candy coating for ease—the key is ensuring it’s something you’ll enjoy eating because it’ll envelop those beautiful peanut butter shapes! Chopping chocolate allows it to melt uniformly without scorching while creating an irresistible shell around each heart.
Equipment You’ll Need:
Before we dive into preparing our delightful Chocolate Peanut Butter Valentine’s Heart, let’s gather some essential tools that will help us along the way! Having the right equipment makes everything smoother and more enjoyable—like having trusted partners by your side during this process.
- Mixing bowl – A large mixing bowl is crucial for combining all your ingredients effectively without spilling over edges; choose one that’s sturdy enough for vigorous stirring!
- Spatula – A spatula helps ensure no precious peanut butter mixture goes to waste when transferring from bowl to dish or smoothing out layers—a true kitchen hero!
- Parchment paper – Lining your baking dish with parchment paper ensures easy removal once set—this simple step saves time (and mess) later!
- Heart-shaped cookie cutter – This fun tool gives our dessert its romantic shape! If you don’t have one handy, you can always improvise using a knife or even craft your own template from cardboard.
- Tray – Having an extra tray lined with parchment paper handy is vital for setting those dipped hearts aside as they cool and firm up after being coated in luscious chocolate.
Now that we have everything gathered—ingredients ready to go and tools at our disposal—let’s start preparing these charming little hearts!
Step 1: Prepare Your Baking Dish
To kick off this delightful adventure, begin by lining an 8 x 8 inch dish with parchment paper, ensuring there’s an overhang on two sides. This step is crucial as it provides an easy grip when lifting out your finished creation later on; trust me—the last thing you want is frustration when trying to get those perfect little hearts out intact! Once lined, set aside; we’ll revisit it shortly as we whip up our decadent filling.
Step 2: Combine Your Creamy Base
In a mixing bowl big enough for some serious stirring action (think cozy yet spacious), add your room-temperature creamy peanut butter alongside melted unsalted butter—this combination creates a smooth base packed full of flavor before anything else comes into play! Use your spatula here for gentle mixing until everything merges smoothly; look for no lumps but rather a gorgeous blend where flavors begin mingling together harmoniously like old friends catching up after years apart! Next comes brown sugar followed by vanilla extract and salt; stir vigorously until all sugars dissolve completely because nobody wants gritty bites—you deserve velvety-rich indulgence instead!
Step 3: Sweeten Things Up
Now it’s time to incorporate our powdered sugar gradually into this luscious mixture—a sprinkle here and there creates just enough resistance against those powerful flavors bursting forth from within! As you mix gently but confidently (no need for aggressive elbow grease), watch as it transforms into something resembling sweet dough—a heavenly concoction begging for attention! Before long you’ll find yourself with an irresistible filling ready to press into our prepared baking dish—it should be thick enough so pressing down lightly forms an even layer throughout without losing its shape entirely.
Step 4: Chill Until Firm
Once you’ve pressed down firmly onto your prepared dish (feel free to use clean hands or spatula depending on preference!), pop it into the freezer until firm enough for cutting—usually about 30 minutes does wonders here but keep an eye on progress since every freezer varies slightly! While waiting patiently (don’t rush this step!), take a moment savoring thoughts about how amazing these will taste once completed; anticipation only heightens enjoyment later on when sharing them lovingly with others!
This initial preparation sets us up beautifully for what’s next—cutting out those adorable hearts before dipping them in luscious chocolate awaits us ahead!
Step 5: Firming Up for Perfect Hearts
Now that you have pressed your delightful peanut butter mixture into the dish, it’s time to let it chill and firm up. This step is absolutely paramount because it allows the flavors to meld together beautifully while creating a solid structure for cutting out those charming heart shapes. I recommend placing the dish in the freezer for about 15-20 minutes; this will allow the mixture to hold its shape without becoming too hard, which is crucial for the next step. If you skip this chilling phase, you may find that your hearts crumble or lose their form when you attempt to cut them out, and trust me, nobody wants a peanut butter disaster on Valentine’s Day! After 15-20 minutes, check your mixture; it should feel firm yet slightly pliable when pressed. If not quite there yet, give it another few minutes—patience is key here!
Step 6: Crafting Heart-Shaped Perfection
Once your peanut butter layer has set nicely in the freezer, it’s time for the fun part: cutting out those adorable hearts! Line a tray with parchment paper again—it’s all about keeping things tidy and ensuring nothing sticks as we work our magic. Using a small heart-shaped cookie cutter, gently press down into the chilled mixture, making sure to cut through completely to get clean edges. As you lift each heart out, you might notice some crumbling around the edges—that’s perfectly normal! Just gently reshape any loose bits back into place if needed; remember that these little imperfections are part of what makes homemade treats so special. Don’t waste any of that delicious batter! Gather up any leftover scraps, knead them together with your hands, and press them down to create more hearts. It’s like a little puzzle, and every piece counts toward sweetening someone’s day!
Step 7: A Second Chill for Stability
After you’ve cut out all your darling hearts, place them back in the freezer for another quick chill—around 10-15 minutes should do it. This second chilling phase is critical because it helps firm up those shapes even further before they take a dip in chocolate heaven. Think of this step as giving your hearts a little spa treatment; they deserve to relax before getting all dressed up! Plus, working with cold treats makes dipping them into melted chocolate much easier since they won’t soften too quickly at room temperature. You want them to maintain their form and keep that beautiful heart shape intact while being coated in rich chocolate bliss.
Step 8: Melting Chocolate – The Art of Dipping
Ahhh, melting chocolate—a process that can be both exhilarating and nerve-wracking! For this recipe, I prefer using a double boiler method or a microwave (in short bursts) to melt my chocolate. If you’re using a double boiler, fill the bottom pot with water and bring it to a gentle simmer; then place your chopped chocolate or candy coating in the top pot. Stir continuously until it’s smooth and glossy—this technique ensures that your chocolate doesn’t scorch and will yield that silky texture we crave! If you’re going the microwave route, be sure to heat in 20-30 second increments and stir between each one; this will help avoid hot spots that can lead to seizing.
Once melted, it’s time to dip those chilled hearts! Using a fork (or even two forks if you’re feeling adventurous), gently lower each heart into the melted chocolate until completely submerged. Allow any excess chocolate to drip off by lifting it back out and tapping lightly against the side of your bowl—this step helps achieve that perfect thin layer of coating rather than an overwhelming clump of chocolate. Remember to work quickly but carefully here; since our peanut butter hearts are nice and firm from their time in the freezer, they’ll hold their structure beautifully during this decadent transformation!
Conclusion:
As we wrap up our journey through this delightful recipe for Chocolate Peanut Butter Valentine’s Hearts, I hope you feel inspired and excited to share these treats with those you cherish most. This recipe isn’t just about combining flavors; it’s about creating moments filled with love and laughter around your kitchen table. The interplay of rich chocolate with creamy peanut butter creates a symphony of flavors that dances on your palate while enveloping your senses in warmth and nostalgia. Together with the simple yet effective technique we used, these hearts transcend ordinary desserts—they become tokens of affection that speak volumes.
Why should you absolutely try making these? Beyond their mouthwatering taste lies an experience that brings joy not only through the creation process but also through sharing these delights with friends or family during special occasions like Valentine’s Day or even just a cozy afternoon at home. Imagine pulling these beauties from the fridge or freezer—your heart will flutter as each heart-shaped delight reveals itself wrapped in silky chocolate—a sight so enticing it could rival any fancy dessert shop display!
For serving suggestions, picture this: savoring one alongside a steaming cup of coffee or tea for an afternoon pick-me-up; enjoying it after dinner paired with fresh strawberries, where each bite complements the fruit’s natural sweetness; or even using them as a topping on vanilla ice cream for an indulgent dessert that feels like pure luxury. There are endless possibilities waiting for you!
Feeling adventurous? This recipe is wonderfully adaptable! You could swap out peanut butter for almond butter or cashew butter if you’re looking to experiment with different nutty flavors—each variation adds its unique twist while still maintaining that classic heart shape we adore! You might also consider drizzling caramel over the top before setting them in the fridge; think about how those sweet notes would enhance each bite! So grab those ingredients, get creative in your kitchen, and don’t forget to share your experiences with me—I can’t wait to hear all about your delicious adventures!
Chocolate Peanut Butter Valentine’s Heart

Indulge in the sweet delight of Chocolate Peanut Butter Valentine’s Hearts, a treat that combines creamy peanut butter with rich chocolate for a perfect dessert experience. These charming heart-shaped goodies are not only visually appealing but also incredibly easy to make. With just a handful of simple ingredients, you can create a dessert that warms the heart and satisfies the sweet tooth. Ideal for sharing with loved ones on special occasions or any day you’re in the mood for something sweet, these no-bake treats promise joy in every bite.
- Prep Time: 20 minutes
- Cook Time: 30 minutes
- Total Time: 50 minutes
- Yield: Approximately 16 servings 1x
- Category: Dessert
- Method: No-bake
- Cuisine: American
Ingredients
- 1 cup creamy peanut butter (room temperature)
- ¼ cup unsalted butter (melted)
- 2 tablespoons brown sugar
- 2 teaspoons vanilla extract
- ¼ teaspoon salt
- 2 cups powdered sugar
- 10–12 oz. chocolate (chopped into small pieces)
Instructions
- Prepare an 8×8 inch baking dish by lining it with parchment paper.
- In a mixing bowl, combine room-temperature peanut butter and melted butter until smooth.
- Mix in brown sugar, vanilla extract, and salt until well blended.
- Gradually add powdered sugar and mix until it forms a thick dough.
- Press the mixture evenly into the prepared dish and chill in the freezer for about 30 minutes until firm.
- Cut out heart shapes using a cookie cutter and return to the freezer for another 10-15 minutes.
- Melt chocolate using a double boiler or microwave in short bursts.
- Dip each chilled heart into melted chocolate, letting excess drip off before placing on parchment-lined tray.
- Refrigerate until chocolate is firm, approximately 30 minutes.
Nutrition
- Serving Size: 1 heart (30g)
- Calories: 150
- Sugar: 10g
- Sodium: 60mg
- Fat: 9g
- Saturated Fat: 3g
- Unsaturated Fat: 5g
- Trans Fat: 0g
- Carbohydrates: 15g
- Fiber: 1g
- Protein: 3g
- Cholesterol: 5mg