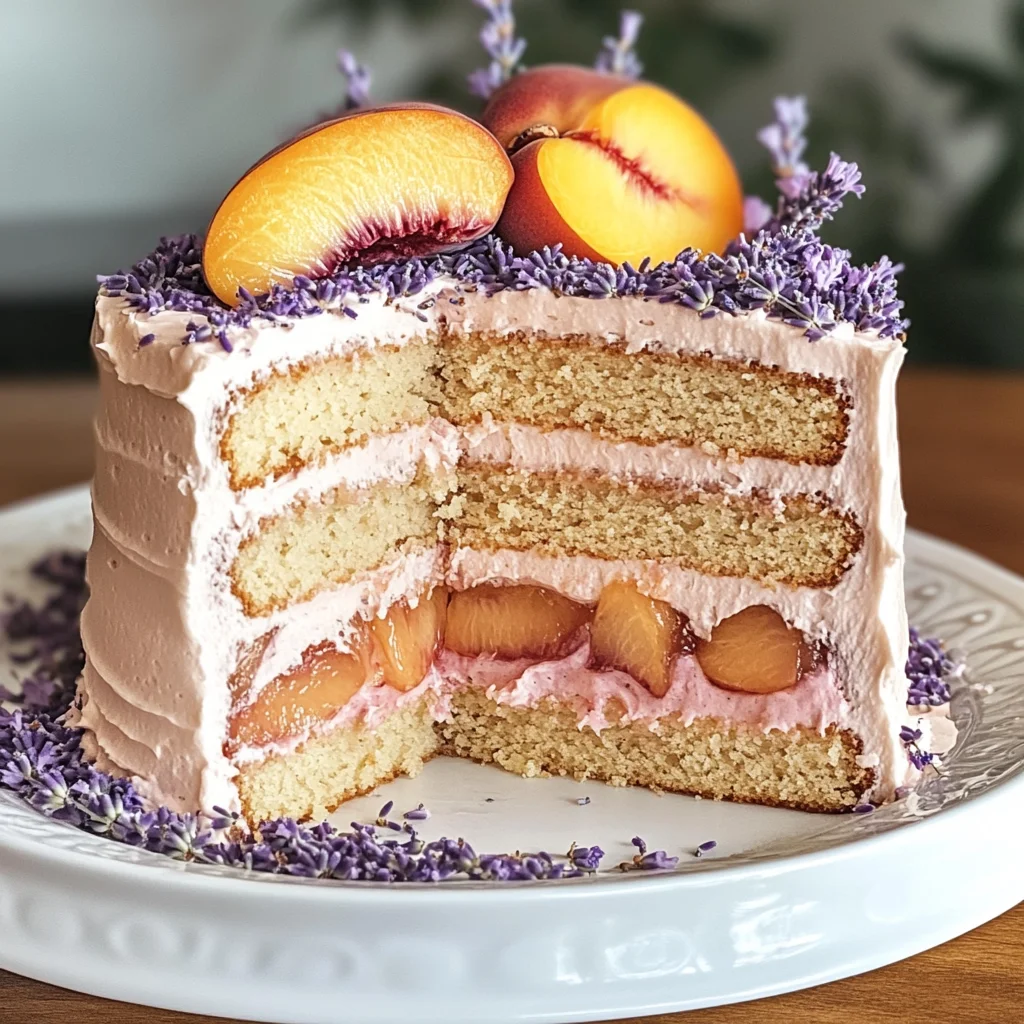
Lavender and Peach Dream Cake
There’s something profoundly magical about the way certain flavors intertwine and elevate each other, creating a symphony that delights not just the palate but also the soul. The Lavender and Peach Dream Cake is one of those extraordinary confections that transcends mere dessert. Imagine, if you will, a luscious cake that captures the essence of summer; it’s an experience that bridges tradition and innovation, where delicate floral notes meet the sweet, juicy embrace of peaches. This cake isn’t just about satisfying a sweet tooth; it’s about savoring moments, sharing joy, and indulging in flavors that transport you to sun-drenched orchards and fragrant gardens. With every bite, you’ll find yourself enveloped in a world of soft textures and vibrant tastes that sing—yes, sing!—of sunny days and cherished memories.
The magic truly begins with the harmonious blend of dried lavender buds and ripe peaches, which together create a dreamlike experience for your senses. Lavender has long been celebrated for its calming properties and aromatic beauty; it’s like a whisper from nature herself, inviting you to slow down and enjoy the moment. On the other hand, peaches burst forth with their natural sweetness, adding layers of juiciness that make this cake simply irresistible. Whether you’re celebrating a special occasion or just wanting to treat yourself on an ordinary day, this cake is sure to impress friends and family alike. Trust me when I say that once you serve this Lavender and Peach Dream Cake at your next gathering, there will be no leftovers—only happy faces asking for seconds!
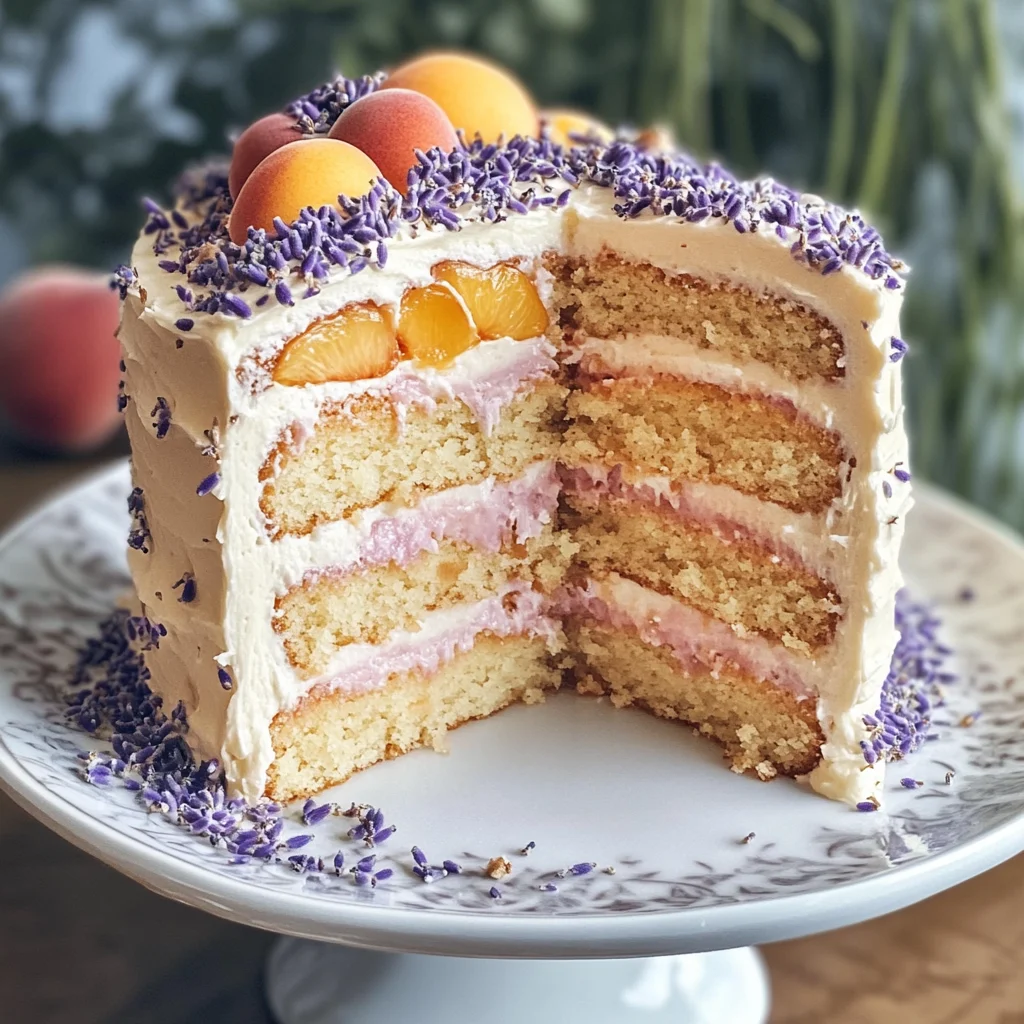
Lavender and Peach Dream Cake: A Slice of Summer Bliss
Welcome to a delightful culinary adventure where we’ll craft a Lavender and Peach Dream Cake that’s as beautiful as it is delicious! This cake promises to be the star of your dessert table—a stunning centerpiece infused with floral elegance from lavender and fruity sweetness from peaches. The balance of these flavors creates a dessert experience unlike any other. Plus, I’ll share all my tips along the way so you can bake this masterpiece with confidence.
Ingredients:
As we embark on this delightful journey to create our Lavender and Peach Dream Cake, let’s take a moment to appreciate each ingredient’s role in making this culinary dream come true. Each element contributes its unique charm to the final creation.
- 2 cups all-purpose flour. Flour is the backbone of our cake; it provides structure while keeping things light yet sturdy. Look for high-quality all-purpose flour to achieve that perfect crumb texture we’re aiming for. If you ever find yourself in need of alternatives due to dietary restrictions or preferences, feel free to substitute with gluten-free flour blends—a fantastic option for those avoiding gluten.
- 1 cup granulated sugar. This sugar does more than simply sweeten; it balances out the delicate floral notes from our lavender perfectly! The sugar also aids in browning during baking which gives our cake that lovely golden crust we all adore. Don’t forget—using organic sugar can enhance not just flavor but also contribute to more sustainable practices!
- 1/2 cup unsalted butter (softened). Butter is crucial here for adding richness and moisture; it helps create those tender crumb textures we all crave in cakes. Softening your butter is key because it allows for better incorporation into our batter—which brings us fluffy results! If you find yourself without butter on hand or wish for a dairy-free option, coconut oil works beautifully as an alternative.
- 1 cup milk (preferably whole). Milk adds moisture while enhancing the cake’s overall texture—it helps everything come together smoothly! Opting for whole milk ensures richness; however, if you’re looking for lighter options or have lactose concerns, almond or oat milk can step in beautifully without losing any flavor!
- 3 large eggs (room temperature). Eggs act as binders in our recipe; they help everything stick together while providing richness and stability. Room temperature eggs are vital because they mix more evenly into your batter compared to cold eggs straight from the fridge—trust me on this one!
- 2 teaspoons baking powder. This little powerhouse is what makes our cake rise beautifully as it bakes! It helps create those fluffy layers we love so much. Always check your baking powder’s expiration date—it should be fresh for optimal results.
- 1/4 teaspoon salt. Salt may seem insignificant but trust me—it enhances every other flavor present! It’s an absolute non-negotiable step in most baking recipes because it rounds out sweetness while ensuring balance.
- 2 tablespoons dried lavender buds (culinary grade). These lovely blooms infuse our cake with their distinct floral essence—think fragrant fields on a warm summer day! Make sure you’re using culinary-grade lavender purchased from reputable sources since some varieties can be too potent or even unsafe for consumption.
- 1 cup sliced peaches (fresh or canned). Juicy slices of peach are like little nuggets of sunshine nestled within our cake! They add both natural sweetness and moisture which keeps each bite delectable. If fresh peaches aren’t available off-season, canned ones can work equally well—just ensure they’re packed in juice rather than syrup!
- 1 teaspoon vanilla extract. This liquid gold enhances every flavor present within our cake—it’s like a warm hug wrapping around each ingredient! Quality matters here too; opting for pure vanilla extract over imitation will elevate your bake significantly.
- 1/2 cup peach preserves (for layering). Adding peach preserves offers delightful bursts of fruity flavor between layers while contributing moisture as well—a true dream indeed! If you’re feeling adventurous, feel free to experiment with different fruit preserves based on personal preference!
- 1/2 cup unsalted butter (softened) for frosting. Just like before, butter plays an essential role here too—but this time as part of our luscious frosting! Softened butter allows us to cream easily with powdered sugar into dreamy peaks suitable for spreading generously onto our cooled cake.
- 4 cups powdered sugar (for frosting). Powdered sugar brings sweetness along with structure into our frosting—it creates that smooth texture we often associate with bakery-style cakes! Sifting beforehand ensures there are no lumps—as nobody enjoys biting into grainy frosting!
- 2 tablespoons milk (for frosting consistency). Adjusting milk quantity helps achieve desired spreading consistency within your frosting—it should be creamy yet spreadable without being overly runny.
- 1 tablespoon crushed lavender buds (for garnish). Crushed dried flowers lend an aromatic touch atop finished creations—they provide both visual appeal and added fragrance when served!
Equipment You’ll Need:
Before we dive into baking heaven, let’s gather up some essential tools that will make this entire process smoother—and honestly more enjoyable! Having the right equipment at hand not only streamlines everything but also sets you up for success as we craft this dreamy creation together.
- Mixing bowls: A good set of mixing bowls in various sizes will serve you well throughout this recipe—from combining dry ingredients to whipping egg whites later on if needed!
- Electric mixer: Whether handheld or stand mixer doesn’t matter too much—as long as it gets the job done efficiently when creaming butter or whipping up frosting until fluffy perfection awaits!
- Measuring cups & spoons: Accurate measurements are absolutely paramount when baking—you want precise ratios so flavors meld harmoniously without surprises later down line!
- Rubber spatula: Perfectly designed for scraping every last bit out from mixing bowls while ensuring nothing goes wasted during preparation stages—don’t overlook how handy these can become!
- Cake pans: Ideally two round 9-inch pans would do well here—these allow even layer heights which lend themselves beautifully towards stacking once cooled down post-baking session concludes!
With all ingredients gathered alongside essential tools prepped ahead-of-time like trusted companions ready-to-go—we’re now set-up nicely toward creating something truly remarkable: yes—you guessed it—the Lavender And Peach Dream Cake awaits us next!!
Step 1: Prepping Your Ingredients
Before diving into mixing flour with sugar or whisking eggs together—let’s take care setting ourselves up by prepping ingredients needed first… Start by measuring out your flour carefully using proper techniques: spoon flour directly into measuring cup then level off excess using edge knife rather than scooping directly from container itself which could lead inconsistencies later down line regarding proportions used overall—a common pitfall many fall prey too unwittingly!! Next gather all remaining components listed above allowing them reach room temperature where applicable especially concerning those eggs & butter otherwise risk having clumps form instead smooth batter required ultimately achieving desired results desired!!
Step 2: Creaming Butter & Sugar
Grab either handheld electric mixer/stand mixer fitted paddle attachment then place softened unsalted butter alongside granulated sugar inside mixing bowl at medium speed until light & fluffy consistency achieved—this process known as creaming creates tiny air pockets essential giving rise throughout baking process later!!! Don’t rush this step either—you want mixture pale-yellow hue appearing visibly airy rather than dense—not fully adhering would yield disappointing outcomes instead layered fluffiness intended here!!
Step 3: Incorporating Eggs & Vanilla
Once creamed mixture appears perfect time introduce eggs one at-a-time ensuring complete incorporation after each addition before moving onward adding beloved vanilla extract next lightly beating through until fully blended enjoy aroma wafting gently around kitchen reminding everyone nearby exactly what magic lies ahead just waiting unfold within oven soon enough!!
Step 4: Sifting Dry Ingredients Together
Now let’s take care sifting together flour alongside baking powder plus measured salt within separate bowl—sifting serves purpose breaking down lumps forming ensuring even distribution throughout batter later aiding rise combined efforts earlier while preventing undesirable surprises appearing baked goods afterward!!! Gradually add sifted dry mixture back into wet components mixing slowly just until combined don’t overmix though—we want maintain airiness created so far…
Stay tuned dear friend—we’ve only just begun crafting this beautiful Lavender And Peach Dream Cake together!! Next steps promise reveal even more fun experimentation fulfilling mouthwatering anticipation building exponentially right now!!
Step 5: Creaming the Butter and Sugar to Perfection
Now, let’s dive into the heart of cake-making: creaming the butter and sugar. This step is an absolute game-changer for your Lavender and Peach Dream Cake. Start by placing your half cup of unsalted butter in a large mixing bowl. It should be softened to room temperature—think just firm enough that you can leave an indentation with your finger but not so soft that it’s melting; this balance is crucial for achieving that light, airy texture we crave in cakes. Add in your one cup of granulated sugar, which will not only lend sweetness but also help aerate the mixture. Using either a hand mixer or a stand mixer fitted with the paddle attachment, beat them together on medium speed until the mixture becomes pale and fluffy—this usually takes about 3-5 minutes.
Why is this step so important? Well, when you cream butter and sugar together, you’re incorporating air into the batter, which will help give your cake its delightful rise. The sugar crystals cut through the butter, creating tiny pockets of air that expand when baked, leading to a wonderfully light crumb. You’ll know you’ve got it right when your mixture looks almost like a soft cloud—pale in color and voluminous in size. Don’t rush this step; take your time to really whip it up! If you stop too soon, your cake may turn out dense instead of light and fluffy.
Step 6: Adding Eggs One by One
Next up is incorporating our eggs, which bind everything together beautifully while adding moisture and richness to our Lavender and Peach Dream Cake. Crack each of the three large eggs into a small bowl first; this way, if any shells happen to sneak in (and trust me, they sometimes do!), you can easily fish them out before they make their way into your batter. Add the first egg to your creamed butter and sugar mixture, mixing on low speed until fully combined. Then repeat with the second egg, ensuring it’s well incorporated before adding the third. This gradual addition allows for better emulsification—meaning all those ingredients blend seamlessly together.
What makes this step particularly special is how it transforms our batter from a fluffy concoction into something more cohesive and rich. So watch as those eggs work their magic! The mixture will take on a shiny appearance as it becomes more uniform—a sign that you’re on the right track. It’s also important not to overmix at this stage; once you see no streaks of egg remaining, stop! Overmixing can lead to a tougher cake due to gluten development from the flour later on.
Step 7: Infusing Lavender for That Floral Note
Now comes one of my favorite parts—the infusion of dried lavender buds! Remember those two tablespoons we set aside? It’s time to unlock their aromatic potential. Before we add them directly into our batter, we’ll steep them in our milk for about five minutes. Heat your one cup of milk gently in a small saucepan over low heat until it’s warm but not boiling—think cozy warmth rather than simmering bubbles. Once warm, stir in the lavender buds and allow them to steep; this process extracts all those lovely floral essences without overwhelming flavor.
This infusion step is absolutely paramount because it ensures that every bite of your Lavender and Peach Dream Cake carries that intoxicating hint of lavender without being too overpowering or perfumed—it should feel like a gentle embrace rather than an overwhelming bouquet. After five minutes have passed (and believe me, those aromas wafting through your kitchen are utterly divine), strain out the lavender buds using a fine-mesh sieve or cheesecloth back into a measuring cup—you want only that luscious liquid gold left behind!
Step 8: The Dry Ingredients Join the Party
Now that we’ve infused our milk with lavender goodness—and oh boy, does it smell heavenly—we need to combine our dry ingredients before uniting everything into one glorious batter! In a separate bowl, whisk together two cups of all-purpose flour, two teaspoons of baking powder, and a quarter teaspoon of salt until well blended. This whisking isn’t just for show; it ensures even distribution of the baking powder (which helps our cake rise) throughout the flour and also prevents any clumps from forming.
Once mixed thoroughly, carefully fold these dry ingredients into your wet mixture in three additions alternating with your infused milk (which should now have cooled slightly). Start with about one-third of the flour mix—gently folding it in using a spatula or wooden spoon until just combined before adding another third of milk followed by another third of flour again until everything is incorporated. Why go slow? This technique helps maintain that beautiful airy texture we created earlier while preventing overmixing—a non-negotiable when aiming for tenderness in cakes.
As you mix everything together, keep an eye out for any dry flour pockets; this means you may be close but not quite there yet! However, don’t worry if there are still some small lumps—those can bake out perfectly fine during cooking! The final addition should contain your delightful sliced peaches; fold them in gently at this stage so they’re evenly distributed throughout without breaking apart too much.
Final Touches
Step 11: Whipping Up Your Frosting Bliss
Ahh… now we arrive at perhaps the most swoon-worthy part—the frosting! We’re going for something utterly luxurious yet delightfully simple: a peach preserves-infused frosting made from half cup unsalted butter whipped until creamy alongside four cups powdered sugar mixed gradually along with two tablespoons milk until reaching desired consistency—you want it smooth but thick enough hold shape beautifully against layered cakes without sliding off too easily!
Incorporating crushed lavender buds adds that extra pop factor elevating flavors yet again while maintaining harmony throughout entire dreamy creation! When preparing frosting remember moderation here—for every spoonful might seem tempting initially but resist urge diving straight-in prior assembly; instead scoop just enough onto first layer spreading evenly across surface leaving edges free from excess drips allowing visibility through gorgeous layers below!
With both layers cooled completely now awaits assembly ahead where dreamy flavors intertwine creating unforgettable experience worth relishing long after last crumb disappears…
Step 12: Assembling Your Lavender and Peach Dream Cake
Finally comes assembling what feels like an art piece worthy display at family gatherings—the layering begins here folks! Carefully place one cooled cake layer onto serving plate or cake stand making sure it’s centered nicely then dollop generous amount peach preserve across top spreading evenly reaching edges without overflow onto plate beneath—it creates sweet surprise awaiting eager tastebuds hidden underneath luscious frosting exterior!
Then gently place second layer atop first pressing down ever-so-slightly ensuring stability during final adornments ahead—don’t worry if slight wobble occurs at start—that’s all part journey bringing delicious tales memories shared around tables filled laughter joy celebrations galore!
Once secured position grab reserved frosting swirling around sides covering entire exterior smoothing out imperfections leaving corners rounded giving finished look elegance while maintaining rustic charm—remember no need achieve perfection here since rustic beauty lies within homemade creations themselves showcasing love poured into each bite taken!
Finish off masterpiece sprinkling additional crushed lavender buds atop center perhaps few peach slices decorating outer edge heightening presentation visually enticing everyone gathered around eager anticipation…
And voila! There stands proud creation waiting patiently ready feast eyes souls alike sharing experiences nourishing body spirit alike celebrating life itself through flavors crafted lovingly together…
Enjoy every bite knowing deeply rooted tradition brought forth generations past lives present weaving stories bringing sweetest moments forever cherished wherever paths may lead next…
Storage and Enjoyment Tips for Your Lavender and Peach Dream Cake
Now that you’ve baked this stunning Lavender and Peach Dream Cake, let’s talk about how to savor every last crumb of it! Whether you’re indulging right away or saving some for later, this cake is a sweet delight that deserves the best care. And trust me, no one wants to waste such a beautiful creation! So let’s dive into how to properly store those delicious slices to keep them as fresh and delightful as the day they were baked.
Storing Leftover Lavender and Peach Dream Cake
To keep your Lavender and Peach Dream Cake at its absolute best, I recommend placing it in an airtight container. This not only protects it from drying out but also helps preserve its delicate flavors. If you have a cake dome or a glass cake keeper, those are excellent options too! Just make sure to store it in a cool, dry place away from direct sunlight. Under these conditions, your cake can stay fresh for up to three days at room temperature. But here’s a little tip that I absolutely swear by: place a slice of bread inside the container with the cake. It may sound odd, but the bread will help maintain moisture levels, keeping your cake delectably moist! When it comes to taste after storage, I assure you that the floral notes of lavender combined with the juicy sweetness of peaches only deepen over time, making each bite even more profound. If you find yourself wanting a slice later on, simply enjoy it straight from the container or give it a light reheat in the microwave for about 10-15 seconds—just enough to warm it slightly and enhance those flavors!
Freezing Your Lavender and Peach Dream Cake for Later
If you’re like me and love having treats on hand for spontaneous celebrations or cozy evenings at home, freezing your Lavender and Peach Dream Cake is an incredible option! To do this properly, wrap each slice tightly in plastic wrap before placing them in a freezer-safe bag or container. This double layer of protection will prevent freezer burn and keep all those delightful flavors intact. When stored correctly, your cake can be kept frozen for up to three months without losing its charm! The beauty of freezing is that you can pull out just what you need whenever the craving strikes—whether it’s for an unexpected guest or simply just because you deserve a treat. To enjoy your frozen slices, allow them to thaw in the refrigerator overnight or let them sit at room temperature for about an hour. I promise you’ll find that they taste nearly as fresh as when they were first made—an absolute game changer!
With these tips in mind, you’re all set to enjoy your Lavender and Peach Dream Cake on your own terms!
Lavender and Peach Dream Cake

Indulge in the enchanting flavors of our Lavender and Peach Dream Cake, a delightful dessert that harmoniously blends floral notes with the sweetness of ripe peaches. This cake encapsulates the essence of summer—a fragrant celebration that transforms any gathering into a memorable occasion. Each slice offers a tender crumb, infused with aromatic lavender and juicy peach pieces, creating a symphony of taste that dances on the palate. Perfect for birthdays or casual get-togethers, this cake is sure to impress and leave everyone asking for seconds. Get ready to bake this luscious treat and share moments of joy with friends and family!
- Prep Time: 30 minutes
- Cook Time: 30 minutes
- Total Time: 1 hour
- Yield: Serves approximately 8 slices 1x
- Category: Dessert
- Method: Baking
- Cuisine: American
Ingredients
- 2 cups all-purpose flour
- 1 cup granulated sugar
- 1/2 cup unsalted butter (softened)
- 1 cup milk
- 3 large eggs
- 2 teaspoons baking powder
- 1/4 teaspoon salt
- 2 tablespoons dried lavender buds (culinary grade)
- 1 cup sliced peaches (fresh or canned)
- 1 teaspoon vanilla extract
- 1/2 cup peach preserves (for layering)
- 1/2 cup unsalted butter (softened) for frosting
- 4 cups powdered sugar (for frosting)
- 2 tablespoons milk (for frosting)
- crushed lavender buds for garnish
Instructions
- Preheat the oven to 350°F (175°C). Grease two round 9-inch cake pans and set aside.
- In a mixing bowl, cream together softened butter and sugar until light and fluffy.
- Add eggs one at a time, mixing well after each addition. Stir in vanilla extract.
- Whisk together flour, baking powder, and salt in another bowl. Gradually add this dry mixture to the wet ingredients alternately with milk infused with lavender.
- Fold in sliced peaches gently into the batter.
- Divide the batter between prepared pans and bake for 25-30 minutes or until a toothpick comes out clean.
- Allow cakes to cool before frosting with a mixture of softened butter, powdered sugar, milk, and crushed lavender.
Nutrition
- Serving Size: 1 slice (100g)
- Calories: 370
- Sugar: 40g
- Sodium: 180mg
- Fat: 15g
- Saturated Fat: 9g
- Unsaturated Fat: 5g
- Trans Fat: 0g
- Carbohydrates: 56g
- Fiber: 1g
- Protein: 4g
- Cholesterol: 70mg