Italian Grinder Sliders
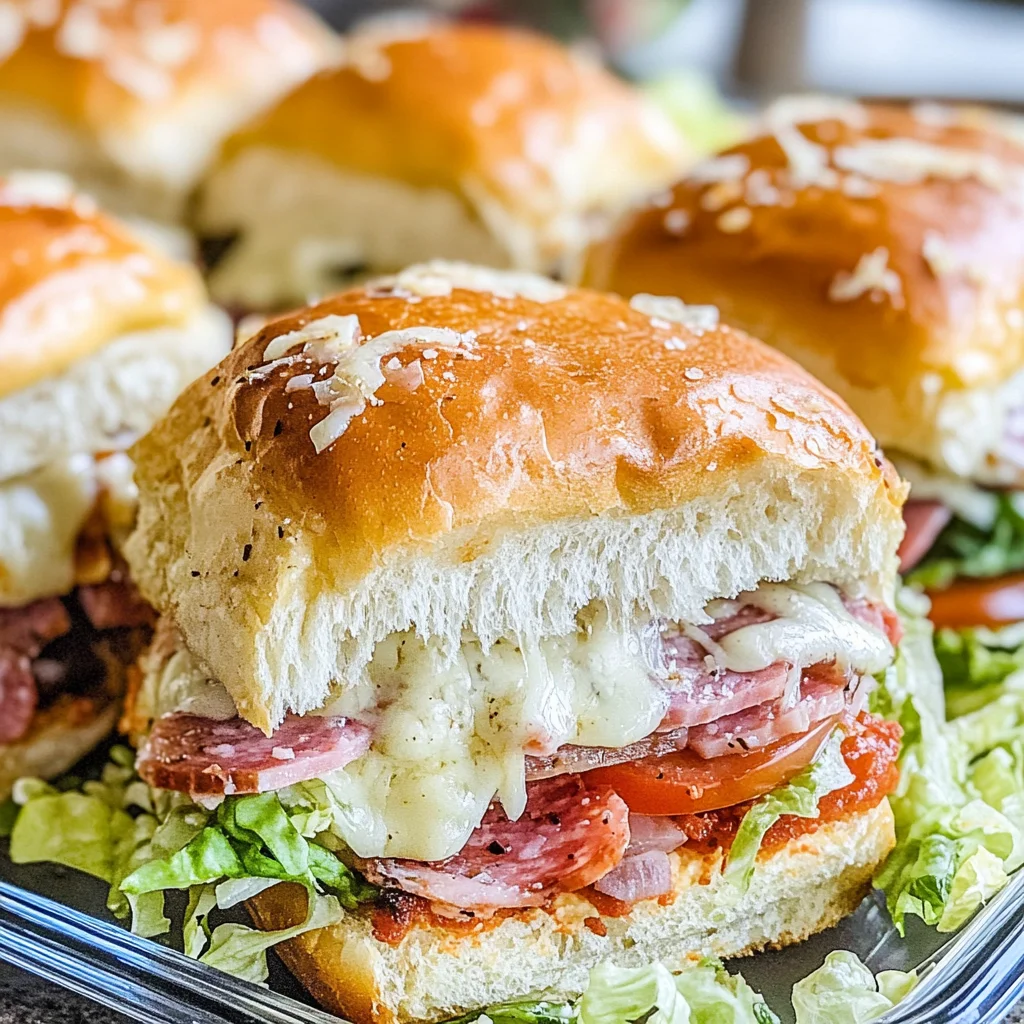
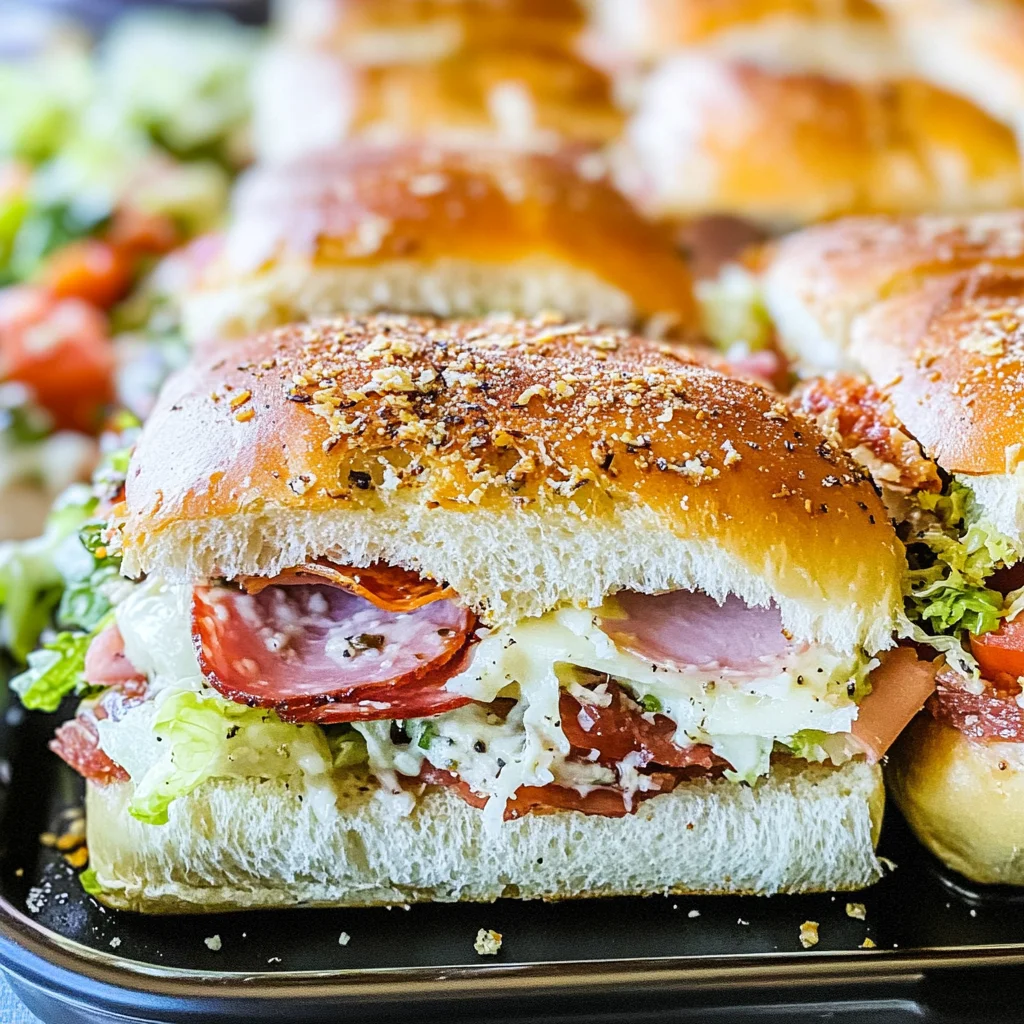
There’s something undeniably magical about food that brings people together, isn’t there? The aroma wafting through the kitchen, the vibrant colors dancing on your plate, and the anticipation that builds as you gather around the table all weave together into an experience that’s far beyond mere sustenance. Today, I want to share with you a recipe that encapsulates this essence—Italian Grinder Sliders. These delightful mini sandwiches are not just a meal; they are an invitation to indulge in a symphony of flavors. Picture this: layers of thinly sliced chicken ham and turkey pepperoni nestled between soft Hawaiian rolls, each bite bursting with melted provolone cheese and a luxurious garlic parmesan glaze. Trust me, this is a culinary revelation that will have your friends asking for seconds (and maybe even thirds!).
Every time I make Italian Grinder Sliders, it feels like I’m bridging generations of Italian-American tradition with modern-day convenience. This dish is perfect for any occasion—whether it’s game day, a cozy family dinner, or just a casual get-together with friends. What makes these sliders so special is not merely their taste but the love and care that goes into assembling them. It’s about creating moments and memories as much as it is about savoring delicious food. So roll up your sleeves and join me on this flavorful journey—together we’ll create something utterly extraordinary.
Italian Grinder Sliders: A Miniature Marvel of Flavor
Get ready to embark on a culinary adventure that will impress your guests and tantalize your taste buds! These Italian Grinder Sliders are ridiculously easy to prepare yet bursting with flavor—perfect for those evenings when you crave something comforting but don’t want to spend hours in the kitchen. As we dive into making these delightful bites, I’ll guide you through every step to ensure you achieve slider perfection.
Ingredients:
As we prepare to create our Italian Grinder Sliders, let’s take a moment to appreciate each ingredient that contributes to this dish’s deliciousness. Each one plays a vital role in crafting those mouthwatering bites.
- 12 Hawaiian rolls. These little gems are the perfect base for our sliders due to their soft texture and slightly sweet flavor profile. Their pillowy nature allows them to soak up all the delicious juices from the fillings without falling apart—non-negotiable for achieving that ideal balance of sturdiness and tenderness. When selecting your rolls, look for ones that are fresh with a golden crust; they should feel light yet firm in your hand.
- 8 ounces chicken ham (thinly sliced). This delightful alternative adds a subtle smokiness while keeping everything light—a crucial factor when pairing with rich cheeses and condiments later on. Thinly sliced chicken ham melds beautifully within our sliders, providing layers of flavor without overwhelming the palate. If you’re unable to find chicken ham at your local deli, turkey ham can serve as an excellent substitute without straying too far from our flavor profile.
- 4 ounces provolone cheese (sliced). Oh my goodness—the creamy richness of provolone is absolutely paramount here! It melts beautifully over our other ingredients, creating that gooey texture we all adore in sandwiches. Provolone also introduces just the right amount of tanginess that complements the savory elements perfectly. When shopping for cheese, opt for freshly sliced varieties from the deli counter rather than pre-packaged options if possible; you’ll notice a significant difference in taste and quality.
- 3 ounces thinly sliced turkey pepperoni. For those who love a bit of spice in their life—but without overwhelming heat—turkey pepperoni adds just enough kick while keeping things light-hearted! Its unique flavor profile brings out incredible depth in each bite of our sliders without overpowering them; it’s like adding a secret ingredient that leaves everyone guessing what makes these so amazing!
- 3 ounces thinly sliced turkey slices. These tender slices provide additional protein while ensuring our sliders remain moist and juicy throughout cooking. The mild flavor works harmoniously with other ingredients without competing for attention, allowing each component’s distinctiveness to shine through beautifully.
- 2 tablespoons butter. Ahh, butter—the liquid gold of cooking! In this recipe, melted butter is spread atop our sliders before baking, forming an irresistibly golden crust that’ll have everyone clamoring for more! Ensure it’s softened but not melted so it spreads evenly across the tops; trust me—you don’t want uneven browning here!
- 2 tablespoons grated parmesan. Parmesan lends an extra layer of umami goodness while also contributing beautiful browning during baking—a truly extraordinary touch! Freshly grated parmesan will elevate this dish beyond ordinary expectations; its nutty notes combine effortlessly with garlic powder later on to create sheer indulgence.
- 1/2 teaspoon garlic powder & 1/4 teaspoon salt: These two essentials tie everything together! Garlic powder offers that unmistakable aromatic quality we associate with comfort foods while salt enhances natural flavors—both playing crucial roles in crafting unforgettable bites.
- 8 ounces shredded lettuce & 1/2 cup diced tomato & 1/2 cup sliced pepperoncini peppers: This trio creates what I call the grinder salad—an essential fresh component balancing richness elsewhere within our sliders! Each ingredient brings brightness: crunchy lettuce complements gooey cheese nicely while tomatoes add juiciness; pepperoncini peppers introduce zingy acidity cutting through heaviness beautifully.
- 1/4 cup mayonnaise, 1 tablespoon apple cider vinegar, 1 teaspoon Italian seasoning, 1/2 teaspoon salt, 1/2 teaspoon pepper, & another 1/2 teaspoon garlic powder: Together they form an addictive dressing elevating flavors substantially! Mayonnaise provides creaminess needed for richness; apple cider vinegar offsets sweetness from rolls’ surface nicely creating harmony overall while seasonings ensure every element shines brightly.
With these carefully selected ingredients at hand, you’re well on your way toward crafting unforgettable Italian Grinder Sliders!
Equipment You’ll Need:
Having the right tools can make all the difference in your cooking experience—it sets you up for success and allows creativity to flourish! While they may not be ingredients themselves, these trusty partners will help bring your vision of perfect sliders into reality.
- Baking dish – A sturdy baking dish is essential here as it holds all those glorious layers together during baking while allowing easy retrieval post-cooking too! Opt for one large enough to accommodate those 12 Hawaiian rolls comfortably without overcrowding them—a non-stick option can save cleanup time later on!
- Sharp knife or serrated knife – Precision counts when slicing through soft bread like Hawaiian rolls—you don’t want jagged edges ruining presentation or structural integrity! A sharp knife ensures clean cuts preventing mushiness while also making assembly smoother overall.
- Mixing bowl – A reliable mixing bowl is necessary for combining ingredients seamlessly when preparing dressings or salads accompanying our sliders—I recommend using one large enough so nothing spills over during whisking!
- Whisk or fork – Essential tools for blending those creamy dressing components together effectively—you’ll want everything combined evenly before tossing with fresh vegetables ensuring balanced flavor distribution throughout!
Each piece plays an important role in achieving slider perfection—from efficient preparation methods down through final assembly—all designed thoughtfully based upon years spent experimenting within my own kitchen!
Preparing the Italian Grinder Sliders
Step 1: Preheat Your Oven – Setting Up For Success
Before diving into assembling these delightful mini sandwiches, let’s take care of one crucial detail: preheating your oven to 350°F (175°C). This step may seem simple but bears immense importance—it ensures consistent heat distribution throughout cooking process promoting even melting of cheese and browning atop buns! While it’s heating up, take this time to gather all your ingredients neatly organized within reach; trust me—this organization saves precious minutes later on!
Step 2: Slice Those Hawaiian Rolls – Creating Foundations
Now comes perhaps my favorite part—the slicing! Carefully cut each Hawaiian roll horizontally across its center producing two equal halves per bun—this forms perfect little vessels awaiting delicious fillings inside! Place only bottoms into prepared baking dish snugly side by side; remember not pressing them tightly together allows enough room for toppings during baking ensuring optimal results across entire batch—not just isolated sections here or there!
Step 3: Layer Your Cheese – Melting Moments Await!
Next comes layering some provolone cheese directly atop those bottoms laid out before us earlier; aim for even coverage across surface area giving every bite satisfaction galore once baked—that glorious oozy stretch you’ll get from melted cheese cannot be understated! Following closely behind add thin slices of chicken ham followed by turkey pepperoni then turkey slices stacking neatly atop one another creating inviting layers filled therein… Seriously folks—the anticipation builds at this point because just imagining how scrumptious they’ll turn out sends shivers down my spine already!
Step 4: Spread Butter Mixture – Elevating Flavor
With all layers stacked beautifully upon buns now it’s time we enhance flavors further by preparing buttery topping mixture comprising melted butter combined alongside grated parmesan cheese along with garlic powder plus sprinkle salt added generously too—we’re aiming high here folks because every slider deserves utmost care right? Using spatula spread this luscious combination evenly over tops ensuring no section left untouched—each bite deserves rich buttery goodness especially after baking achieves its golden-brown glory later when served hot straight from oven onto plates waiting eagerly below… The aroma alone will entice everyone nearby irresistible invitation beckoning them closer towards table where magic unfolds soon!
As we move forward through preparation steps further down line remember patience pays off immensely when cooking—it allows flavors meld beautifully whilst presenting visually appealing dishes worthy celebration at any gathering ahead awaiting us soon… Keep going—I promise you’re nearly there!
Step 5: Crafting the Irresistible Grinder Salad
While your sliders are basking in the warmth of the oven, it’s time to create a vibrant and utterly refreshing grinder salad. This step is not just about tossing some greens together; it’s about elevating your Italian Grinder Sliders into an extraordinary experience. Begin by whisking together 1/4 cup of mayonnaise and 1 tablespoon of apple cider vinegar in a medium bowl. The combination of the creamy mayonnaise with the tangy vinegar is incredibly transformative, creating a dressing that will tie all the flavors together beautifully. Don’t rush this step! Take your time to ensure that your dressing is smooth and well-blended—this is crucial for achieving that luscious texture that coats every leaf.
Next, stir in 1 teaspoon of Italian seasoning, 1/2 teaspoon of salt, 1/2 teaspoon of pepper, and 1/2 teaspoon of garlic powder. As you mix these aromatic spices into the dressing, you’ll notice how they begin to dance together, filling your kitchen with a fragrant aroma that’s just intoxicating. Trust me on this: each sprinkle adds a layer of depth that elevates this salad from simple greens to a glorious topping for your sliders. Once you’ve combined everything seamlessly, add in 8 ounces of shredded lettuce, 1/2 cup of diced tomatoes, and 1/2 cup of sliced pepperoncini peppers. Gently toss until every piece is coated in that delightful dressing; this step ensures every bite will burst with flavor while adding freshness and crunch to balance the richness of your sliders.
Step 6: The Artful Assembly
Now comes one of my favorite moments—the assembly! After about 15-20 minutes in the oven, your sliders should emerge looking gloriously golden brown, with melted cheese oozing out like liquid gold. Carefully remove them from the oven and let them cool slightly; this moment allows the cheese to set up just enough so that when you cut into them later, everything holds together beautifully without falling apart.
Once cooled for a couple of minutes, it’s time to take off those tops gently. Layering is where the magic happens! Spoon a generous amount of your freshly made grinder salad onto each slider base. I promise you, this addition is absolutely paramount; it brings not only delightful texture but also that punchy flavor profile which is characteristic of Italian cuisine. Don’t be shy—let those vibrant colors shine through as they peek out from beneath their fluffy tops! After you’ve added your salad, place those cheesy tops back on with care, ensuring they sit snugly atop their flavorful foundation.
Step 7: The Final Bake
With everything assembled, it’s time for one last trip into the oven—a brief encore that will solidify all those beautiful layers into one harmonious dish. Preheat your oven once again to 350˚F if it has cooled down too much during assembly (it’s okay if it has!). Place your assembled Italian Grinder Sliders back into the baking dish and cover them loosely with aluminum foil; this will allow them to heat through without becoming overly brown or crusty on top too soon.
You’re looking at around another 10-15 minutes in this phase, so keep an eye on them as they bake. It’s essential to watch for visual cues: you want those tops to glisten slightly while the cheese continues melting into every nook and cranny below. If you’re feeling bold, remove the foil during the last few minutes for an extra crispy finish—you’ll know they’re done when they look irresistibly golden and bubbly! Remember, patience here pays off big; allowing them to meld together creates a symphony of flavors that’s simply unforgettable.
Step 8: The Grand Reveal
At long last comes what I like to call “the grand reveal.” Carefully pull your sliders out from the oven, letting their warm aroma envelop you like a comforting hug—it’s utterly intoxicating! Allow them to rest for about five minutes before diving in; just like any good dish, giving them a moment helps everything settle nicely so that when you slice in, each component stays perfectly intact instead of spilling out everywhere.
Using a sharp knife (and I mean sharp!), cut through those gorgeous rolls between each slider portion—this is where you get to see all those layers revealed in their stunning glory! The sight alone will make anyone weak at the knees; you’ll see glistening cheese mingling with colorful veggies, all encased within soft Hawaiian rolls. Serve immediately while they’re still warm and gooey—the anticipation will be palpable as everyone gathers around ready to savor these heavenly bites!
Conclusion:
As we wrap up our journey through crafting these delightful Italian Grinder Sliders, I can’t help but feel giddy with anticipation for you to experience this culinary adventure! From the moment you layer those exquisite deli meats and cheeses between sweet Hawaiian rolls, to brushing on that rich garlic parmesan glaze, there’s something profoundly satisfying about every step. What makes this recipe truly special is its harmonious combination of textures—the softness of the bread enveloping the savory fillings paired with that irresistible crunch from the freshly prepared grinder salad atop. It’s a symphony of flavors that dances on your palate and brings joy with every mouthful.
You simply must try making these sliders! Not only do they offer incredible taste, but they also provide an opportunity for connection; whether you’re sharing them at a family gathering or serving them at a casual get-together with friends. Picture yourself pulling these golden beauties from the oven—the aroma filling your home will have everyone rushing to gather around the table. The laughter shared while assembling each slider is an experience all its own, making it more than just another meal but rather a cherished moment spent together.
For an afternoon pick-me-up, imagine savoring one alongside a side of crispy baked fries or perhaps some zesty pickles—that contrast will elevate your slider game! And if you’re feeling adventurous, pair it with a refreshing glass of iced tea or lemonade for an utterly intoxicating experience during those warm evenings when you crave something comforting yet satisfying.
Feeling adventurous? This recipe is wonderfully adaptable; consider swapping out turkey pepperoni for spicy turkey slices if you’re craving heat or adding roasted red peppers for an extra layer of flavor. You could even play with different types of cheese—imagine gouda melting beautifully beneath that gooey topping! The possibilities are endless, and I encourage you to take this foundational recipe and make it uniquely yours. Please share your creations and experiences—I would love to hear how these sliders become part of your culinary repertoire!
Italian Grinder Sliders

Italian Grinder Sliders are a delightful twist on classic mini sandwiches, perfect for gatherings or cozy dinners. These mouthwatering sliders feature layers of thinly sliced chicken and turkey, complemented by melted provolone cheese and a flavorful garlic parmesan glaze. Nestled between soft Hawaiian rolls, they offer an irresistible combination of textures and flavors that will have everyone coming back for more. Ideal for game days, family dinners, or casual get-togethers, these sliders not only satisfy your cravings but also create cherished moments around the table. Try this recipe today to experience the magic of Italian cuisine in a bite-sized form!
- Prep Time: 20 minutes
- Cook Time: 20 minutes
- Total Time: 40 minutes
- Yield: Serves approximately 12 sliders 1x
- Category: Dinner
- Method: Baking
- Cuisine: Italian
Ingredients
- 12 Hawaiian rolls
- 8 ounces thinly sliced chicken or turkey ham
- 4 ounces provolone cheese, sliced
- 3 ounces thinly sliced turkey pepperoni
- 3 ounces thinly sliced turkey breast
- 2 tablespoons butter
- 2 tablespoons grated parmesan cheese
- 1/2 teaspoon garlic powder
- Salt and pepper to taste
- Fresh vegetables: shredded lettuce, diced tomatoes, sliced pepperoncini peppers
Instructions
- Preheat your oven to 350°F (175°C).
- Slice each Hawaiian roll horizontally and place the bottoms in a baking dish.
- Layer provolone cheese, chicken ham, turkey pepperoni, and turkey slices on top.
- In a small bowl, combine melted butter with parmesan cheese and garlic powder; spread this mixture over the tops of the rolls.
- Bake for 15-20 minutes until golden brown and cheese is melted.
- Prepare a grinder salad by mixing mayonnaise, apple cider vinegar, Italian seasoning, salt, pepper, garlic powder, shredded lettuce, diced tomatoes, and pepperoncini peppers in a bowl.
- Once sliders are out of the oven and slightly cooled, add the grinder salad onto each slider base and reassemble the tops.
Nutrition
- Serving Size: 1 slider (approximately 100g)
- Calories: 310
- Sugar: 4g
- Sodium: 820mg
- Fat: 18g
- Saturated Fat: 8g
- Unsaturated Fat: 10g
- Trans Fat: 0g
- Carbohydrates: 26g
- Fiber: 1g
- Protein: 14g
- Cholesterol: 60mg