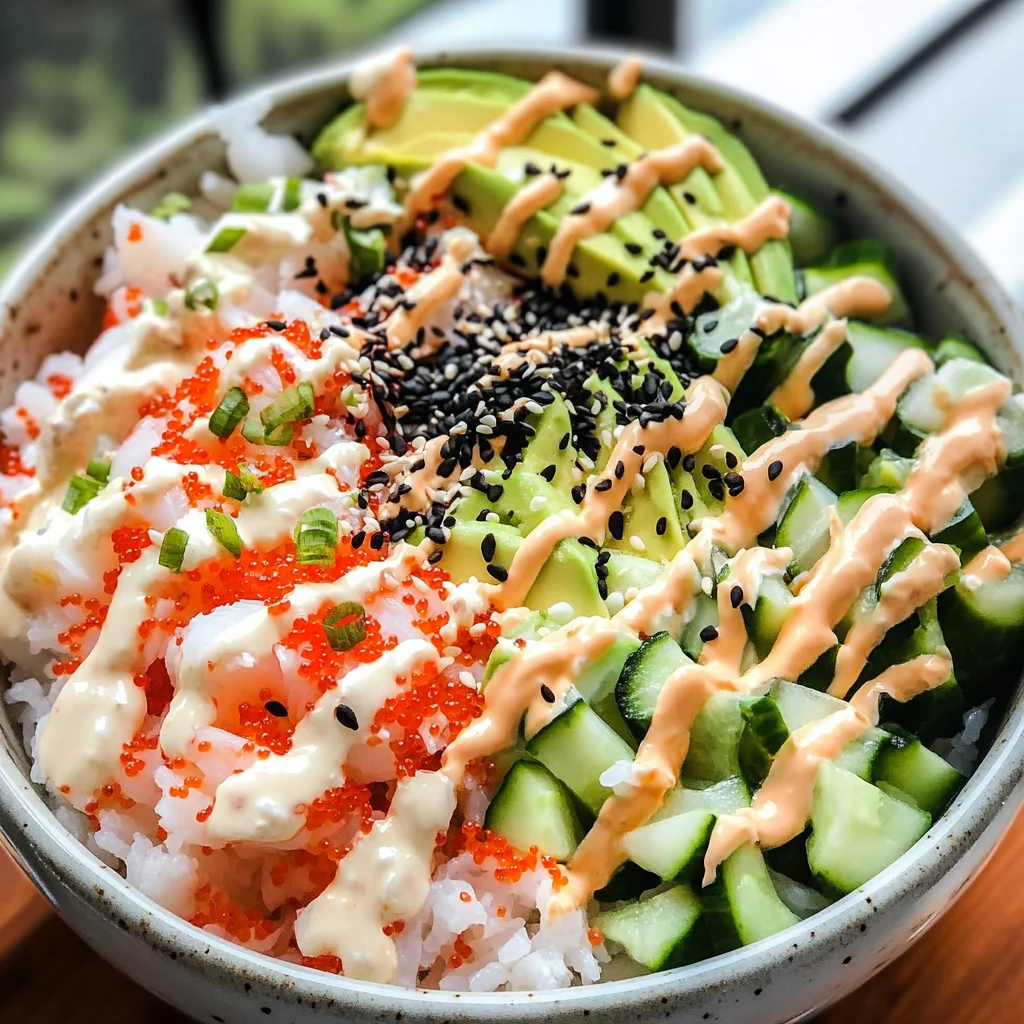
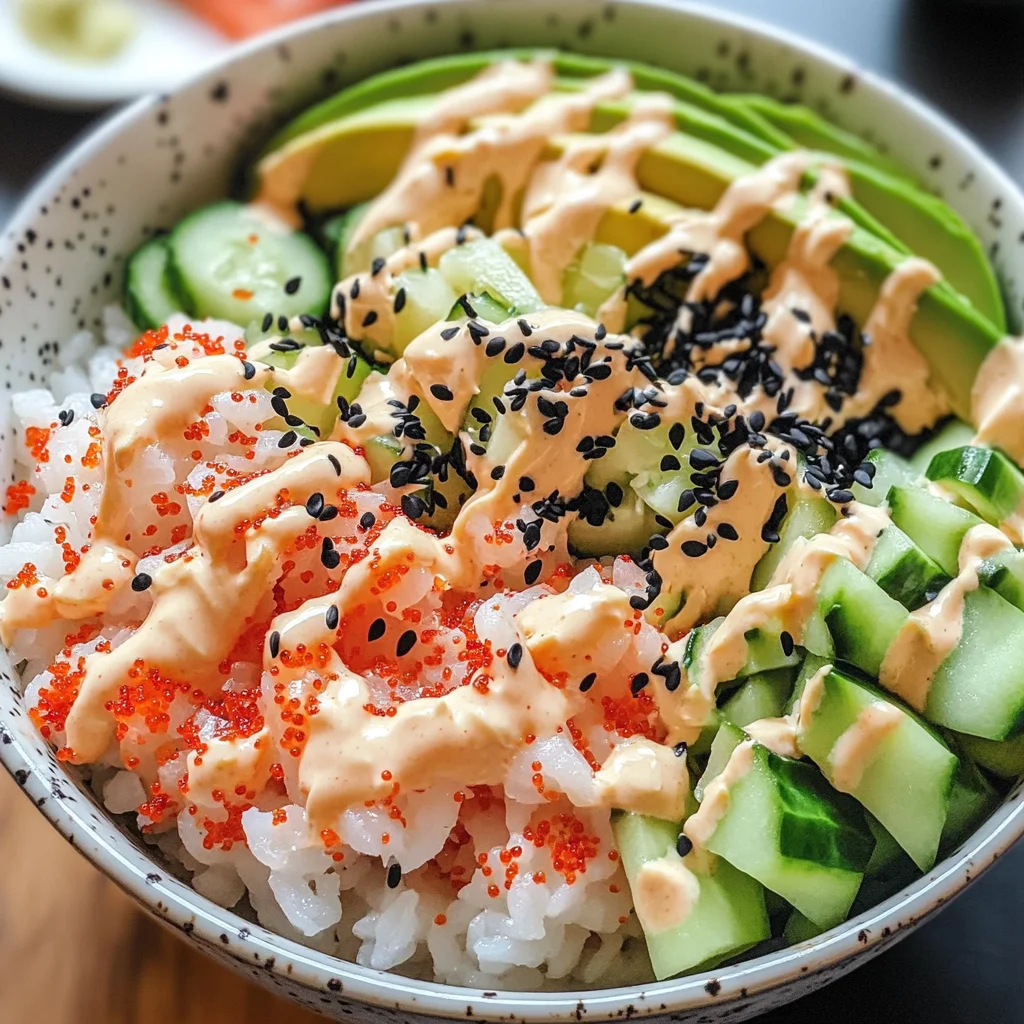
California Sushi Bowls
When I think about the comfort of a home-cooked meal, one dish that always comes to mind is the California Sushi Bowl. It’s not just a meal; it’s an experience—a beautiful tapestry woven from flavors, colors, and textures that transport you straight to a sun-drenched beach in California. Imagine tender chunks of crab mingling with fluffy sushi rice, while fresh cucumber and creamy avocado add bursts of color and flavor. As the nori crumbles over the top like edible confetti, you can almost hear the waves crashing nearby. There’s something magical about how this dish bridges tradition with innovation; it pays homage to classic sushi while being accessible enough for any weeknight dinner. What makes these bowls even more special is their lightness—perfect for warm evenings when all you want is something refreshing yet satisfying. Trust me, once you take that first bite, you’ll understand why I adore them so much.
Now, let’s dive deeper into why California Sushi Bowls hold such a special place in my heart. This dish embodies creativity; it invites you to play with flavors while still keeping those roots in Japanese cuisine. You might find it interesting to note that these bowls offer a delightful contrast between creamy and crunchy, savory and tangy—all while being adaptable for different tastes or dietary needs. Whether you’re hosting a casual get-together or simply enjoying a quiet night in, these sushi bowls elevate the ordinary into something truly extraordinary. The vibrant colors make them visually striking—perfect for impressing guests or just treating yourself because you deserve it! So let’s roll up our sleeves and embark on this culinary journey together!
California Sushi Bowls: A Flavorful Journey Awaits
These California Sushi Bowls are not just easy to whip up but also burst with flavor and freshness that will make your taste buds dance in delight! With simple ingredients coming together in perfect harmony, this dish is sure to become a staple in your kitchen.
Ingredients:
As we embark on this culinary journey together, let’s take a moment to appreciate our ingredients. Each one plays a vital role in crafting the symphony of flavors that make up these California Sushi Bowls.
- 1 1/2 cups dry Calrose Sushi Rice. This particular type of rice is essential because it has the perfect balance of stickiness and tenderness that allows each grain to cling together without becoming mushy—a crucial characteristic for sushi dishes! When shopping for Calrose rice, look for brands that specify “sushi” on the package; they often have gone through quality checks ensuring they meet the standards needed for sushi preparation. Rinsing the rice before cooking helps remove excess starch, which can lead to clumping—trust me; this step is non-negotiable!
- 2 cups water. While seemingly straightforward, the water-to-rice ratio will determine how fluffy your sushi rice turns out. Using precisely two cups gives just enough moisture for those grains to absorb while cooking without turning into a soupy mess. If you’re using a rice cooker (which I highly recommend), this ratio is generally foolproof!
- 1/4 cup seasoned rice vinegar (Marukan). This ingredient adds an incredible tanginess that balances perfectly with the sweetness of the crab and creaminess of avocado. Seasoned rice vinegar has sugar and salt added, making it ideal for sushi rice as it enhances flavor without needing additional seasoning afterward. If you’re ever in doubt at the store, Marukan is my go-to brand—it’s simply delicious!
- 1/4 cup Japanese mayonnaise. Unlike regular mayonnaise, this version boasts a creamier texture and slightly sweeter taste due to its unique blend of ingredients like egg yolks and vinegar. It adds richness to our spicy mayo mix that’s utterly intoxicating! You can find Japanese mayonnaise in most Asian grocery stores or online; trust me on this—don’t skip it!
- 2 teaspoons sriracha. This spicy condiment brings heat without overwhelming your palate and creates an addictive contrast against the cool veggies and crab meat. Feel free to adjust the amount based on your spice tolerance! If you’re feeling adventurous, try adding some chili garlic sauce instead—it’ll give another layer of flavor.
- 8 oz imitation crab chopped into small pieces. Imitation crab meat offers all those delightful ocean flavors without being overpowering or overly fishy—plus, it’s easy to work with! Choosing leg-style imitation crab provides that familiar texture reminiscent of real crab meat but at a fraction of the cost (and no shelling required!). Just chop it into bite-sized pieces so every spoonful has some crab goodness.
- 1/2 cup diced English cucumber. The crunchiness and subtle sweetness of English cucumbers add refreshing notes that brighten up each bowl beautifully! Their thin skin means you don’t need to peel them—just dice them up as they are! Look for firm cucumbers with no soft spots when selecting at the store.
- 1-2 nori sheets (chopped or crumbled into small pieces). Nori sheets provide an umami depth that’s indispensable in sushi dishes! They also add visual appeal when scattered atop your bowls like little green confetti! You can find nori sheets dried near other Asian products—just remember to keep any leftovers sealed tightly so they don’t lose their crispness.
- 1 large avocado (peeled and sliced). Avocado brings creaminess unlike anything else—think of it as nature’s butter! Choose avocados that yield slightly when pressed gently; this indicates ripeness without being overly mushy inside! Incorporating slices elevates both texture and presentation; plus who doesn’t love avocado?
- Black and toasted sesame seeds (for garnish). These tiny seeds pack a punch when it comes to flavor—they’re nutty yet subtle—and sprinkle beautifully over your finished bowls giving them that gourmet touch we all crave! Toasting them brings out their oils enhancing their taste even further—a step worth taking if time allows!
- 1/4 cup low-sodium soy sauce (for serving). Soy sauce acts like liquid gold here—it ties all elements together creating harmony among diverse flavors within each bowl while offering depth through its salty profile too! Opting for low-sodium keeps things balanced without overwhelming your dish with saltiness.
- Nori Furikake. This Japanese condiment combines dried seaweed flakes with sesame seeds and seasonings—it’s utterly divine sprinkled over everything from rice dishes to salads! Adding furikake not only enhances flavor but also adds textural contrast making every mouthful exciting!
Equipment You’ll Need:
Before we dive into preparing our delectable California Sushi Bowls, let’s take a moment to talk about some essential equipment you’ll need along the way—think of them as trusty companions on this culinary adventure!
- Rice Cooker: Investing in a quality rice cooker makes preparing perfect sushi rice effortless every time! It automates cooking while allowing you greater focus on other components of your dish without worrying about burning anything—I promise you’ll wonder how you ever cooked without one!
- Mesh Sifter: Having one handy ensures thorough rinsing of your sushi rice before cooking—a crucial step preventing clumpy or gummy results later on! If you don’t have one available at home right now? No worries—you can use any fine-mesh strainer instead!
- Rice Paddle: This tool is designed specifically for handling delicate cooked rice; its flat surface lets you fold ingredients gently rather than smashing grains together—a technique paramount when preparing sushi rice properly!
- Cutting Board & Sharp Knife: A sturdy cutting board paired with a sharp knife will help streamline prep work like chopping vegetables or slicing avocados quickly while ensuring safety throughout your process!
Now that we have our ingredients prepped and equipment ready let’s dive into preparing these delightful California Sushi Bowls—the fun part awaits us next!
Step 1: Rinse Your Rice
The first step in crafting perfectly fluffy California Sushi Bowls begins by rinsing 1 1/2 cups of dry Calrose sushi rice under cold water using a mesh sifter or fine-mesh strainer until the water runs clear—this may take several passes but trust me; don’t rush this step! Why rinse? It removes excess starch from outside each grain which helps prevent clumping during cooking—a crucial aspect if we’re aiming for beautiful individual grains later on! Once rinsed thoroughly, transfer the clean rice into your rice cooker along with 2 cups water before turning it on according to manufacturer instructions—this method guarantees consistent results every time while freeing you up for other preparations ahead!
Step 2: Cool Down That Rice
Once cooked (which should take about 10 minutes depending on model), carefully transfer your fluffy sushi rice onto a rimmed baking sheet making sure not too much steam escapes during transfers—the goal here is cooling down evenly without letting steam continue cooking away moisture content unnecessarily afterward either! Pour 1/4 cup seasoned rice vinegar evenly over warm cooked grains then gently fold using your trusty paddle—we want incorporation happening smoothly rather than mashing everything together here—patience pays off big time during this critical stage because well-seasoned cooled sticky goodness awaits us later on when assembling bowls too!
Step 3: Whip Up Your Spicy Mayo
While waiting patiently for that aromatic cloud from freshly cooked grains wafts through space around us let’s create our spicy mayo concoction next—it takes mere seconds yet elevates overall flavor tremendously too! In small mixing bowl combine measured amounts (1/4 cup) Japanese mayonnaise alongside zesty sriracha (2 teaspoons)—mix thoroughly until blended completely giving rise towards creamy lusciousness full-on heat sensations tickling tastebuds upon each application later down line too… if feeling adventurous add more heat levels as desired but remember moderation here goes far especially balancing richness otherwise could overshadow delicate aspects present throughout remaining components!
Step 4: Chop Those Fresh Ingredients
With our base components ready now comes time prepping fresh vegetables alongside imitation crab meat ensuring they’re chopped uniformly small pieces enabling seamless integration within finished bowls later down line too… start by dicing half cup English cucumber followed by chopping eight ounces leg-style imitation crab meat into bite-sized morsels ready joining party happening inside each bowl soon enough so get excited about what lies ahead now friends?! And don’t forget breaking few nori sheets apart either yielding crisp flakiness topping off final presentation quite nicely once assembled altogether afterward… can’t wait till we reach assembly stage soon enough folks stay tuned!!
Stay tuned as we continue breaking down further steps toward creating these glorious Japan-inspired creations bringing smiles wherever served alongside heartfelt memories shared among loved ones gathered around tables everywhere across land celebrating life itself through food prepared lovingly hands-on style!!
Step 5: Assemble the Flavorful Base
Now that your sushi rice has cooled into a fluffy, slightly sticky masterpiece, it’s time to bring everything together. Start by taking a large bowl—something that feels generous and inviting—and gently spoon in your perfectly cooled sushi rice. This rice is the heart of your California Sushi Bowls, and every grain is essential for that delightful texture we all crave. As you transfer the rice into the bowl, take a moment to appreciate its glossy sheen. That’s the magic of seasoned rice vinegar at work!
Next, it’s time to add our star ingredient: the chopped imitation crab meat. I love using imitation crab not just for its delightful sweetness but also for its incredible ability to absorb flavors, making every bite a symphony of tastes. The key here is to fold the crab meat delicately into the rice rather than stirring aggressively; this preserves the integrity of both ingredients and ensures an even distribution throughout. After you’ve added about eight ounces of crab (or more if you’re feeling indulgent), toss in that half cup of diced English cucumber. This fresh addition brings a crisp crunch that beautifully contrasts with the tender, luscious crab and soft sushi rice. Trust me on this: each mouthful should feel like a refreshing burst of flavor!
Step 6: The Creamy Spicy Mayo Magic
What makes these California Sushi Bowls truly extraordinary is the rich and zesty kick from our homemade spicy mayo. In a small mixing bowl, combine one quarter cup of Japanese mayonnaise with two teaspoons of sriracha. The creamy base from the mayonnaise serves as a perfect canvas for the fiery sriracha—it’s all about balance here! You want to whisk them together until they form a smooth and luscious sauce that’s ready to dance atop your ingredients.
Why do we use Japanese mayonnaise specifically? It has a richer flavor profile than regular mayonnaise because it blends egg yolks instead of whole eggs, resulting in a creamier texture and deeper taste—absolutely non-negotiable for this dish! So don’t skimp on this step; it elevates your sushi bowls to something sublime. Once combined, set it aside but keep it handy because we’ll drizzle it over our assembled bowls later. And let’s be honest; no one ever complains about having extra mayo on hand!
Step 7: Slice Your Avocado with Love
Now comes one of my favorite parts—the avocado! A perfectly ripe avocado adds an utterly intoxicating creaminess that takes these California Sushi Bowls to new heights. Begin by carefully slicing your large avocado in half lengthwise around the pit. With gentle hands, twist the halves apart and remove the pit (be cautious here!). Then, using a sharp knife, score each half into thin slices while still in its skin—this technique makes lifting out those beautiful slices effortless.
Once you’ve created those gorgeous slices, use a spoon to carefully scoop them out and arrange them atop your vibrant rice mixture. This isn’t just about looks—avocados are loaded with healthy fats that promote satiety while adding depth to each bite. Their buttery texture complements every crunchy and tender ingredient in your bowl beautifully! Remember, presentation matters; take your time arranging those avocado slices artfully so they not only taste good but look stunning too!
Step 8: Garnish with Flavors That Pop
Now we’re reaching the final stretch—garnishing our California Sushi Bowls! To finish off this masterpiece, sprinkle chopped nori over each bowl generously; this adds an umami punch that’s simply irresistible! Use as much or as little as you prefer; after all, it’s about personalizing this dish to your taste buds’ desire. Next up are black and toasted sesame seeds; their nutty flavor will add another layer of depth while providing that signature crunch when you bite into your creation.
And let’s not forget about furikake—a Japanese seasoning blend filled with umami goodness! A sprinkle or two will elevate your bowls even further—think crispy seaweed flakes mixed with sesame seeds and subtle sweetness. Each bite becomes an explosion of flavors reminiscent of summer days spent savoring fresh sushi by the beach. Lastly, don’t forget about serving low-sodium soy sauce on the side for dipping or drizzling over your bowls; it brings everything together beautifully.
Conclusion:
As we wrap up our journey through this delightful recipe for California Sushi Bowls, I hope you’re as excited as I am about creating this stunning dish! It’s truly more than just a meal; it’s an experience filled with contrasting textures and vibrant flavors that are profoundly satisfying. The tender imitation crab combined with tangy sushi rice and crisp vegetables creates a symphony of flavors that dances on your taste buds—a remarkable balance that elevates it far beyond ordinary fare.
This recipe is absolutely a must-try—it’s not only delicious but also incredibly versatile and accessible! Imagine hosting a gathering where everyone gets their hands into assembling their own sushi bowls; it sparks creativity and conversation while being suitable for both busy weeknights and special occasions alike. And when you pull those beautiful bowls from the fridge or freezer and serve them chilled on a warm evening? Oh, trust me—it’s an experience that feels like sunshine on your palate.
When it comes to serving suggestions, consider pairing these sushi bowls with something refreshing like pickled ginger or even crispy tempura vegetables for added crunch. Picture savoring one alongside a light cucumber salad or perhaps indulging in some miso soup—it creates an inviting Japanese-inspired feast right at home! For an afternoon pick-me-up after work or school? A California Sushi Bowl hits all the right notes and leaves you feeling revitalized instead of weighed down.
Feeling adventurous? This recipe is wonderfully adaptable! You could easily swap out ingredients based on what you have on hand—think crunchy bell peppers instead of cucumbers or even adding slices of mango for sweetness. Or if you’re feeling daring, why not play around with different sauces? A drizzle of wasabi mayo would add an exciting kick! Each variation opens doors to new flavors while remaining grounded in that comforting essence of home cooking. So go ahead—give this recipe a whirl, and don’t forget to share your experiences with those around you! Let’s create memories together over these gorgeous California Sushi Bowls.
California Sushi Bowls
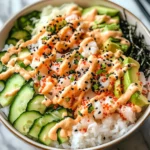
California Sushi Bowls are a delightful fusion of fresh flavors and vibrant colors, perfect for a quick weeknight dinner or a casual gathering. This dish brings the essence of traditional sushi into a bowl format, making it accessible and customizable to suit your taste. Tender imitation crab mingles with fluffy sushi rice, crisp cucumbers, and creamy avocado, all topped off with a zesty spicy mayo and crunchy nori. Enjoy the refreshing contrasts in every bite while creating an impressive meal that feels like a mini culinary getaway to the sunny beaches of California.
- Prep Time: 20 minutes
- Cook Time: 10 minutes
- Total Time: 30 minutes
- Yield: Serves 4
- Category: Dinner
- Method: Cooking
- Cuisine: Asian
Ingredients
- 1 1/2 cups dry Calrose sushi rice
- 2 cups water
- 1/4 cup seasoned rice vinegar
- 1/4 cup Japanese mayonnaise
- 2 teaspoons sriracha
- 8 oz imitation crab, chopped
- 1/2 cup diced English cucumber
- 1 large avocado, sliced
- Nori sheets (for garnish)
- Black and toasted sesame seeds (for garnish)
- Low-sodium soy sauce (for serving)
Instructions
- Rinse the sushi rice under cold water until the water runs clear. Transfer to a rice cooker with 2 cups of water and cook according to instructions.
- Once cooked, spread the rice on a baking sheet to cool. Drizzle with seasoned rice vinegar and gently fold using a paddle.
- In a small bowl, mix Japanese mayonnaise and sriracha to create the spicy mayo.
- Chop imitation crab into small pieces and dice the cucumber.
- Assemble the bowls by placing sushi rice as the base, followed by imitation crab, cucumber, and avocado slices.
- Drizzle with spicy mayo and top with crumbled nori and sesame seeds.
- Serve with low-sodium soy sauce on the side.
Nutrition
- Serving Size: 1 serving
- Calories: 380
- Sugar: 3g
- Sodium: 550mg
- Fat: 14g
- Saturated Fat: 2g
- Unsaturated Fat: 10g
- Trans Fat: 0g
- Carbohydrates: 52g
- Fiber: 5g
- Protein: 14g
- Cholesterol: 10mg