Salmon Croquettes Recipe
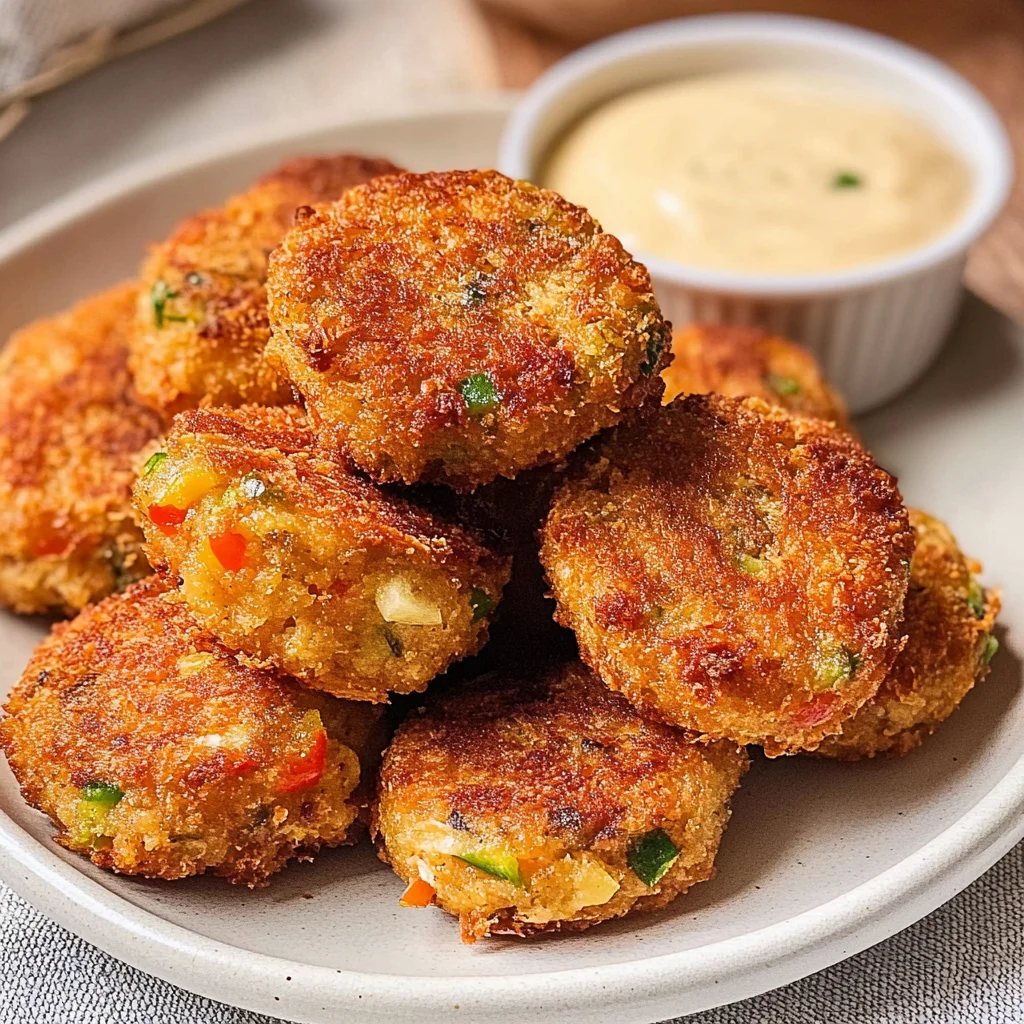
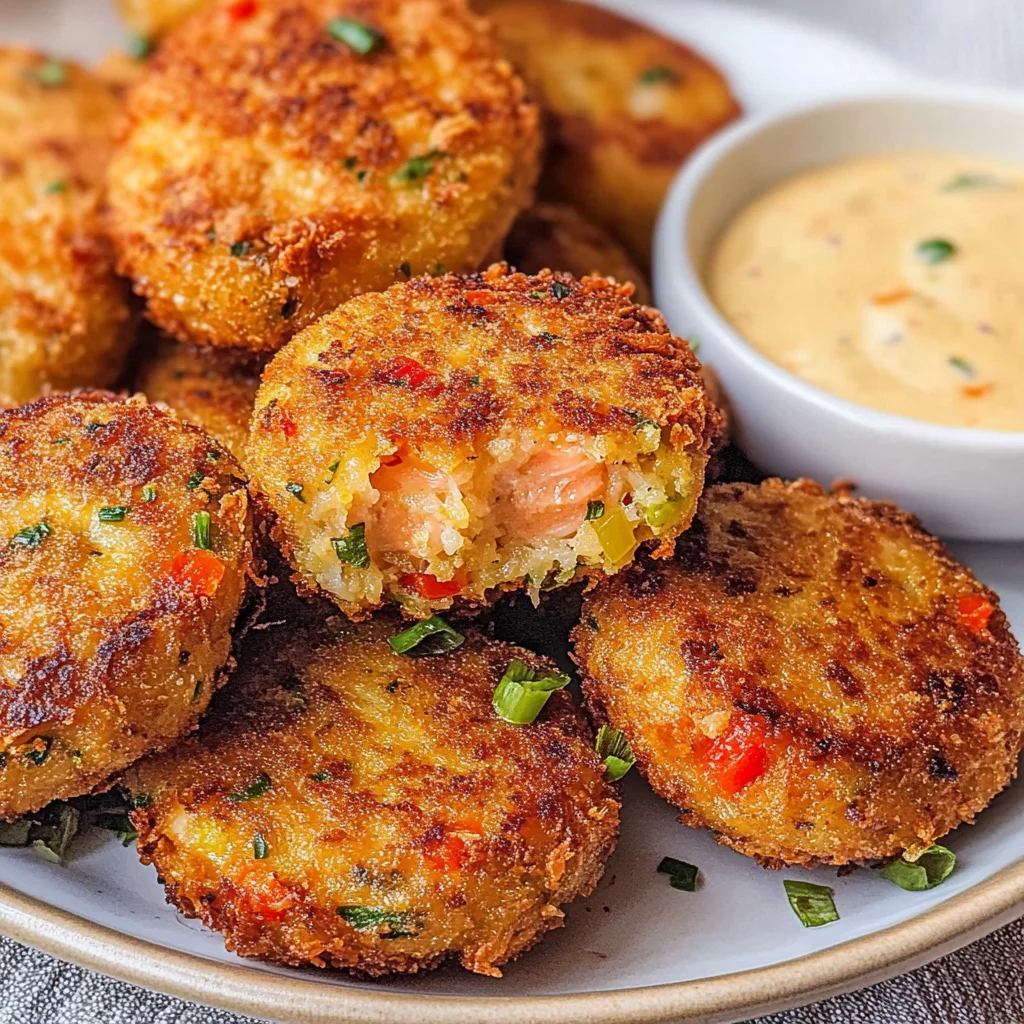
There’s a magic that happens in the kitchen when you cook with love, and I can’t help but feel that every time I whip up these delightful salmon croquettes. They aren’t just a meal; they are a warm embrace on a plate, a symphony of flavors that dances on your palate, bringing together the ocean’s bounty and the vibrant notes of fresh vegetables. Each bite is a revelation—a crispy exterior giving way to soft, flavorful salmon, punctuated by the crunch of bell peppers and the zing of cilantro. I promise you, this Salmon Croquettes Recipe is not only easy to make but also a gateway to comforting memories, whether you’re serving them as an appetizer at a gathering or as a cozy weeknight dinner.
What makes these croquettes truly special is their versatility and the sheer joy they bring to any table. They embody the spirit of innovation while respecting tradition—an ode to classic seafood dishes infused with fresh ingredients and exciting flavor combinations. Imagine sharing these with friends after a long day, their aromas wafting through your home, creating an atmosphere that’s warm and inviting. It’s moments like these that remind us food is more than just sustenance; it’s an experience that nourishes our souls.
Salmon Croquettes Recipe: A Crispy Delight for Every Occasion
Let’s embark on this culinary journey together! With just a handful of ingredients and some simple techniques, you’ll be able to create something absolutely wonderful. These salmon croquettes are not only packed with protein but are also incredibly satisfying for anyone who takes a bite. Whether you choose to bake or fry them, you’re in for a treat that will leave everyone asking for seconds.
Ingredients:
As we gather our ingredients for this delightful Salmon Croquettes Recipe, take a moment to appreciate each component’s role in creating those irresistible bites. From the main star—salmon—to the supporting cast of herbs and spices, each ingredient adds its own unique flair.
- 15 oz salmon flakes (or 3 cans of 5-oz canned salmon, drained and flaked). This is the heart of our dish! Freshly cooked salmon gives you more control over texture and taste, while canned salmon offers convenience without sacrificing flavor. With either option, look for high-quality fish that has been sourced sustainably; it makes all the difference in both taste and ethics. When flaking the salmon, aim for chunky pieces to add texture—you want those little surprises in every bite!
- ½ cup Panko breadcrumbs. These Japanese-style breadcrumbs are light and airy compared to regular breadcrumbs. Their unique structure allows for an extra crispy texture once cooked—something we all crave when biting into croquettes! If you can’t find Panko, regular breadcrumbs work too but won’t give quite the same crunch. Feel free to toast them lightly in olive oil beforehand to add even more flavor!
- ¼ cup all-purpose flour. This acts as a binder in our croquette mixture; it helps everything stick together without making them dense or heavy. The flour also contributes to the crispy crust when frying or baking. If you’re looking for gluten-free alternatives, almond flour or rice flour could work beautifully in this recipe too!
- ½ tsp garlic powder. Garlic powder brings depth and warmth to our croquettes without overpowering them—it’s like adding a secret handshake among friends! Consider using fresh minced garlic if that’s what you have on hand; just keep in mind it will alter the texture slightly.
- ½ tsp salt. This is essential because it enhances all other flavors present in our dish—think of it as food’s best friend! When measuring salt, especially if you’re using different varieties like kosher or sea salt, remember that their sizes can vary significantly.
- ¼ tsp black pepper. This little spice packs quite the punch! It not only adds heat but also complements the richness of salmon beautifully. Freshly ground black pepper will elevate your dish even further with its aromatic oils.
- ½ piece green bell pepper (cut into cubes) & ½ piece red bell pepper (cut into cubes). Not only do these vibrant veggies add color and crunch, but they also introduce sweetness and freshness into our croquettes—a delightful contrast against the rich salmon.
- 1 piece egg (lightly beaten). The egg acts as another binder while also enriching your croquettes with moisture and richness. Make sure it’s well-beaten before incorporating it; this allows it to blend evenly throughout the mixture.
- ¼ cup mayonnaise. Mayonnaise adds creaminess and moisture while also imparting subtle tanginess—think of it as liquid gold in this recipe! You could swap it out for Greek yogurt if you’re looking for something lighter without losing that creamy texture.
- 1 tbsp Worcestershire sauce. This savory sauce deepens flavors with its complex umami profile—it’s like adding an unexpected twist that elevates everything else! Just be mindful if you’re using low-sodium versions so you don’t lose out on that signature taste.
- ¼ cup cilantro (chopped). Fresh herbs brighten up any dish! Cilantro brings an herbaceous note that contrasts beautifully with the richness of salmon and complements other ingredients perfectly—don’t skip on this one! If cilantro isn’t your favorite herb (I get it!), parsley or green onions can serve as lovely substitutes.
- 1 tbsp olive oil. We’ll use this in frying or baking our croquettes depending on how you decide to prepare them! Olive oil not only adds richness but helps achieve that golden-brown crust we all love so much—just ensure you’re using good quality extra virgin olive oil for maximum flavor.
Now that we have everything ready, let’s talk about how we’ll bring these incredible flavors together!
Equipment You’ll Need:
Having the right tools can transform your cooking experience from ordinary to extraordinary! While ingredients are essential players in your Salmon Croquettes Recipe, your kitchen equipment acts as trusted partners in achieving perfection.
- Mixing Bowls – A set of mixing bowls is crucial for combining your ingredients effectively without making a mess! Look for bowls made from glass or stainless steel—they’re durable and easy to clean while allowing you to see how well your mixture comes together at every stage.
- Forks – Simple yet effective tools for flaking your salmon gently without turning it into mushy paste; two forks will help maintain those chunky pieces we talked about earlier!
- Measuring Cups & Spoons – Precision matters when crafting recipes that balance flavors perfectly; having reliable measuring cups and spoons ensures consistency every time you make these croquettes.
- Baking Sheet or Skillet – Depending on whether you’ll bake or fry your croquettes, having good non-stick options will make cleanup easier—and ensure nothing sticks during cooking!
- Food Processor (optional) – If you’re feeling ambitious or want an ultra-smooth mixture without any chunks at all, using a food processor can give excellent results—but remember not to over-process if you prefer some texture!
With our ingredients gathered and trusty tools at hand, let’s dive into preparing these scrumptious salmon croquettes step by step!
Step 1: Mise en Place – The Foundation of Great Cooking
The first step might seem simple but trust me—it sets everything else up for success! Begin by gathering all your ingredients together on your countertop along with measuring cups and spoons at arm’s reach; this practice is called mise en place—a French term meaning everything in its place. By pre-measuring everything before diving into cooking, you’ll avoid frantic searches through cluttered cabinets mid-recipe (and believe me—that can throw off even seasoned cooks!). This calm preparation allows creativity to flourish instead of chaos taking center stage.
Step 2: Flake the Salmon – Careful Handling Matters
Now comes one of my favorite parts: flaking that beautiful salmon! If you’ve opted for fresh fish rather than canned varieties—which I totally recommend if available—make sure it’s fully cooked through before letting it cool slightly so it’s comfortable enough to handle easily later on! Using two forks gently pull apart chunks from either side—the goal here is maintaining some texture while breaking up larger pieces into manageable bits along with removing any skin or bones if needed from canned options beforehand too—just take care not to overwork it because doing so could lead us down a slippery path toward mushy croquettes (yikes!).
Step 3: Combine Dry Ingredients – The Binding Elements
In another large bowl (or perhaps even back into one used earlier), whisk together those Panko breadcrumbs along with all-purpose flour until they’re well combined—this step ensures every single bite maintains cohesion when cooking later down the line! Remember: we want each ingredient evenly distributed throughout our mixture so no surprises pop up unexpectedly during cooking time!
Step 4: Mix Wet Ingredients – Flavor Explosion!
Now let’s move onto mixing those wet constituents together which layer flavor upon flavor within our final creation—grab another bowl where you’ll combine flaked salmon alongside mayo along with Worcestershire sauce plus chopped vegetables including both bell peppers first followed closely by herbs seasonings such as garlic powder plus beaten egg until it’s thoroughly integrated throughout everything else present inside there too—you’ll notice how fragrant this begins smelling almost immediately after mixing starts happening already!
This process can seem lengthy at first glance yet trust me—it really pays off once everything melds beautifully later down road once cooked properly! Don’t forget about checking consistency here though since too much moisture may require further adjustments via adding extra breadcrumbs gradually until ideal moisture level achieved before moving forward beyond this stage altogether…
Keep going strong—you’re doing fantastic so far as we delve deeper into making these morsels come alive soon enough ahead…
Step 5: Gently Marrying Flavors
Now that you have your wet and dry ingredients prepped, it’s time for the magic to happen! Gently fold the wet mixture into the dry ingredients using a spatula or wooden spoon. This step may seem simple, but trust me, it is absolutely paramount to achieving the perfect texture for your salmon croquettes. You want to combine them just enough to bring everything together without overworking the mixture. Over-mixing can lead to tough croquettes, which we absolutely don’t want! Instead, aim for a harmonious blend where you can still see flecks of colorful bell peppers and herbs throughout—this not only looks beautiful but promises an explosion of flavors in every bite.
As you fold, pay close attention to the moisture level of your mixture; it should be moist enough to hold together when formed into patties but not so wet that it falls apart in your hands. If it feels too loose, sprinkle in more breadcrumbs a tablespoon at a time until you reach that perfect consistency—a bit like molding clay! Remember, this balance is what will give your croquettes that delightful crisp on the outside while remaining tender and flaky on the inside. So take your time here—don’t rush this step. I promise you, the results will be worth it!
Step 6: Chill Out (But Not Too Much!)
Ah, chilling—the underrated hero of many recipes! While this step might seem optional, I highly encourage you to embrace it wholeheartedly. Once you’ve combined your salmon mixture, cover it with plastic wrap or transfer it into an airtight container and pop it in the refrigerator for about 15-20 minutes. What does this do? Well, allowing the mixture to chill helps firm up the ingredients and allows those vibrant flavors to meld beautifully together, enhancing every bite of your salmon croquettes.
Think of chilling as giving your ingredients a moment to get acquainted; when they mingle in cooler temperatures, they create a stronger bond that translates into better texture during cooking. Additionally, cold mixtures tend to hold their shape much better when they hit hot oil or baking sheets—no one wants their delicious creations falling apart! So set a timer and enjoy a brief moment of peace as you anticipate those crispy wonders coming out of your kitchen.
Step 7: Shaping Your Croquettes
Here comes one of my favorite parts—shaping those little flavor bombs! Lightly wet your hands with water; this little trick prevents the mixture from sticking all over you and makes forming these lovely bites so much easier. Now scoop out about a generous tablespoon of the chilled salmon mixture and gently roll it into a ball or form a slightly flattened patty. Pay attention to size; aim for uniformity so they cook evenly—think golf ball size for round ones or small burgers for patties!
This shaping technique is crucial because how you form these croquettes directly affects how they cook. A compact yet tender patty will ensure they fry up beautifully golden brown on the outside while remaining moist on the inside—a perfect contrast that makes each bite utterly intoxicating. As you’re working through all your mixture, don’t forget that patience is key here; if some are slightly bigger than others, that’s okay—just keep an eye on them while cooking so everything gets done around the same time!
Step 8: Cooking Your Salmon Croquettes
Finally, we come to the exhilarating moment—the actual cooking! You have two options here: frying or baking. Let’s talk about frying first because there’s something magical about hearing that sizzle as croquettes meet hot oil—it’s like music in my kitchen! In a large skillet over medium heat, add about 2 tablespoons of olive oil; watch as it heats up until shimmering like liquid gold. Carefully place each shaped croquette into the pan without overcrowding them; giving them space allows for proper browning and ensures they won’t stick together.
Fry them for about 3-4 minutes on each side or until they’re beautifully golden brown—your kitchen will fill with an aroma that’s simply irresistible! Keep an eye on them; if they’re browning too quickly, lower that heat just a notch! It’s essential not to rush this part; letting them develop that deep color adds layers of flavor and crunchiness we all crave in good comfort food. Once done, transfer them onto paper towels to absorb any excess oil while keeping them warm in an oven set at low heat if you’re cooking in batches.
Final Touches: Plating Your Masterpiece
Now that your salmon croquettes are perfectly golden and crispy, let’s talk presentation because we eat with our eyes first! Arrange these delightful morsels on a platter lined with fresh greens like arugula or baby spinach for a pop of color—plus they add a lovely peppery bite that complements the richness of the croquettes beautifully. Consider serving them alongside a zesty dipping sauce made from mayo mixed with lemon juice and chopped capers or even some sweet chili sauce for an extra kick; either way, these sauces elevate every mouthful into something truly extraordinary.
As you gather around with family or friends for what I promise will be an unforgettable meal experience, take a moment to soak in their reactions when they taste these luscious bites—the smiles and satisfaction say it all. You’ve created more than just food here; you’ve crafted memories filled with warmth and joy! And remember: sharing food is sharing love—so dig in together and relish every morsel!
I can’t wait for you to try this salmon croquettes recipe! Please let me know how yours turn out—I’d love to hear all about your culinary adventures!
Storage and Enjoyment Tips for Your Salmon Croquettes Recipe
Now that you’ve journeyed through the steps of crafting these delightful salmon croquettes, it’s time to savor the fruits of your labor! Imagine the crispy exterior giving way to a tender, flavorful center that bursts with the essence of fresh herbs and spices. What’s even better is knowing how to keep these treasures fresh for later enjoyment. Whether you’ve made a big batch or just have a few leftover, I’m here to guide you in preserving that deliciousness!
Storing Leftover Salmon Croquettes Recipe
To store your leftover salmon croquettes, you’ll want to use an airtight container to prevent them from drying out or absorbing any unwanted odors from your fridge. Placing a slice of bread inside the container can also work wonders; it helps maintain moisture while adding a touch of softness to the croquettes. When stored properly in the refrigerator, they can last up to three days. However, I promise you, they won’t last long because their flavor is simply too enticing! Even after some time in the fridge, they hold onto that delightful crunch and savory taste. For reheating, pop them back in an oven preheated to 350°F (175°C) for about 10 minutes until they’re heated through and regain their crispy exterior – trust me on this; it’s as if they’ve just been made fresh!
Freezing Salmon Croquettes for Later
If you want to prepare ahead and enjoy these scrumptious salmon croquettes at your convenience, freezing them is an excellent option! Simply arrange your formed croquettes on a baking sheet lined with parchment paper and freeze them until solid before transferring them into a freezer-safe bag or container. This method helps prevent them from sticking together. Properly frozen, they can stay good for up to three months—perfect for those busy weeknights when you crave something comforting and quick! To use from frozen, just take out however many you need and cook them straight from the freezer—no thawing necessary! You’ll be amazed at how convenient this option is; it’s like having little gourmet bites waiting for you whenever hunger strikes!
Salmon Croquettes Recipe

Indulge in the delightful flavors of our Salmon Croquettes Recipe—a crispy sensation that brings together tender salmon, vibrant bell peppers, and fresh herbs in every bite. These savory bites are perfect as an appetizer for gatherings or a comforting weeknight dinner. With their golden exterior and moist interior, these croquettes promise to be a hit among family and friends alike. Plus, they’re easy to make with just a handful of ingredients! Whether you choose to fry or bake them, you’ll create a dish that not only satisfies your taste buds but also fills your home with mouthwatering aromas. Get ready to impress with this scrumptious seafood treat!
- Prep Time: 20 minutes
- Cook Time: 20 minutes
- Total Time: 40 minutes
- Yield: Approximately 12 servings 1x
- Category: Main
- Method: Frying/Baking
- Cuisine: Seafood
Ingredients
- 15 oz salmon flakes (or 3 cans of 5-oz canned salmon, drained and flaked)
- ½ cup Panko breadcrumbs
- ¼ cup all-purpose flour
- ½ tsp garlic powder
- ½ tsp salt
- ¼ tsp black pepper
- ½ green bell pepper (diced)
- ½ red bell pepper (diced)
- 1 egg (lightly beaten)
- ¼ cup mayonnaise
- 1 tbsp Worcestershire sauce
- ¼ cup cilantro (chopped)
- Olive oil for frying/baking
Instructions
- In a large bowl, combine the flaked salmon, mayonnaise, Worcestershire sauce, diced bell peppers, cilantro, garlic powder, salt, black pepper, and beaten egg.
- In another bowl, mix the Panko breadcrumbs and all-purpose flour.
- Gently fold the wet mixture into the dry ingredients until just combined; adjust moisture with extra breadcrumbs if needed.
- Chill the mixture for 15-20 minutes in the refrigerator.
- Form the mixture into evenly sized patties.
- Heat olive oil in a skillet over medium heat or preheat your oven to 375°F (190°C) for baking.
- Fry each croquette for about 3-4 minutes on each side until golden brown or bake for approximately 20 minutes until crispy.
Nutrition
- Serving Size: 1 croquette (45g)
- Calories: 115
- Sugar: 0g
- Sodium: 230mg
- Fat: 6g
- Saturated Fat: 1g
- Unsaturated Fat: 4g
- Trans Fat: 0g
- Carbohydrates: 8g
- Fiber: 1g
- Protein: 7g
- Cholesterol: 25mg