Amazing Tuna and White Bean Salad: 1 Simple Trick for Healthy Joy
There’s something profoundly satisfying about a meal that comes together in mere minutes, yet tastes like it took hours of careful preparation. This Amazing Tuna and White Bean Salad: 1 Simple Trick for Healthy Joy is just that—a delightful revelation that bridges the gap between convenience and flavor. Imagine sitting down to a dish that sings of bright Mediterranean flavors, where the creamy cannellini beans mingle harmoniously with the tender, flaky tuna, all brought to life by a fresh lemon vinaigrette. Each bite is an invitation to savor the moment, an experience that transcends mere sustenance; it’s a celebration of everything good about food—comfort, simplicity, and joy.
This salad isn’t just a quick fix; it’s an embodiment of what healthy eating can be—accessible, vibrant, and utterly delicious. I’ve always been captivated by meals that rely on pantry staples yet deliver an exhilarating punch of flavor. This salad takes those humble ingredients—tuna and white beans—and transforms them into something that feels special without requiring hours in the kitchen. Whether you’re preparing it for a light lunch or serving it up as part of a more elaborate dinner spread, trust me when I say this dish will leave you feeling nourished in body and spirit.
Amazing Tuna and White Bean Salad: 1 Simple Trick for Healthy Joy
This recipe is one of those gems you’ll want to keep close at hand for busy weeknights or lazy weekends alike. It reflects my belief that healthy food doesn’t have to compromise on taste or excitement. The combination of fresh ingredients and simple techniques creates a truly remarkable dish that will make your taste buds dance with joy.
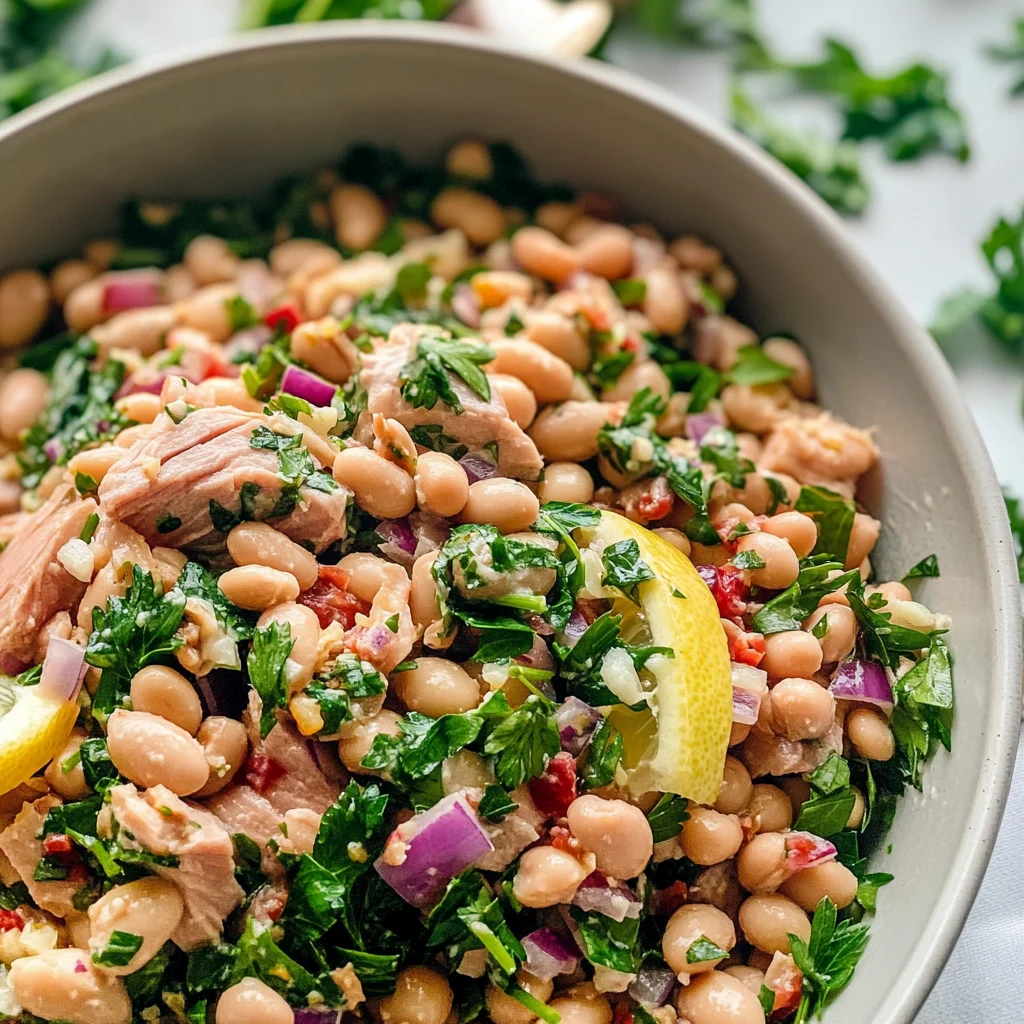
Ingredients:
As we embark on this culinary journey together, let’s take a moment to appreciate each ingredient’s unique role in crafting this incredible salad. Each component contributes not just flavor but also texture and nutrition, creating a well-rounded dish that you’ll return to time and again.
- 2 (5 ounce) cans tuna in olive oil, drained. Tuna packed in olive oil is my go-to choice for its rich flavor profile and moist texture. The oil not only enhances the taste but also provides healthy fats essential for our bodies. When selecting your tuna, opt for brands that use sustainably sourced fish—this ensures not only quality but also supports responsible fishing practices. Remember, high-quality tuna will elevate your salad from good to unforgettable!
- 1 (15 ounce) can cannellini beans, rinsed and drained. Cannellini beans are creamy yet firm, offering a delightful contrast to the tender tuna. Their mild flavor allows them to absorb the zesty vinaigrette beautifully while contributing protein and fiber to keep you feeling satisfied longer. Rinsing them is essential; it eliminates excess sodium from the canning process and prevents any residual starchy liquid from making your salad mushy.
- 1/2 cup chopped red onion. Red onions lend a lovely crunch along with their slightly sweet yet sharp flavor, which balances perfectly with the other ingredients. Their vivid color adds visual appeal too! When chopping onions, don’t rush—it’s worth taking your time to get even pieces so they distribute evenly throughout the salad. If raw onion feels too potent for you, consider soaking them in cold water for about 10 minutes before adding them to mellow their bite.
- 1/4 cup chopped fresh parsley. Fresh parsley isn’t just a garnish; it brightens up this salad like nothing else! Its herbaceous notes bring freshness that cuts through the richness of tuna while providing vital nutrients like vitamin K and antioxidants. Always choose vibrant green leaves without any wilting or browning—it speaks volumes about its freshness! Chopping parsley finely allows its flavor to disperse evenly throughout your dish.
- 2 tablespoons fresh lemon juice. Freshly squeezed lemon juice adds an invigorating brightness that’s absolutely crucial here—the acidity lifts all other flavors while bringing harmony to the dish. Bottled lemon juice simply won’t do; I promise you’ll notice the difference with fresh juice! When juicing lemons, roll them firmly on your countertop first; this helps release more juice than if you squeeze them right away.
- 3 tablespoons extra virgin olive oil. Extra virgin olive oil is liquid gold—the quality matters immensely! It should have a robust flavor profile with hints of fruitiness or pepperiness depending on its origin. This ingredient not only enriches our vinaigrette but acts as a carrier for fat-soluble vitamins present in our veggies! Feel free to experiment with different varieties as they can add unique characteristics to your final dish.
- 1 teaspoon Dijon mustard. Dijon mustard adds depth and complexity that ties all flavors together seamlessly while providing just enough tanginess without overpowering other components. It’s important because it acts as an emulsifier in our vinaigrette—helping oil and acid blend beautifully rather than separating into layers.
- 1/2 teaspoon dried oregano. Dried oregano brings warmth and earthiness reminiscent of sunny Mediterranean afternoons—just a pinch infuses our salad with aromatic goodness! If you have fresh oregano on hand, feel free to use it instead; just remember that fresh herbs are generally more potent than their dried counterparts—so adjust accordingly!
- Salt and black pepper to taste. Seasoning is non-negotiable in any cooking venture; it elevates flavors from mundane to extraordinary! Start lightly seasoned—instead of overwhelming your dish at once—gradually adjust according to preference as you toss everything together until perfect harmony is reached.
Equipment You’ll Need:
Cooking becomes such an enjoyable experience when you have the right tools by your side! While ingredients are obviously essential players in this recipe’s success story, having dependable equipment makes all the difference during preparation—and trust me when I say these tools will be your best friends!
- Large mixing bowl – A sturdy mixing bowl provides ample space needed for flaking tuna without making too much mess while allowing room for tossing ingredients later on too! Look for one made from glass or stainless steel; they’re easy-to-clean options that resist odors over time.
- Small mixing bowl – You’ll need another smaller bowl specifically reserved for whisking together our luscious vinaigrette components without worrying about spilling anything overboard!
- Fork – A simple fork works wonders when flaking tuna apart gently—this technique prevents large clumps from forming while maintaining texture throughout every bite!
- Chef’s knife & cutting board – A sharp chef’s knife paired with a reliable cutting board ensures precision when chopping vegetables like onions or parsley into uniform pieces necessary for even distribution within our salad masterpiece!
- Whisk – This tool proves indispensable during vinaigrette-making since whisking incorporates air efficiently into oils helping emulsify beautifully alongside other liquids—giving us smooth consistency crucial before pouring onto salads later on!
Preparing the Amazing Tuna and White Bean Salad: 1 Simple Trick for Healthy Joy
Step 1: Flake That Tuna!
Start by opening those cans of tuna packed in rich olive oil—oh my goodness! Let me tell you how intoxicating this aroma is going to be once you drain them properly—you’ll feel like you’ve stepped inside an Italian kitchen bustling with love! Using a fork here is key; gently flake apart chunks until they’re broken down into smaller pieces without becoming mushy—it’s this texture contrast we’re aiming for.
Step 2: Combine Your Beans & Aromatics
Next up? Add those beautiful cannellini beans into your large mixing bowl along with finely chopped red onion and fresh parsley straight off their stems! Trust me when I say this combination brings vibrancy both visually AND flavor-wise—you want every ingredient working harmoniously together so take care while stirring gently at first until everything has mingled delightfully!
Step 3: Whip Up Your Vinaigrette
While you’re blending these wonderful ingredients, let’s turn our attention towards creating an irresistible vinaigrette using another small mixing bowl! Whisk together freshly squeezed lemon juice along with extra virgin olive oil followed by Dijon mustard & dried oregano until fully combined—the texture should become silky smooth as air gets incorporated through vigorous whisking action (this process known as emulsification). Do not skip out here folks; skipping proper emulsifying means losing out on amazing cohesion between flavors!
Step 4: Dress It All Up
Now comes one of my favorite moments—the dressing stage where we pour our luscious vinaigrette over this glorious mixture waiting patiently in its bowl…Every drop counts here folks so make sure every last bit finds its way onto those delightful morsels resting below! Gently fold everything together ensuring even coverage across every single piece—it should look like springtime bursting forth right before your eyes!
And there you have it—the first few steps toward creating something utterly magnificent out of pantry staples transformed into pure joy served atop plates ready-for-action ahead of lunchtime gatherings or cozy dinners alike! You’re well on track now toward relishing all these incredible flavors coming together effortlessly—I can’t wait for you to take that first bite!
Step 5: The Art of Whisking Your Vinaigrette
Now, let’s bring our salad to life with a vibrant lemon vinaigrette that will serve as the exquisite dressing for this Amazing Tuna and White Bean Salad. In a small bowl, you’ll want to whisk together the fresh lemon juice, which brings that zesty brightness, with three tablespoons of extra virgin olive oil. This liquid gold is not only delicious but also provides those heart-healthy fats we all adore. The key here is to create an emulsion, which is a fancy culinary term for mixing two liquids that don’t naturally combine—like water and oil—into a harmonious blend. As you whisk, you’ll notice the oil slowly integrates with the lemon juice, creating a creamy texture that beautifully coats the ingredients later on.
Trust me on this: taking the time to properly emulsify your vinaigrette makes all the difference in how the flavors meld together in our salad. You might even want to consider adding a teaspoon of Dijon mustard at this stage. It acts as an emulsifier, enhancing both the flavor and the consistency of your dressing while imparting an added layer of complexity that’s utterly intoxicating. As you whisk vigorously, watch for those tiny bubbles forming—the sign that your vinaigrette is becoming one cohesive unit! It’s truly a symphony of flavors waiting to grace your salad. A pinch of dried oregano completes this mixture and adds an aromatic depth that echoes Mediterranean vibes; you’ll want to close your eyes and imagine yourself dining al fresco under a sun-drenched sky.
Step 6: Uniting Flavors in Harmony
Now comes one of my favorite moments—the joyful act of combining our vibrant ingredients! In that large bowl where we flaked our tuna (remember how satisfying it felt?), it’s time to add in our rinsed and drained cannellini beans, chopped red onion, and fresh parsley. The beans are like little nuggets of creaminess that balance out the flakiness of tuna while providing an additional protein punch! Make sure they’re well-drained; excess moisture can dilute your glorious vinaigrette later on. The red onion offers a sharp bite that contrasts beautifully with the smoothness of both the tuna and beans, while freshly chopped parsley adds not just color but a refreshing herbaceous note that brightens everything up.
Gently toss these ingredients together with your hands or two forks—this isn’t about brute force; it’s about love! You want each bean, piece of tuna, and morsel of onion to be lovingly coated by the upcoming dressing without mashing them into oblivion. This step is vital; it allows all those textures to intermingle before we add their flavor partner—the vinaigrette. Can you smell those wonderful aromas already? It’s like a prelude to what’s about to become something truly extraordinary!
Step 7: Dressing with Care
Once you’ve got your salad base ready—a beautiful medley full of promise—it’s time for that luscious vinaigrette we whisked up earlier. Pour it over your tuna and bean mixture slowly; I recommend doing this in stages so you can gauge how much dressing you really want on there. Start with half of what you made; remember, you can always add more but can’t take away if it becomes too soggy! This moment is crucial because every ingredient needs its fair share of dressing for maximum flavor absorption.
As you gently toss everything again—oh-so-carefully so as not to break up those delicate beans—you’ll see how they soak up that zesty goodness like little sponges. You’re creating layers upon layers of flavor here; each bite will be a perfectly balanced explosion of taste when you’re done. Don’t rush this step! Take a moment to revel in what you’ve created so far—the colors alone are enough to make anyone excited about eating healthy! Taste it at this stage; adjust seasoning if needed by adding more salt or pepper according to your preference.
Step 8: Patience is Key – Chilling Time
Now here comes one last crucial step before diving into this Amazing Tuna and White Bean Salad: chilling! While you could certainly enjoy it immediately—especially if you’re short on time—I wholeheartedly encourage you to let it rest in the refrigerator for at least 30 minutes if possible. Why chill? Well, during this resting period, all those beautiful flavors have time to meld together in ways that simply cannot be rushed. Imagine letting them steep like tea leaves in hot water; that’s exactly what’s happening here!
As the salad cools down, you’ll find that those robust flavors intensify and harmonize into something profoundly satisfying. If you have time, allow it to chill for an hour or even longer; trust me when I say it’s worth every minute! When you’re ready to serve after chilling, give everything another gentle toss just before plating or serving it up family-style in a large bowl—this ensures any settled ingredients get redistributed beautifully across each serving.
Final Touches
Step 9: Serving Up Happiness
And now we arrive at perhaps my favorite part—the serving! This Amazing Tuna and White Bean Salad isn’t just food; it’s an experience filled with joy and nourishment waiting to unfold at your table. Whether you’re scooping generous portions onto plates or serving from a beautiful bowl at your next gathering, I promise you will feel proud presenting such wholesome goodness made from simple pantry staples.
Consider garnishing with an extra sprinkle of fresh parsley or even some grated lemon zest atop for an added pop of color right before serving—it elevates this dish from delightful home-cooking into something special fit for any occasion! As everyone takes their first forkfuls, watch their faces light up with surprise at just how flavorful something so easy can be! Remember: good food nourishes not only our bodies but also our souls—enjoy every bite knowing you’ve created something remarkable.
So grab some forks and dig into this healthy joy—you deserve it!
Storage and Enjoyment Tips for Your Amazing Tuna and White Bean Salad: 1 Simple Trick for Healthy Joy
Now that you’ve crafted this vibrant dish bursting with flavors, it’s time to talk about how to keep that joy alive for meals to come! This Amazing Tuna and White Bean Salad is not just a delightful instant treat; it’s also incredibly eager to be enjoyed later. Whether you’re packing leftovers for lunch or planning a quick dinner on a busy weeknight, knowing how to store this salad properly can elevate your experience even further. Trust me, the freshness and zing of this salad can last longer than you might think!
Storing Leftover Amazing Tuna and White Bean Salad: 1 Simple Trick for Healthy Joy
To preserve the brightness of your tuna and white bean salad, opt for an airtight container—this is absolutely paramount to maintaining its flavor integrity. If possible, choose glass containers as they don’t retain odors like plastic can over time. You can store the salad in the fridge for up to three days, but I promise you, its best days are within the first two! To keep things fresh, consider placing a paper towel inside the container; this little trick absorbs excess moisture that could make your salad soggy. When you take a bite after chilling, you’ll still experience those lovely textures—the creamy beans mingling with the tender tuna and crunchy onions will still dance on your palate as if they were prepared just moments ago. Serving suggestions? Enjoy it cold straight from the fridge or let it sit at room temperature for about 15 minutes before diving in again.
Freezing Tuna Salad for Later
If you find yourself with more than you can handle (which is often a delightful problem!), consider freezing portions of your Amazing Tuna and White Bean Salad, but with a little twist—only freeze the components separately! The beans and tuna freeze well on their own; simply place them in freezer-safe bags or containers with all the air pressed out. They’ll thrive in your freezer for about three months. When you’re ready to enjoy them again, simply thaw them overnight in the fridge or use a microwave on low power. Recombine with fresh parsley and vinaigrette right before serving; it will feel like an exciting reunion of flavors! This technique not only maximizes convenience but also ensures that when you’re ready to indulge again, each component will taste as vibrant and delightful as when you first made it.
Amazing Tuna and White Bean Salad: 1 Simple Trick for Healthy Joy
Experience the delightful fusion of flavors with this Amazing Tuna and White Bean Salad: 1 Simple Trick for Healthy Joy. This vibrant dish is a perfect blend of tender tuna and creamy cannellini beans, elevated by a zesty lemon vinaigrette. In just minutes, you can prepare a meal that’s not only quick but also packed with nutrition, making it ideal for light lunches or as a fresh side at dinner gatherings. With its Mediterranean flair, this salad celebrates simplicity and taste, proving that healthy eating can be both satisfying and enjoyable.
- Prep Time: 10 minutes
- Cook Time: 0 minutes
- Total Time: 10 minutes
- Yield: Serves 4
- Category: Salad
- Method: No cooking required
- Cuisine: Mediterranean
Ingredients
- 2 (5 ounce) cans tuna in olive oil, drained
- 1 (15 ounce) can cannellini beans, rinsed and drained
- 1/2 cup chopped red onion
- 1/4 cup chopped fresh parsley
- 2 tablespoons fresh lemon juice
- 3 tablespoons extra virgin olive oil
- 1 teaspoon Dijon mustard
- 1/2 teaspoon dried oregano
- Salt and black pepper to taste
Instructions
- Flake the drained tuna into a large mixing bowl using a fork.
- Add the rinsed cannellini beans, chopped red onion, and parsley to the bowl.
- In a separate small bowl, whisk together lemon juice, olive oil, Dijon mustard, and oregano until emulsified.
- Pour the vinaigrette over the salad ingredients and gently mix until everything is evenly coated.
- Season with salt and pepper to taste.
- For best results, let it chill in the refrigerator for at least 30 minutes before serving.
Nutrition
- Serving Size: 1 cup (240g)
- Calories: 272
- Sugar: 3g
- Sodium: 380mg
- Fat: 15g
- Saturated Fat: 2g
- Unsaturated Fat: 12g
- Trans Fat: 0g
- Carbohydrates: 19g
- Fiber: 6g
- Protein: 18g
- Cholesterol: 25mg