Salted Caramel Brown Sugar Pop Tart Cookie Bars
There’s something profoundly magical about baking that transcends mere nourishment; it’s a tapestry woven with memories, emotions, and the essence of home. As I think back to my childhood kitchen, I can almost feel the warmth radiating from the oven and smell the sweet aroma of cookies baking. This Salted Caramel Brown Sugar Pop Tart Cookie Bars recipe encapsulates that nostalgia and excitement, turning simple ingredients into a symphony of flavors that brings everyone together. With a crispy top layer that shatters beautifully upon your first bite, a gooey caramel center that oozes joy, and a cinnamon glaze that dances on your palate, these bars are more than a treat; they’re an experience waiting to unfold.
Imagine gathering your loved ones around a cozy table, sharing stories while savoring each bite of these decadent bars. The combination of sweet and salty is utterly intoxicating—each morsel transports you to a place where comfort meets indulgence. These Salted Caramel Brown Sugar Pop Tart Cookie Bars are perfect for any occasion: family gatherings, celebrations, or even just as a delightful pick-me-up during a busy week. Trust me when I say this recipe will become a cherished favorite in your home, as it has in mine.
Salted Caramel Brown Sugar Pop Tart Cookie Bars: A Delightful Twist on Tradition
Let’s embark on this delicious adventure together! These bars are not just another dessert; they’re about creating memories and sharing joy through food. The process is simple yet rewarding, ensuring that you’ll want to return to this recipe again and again. So grab your apron, preheat your oven, and let’s dive into making these luscious treats!
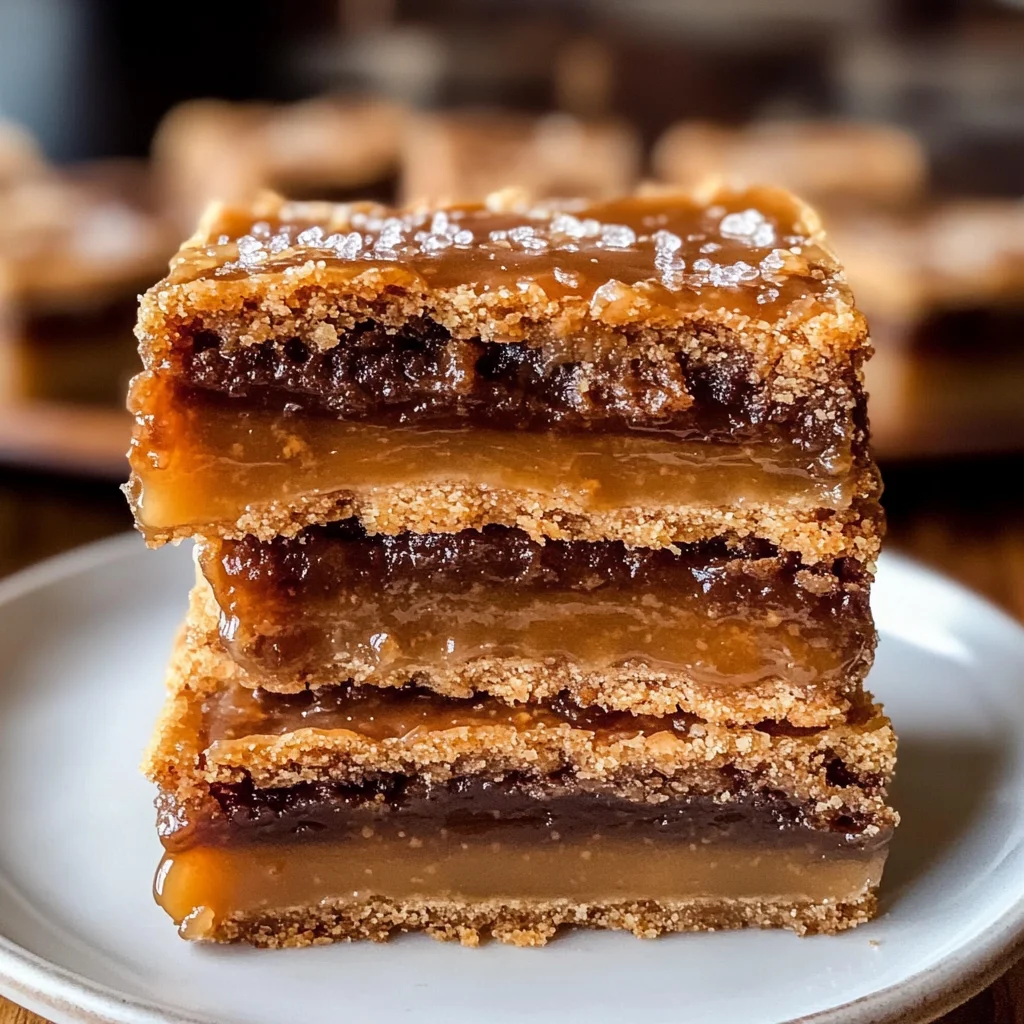
Ingredients:
As we prepare our Salted Caramel Brown Sugar Pop Tart Cookie Bars, each ingredient plays a pivotal role in crafting something truly spectacular. Each component is not merely an addition but rather an essential piece of the puzzle that creates this delectable treat.
- 1 cup (2 sticks or 226g) unsalted butter, softened to room temperature. This is crucial for creaming properly and creating that light, airy texture we’re aiming for in our Salted Caramel Brown Sugar Pop Tart Cookie Bars. If your butter is too cold, it won’t cream effectively; if it’s melted, your bars will spread too much during baking. Opt for high-quality butter—think European-style with its higher fat content—which will enrich the flavor and give you those indulgent results we all crave.
- 1.5 cups packed light brown sugar. The star of our show! This sugar brings not only sweetness but also moisture and depth thanks to its molasses content. It contributes to that beautiful chewiness we adore in cookie bars while imparting a hint of caramel flavor that harmonizes wonderfully with our salted caramel sauce.
- 0.5 cup granulated sugar. While brown sugar steals the spotlight for moisture and flavor complexity, granulated sugar adds essential sweetness without overpowering the other flavors. It helps create those lovely edges on our cookie bars that contrast beautifully against the soft center.
- 2 large eggs, room temperature. Eggs are vital here for binding everything together while adding richness to our mixture. Using room temperature eggs ensures they incorporate seamlessly into the batter—no one wants clumps of cold egg interrupting their silky dough!
- 2.5 cups all-purpose flour. Flour acts as the backbone of our bars—it provides structure while allowing them to hold their shape during baking. For best results, use flour that’s been freshly opened; older flour can lose some of its effectiveness due to moisture absorption over time.
- 1 tsp baking soda. This leavening agent is responsible for giving our cookie bars their lift! It reacts with acidity in other ingredients (like brown sugar) to produce carbon dioxide bubbles which help create those tender crumb textures we love so much.
- 0.5 tsp salt. A non-negotiable ingredient! Salt enhances all flavors present in the dish—without it, everything can taste flat or one-dimensional. In this recipe specifically, it balances out the sweetness beautifully while highlighting the rich notes from our caramel sauce.
- 1 tsp vanilla extract. Vanilla elevates every dessert by adding warmth and depth; it’s like that comforting hug you didn’t know you needed! Always opt for pure vanilla extract over imitation for genuine flavor; it makes all the difference.
- 1 cup store-bought or homemade salted caramel sauce. Here lies liquid gold! High-quality caramel adds sweetness but also complexities such as buttery notes and slight bitterness from cooking sugar until golden brown—it’s simply divine when paired with our dessert bars.
- Sea salt flakes for sprinkling (to taste). A sprinkle of flaky sea salt right before serving heightens everything about these cookie bars—it’s an unexpected burst of flavor that takes them from delicious to extraordinary!
- 1 cup powdered sugar. Used in our cinnamon glaze later on, powdered sugar adds sweetness without affecting consistency too much—it dissolves easily giving us that smooth finish we desire atop our treats.
- 2 tbsp whole milk or cream (your choice!). Milk adds moisture while ensuring our glaze reaches just the right consistency—not too runny or thick—and enhances its richness overall!
- 1 tsp ground cinnamon. Ahh—the spice of life! Cinnamon introduces warmth and familiarity to our glaze which complements both sweet elements perfectly while enhancing flavor profiles across each bar.
- 0.5 tsp vanilla extract (for glaze). Just like before—this touches everything off nicely leaving behind subtle layers of aromatic bliss!
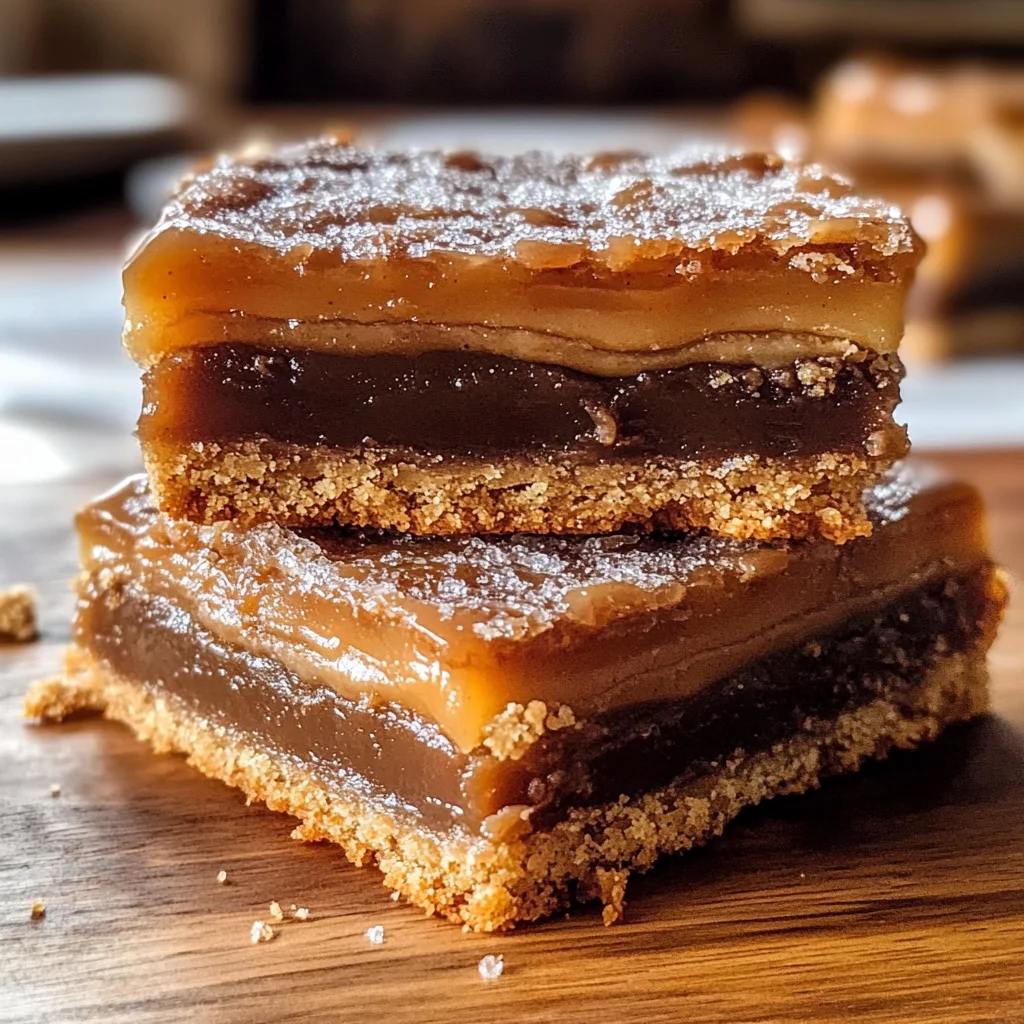
Equipment You’ll Need:
Before diving into creating these delightful cookie bars, let’s gather some essential tools that’ll make your baking venture smooth sailing! While ingredients bring flavor and texture to life, having the right equipment makes all the difference between okay results and jaw-dropping success!
- Mixing bowls: A good set of mixing bowls will allow you to blend ingredients efficiently without worrying about spills or messes along the way! Opt for glass or stainless steel—both are durable options ideal for any baking project.
- Electric mixer (or whisk): For creaming butter and sugars together smoothly, an electric mixer cuts down on time significantly—but don’t fret if you don’t have one! A sturdy whisk works wonders too—it just requires more elbow grease!
- Measuring cups & spoons: Precision matters in baking—ensure your measuring implements are accurate so each ingredient shines through perfectly! Investing in quality dry measuring cups alongside liquid ones makes life easier when dealing with various ingredient types!
- Spatula: A flexible spatula will come handy throughout this process—from scraping down bowl sides during mixing sessions to spreading gooey caramel evenly within layers! Choose one made from silicone as it withstands heat better than plastic counterparts while ensuring delicate surfaces remain unscathed during use.
Now that we’ve gathered all necessary equipment along with key ingredients—you’re ready to embark on your culinary journey toward making these heavenly Salted Caramel Brown Sugar Pop Tart Cookie Bars!
Preparing the Salted Caramel Brown Sugar Pop Tart Cookie Bars
Step 1: Creaming Together Butter & Sugars
Start by placing your softened unsalted butter into a large mixing bowl—this step is absolutely paramount as creaming butter creates air pockets essential for lifting baked goods during cooking! Use an electric mixer at medium speed until it turns pale yellow and fluffy—a process known as aeration—which should take about 3 minutes if done correctly! Now slowly add both granulated sugar followed by packed brown sugar into this mixture while continuing to beat until everything combines well together—you’re looking for consistency resembling whipped clouds here! Don’t rush this step; patience yields rewards beyond measure since proper incorporation leads directly towards achieving those delightfully chewy textures later on!
Step 2: Incorporating Eggs & Vanilla
Once you’ve achieved creamy perfection from Step 1—let’s introduce two large eggs one at a time along with vanilla extract next! Make sure each egg gets generously mixed before adding another—this ensures full emulsification resulting in uniformity across batters which ultimately guarantees even cooking throughout every single bar later down line during baking sessions ahead…a little science goes long way my friend! Mix until fully combined again then scrape down sides using spatula if needed—a key habit ensuring no rogue bits linger around unnoticed!
Step 3: Whisking Dry Ingredients Together
In another bowl altogether combine dry elements: all-purpose flour alongside baking soda along with salt mentioned earlier…give them gentle whisk till blended thoroughly—it’s important because you want even distribution throughout dough once added into wet mix ahead next step plus prevents clumping issues arising if incorporated directly without prior attention given beforehand…trust me nothing worse than biting into chunkier pieces unexpectedly whilst enjoying deliciousness unfolding before eyes!
Step 4: Merging Wet & Dry Mixtures
With dry ingredients prepped nicely now let’s fold gently those floury elements into original wet batter previously created—we want careful incorporation here since over-mixing could lead toughened texture develop undesirable characteristics resulting poor outcomes overall…so gentle strokes utilizing spatula work wonders keeping integrity intact whilst progressing forward towards final product desired outcome which is soft gooey centers surrounded by crisp edges holding up magnificently under pressure exerted upon biting down upon finally tasting completion after long awaited anticipation building up throughout preparations involved thus far…
Stay tuned as we continue this delightful journey toward crafting absolute perfection within each batch crafted lovingly from scratch leading straight towards ultimate satisfaction guaranteed every single time coming forth next steps involved soon await unveiling secrets unlocking true potential hidden within soul nourishing indulgences awaiting discovery always waiting patiently willing share joys found within kitchens everywhere across lands near far alike bringing happiness families friends alike should not miss out experiencing fullness life offers especially moments spent together shared through culinary adventures unfolding endlessly through time itself!
Step 5: Crafting the Cookie Dough Symphony
Now that we have our butter and sugars beautifully creamed together, it’s time to bring in some serious flavor and structure with our dry ingredients. Begin by taking your mixing bowl filled with that creamy, dreamy butter and sugar mixture, and gently add in the flour, baking soda, and salt. You’ll want to do this gradually—trust me, it makes a world of difference. This method prevents flour from flying everywhere and creates a smooth dough without lumps. As you mix these ingredients in, you’ll notice the dough starting to come together into a cohesive ball, which is just what we want!
Why is this step so vital? The combination of flour and baking soda provides the foundation for our cookie bars. The baking soda acts as a leavening agent; it will create those delightful little pockets of air that give our bars that perfect texture—not too dense, yet wonderfully chewy. When you reach that perfect consistency—where the dough holds together but isn’t overly sticky—you know you’re on the right track. Don’t rush this step; take your time to ensure everything is well mixed and incorporated, so you achieve that perfect balance of flavors later on.
Step 6: Dividing the Dough for Layers of Delight
Once your dough has reached its ideal consistency, it’s time to divide it into two portions. This might sound simple enough, but let me tell you—it’s crucial for achieving those beautiful layers we’re after in our Salted Caramel Brown Sugar Pop Tart Cookie Bars. Take about two-thirds of the dough and press it evenly into the bottom of your prepared baking pan; I find using my fingers works best here to create an even layer—be sure not to skip this part!
When pressing down the dough, aim for an even thickness across the bottom—it should fill every corner of the pan with love! This base layer is going to hold all that gooey caramel goodness we’re adding later, so making sure it’s sturdy yet soft is absolutely paramount for textural harmony. As you’re doing this, keep an eye out for any cracks or uneven spots; if you see them, simply pinch them back together. Once you’ve got a solid base, pop it into your preheated oven at 350°F (175°C) for about 15 minutes until it’s set but not fully browned—the edges should just start to turn golden brown. This initial bake will help create a nice firm surface for our caramel layer while maintaining a soft center.
Step 7: Adding Your Liquid Gold – The Salted Caramel
Ahh, now comes one of my favorite moments—the addition of the salted caramel sauce! After your base layer has baked just enough to set its shape, carefully remove it from the oven and let it cool slightly before drizzling on that luscious salted caramel sauce. If you’re using store-bought caramel (which I totally understand), make sure it’s high-quality—this is what elevates your bars from good to truly extraordinary! Pour about one cup over your warm cookie base and spread it evenly with a spatula or spoon; watching its rich color cascade over the surface is utterly intoxicating.
Now why do we want to add the caramel while the base is still warm? Well, when you drizzle warm caramel onto your slightly cooled crust, it creates a beautiful melding effect where they meet—allowing some of that buttery goodness to soak slightly into the cookie below while keeping some intact on top. Plus, patience here reaps rewards; letting it sit for about five minutes allows everything to settle in nicely before adding our final layer of cookie dough on top.
Step 8: Topping It Off with Cookie Bliss
Here comes another exciting part! With your salted caramel lovingly layered atop your partially baked crust, we’ll turn back to our remaining one-third portion of cookie dough. Using your hands or a spoon (whichever feels more comfortable), break off small pieces of dough and gently flatten them before placing them atop the caramel layer. Don’t worry about covering every inch perfectly; leaving some gaps allows those gorgeous caramel swirls to peek through once baked—which not only looks stunning but also adds an unforgettable burst of flavor!
Now it’s time to return our creation back into the oven! Bake for an additional 20-25 minutes until the top is golden brown and set—a visual cue indicating everything has come together beautifully. Keep an eye on it during those last few minutes because every oven is unique; look for that lovely golden hue around the edges while ensuring it doesn’t get too dark in color overall. When ready, remove it from the oven and let it cool completely in the pan before attempting to cut into bars—this step allows all those flavors to meld beautifully while making slicing easier later on.
Final Touches: Glazing Your Masterpiece
Once everything has cooled down—and I know waiting can be tough—you can finally indulge in glazing these magnificent Salted Caramel Brown Sugar Pop Tart Cookie Bars! In a small bowl, whisk together powdered sugar, whole milk (or cream), ground cinnamon, and vanilla extract until smooth; this sweet glaze adds such a lovely touch both visually and flavor-wise! Drizzle over each bar liberally because who doesn’t love an extra touch of sweetness?
After glazing each piece generously (and trust me—you definitely want to be generous here), sprinkle some sea salt flakes lightly on top—this contrast between sweet and salty creates an utterly satisfying experience with every bite! Allowing these bars to rest after glazing helps set everything nicely so when you finally cut them into squares or rectangles (whatever speaks to your heart!), they maintain their shape without crumbling apart.
I promise you; these bars are not just dessert—they’re little bites of joy wrapped up in nostalgia! Perfect for sharing at gatherings or simply indulging on a quiet afternoon with a hot cup of tea or coffee by your side as you savor each glorious bite. Enjoy every moment spent baking these beauties—I can’t wait for you to taste them!
Storage and Enjoyment Tips for Your Salted Caramel Brown Sugar Pop Tart Cookie Bars
Congratulations, my friend! You’ve successfully crafted a treat that’s bound to bring smiles and happy memories. Now that your Salted Caramel Brown Sugar Pop Tart Cookie Bars are out of the oven, it’s time to indulge in their warm, gooey goodness. But what about those moments when you have leftovers—or maybe you just want to prepare ahead? Worry not! I’ve got you covered with some delightful storage tips that will keep these bars fresh and tasty, ensuring every bite is as magical as the first.
Storing Leftover Salted Caramel Brown Sugar Pop Tart Cookie Bars
To preserve the deliciousness of your Salted Caramel Brown Sugar Pop Tart Cookie Bars, the best approach is to use an airtight container. This ensures that the bars stay moist and irresistible without losing any of that delightful texture. You can store them at room temperature for up to five days, or if you want to extend their life a bit longer, pop them into the fridge where they’ll last about a week. For an extra touch of moisture, place a slice of bread in the container with the bars; this little trick works wonders by keeping everything soft and chewy. And trust me, after a day or two, these cookie bars still taste fantastic—the flavors meld beautifully over time, creating a truly sublime experience. When you’re ready to enjoy them again, simply warm them up slightly in the microwave for about 10-15 seconds; this will revive that gooey caramel center and make them feel freshly baked all over again!
Freezing for Later
If you’re anything like me and love having sweet treats on hand for unexpected guests or a cozy night in, freezing these Salted Caramel Brown Sugar Pop Tart Cookie Bars is an absolute game changer! To freeze properly, simply wrap each bar tightly in plastic wrap before placing them in an airtight container or freezer bag—this prevents freezer burn and keeps them tasting divine. They can be stored in the freezer for up to three months; yes, three glorious months of caramel-infused bliss waiting for you! When you’re ready to enjoy one (or many!), just let them thaw at room temperature for about 30 minutes or heat them directly from frozen in the microwave for about 20-30 seconds. The convenience of being able to indulge in homemade treats whenever your sweet tooth strikes makes this option irresistibly appealing!
Now that we’ve covered how to savor every last crumb of your creation, let’s dive into why this recipe stands as a cherished gem.
Salted Caramel Brown Sugar Pop Tart Cookie Bars
Experience the bliss of baking with these irresistible Salted Caramel Brown Sugar Pop Tart Cookie Bars. Each bite combines a crispy top layer with a gooey caramel center, all beautifully finished with a cinnamon glaze that enhances the sweetness. Perfect for sharing at gatherings or enjoying during a quiet afternoon, these bars are more than just a treat; they’re a delightful experience that captures the essence of home and togetherness. With easy-to-follow instructions and simple ingredients, you’ll find joy in creating these nostalgic bars that are sure to become a family favorite.
- Prep Time: 20 minutes
- Cook Time: 40 minutes
- Total Time: 1 hour
- Yield: 12 servings 1x
- Category: Dessert
- Method: Baking
- Cuisine: American
Ingredients
- 1 cup (2 sticks or 226g) unsalted butter, softened to room temperature
- 1.5 cups packed light brown sugar
- 0.5 cup granulated sugar
- 2 large eggs, room temperature
- 2.5 cups all-purpose flour
- 1 tsp baking soda
- 0.5 tsp salt
- 1 tsp vanilla extract
- 1 cup store-bought or homemade salted caramel sauce
- Sea salt flakes for sprinkling (to taste)
- 1 cup powdered sugar
- 2 tbsp whole milk or cream
- 1 tsp ground cinnamon
- 0.5 tsp vanilla extract (for glaze)
Instructions
- Preheat your oven to 350°F (175°C) and prepare a baking pan.
- Cream softened butter, brown sugar, and granulated sugar until fluffy.
- Beat in eggs one at a time along with vanilla extract.
- In another bowl, whisk together flour, baking soda, and salt. Gradually add to the wet mixture until combined.
- Press two-thirds of the dough into the bottom of the prepared pan; bake for 15 minutes.
- Drizzle salted caramel sauce over the baked base layer.
- Flatten remaining dough and place it on top of the caramel layer.
- Bake for an additional 20-25 minutes until golden brown and set.
- Cool completely before glazing with whipped powdered sugar, milk, cinnamon, and vanilla.
Nutrition
- Serving Size: 1 bar (60g)
- Calories: 270
- Sugar: 18g
- Sodium: 150mg
- Fat: 13g
- Saturated Fat: 8g
- Unsaturated Fat: 4g
- Trans Fat: 0g
- Carbohydrates: 34g
- Fiber: 1g
- Protein: 3g
- Cholesterol: 40mg