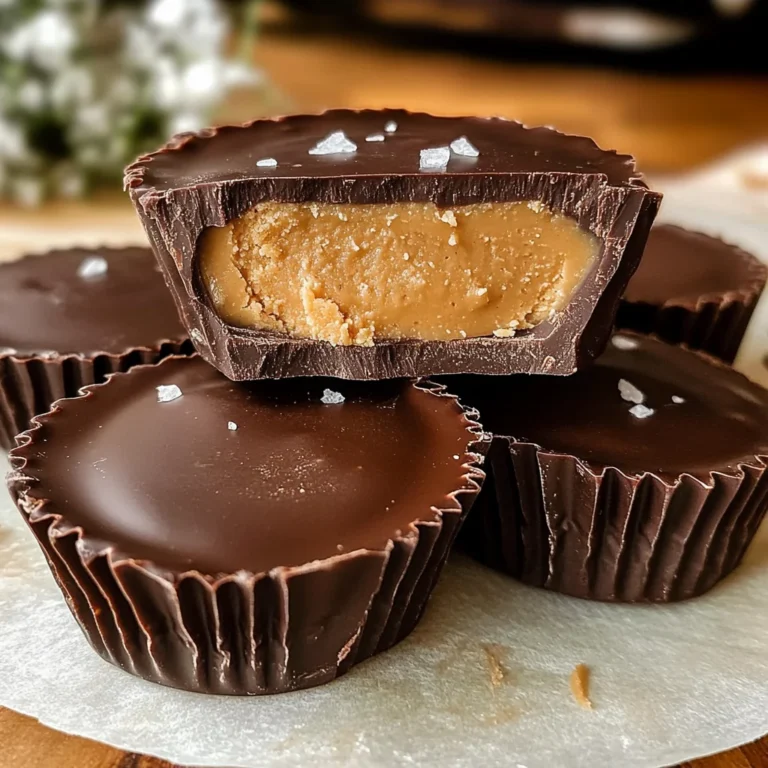
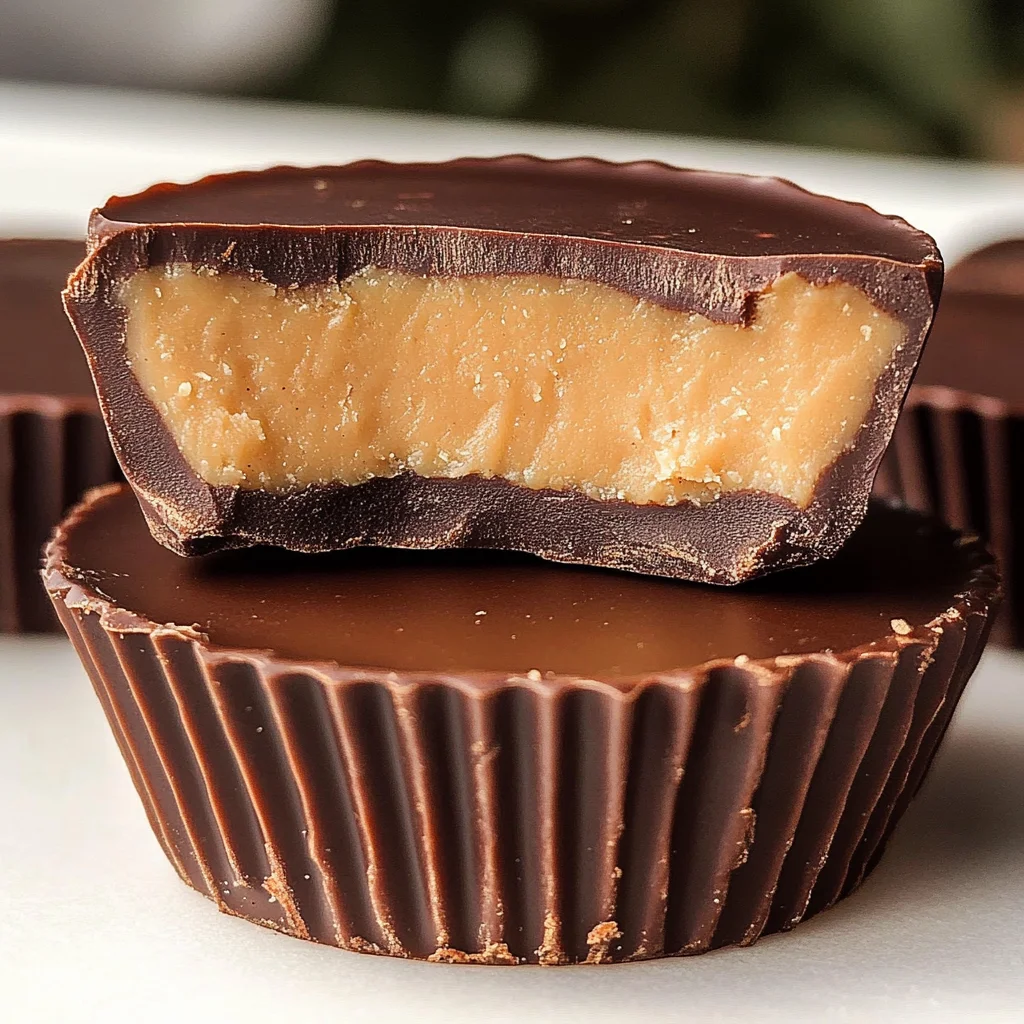
Protein Peanut Butter Cups
There’s something profoundly magical about creating your own treats, especially when they have that nostalgic taste of childhood wrapped in every bite. Enter the Protein Peanut Butter Cups! If you’ve ever savored a Reese’s Cup, you know that delightful rush of sweet and salty goodness; these little gems capture that essence perfectly but with a twist of nutrition. Imagine biting into a creamy layer of peanut butter, enveloped by smooth semi-sweet chocolate – it’s not just a snack; it’s an experience. Each cup is a revelation, where tradition meets innovation, and I promise you’ll feel like a culinary hero as you whip these up in your kitchen.
As we embark on this delicious journey together, let me assure you: this recipe is more than just food; it’s about embracing flavors that resonate with comfort and joy. The blend of natural ingredients brings not only satisfaction but also a sense of accomplishment when you realize how simple it is to create something that feels indulgent yet wholesome. Whether you’re whipping these up for yourself or to share with loved ones, each bite will evoke memories and create new moments worth cherishing. So grab your apron and let’s dive into the delightful world of protein peanut butter cups!
Protein Peanut Butter Cups: A Guilt-Free Indulgence
When I first discovered how to make these Protein Peanut Butter Cups, it was like opening the door to my very own treasure trove of flavors! They perfectly blend the sweetness of chocolate with the rich creaminess of peanut butter while delivering a protein punch through vanilla protein powder. These cups are not only satisfying but also incredibly easy to make, making them ideal for any occasion – whether you’re looking for an afternoon pick-me-up or a post-workout treat. Trust me on this one; each time you reach for one of these babies from the fridge, you’ll be reminded of why homemade treats are simply the best.
Before we get started on our culinary adventure, let’s gather our ingredients! Each component plays a vital role in ensuring our protein peanut butter cups come together flawlessly.
Ingredients:
As we embark on this culinary journey to create our delectable protein peanut butter cups, it’s essential to understand the role each ingredient plays in crafting these little delights. Every ingredient contributes to the flavor profile and texture in ways that elevate this treat from ordinary to extraordinary.
- 12 oz semi-sweet chocolate chips. This ingredient is key to achieving that classic chocolatey goodness we all adore. Semi-sweet chocolate chips provide just the right balance between sweetness and richness without overpowering the other flavors. When choosing chocolate chips, I always recommend looking for high-quality brands with minimal additives—after all, you want pure chocolate bliss in every bite! Plus, melting them creates that luscious coating that will envelop our peanut butter filling perfectly.
- 1 teaspoon coconut oil (measured solid). Coconut oil acts as our secret weapon here; it helps achieve an ultra-smooth melted chocolate consistency while also adding a hint of tropical flavor that complements the richness of chocolate beautifully. When melted alongside the chocolate chips, it creates a glossy finish that’s absolutely irresistible. Just remember to measure it solid because if it’s too warm or liquidy when combined with chocolate, it can change how everything sets!
- 1/4 teaspoon vanilla extract. Ahh, vanilla—the unsung hero in many recipes! This simple addition enhances the overall flavor profile by adding depth and warmth to our peanut butter cups. It’s crucial because vanilla has this magical ability to elevate both sweet and savory dishes alike. Look for pure vanilla extract rather than imitation—your taste buds will thank you!
- 1/4 cup natural creamy peanut butter (the only ingredients should be peanuts + salt). Here’s where the magic happens! Natural creamy peanut butter offers that comforting nuttiness we all crave while providing healthy fats and protein for sustenance. Always check labels; avoid those with added sugars or oils since they dilute the pure flavor we’re after. When combined with melted chocolate, this creamy goodness becomes utterly intoxicating.
- 2 tablespoons pure maple syrup. Not only does maple syrup add sweetness, but it also brings a unique flavor note that pairs beautifully with both chocolate and peanut butter. It adds complexity without being overly sugary—just enough to complement our other ingredients perfectly! Make sure you’re using pure maple syrup instead of pancake syrup because authenticity matters here.
- 1/3 cup vanilla protein powder. This is where we boost our nutritional profile! Vanilla protein powder not only gives us an extra punch of protein but also integrates seamlessly into our filling without altering its texture dramatically. For those who might be sensitive to certain proteins or flavors, feel free to experiment with plant-based options—just ensure they are vanilla-flavored for harmony within this recipe.
- 1/4 teaspoon salt. Don’t underestimate salt—it’s absolutely paramount in enhancing all those sweet flavors we’ve worked hard to create! A pinch balances out sweetness while intensifying other flavors at play here, making every bite even more satisfying!
Now that we’ve gathered our ingredients let’s talk about what tools will help us create these delicious treats!

Equipment You’ll Need:
Having the right tools can transform your baking experience from chaotic to seamless and enjoyable! While they may not be ingredients, think of your equipment as essential partners in crafting something truly wonderful.
- Muffin tin: This is crucial as it shapes our peanut butter cups into those perfect little rounds we love so much! You can use standard muffin tins or mini ones if you prefer bite-sized delights—just adjust cooking times accordingly! A non-stick muffin tin will help prevent any sticking issues but lining it with parchment paper muffin liners ensures easy removal later on.
- Parchment paper muffin liners: These little beauties are non-negotiable—they keep your creations from sticking while providing an easy way to lift them out once set. Plus, they add an adorable touch when presenting your finished product!
- Microwave-safe bowl: We’ll use this bowl primarily for melting our chocolate chips and coconut oil together smoothly without burning them—this step requires care as overheating can lead to grainy results instead of velvety goodness!
- Spoon or spatula: A trusty tool for mixing everything together thoroughly throughout the process! Silicone spatulas are great as they’re flexible enough for scraping down sides effectively without wasting any precious filling—a true baker’s best friend!
- Refrigerator: Though not technically equipment per se (but oh-so-important!), having access to refrigeration allows us time between steps so things can set properly before diving back into assembly mode!
Now we’ve gathered everything we need—let’s get ready for some fun in preparing these scrumptious Protein Peanut Butter Cups!
Step 1: Prepare Your Muffin Tin
Begin by lining each cup in your muffin tin with parchment paper liners; this step is essential for ensuring easy release once your delicious creations have set up properly! It’s worth taking an extra moment here because removing them from their molds should be effortless—I’ve had my fair share of sticky disasters before discovering how vital this step truly is! Once lined up nicely, set aside your prepared muffin tin while we move on to melting that heavenly semi-sweet chocolate mixture.
Step 2: Melt Chocolate Chips & Coconut Oil
In a microwave-safe bowl (remember safety first!), combine your semi-sweet chocolate chips along with solid coconut oil measured precisely at one teaspoon—this combination works wonders together! Microwave in thirty-second intervals while stirring each time until melted and silky smooth throughout—you might think “Oh no!” if it looks lumpy initially; don’t panic—patience during this process pays off immensely—as soon as you stir lightly after each interval magic happens before your eyes! The addition of coconut oil ensures not just optimal meltability but also provides shine once everything cools down post-melting.
Step 3: Add Vanilla Extract
Once you’ve achieved that dreamy melted state (seriously—it should look like liquid gold!), gently fold in your quarter teaspoon vanilla extract—the aroma wafting through your kitchen at this point will leave no doubt about how amazing things are going already! This infusion brings warmth into play which elevates all other flavors present within those luscious layers yet awaits creation ahead… Trust me when I say skipping out on quality extracts would be doing yourself—and these treats—a disservice entirely!
Step 4: Create Chocolate Base Layers
Now comes one of my favorite parts—pouring one heaping teaspoonful from your melted mixture into each muffin liner at its base then spreading evenly across until forming flat layers against edges completely—this helps form sturdy foundations allowing subsequent fillings atop remain intact later on during consumption time too! Repeat pouring technique until all twelve cups get their lovely layers established firmly below waiting patiently before cooling off further in refrigerator while we prepare next components ahead…
Stay tuned as we’ll continue exploring how easily assembling delectable fillings becomes next—it’s easier than you might think once getting hands dirty involved underway!
The Art of Assembling Your Protein Peanut Butter Cups
Step 5: Chill Out for Chocolate Bliss
Now that you’ve created a beautiful base of melted chocolate, it’s time to give it a brief rest in the refrigerator. This step is absolutely crucial because it allows the chocolate to set just enough to provide a delightful contrast against the creamy peanut butter filling we’re about to create. Think of this as letting your chocolate layer solidify into a luscious shell; it will not only enhance the texture but also make it easier to layer on that delectable peanut butter mix. Simply pop your muffin tin into the fridge for about 10-15 minutes—just long enough for the chocolate to become firm but not completely hardened. Trust me, don’t rush this step! If you skip this chilling phase, you might end up with a gooey mess when you add the peanut butter mixture, and no one wants that.
As the chocolate cools, take a moment to appreciate how it transforms from a warm, liquid state into something more substantial—a beautiful, dark canvas just waiting for its next layer. The anticipation builds like sweet suspense; you can almost taste the magic that’s about to happen!
Step 6: Melting Peanut Butter Perfection
While your chocolate is setting, let’s turn our attention to that creamy peanut butter filling that will bring these cups to life! Grab your natural creamy peanut butter and scoop it into a microwave-safe bowl. You want to gently warm it in the microwave for about 15-20 seconds—this is key! Warming it makes it easier to mix in our protein powder and maple syrup smoothly. After all, we’re aiming for a velvety filling that melds beautifully with our chocolate layers.
When you pull out your bowl, watch how the peanut butter transforms as it warms up—it becomes runny and invitingly aromatic. Stir in your vanilla protein powder, salt, and pure maple syrup until everything is combined into an irresistible mixture. I can practically feel my heart racing at this point because trust me on this: those simple ingredients come together in an utterly intoxicating way. The salt enhances the sweetness of the maple syrup while balancing out the richness of the peanut butter; it’s like a symphony of flavors playing right in your kitchen!
Step 7: Forming Irresistible Discs
Now comes one of my favorite parts: shaping the peanut butter filling into discs! Using a spoon or even your hands (if you’re feeling adventurous), divide your luscious mixture into twelve generous portions. Each should be slightly smaller than the width of your muffin liners—a bit of finesse here goes a long way! This ensures that when we layer them on top of our hardened chocolate base, they won’t overflow but instead fit perfectly within their chocolatey homes.
As you mold these discs, think about how each one will eventually contribute to that magical bite—smooth peanut butter enveloped in silky chocolate! Make sure they are uniform in size so every cup bakes evenly; we want all our friends (or family!) enjoying equally delicious treats! Trust me when I say this will elevate their experience from simply good to truly extraordinary.
Step 8: The Grand Assembly
With both layers prepared and filled with love, it’s time for assembly—this is where dreams come true! Carefully remove your muffin tin from the refrigerator and place those adorable little peanut butter discs atop each mound of chocolate goodness. Take care as you do this; each placement should feel intentional, like tucking your favorite blanket around yourself on a chilly evening.
If at any point during this process you notice that your leftover melted chocolate has cooled too much and isn’t spreadable anymore, fear not! Just pop it back in the microwave for another 15-20 seconds. You want it warmed just enough so it’s smooth and pourable again—you’ll need this flowing consistency for our final touch. Once all discs are placed snugly onto their chocolate beds, drizzle or pour any remaining melted chocolate over these beauties until they are fully covered—smooth out any bumps with a spatula or back of a spoon if necessary; we want them looking pristine!
This final coating isn’t merely cosmetic—it seals everything in while creating another layer of rich flavor that melts beautifully together as they chill again. Now pop these wonderful creations back into the refrigerator one last time for at least an hour or until they are completely set—patience here is key! This chilling phase allows all those harmonious flavors to meld together perfectly while firming up our cups into delightful bites!
Final Touches for Your Protein Peanut Butter Cups
Step 9: The Reveal
After an hour—the moment we’ve all been waiting for—the protein peanut butter cups are ready to be unveiled! Gently peel away those parchment paper liners; oh my goodness, just look at them! They should pop out effortlessly with their glossy tops shining under soft light like little treasures waiting to be discovered. As you hold one in your hand, take a moment to admire how beautifully they came together—the perfect balance between rich chocolate and creamy peanut butter peeking through.
Now comes perhaps my favorite part: taking that first bite. I promise you, as soon as you sink your teeth into these heavenly creations, you’ll experience an explosion of flavors: the sweet richness from both layers harmonizing so perfectly that you’ll find yourself lost in blissful satisfaction. Share them with friends or keep them all to yourself—though I recommend being generous; watching others enjoy these treats is almost as delightful as eating them!
These Protein Peanut Butter Cups are not only satisfying but also provide you with some wholesome energy thanks to their protein content—making them perfect for an afternoon snack or post-workout refuel. And remember, any leftovers can be stored in an airtight container either in your refrigerator or freezer; they hold up beautifully and remain irresistible whenever cravings strike again.
So there you have it—a truly special recipe that’s easy enough for anyone yet sophisticated enough to impress even those discerning palates among us! Enjoy every moment spent making (and eating) these delightful cups; cooking should always feel like love wrapped up in deliciousness!
Storage and Enjoyment Tips for Your Protein Peanut Butter Cups
Oh my goodness, can you believe how delicious these protein peanut butter cups turned out? I can hardly contain my excitement as I imagine you savoring the first bite of that creamy peanut butter nestled between layers of rich chocolate. But what happens if you have a few left over? Fear not! These tasty treats are just as delightful after storage as they are fresh from the fridge. Let’s dive into how to keep them at their best for your next indulgent moment.
Storing Leftover Protein Peanut Butter Cups
To keep your protein peanut butter cups fresh and utterly scrumptious, I recommend storing them in an airtight container. This is absolutely paramount because exposure to air can cause those luscious flavors to fade away. Ideally, place a piece of parchment paper or wax paper between layers if you’re stacking them; this little trick prevents sticking and keeps each cup intact. You can store them in the refrigerator for about a week without any worry—trust me, they’ll still taste divine! If you notice that they’re starting to dry out (though I doubt that will happen quickly with how delicious they are!), placing a slice of bread in the container can help maintain moisture. The texture remains wonderfully creamy and satisfying even after a few days; just imagine biting into one and being greeted by that familiar, comforting blend of chocolate and peanut butter!
Freezing Protein Peanut Butter Cups for Later
Now, if you find yourself with extra cups—or if you’re simply a savvy snack prepper—you can freeze these beauties for future enjoyment! To freeze properly, simply place the cups in a single layer on a baking sheet lined with parchment paper and pop them in the freezer until they’re solid. Then transfer them to an airtight container or freezer bag, separating layers with parchment paper again to avoid any sticking mishaps. They’ll stay good frozen for up to three months! When you’re ready to enjoy one (or two!), just take them out of the freezer and let them sit at room temperature for about 10-15 minutes—this allows their decadent textures to come back to life perfectly. Imagine the convenience of having homemade protein-packed treats waiting for you on those busy days when you just need something sweet!
Protein Peanut Butter Cups
Indulge in homemade Protein Peanut Butter Cups that blend rich chocolate with creamy peanut butter! Try this easy recipe today!
- Prep Time: 20 minutes
- Cook Time: 15 minutes
- Total Time: 35 minutes
- Yield: Makes 12 servings 1x
- Category: Dessert
- Method: No-Bake
- Cuisine: American
Ingredients
- 12 oz semi-sweet chocolate chips
- 1 teaspoon coconut oil
- 1/4 teaspoon vanilla extract
- 1/4 cup natural creamy peanut butter
- 2 tablespoons pure maple syrup
- 1/3 cup vanilla protein powder
- 1/4 teaspoon salt
Instructions
- Line a muffin tin with parchment paper muffin liners.
- In a microwave-safe bowl, combine semi-sweet chocolate chips and coconut oil; melt in 30-second intervals until smooth.
- Stir in vanilla extract once melted.
- Pour one teaspoon of melted chocolate into each muffin liner to create the base layer; chill in the refrigerator for 10-15 minutes until set.
- In another bowl, warm peanut butter slightly in the microwave. Mix in protein powder, maple syrup, and salt until well combined.
- Shape the peanut butter mixture into discs and place them on top of the chilled chocolate layer.
- Drizzle remaining melted chocolate over each disc to cover completely; chill again for at least an hour until fully set.
Nutrition
- Serving Size: 1 serving
- Calories: 180
- Sugar: 9g
- Sodium: 45mg
- Fat: 11g
- Saturated Fat: 5g
- Unsaturated Fat: 6g
- Trans Fat: 0g
- Carbohydrates: 15g
- Fiber: 2g
- Protein: 6g
- Cholesterol: 0mg