Delectable Reese’s Peanut Butter Cupcakes
Indulge in the ultimate dessert experience with these Delectable Reese’s Peanut Butter Cupcakes. You know, there’s something magical about desserts that weave together memories of childhood and the cozy comforts of home. As I stand in my kitchen, mixing rich cocoa and silky peanut butter, I can’t help but be transported back to those warm afternoons spent baking with friends and family. Each cupcake is more than just a treat; it’s a little piece of joy, a celebration of flavors that dance harmoniously on your palate. When you take that first bite, you’ll discover the moist chocolate cake hugging a surprise Reese’s cup at its heart, revealing a symphony of textures: soft cake, creamy peanut butter frosting, and that delightful crunch from the chocolatey goodness. I promise you, these cupcakes will not only satisfy your sweet tooth but also create moments worth cherishing.
What’s truly special about these Delectable Reese’s Peanut Butter Cupcakes is their ability to bring people together. Whether it’s a birthday party, a casual get-together, or just an ordinary Tuesday that needs a sprinkle of magic, these cupcakes are perfect for any occasion. The allure of sweet and salty is irresistible; it walks that fine line between indulgence and comfort while appealing to kids and adults alike. Just imagine the smiles as you present these beauties—it’s like serving up happiness in cupcake form! So gather your loved ones around, roll up your sleeves, and let’s embark on this sweet adventure together.
Delectable Reese’s Peanut Butter Cupcakes: A Love Letter to Chocolate and Peanut Butter
Are you ready to dive into this delightful recipe? With each step, we’ll unlock the secrets to achieving moist cupcakes topped with creamy peanut butter frosting that will have everyone begging for seconds. It’s all about those rich chocolatey flavors paired with luscious peanut butter—an absolutely irresistible combination! Let’s make something extraordinary today.
Ingredients:
As we prepare for our baking journey, let me tell you about the essential ingredients that will come together to create our Delectable Reese’s Peanut Butter Cupcakes. Each one plays its role beautifully in crafting not just flavor but also texture and moisture, ensuring every bite is an experience worth savoring.
- 1 ½ cups all-purpose flour. This staple ingredient provides structure to our cupcakes without making them too dense. All-purpose flour strikes the perfect balance for baked goods like these; it contains enough protein to hold everything together while maintaining a tender crumb. When measuring flour, be sure to spoon it into your measuring cup and level it off—packing it down could lead to dry cupcakes instead of the moist delights we’re aiming for!
- ½ cup cocoa powder. This ingredient adds rich chocolate flavor and depth to our batter; it’s what transforms an ordinary cupcake into something extraordinary! Cocoa powder should be unsweetened for this recipe—trust me on this one—so you get all that deep chocolate richness without added sugars interfering with our desired sweetness level. Look for high-quality cocoa powder; Dutch-processed options will give you a smoother taste profile if you’re feeling adventurous.
- 1 tsp baking powder. This leavening agent is absolutely paramount for achieving lightness in our cupcakes. Baking powder works by releasing carbon dioxide when it comes into contact with moisture and heat; this creates small bubbles in the batter that expand while baking. Make sure your baking powder is fresh—if it’s been hanging out in your pantry longer than six months, it might not do its job effectively!
- 1 cup granulated sugar. Sugar isn’t just about sweetness; it also contributes to moisture retention and helps create a lovely texture within our cupcakes. When it dissolves during mixing or baking, sugar interacts with other ingredients promoting browning through caramelization—a key factor in developing those enticing flavors we love so much! Feel free to experiment with organic cane sugar or even coconut sugar if you’re looking for subtler sweetness variations.
- 2 large eggs. Eggs serve multiple purposes here: they add moisture, help bind everything together, and contribute richness thanks to their fat content found in the yolks. Always use room-temperature eggs for best results; they emulsify better into the batter when warmed slightly before mixing! If you’re looking for an egg substitute due to dietary preferences or restrictions, try using flaxseed meal (1 tablespoon mixed with 2 tablespoons water per egg) as an excellent alternative.
- ½ cup whole milk. This creamy liquid brings in moisture while adding slight richness—a non-negotiable component that elevates our cupcake’s tenderness! Whole milk has fat content that enhances flavor compared to skim or low-fat options; however, feel free to swap with almond milk or oat milk if dairy isn’t part of your routine—you’ll still achieve delightful results!
- ½ cup unsalted butter, melted. Butter acts as a flavor powerhouse here—it enriches our batter while contributing fat necessary for tenderness! By melting it beforehand (but allowing it cool slightly), we facilitate easier incorporation into our mix without creating lumps or overly greasy results later on! If you’re vegan or avoiding dairy completely, coconut oil can provide similar melt-in-your-mouth effects.
- ¾ cup creamy peanut butter. Ahh… the star of our show! Creamy peanut butter brings luxurious texture along with its nutty goodness right into each bite of cupcake heaven! It also aids in binding ingredients together nicely while adding protein which keeps us satisfied post-treat-time! For smooth integration within batters like this one—and especially since we’re doing frosting later on—I recommend using lightly warmed (but not hot!) peanut butter so it’s easier to mix smoothly!
- 1 cup chopped Reese’s Peanut Butter Cups (plus extra for topping). These delightful morsels are what truly transform these cupcakes into something magical—they add bursts of chocolate-peanut-butter bliss throughout every bite! Ensure they’re chopped evenly so they distribute well within the batter; I often sneak some pieces in right before heading into oven excitement too—it makes me feel like I’m getting two treats in one!
Let’s gather everything we need because soon enough we’ll create something utterly intoxicating!
Equipment You’ll Need:
Having the right tools on hand can make all the difference in creating beautiful baked goods—and trust me when I say this is no exception with our Delectable Reese’s Peanut Butter Cupcakes! While these tools may not be ingredients themselves, they’re essential partners in crafting something truly wonderful from scratch.
- Cupcake pan – This handy tool holds each cupcake securely while they bake evenly without spreading too much or collapsing under their own weight! Opt for non-stick versions if possible—they’ll ensure easy removal once cooled without leaving crumbs behind.
- Paper liners – These little beauties not only prevent sticking but also provide a professional touch that’ll impress anyone who lays eyes on your creation! There are many fun colors available—feel free to choose ones that match themes or occasions!
- Mixing bowls – A set of various-sized mixing bowls ensures smooth transitions between steps as we mix dry ingredients separately from wet then combine them seamlessly later on—this layering process guarantees perfectly blended batters every time!
- Whisk & spatula – Whisks work wonders when stirring dry ingredients together quickly yet thoroughly while spatulas help scrape down bowl sides ensuring nothing goes unnoticed during mixing sessions—every bit counts toward achieving success here!
- Electric mixer (handheld or stand) – Though entirely doable by hand if you’re feeling strong (or nostalgic!), electric mixers save us time and energy by whipping things up faster leading us closer toward cupcake bliss sooner rather than later!
Now that we have everything lined up neatly before us let’s dive right into preparing those amazing Delectable Reese’s Peanut Butter Cupcakes!
Preparing the Delectable Reese’s Peanut Butter Cupcakes
Step 1: Preheat Your Oven & Prepare Your Pan
First things first—we need our oven preheated at 350°F (175°C). This step is crucial because starting off with a hot oven ensures proper rising right from the moment those little beauties go inside; they’ll spring up perfectly fluffy if greeted warmly upon entry! While waiting on preheating magic happens at home—line up your cupcake pan with paper liners because nobody wants stuck cupcakes ruining their day after all this effort made so far! It’s like setting stage pieces before unveiling theater magic—the anticipation builds as we await greatness unfolding!
Step 2: Whisk Together Dry Ingredients
In a large bowl—preferably mixing bowl sized appropriately based on volume—you’ll want whisk together all-purpose flour along cocoa powder along baking powder followed by granulated sugar until fully combined (think pale brown color throughout). This process helps aerate everything which leads us toward lighter textures once baked—as well as distributing all dry elements uniformly preventing clumps further down road ahead during subsequent steps! Don’t rush through this part; savor each moment knowing how foundational these initial ingredients lay groundwork leading toward incredible results later on!
Step 3: Combining Wet Ingredients
In another medium-sized bowl (a separate one helps keep things organized), combine melted butter that’s cooled slightly along eggs until well-blended followed closely behind by whole milk plus creamy peanut butter joining forces smoothen any lumps left behind from earlier melts happening now too—all should come together harmoniously creating luscious liquid gold mixture ready join forces alongside dry counterparts shortly thereafter! Remember: room temperature items integrate more effortlessly compared chilled counterparts making life easier overall so check if anything needs warming beforehand—it pays off immensely toward achieving success today!
Step 4: The Joyful Mixing Dance
Now here comes my favorite part where everything comes full circle—the joining of wet loving embrace meeting dry particles awaiting transformation into cake batter bliss awaiting full realization soon enough!! Carefully pour wet mixture directly atop those patiently-whisked dry ones making sure no bits left unturned then gently fold both mixtures until barely combined (we’re talking just enough here!) Avoid overmixing at all costs since doing so leads toughened textures instead delicate softness desired here instead—it can be hard but trust me when I say letting go means indulging ahead without regret down track ahead awaits satisfying bites enjoyed guilt-free afterward knowing effort put forth yielded rewards beyond imagination…
With each step taken thus far moving us closer towards delectable creations ahead let’s keep going strong until completion becomes reality right before eyes…
Step 5: Folding in the Sweet Surprise
Now that your batter is well on its way to becoming a chocolatey masterpiece, it’s time to introduce the star of the show: the chopped Reese’s Peanut Butter Cups. Trust me when I say this step is where the magic truly begins. Gently folding in these delightful morsels is absolutely paramount because it ensures that each cupcake will have pockets of that rich, creamy peanut butter flavor nestled within. You’ll want to use a spatula or a wooden spoon for this part—something that lets you easily lift and turn the batter without overmixing.
The goal here is to combine everything until just incorporated. Overmixing can lead to dense cupcakes instead of the light and fluffy texture we’re aiming for. As you fold, you might feel that little twinge of anticipation—each piece of Reese’s should be evenly distributed throughout without breaking down into tiny bits. If you find yourself tempted to stir vigorously, take a deep breath and remind yourself: patience is key! You want to maintain those lovely chunks so that when you bite into your cupcake, you’re greeted with bursts of chocolate and peanut butter bliss.
Step 6: Filling Your Liners with Love
Now comes a truly joyful moment—dividing your batter into those cheerful cupcake liners! Using an ice cream scoop or a measuring cup can ensure uniformity, which not only looks fabulous but also helps them bake evenly. Aim for about two-thirds full; this allows enough room for them to rise beautifully without overflowing. Visualize how they’ll puff up in the oven like little clouds of happiness!
As you fill each liner, take a moment to appreciate how far you’ve come—the fragrant aromas of cocoa and peanut butter wafting around your kitchen are simply intoxicating. It’s important not to skip this step because proper filling ensures even baking and prevents any cupcakes from sinking in the middle as they cool. If you happen to notice any air bubbles in your batter as you’re scooping, gently tap the pan on your countertop; this will help release them before they hit the heat. Trust me, such small details can make all the difference!
Step 7: Baking Your Delectable Creations
With your cupcake liners filled to perfection, it’s finally time to place them in the preheated oven! Bake these beauties at 350°F (175°C) for 18-20 minutes, but don’t rush; allow yourself a moment to savor this anticipation because good things take time! The scent wafting from your oven will begin to envelop you like a warm hug, promising sweet rewards ahead. A crucial tip here is to keep an eye on them towards the end of baking; every oven behaves differently, so knowing when they’re done is vital.
You can perform a simple toothpick test—insert it into the center of one cupcake; if it comes out clean or with just a few moist crumbs attached, they’re ready! This step is about more than just doneness; it ensures that each bite remains moist yet perfectly baked through. After pulling them from the oven, let them cool in their pan for about five minutes before transferring them onto a wire rack. This cooling phase allows steam to escape and avoids soggy bottoms while letting those adorable peaks settle slightly before frosting.
Step 8: Crafting Irresistibly Creamy Frosting
While our cupcakes cool down and await their crowning glory, let’s prepare that utterly addictive peanut butter frosting! Begin by beating together softened unsalted butter and creamy peanut butter until they reach an airy fluffiness—this may take about two to three minutes on medium speed. The reason we start with room temperature ingredients here is crucial: it creates a smooth texture without lumps so that every frosting swirl glides effortlessly onto those cupcakes.
Gradually add powdered sugar while mixing at low speed—trust me when I say it will prevent a sugary cloud from engulfing your kitchen! As sugar combines with your buttery mixture, you’ll notice it thickening into something truly divine. If it feels too thick for piping or spreading (and we all know we want our frosting spreadable), drizzle in just enough milk until you achieve that perfect consistency—smooth yet still holding shape beautifully as you frost.
Step 9: Frosting with Flair
Now comes perhaps my favorite part—the frosting process! Once your cupcakes are completely cooled (this cannot be stressed enough!), grab a piping bag fitted with your favorite tip or even just use an offset spatula if that’s what you have on hand. No matter how you choose to frost them, just remember: there’s no wrong way as long as there’s love involved! Start by swirling generous amounts of that creamy frosting atop each cupcake; let it cascade over the edges slightly for an enticing look.
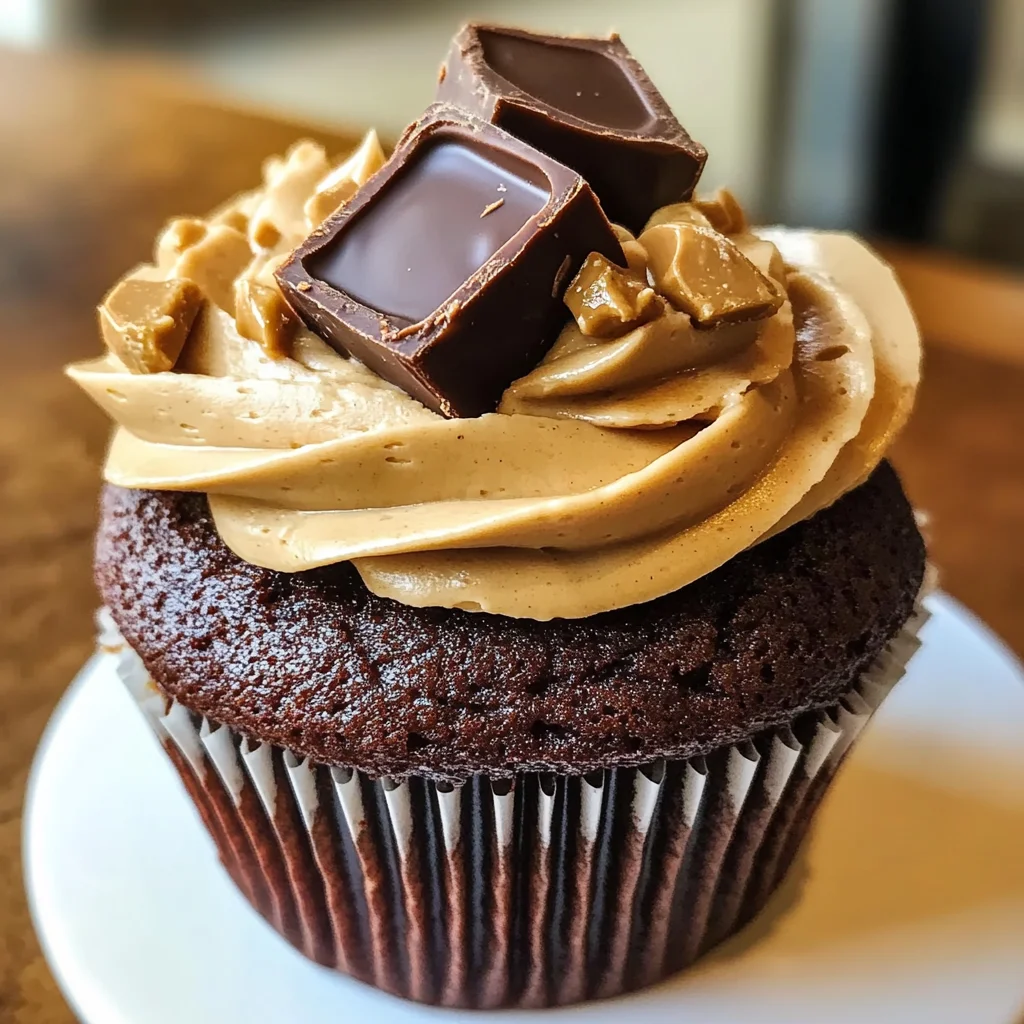
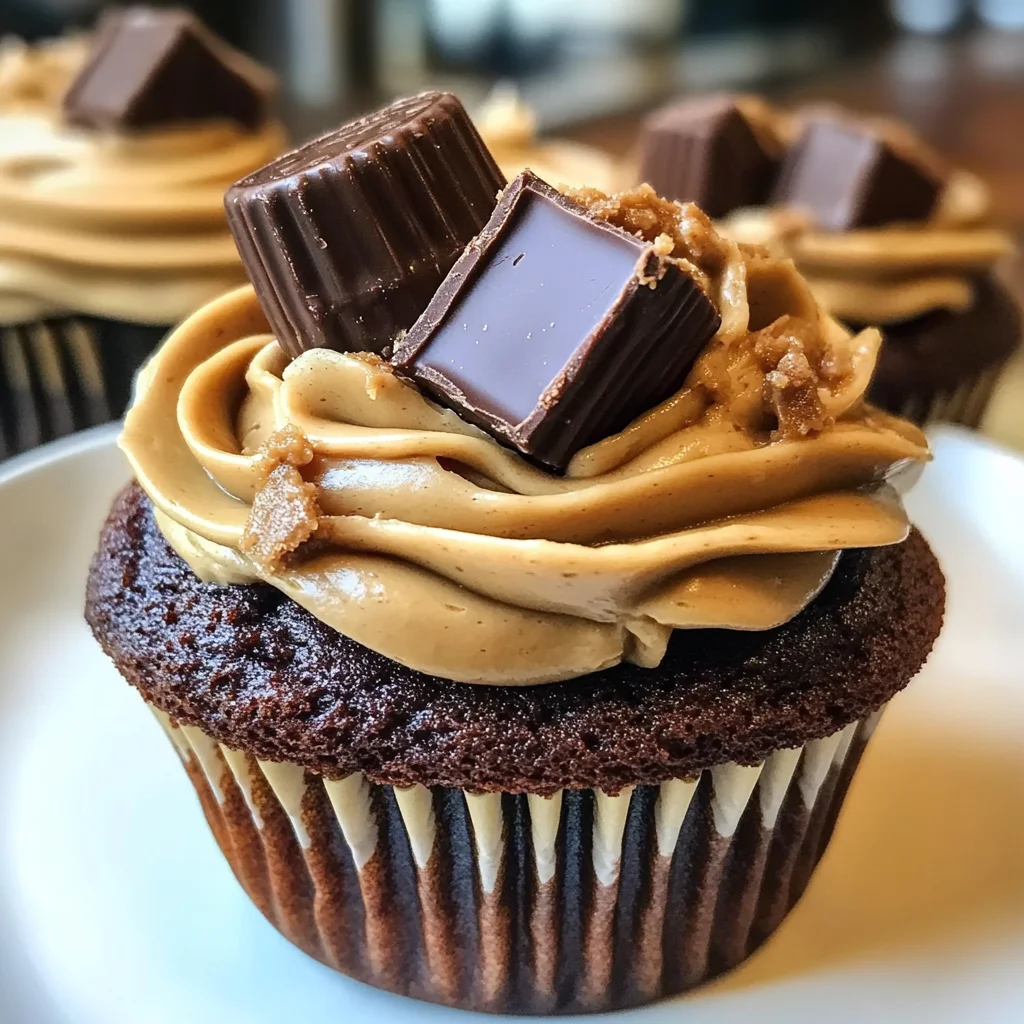
And don’t forget those final touches—chop up some extra Reese’s cups and sprinkle them generously on top like confetti at a celebration! This adds even more texture and reinforces that wonderful surprise inside each bite. As you admire your creations, take pride in knowing you’ve crafted something truly extraordinary from scratch—a labor of love bound to elicit smiles from anyone lucky enough to indulge.
Step 10: The Moment of Truth
Once frosted and topped with those delightful pieces of Reese’s goodness, it’s time for what I call “the moment of truth.” Gather friends or family around (or perhaps just treat yourself—you deserve it) and serve these Delectable Reese’s Peanut Butter Cupcakes fresh on their own or alongside a tall glass of cold almond milk or non-dairy beverage of choice. As everyone takes their first bite, watch their faces light up—that sheer joy tells you everything you need to know about how special these treats really are.
Letting people savor these cupcakes is not just about taste; it’s about creating memories together—a shared experience filled with laughter and sweetness. So go ahead and relish every bite; after all, cooking isn’t merely about sustenance—it’s about connection, love, and joy wrapped up in every delicious morsel! Enjoy every scrumptious second this recipe brings into your life—it truly doesn’t get better than this sweet adventure!
Storage and Enjoyment Tips for Your Delectable Reese’s Peanut Butter Cupcakes
Now that your kitchen is filled with the intoxicating aroma of freshly baked Delectable Reese’s Peanut Butter Cupcakes, it’s time to dive into the joy of savoring these little delights! Trust me, there’s nothing quite like breaking into that moist chocolate cake, discovering the creamy peanut butter frosting, and getting a surprise bite of a Reese’s cup. But if you find yourself with leftovers (which I can’t imagine will happen), worry not! I’ve got some fantastic tips to help you store these cupcakes so they remain just as scrumptious as the day you baked them.
Storing Leftover Delectable Reese’s Peanut Butter Cupcakes
To keep your Delectable Reese’s Peanut Butter Cupcakes in pristine condition, store them in an airtight container at room temperature. This simple step is crucial because it helps to retain their moisture and prevents them from drying out. Ideally, you’ll want to enjoy these treats within 3-4 days for the best flavor experience. One delightful pro tip I swear by is placing a slice of bread in the container along with the cupcakes; this clever trick keeps everything moist while the bread absorbs any excess moisture. After a day or two, you might notice that they still taste heavenly, with each bite bursting with rich chocolate and creamy peanut butter goodness, perfectly balanced and utterly satisfying. If you’re thinking about reheating one for a cozy treat later on, simply pop it in the microwave for about 10-15 seconds; this will bring back that fresh-from-the-oven warmth and make the frosting extra melty!
Freezing Delectable Reese’s Peanut Butter Cupcakes for Later
If you find yourself wanting to save some cupcakes for a special occasion or just for those moments when sweet cravings strike unexpectedly, freezing is absolutely a fantastic option! Here’s how to do it: first, ensure your cupcakes are completely cooled after baking. Then, wrap each cupcake individually in plastic wrap or aluminum foil and place them into a freezer-safe container or zip-top bag. They’ll keep well frozen for up to three months—talk about convenience! When you’re ready to indulge again, just take out however many you desire and let them thaw at room temperature for about an hour. You can also warm them in the microwave if you prefer that delightful melt-in-your-mouth experience right away. Isn’t it amazing how easy it is to have homemade treats ready whenever you want?
Delectable Reese’s Peanut Butter Cupcakes
Indulge in the ultimate dessert experience with Delectable Reese’s Peanut Butter Cupcakes. These delightful treats combine rich chocolate cake and creamy peanut butter frosting, all featuring a surprise Reese’s cup at the heart of each cupcake. Perfect for any occasion, these cupcakes offer a wonderful balance of sweet and salty flavors that will have everyone smiling. With each bite, you’ll savor the moist texture and harmonious blend of chocolate and peanut butter, creating cherished memories around your table. Whether it’s a birthday celebration or a cozy night in, these cupcakes are sure to bring joy and satisfaction to all who partake.
- Prep Time: 20 minutes
- Cook Time: 20 minutes
- Total Time: 40 minutes
- Yield: Makes approximately 12 servings 1x
- Category: Dessert
- Method: Baking
- Cuisine: American
Ingredients
- 1 ½ cups all-purpose flour
- ½ cup cocoa powder
- 1 tsp baking powder
- 1 cup granulated sugar
- 2 large eggs
- ½ cup whole milk
- ½ cup melted unsalted butter
- ¾ cup creamy peanut butter
- 1 cup chopped Reese’s Peanut Butter Cups (plus extra for topping)
Instructions
- Preheat your oven to 350°F (175°C) and line a cupcake pan with paper liners.
- In a mixing bowl, whisk together flour, cocoa powder, baking powder, and sugar until well combined.
- In another bowl, mix together melted butter, eggs, milk, and peanut butter until smooth.
- Pour the wet ingredients into the dry ingredients and fold until just combined.
- Gently fold in the chopped Reese’s Peanut Butter Cups until evenly distributed.
- Fill each cupcake liner two-thirds full with batter and bake for 18-20 minutes or until a toothpick comes out clean.
- Allow cupcakes to cool before frosting with creamy peanut butter frosting and topping with extra Reese’s pieces.
Nutrition
- Serving Size: 1 cupcake (84g)
- Calories: 320
- Sugar: 24g
- Sodium: 150mg
- Fat: 17g
- Saturated Fat: 7g
- Unsaturated Fat: 10g
- Trans Fat: 0g
- Carbohydrates: 38g
- Fiber: 2g
- Protein: 6g
- Cholesterol: 40mg