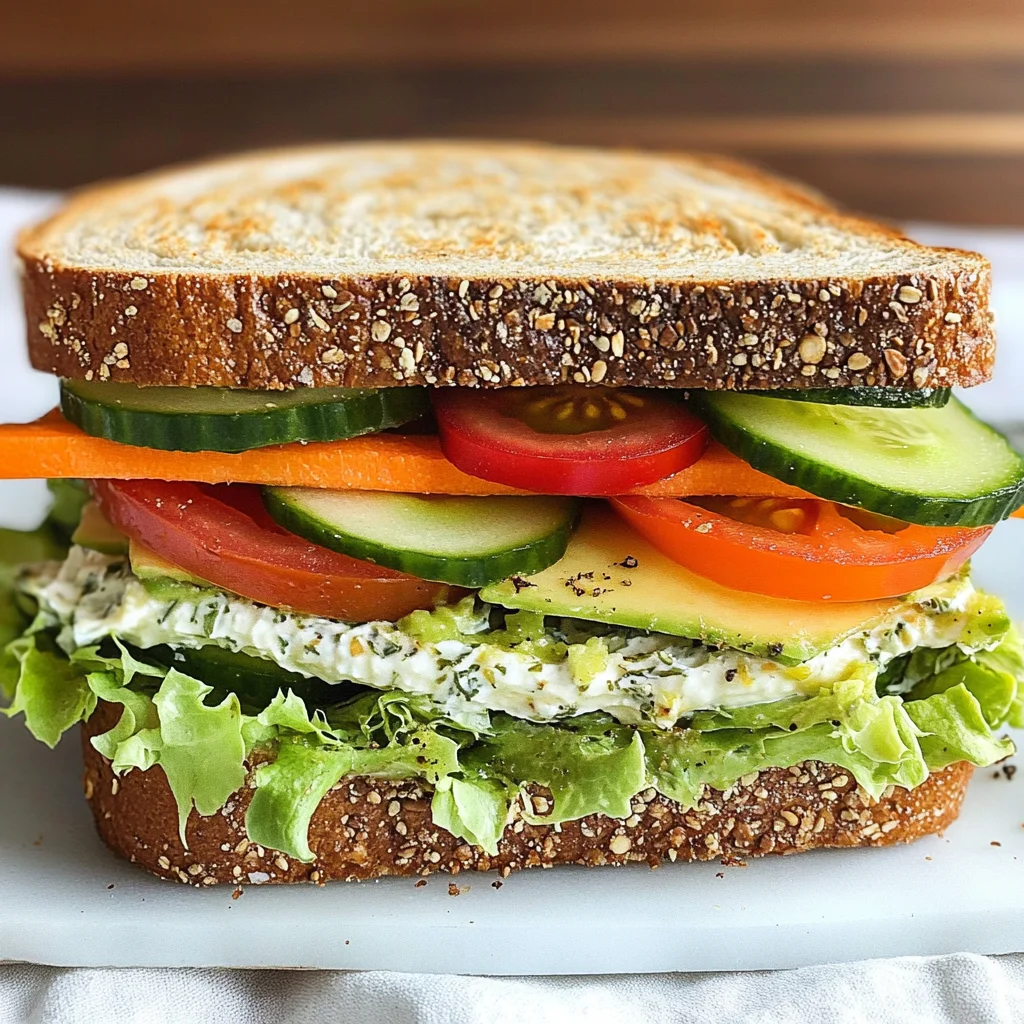
Veggie Sandwich with Herbed Cream Cheese
When I think about comfort food, my mind often drifts to the simplicity and warmth of a sandwich. But not just any sandwich—I’m talking about one that bursts with color, flavor, and freshness. This Veggie Sandwich with Herbed Cream Cheese is more than just a meal; it’s an experience that brings together the best of nature’s bounty in a delightful embrace of whole grain goodness. Imagine biting into hearty slices of bread, layered generously with vibrant vegetables and rich, creamy herbed cream cheese that dances on your taste buds. It’s truly a celebration of wholesome ingredients that are not only satisfying but also nourishing for the soul.
Every time I make this sandwich, I’m reminded of lazy summer afternoons spent picnicking in the park or enjoying a casual lunch at home with friends. The crunch of cucumbers and carrots mingling with the creaminess of avocado feels like a hug from nature itself. Plus, making your own herbed cream cheese is like crafting a little bit of magic in your kitchen—it’s easy, fun, and incredibly rewarding! Trust me when I say, once you take your first bite, you’ll be utterly captivated by how something so simple can feel so profoundly satisfying. Let’s dive into this recipe together; I promise you won’t regret it!

Ingredients:
Embarking on this culinary journey to create your Veggie Sandwich with Herbed Cream Cheese means gathering some fantastic ingredients that will transform ordinary bread into an extraordinary lunch experience. Each component plays its part beautifully—let’s explore them together.
- 8 slices whole grain bread. The foundation of our sandwich! Whole grain bread not only provides a hearty texture but also packs in fiber and nutrients that white bread simply can’t match. Look for loaves that list whole grains as the first ingredient; they should feel dense yet soft to the touch. If you’re feeling adventurous, try sourdough or multigrain varieties for added flavor complexity.
- 4 slices provolone cheese. This cheese adds a delightful creaminess and mild flavor that perfectly complements our veggie medley. Provolone has a lovely meltability which makes it ideal for sandwiches! If you’re looking for alternatives, mozzarella or gouda can offer similar textures and flavors without overwhelming the other ingredients.
- 1 medium avocado (sliced). Avocado is like liquid gold—its creamy texture adds depth to every bite while providing healthy fats that are good for your body and skin alike! Choose ripe avocados that yield slightly when pressed gently; they should be deep green but not too soft or brown inside. A sprinkle of lemon juice after slicing can help maintain their beautiful color.
- 1/2 cup pickle slices. These tangy bites bring a wonderful contrast to our sandwich—a delightful zing that cuts through the creaminess! When selecting pickles, go for those made with vinegar rather than sugar for that classic tartness. You can even experiment with different types; dill pickles are traditional, but sweet or spicy varieties can add unique flair!
- 1 medium cucumber (thinly sliced). Cucumber brings crunch and freshness to our layers, offering hydration alongside texture! Opt for firm cucumbers free from blemishes—English cucumbers are especially sweet and have fewer seeds if you prefer a smoother bite.
- 2 medium tomatoes (sliced). Tomatoes add juiciness and rich flavor while contributing vital vitamins! Look for seasonal tomatoes; their taste will elevate your sandwich significantly. Heirloom varieties can provide vibrant colors and distinct flavors if available.
- 1 carrot (grated). This adds subtle sweetness and crunch while boosting the nutritional profile of our sandwich! Freshly grated carrots have an earthy taste that’s far superior to pre-packaged options—plus, they add such beautiful color!
- 1 head romaine lettuce (rinsed and patted dry). Romaine offers crispness and freshness as well as vital nutrients like vitamin C! When selecting lettuce, choose leaves that are bright green without any wilting or browning—this ensures maximum crunch!
- 4 ounces whipped cream cheese. Whipped cream cheese is spreadable bliss—it allows us to easily layer on flavor without overwhelming everything else in our creation! You can also use vegan cream cheese if you’re looking for a dairy-free option; both work beautifully here.
- 1/4 cup chopped chives and dill. Fresh herbs are what truly elevate this dish—chives add mild onion notes while dill lends its iconic fragrance that’s reminiscent of summer days! Always opt for fresh herbs over dried when possible; their flavors are exponentially more vibrant.
- 1/2 teaspoon garlic powder. Garlic powder serves as an essential background flavor in our herbed cream cheese mixture—it enhances every bite without overpowering the freshness of the veggies!
- 1 teaspoon lemon juice. This brightens up all the flavors in our herbed spread while preventing oxidation in avocados; consider it your secret weapon against dullness!
- Salt and pepper to taste. These universal seasonings help bring out all the flavors in each ingredient—it’s amazing what a pinch of salt can do!
With these fresh ingredients ready to go, we’re set to create something truly special together!
Equipment You’ll Need:
Having the right tools in your kitchen makes all the difference when it comes to whipping up something delicious like this Veggie Sandwich with Herbed Cream Cheese. While they’re not ingredients, these tools act as essential partners in creating something wonderful.
- Cutting board – A sturdy cutting board provides a safe workspace where you can chop veggies efficiently without worrying about damaging your countertops or fingers! I recommend having both wood and plastic boards on hand; wooden ones are great for prep work while plastic boards can be easily sanitized after handling raw foods.
- Sharp knife – A good-quality chef’s knife is non-negotiable here; it makes slicing through tomatoes and cucumbers effortless while ensuring clean cuts without squishing them! Dull knives lead to frustration—and potential accidents—so keep yours sharp!
- Mixing bowl – A medium-sized mixing bowl is perfect for combining our herbed cream cheese ingredients thoroughly without splattering everywhere! Choose one that’s easy to grip and durable enough to withstand some vigorous stirring.
- Spatula or spoon – Whether you prefer silicone spatulas or wooden spoons, having something handy to mix up your cream cheese mixture makes life easier—and cleaner too! They allow you to scrape down sides effectively so nothing goes uneaten.
Now that we have everything set up nicely let’s dive right into preparing this delightful Veggie Sandwich with Herbed Cream Cheese!
Step 1: Whipping Up the Herbed Cream Cheese
Begin by grabbing a small bowl—the heart of our creamy concoction awaits! Measure out 4 ounces of whipped cream cheese (trust me, using whipped instead of regular elevates this dish) into the bowl alongside ¼ cup each of freshly chopped chives and dill along with ½ teaspoon garlic powder—a sprinkle here adds depth without overshadowing those delicate flavors we’ve got going on later—and finally squeeze in 1 teaspoon lemon juice which will brighten everything beautifully while adding zestful balance against all those earthy elements we’ve chosen together today.
Now comes my favorite part: mixing! Use a spatula or fork to stir until everything is well combined—this process allows each herb’s essence to meld into one harmonious spread reminiscent of gardens bursting forth after spring rains—a moment worth taking time over because it sets up success later down this culinary path we’re forging ahead on together!
Step 2: Assembling Your Sandwich Layers
With our herbed cream cheese ready, lay out eight slices of whole grain bread on your cutting board like blank canvases waiting patiently for their artistic toppings! Grab your mixing bowl filled with aromatic goodness from step one then apply generous dollops onto both sides—you want those layers thick enough so every bite carries flavorful surprises but not so much that they ooze out during assembly—a delicate balance indeed but oh-so rewarding when executed perfectly!
Next comes adding four slices of provolone cheese across four pieces—these cheesy beauties create luscious layers between veggies while melting slightly under warm sun rays if served outdoors—how delightful would that be? Then layer on thinly sliced avocado followed by half-cup pickle slices bringing tangy contrasts against creamy textures unfolding before us.
Step 3: Layering Up Fresh Vegetables
Now let’s play artist again by arranging thinly sliced cucumbers next—their crispness contrasts beautifully against richer elements already present while balancing out heaviness introduced earlier; follow suit by layering two medium tomato slices atop giving colorful pizazz too—all paired harmoniously amongst grated carrots adding sweet crunch—we’re crafting symphonies here folks!
Lastly lay down single romaine leaf atop everything else before sprinkling salt & pepper liberally across surfaces ensuring every morsel tastes divine—you deserve nothing less than perfection after all hard work put forth thus far… Now close these masterpieces off gently folding remaining slice over fillings carefully so nothing spills out prematurely before slicing diagonally into halves revealing gorgeous insides waiting eagerly underneath golden crusts beckoning us forward towards flavor paradise awaiting beyond first bites taken…
Step 4: Enjoying Your Creation
And there you have it—the culmination of fresh ingredients coming together harmoniously into scrumptious veggie sandwiches ready for feasting upon now awaits you eagerly ahead promising joy-filled moments shared amongst friends & family alike whether enjoyed indoors cozied up during rainy days or sunny picnics beneath azure skies inviting smiles from anyone lucky enough partake alongside… So dig in my dear friend savoring every last mouthful because these sandwiches encapsulate love crafted lovingly amidst laughter shared around tables where bonds deepen over meals prepared thoughtfully whilst nourishing bodies souls alike… Enjoy every moment!
With each step taken towards creating this veggie delight behind us now fueling appetites ignited let memories unfold naturally thereafter blossoming forth joyfully unfolding stories told through bites shared amongst loved ones gathered round tables filled laughter warmth nourishing hearts minds spirits alike… I hope you find as much happiness creating & indulging within these glorious creations just as I do whenever I whip them up myself!
Step 5: Layering the Ingredients with Love
Now that you have your beautifully whipped herbed cream cheese ready, it’s time to assemble your Veggie Sandwich with Herbed Cream Cheese. This is where the magic happens! Lay out your eight slices of whole grain bread like a canvas awaiting a masterpiece. I love using whole grain bread not only for its nutty flavor but also for its hearty texture that can hold up against all the delicious layers we’re about to create. Take a generous dollop of that luscious cream cheese mixture and generously slather it on both sides of each slice of bread. Trust me, this step is absolutely paramount; the creamy texture and fresh herb flavor will meld beautifully with the crispness of the veggies, creating a symphony of flavors in every bite.
Once you’ve coated each slice with that creamy goodness, it’s time to layer on the other ingredients. Start with a slice of provolone cheese—its creamy richness adds depth and balances out the crunchiness we’re about to introduce. Next, gently lay down those perfectly sliced avocados; their buttery texture is utterly intoxicating and provides a wonderful contrast to the sharper notes of our veggies. Don’t rush this step! Each layer contributes to an overall experience, so take your time arranging everything so that every bite includes a little bit of everything we’ve prepared. After avocado, add the pickle slices—they’ll bring an essential tangy crunch that will elevate your sandwich into something truly extraordinary.
Step 6: The Crisp Factor – Adding Fresh Veggies
Now comes my favorite part: piling on the fresh vegetables! Start with those thinly sliced cucumbers—these little guys are not just for decoration; they add refreshing crunch and hydration to our veggie sandwich. Next up are those vibrant tomato slices; I like to choose ripe tomatoes that smell fragrant and sweet, as they bring an unmatched burst of flavor. As you layer them on, think about how these colors will not only make your sandwich beautiful but also provide various nutrients that are beneficial for both body and soul.
After your tomatoes, sprinkle on some grated carrots—these will add a lovely sweetness and an additional crunch factor that makes each bite feel like you’re indulging in nature’s candy. Finally, place a crisp leaf or two of romaine lettuce atop all those veggies. The lettuce acts as a light barrier that keeps everything contained while adding its own refreshing element. Now, at this point, don’t forget to season lightly with salt and pepper before topping it all off with another slice of cream-cheese-coated bread. This seasoning is crucial because it enhances all those incredible flavors you’ve just layered together; it makes them sing in harmony rather than compete against one another!
Step 7: The Art of Pressing
With your sandwiches assembled, it’s time for one more important step: pressing them down gently. This may seem trivial, but pressing your sandwiches slightly allows all those glorious layers to marry into one cohesive dish rather than remaining separate entities fighting for attention. I usually place my sandwich on a clean cutting board and use my palm to press down firmly yet gently—think of it as giving your sandwich a loving hug! This process helps compress everything together while ensuring that when you take your first bite, you experience a delightful explosion of flavors instead of an avalanche of toppings falling everywhere.
Let’s talk about timing here; allow your pressed sandwiches to rest for about 5-10 minutes before slicing into them. You might be tempted to dig right in (and who could blame you?), but this resting period allows the cream cheese mixture to set slightly and helps bind everything together better—making for easier handling when you’re ready to serve them up. During this time, breathe in the aromas wafting from your creation; it’s a reminder that good things come to those who wait!
Step 8: Slicing and Presentation – The Finishing Touch
Now comes perhaps one of the most satisfying parts—the slicing! Using a sharp knife (serrated works wonders) cut each sandwich diagonally or straight down the middle if you prefer traditional halves. It’s important here not to saw through too aggressively; instead use gentle downward pressure so you don’t squish all those beautiful layers out from within their cozy confines. As you cut through, observe how each cross-section reveals colorful layers stacked high—a feast for both eyes and palate!
Presentation matters just as much as taste when it comes to enjoying food—so arrange those halves neatly on a platter or individual plates like precious jewels waiting to be admired before devoured! Consider garnishing with extra sprigs of fresh herbs or even serving alongside crunchy veggie sticks or chips for an added touch—you want this moment to feel special because it truly is! I promise you, once everyone sees these stunning sandwiches gracing the table, they’ll be eagerly lining up for their chance to indulge!
The Grand Finale – Enjoying Your Creation
And there you have it—a delightful Veggie Sandwich with Herbed Cream Cheese that’s not just a meal but an experience! Each bite bursts with freshness and flavor while being packed full of nutrients—a truly winning combination if I’ve ever seen one! As you take that first bite, notice how all elements come together: the smooth creaminess contrasting against crunchy vegetables creates an utterly satisfying mouthfeel you’re going to adore.
So gather around the table with friends or family (or even just treat yourself), and enjoy every moment spent savoring this gorgeous creation together! Remember this isn’t just food; it’s love served between two slices of bread! And don’t forget—these sandwiches are incredibly versatile too! Feel free to swap out any veggies based on what’s seasonal or what tickles your fancy—this recipe is meant for experimentation and creativity! Enjoy every delicious moment!
Storage and Enjoyment Tips for Your Veggie Sandwich with Herbed Cream Cheese
Now that you’ve crafted this delightful Veggie Sandwich with Herbed Cream Cheese, it’s time to revel in the joy of enjoying your creation! Whether you’re savoring each bite as a quick lunch or sharing it with loved ones during a sunny picnic, this sandwich is destined to be a hit. But what if there are leftovers? Don’t worry; I’ve got you covered on how to store them perfectly so you can continue enjoying this deliciousness later on!
Storing Leftover Veggie Sandwich with Herbed Cream Cheese
To keep your leftover veggie sandwiches fresh and utterly delicious, I recommend using an airtight container. This is crucial because it prevents the bread from becoming soggy and maintains the vibrant flavors of your veggies and herbed cream cheese. Ideally, stash them in the refrigerator where they’ll stay good for about 2-3 days. If you’re worried about the bread getting too soft, consider layering a piece of parchment paper between slices—this simple trick works wonders! After storage, the flavors meld beautifully, creating a harmonious blend that’s just as satisfying as when it was first made. When you’re ready to enjoy again, simply serve it cold or take a moment to let it come to room temperature for that fresh taste (trust me; it makes all the difference!).
Freezing Components for Later
If you want to take meal prep to the next level, freezing components of this sandwich is a fantastic option! You can freeze the herbed cream cheese mixture in small portions using an ice cube tray or silicone molds. This way, you’ll have easy access to homemade flavor whenever you need it! The cream cheese will stay good in the freezer for up to 2 months without losing its creamy texture or zesty flavor. When you’re ready to use it, just transfer a portion to the refrigerator overnight to thaw. Imagine waking up and knowing that a burst of flavor awaits you for lunch—how exciting is that? Plus, having these components prepped ahead of time means whipping up a fresh veggie sandwich is quicker than ever on busy days!
Veggie Sandwich with Herbed Cream Cheese

Enjoy our delightful Veggie Sandwich with Herbed Cream Cheese – fresh veggies layered between hearty bread await! Try making one today!
- Prep Time: 15 minutes
- Cook Time: 0 minutes
- Total Time: 15 minutes
- Yield: Serves 2
- Category: Lunch
- Method: Assembling
- Cuisine: American
Ingredients
- 8 slices whole grain bread
- 4 slices provolone cheese
- 1 medium avocado (sliced)
- 1/2 cup pickle slices
- 1 medium cucumber (thinly sliced)
- 2 medium tomatoes (sliced)
- 1 carrot (grated)
- 1 head romaine lettuce (rinsed and patted dry)
- 4 ounces whipped cream cheese
- 1/4 cup chopped chives and dill
- 1/2 teaspoon garlic powder
- 1 teaspoon lemon juice
- Salt and pepper to taste
Instructions
- In a mixing bowl, combine whipped cream cheese with chopped chives, dill, garlic powder, and lemon juice. Mix until smooth.
- Lay out slices of whole grain bread and spread the herbed cream cheese generously on both sides.
- On half of the slices, layer provolone cheese, avocado slices, pickle slices, cucumbers, tomato slices, grated carrot, and romaine lettuce.
- Top with remaining bread slices and gently press down.
- Slice diagonally to serve.
Nutrition
- Serving Size: 1 sandwich (approximately 200g)
- Calories: 350
- Sugar: 4g
- Sodium: 620mg
- Fat: 16g
- Saturated Fat: 6g
- Unsaturated Fat: 10g
- Trans Fat: 0g
- Carbohydrates: 42g
- Fiber: 8g
- Protein: 12g
- Cholesterol: 20mg