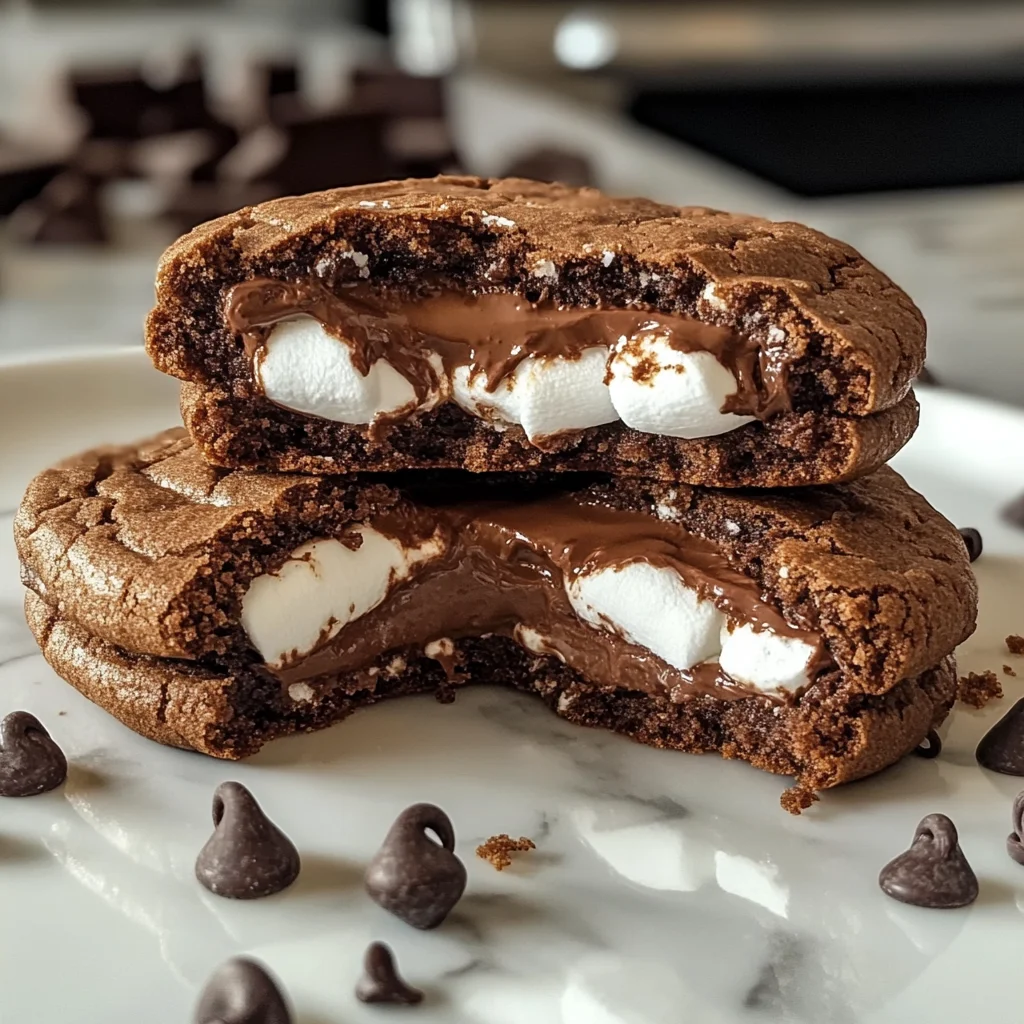
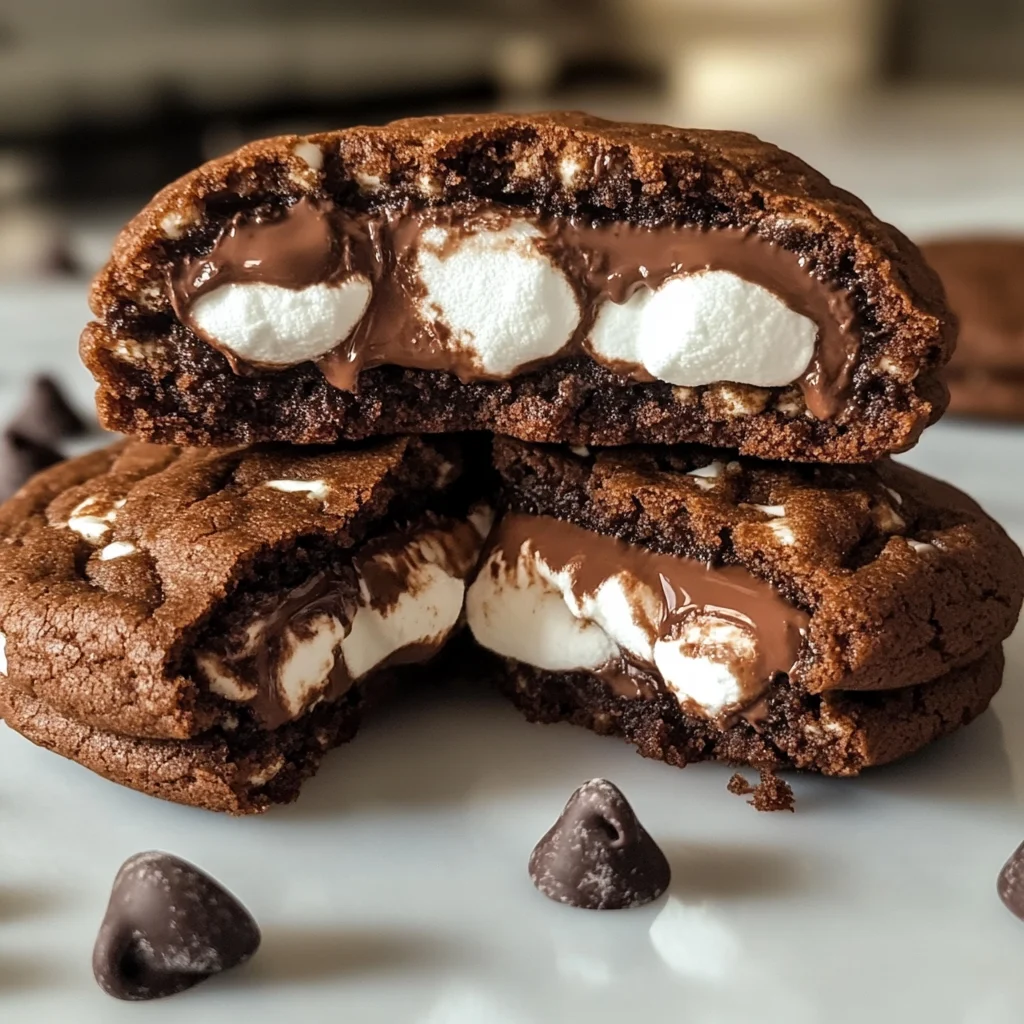
vegan marshmallows and Nutella Stuffed Chocolate Cookies
There’s something indescribably magical about the combination of gooey, sweet marshmallows and rich, velvety chocolate—it’s like a warm hug on a plate. When I first stumbled upon the idea of creating vegan marshmallows and Nutella stuffed chocolate cookies, I knew I was onto something special. This recipe transcends mere indulgence; it encapsulates those delightful moments shared with friends and family, where laughter fills the air, and every bite brings back cherished memories. Imagine sinking your teeth into soft, chewy cookies that are bursting with molten Nutella and fluffy marshmallow goodness. It’s an experience that tantalizes the senses, making you feel both comforted and exhilarated all at once.
Each cookie is a delightful dance of textures and flavors—the crisp exterior gives way to a soft center that is lusciously filled with Nutella and sweet vegan marshmallows. The joy truly lies not just in how these cookies taste but in the process of making them—the anticipation builds as you mix together simple yet essential ingredients to craft something extraordinary. I promise you, this recipe will become a staple in your kitchen; it’s perfect for cozy gatherings or late-night cravings. So grab your apron, gather your ingredients, and let’s dive into this mouthwatering adventure!
The Irresistible Allure of Sweet and Salty
There’s a reason why sweet treats have a special place in our hearts—they create shared experiences that bring us together. The contrast of flavors in these vegan marshmallows and Nutella stuffed chocolate cookies speaks to our innate desire for balance: sweet meets rich in a delightful harmony. Whether you’re celebrating a birthday or simply treating yourself after a long day, these cookies are versatile enough for any occasion. Plus, with the growing interest in plant-based ingredients, this recipe embraces innovation while respecting tradition. It’s about enjoying dessert without compromising on ethical choices or flavor.
vegan marshmallows and Nutella Stuffed Chocolate Cookies: Decadent Delights
These cookies are more than just dessert; they’re little pockets of joy waiting to be discovered. With every bite, you’ll find yourself immersed in layers of flavor—rich chocolate enveloping creamy Nutella and soft marshmallows, creating an utterly intoxicating experience. So let’s embark on this delectable journey together!
Ingredients:
As we prepare to create these delectable cookies, it’s crucial to understand each ingredient’s role in bringing this recipe to life. Each component contributes not only flavor but also texture and structure, setting the stage for some incredible baking magic.
- 1 cup (2 sticks or 226g) unsalted butter, softened. This is absolutely paramount for achieving that perfectly creamy texture we desire in our cookies. Softened butter allows for proper creaming with sugars, which introduces air into the mixture—a key element for lightness in baked goods. If your butter is too cold or melted, you might end up with dense cookies rather than the fluffy bites we’re aiming for. Always look for high-quality butter; if you can find European-style butter with higher fat content, it will yield even richer results.
- 1 cup granulated sugar. This sugar is vital not just for sweetness but also for contributing to the cookie’s structure by helping it spread during baking. Granulated sugar dissolves easily into the butter during creaming, ensuring an even texture throughout the dough. Trust me on this: using organic sugar enhances the flavor profile beautifully while providing that perfect amount of crispiness to the edges.
- 1 cup packed brown sugar. Brown sugar adds moisture due to its molasses content, creating that chewy texture we all adore in a cookie! When packed into the measuring cup, it brings out more flavor depth—think caramel notes mingling with chocolate! The combination of both granulated and brown sugars strikes an ideal balance between crispiness and chewiness.
- 2 large eggs (or flax eggs). For those opting for vegan alternatives, substituting each egg with one flax egg (1 tablespoon ground flaxseed mixed with 2 tablespoons water) works wonderfully here! Eggs play an essential role as binders in this recipe while also adding moisture; thus they contribute to that delightful chewy middle we crave so much.
- 2 teaspoons vanilla extract. This liquid gold is non-negotiable! Vanilla elevates all other flavors present in your dough—it enhances sweetness while adding an aromatic touch that’s simply irresistible! Be sure to use pure vanilla extract instead of imitation; it makes all the difference.
- 2 ½ cups all-purpose flour. Flour provides structure to our cookies; it’s like the backbone holding everything together! Measuring accurately is crucial here; too much flour can make your cookies dry while too little can lead to spreading disasters! For best results, consider spooning flour into your measuring cup before leveling it off.
- ¾ cup unsweetened cocoa powder. This ingredient introduces deep chocolate flavor while imparting a beautiful dark hue to our cookie dough! Opting for high-quality Dutch-process cocoa powder will result in a smoother taste profile that perfectly complements our other sweet elements.
- 1 teaspoon baking soda. Baking soda acts as a leavening agent—it helps our cookies rise slightly while creating those lovely cracks on top as they bake! Make sure your baking soda is fresh; otherwise, it may not provide sufficient lift.
- ½ teaspoon salt. A pinch of salt isn’t just optional; it’s crucial! Salt enhances sweetness by balancing flavors—without it, you’d lose out on the symphony of tastes we aim for here.
- 1 cup semi-sweet chocolate chips. Chocolate chips add bursts of melty richness throughout each cookie bite! Go for dairy-free versions if needed—they melt beautifully when baked while providing that quintessential chocolatey goodness we all adore!
- ½ cup Nutella (dairy-free option available). Nutella serves as our delicious filling—its creamy consistency offers richness that pairs exceptionally well against sweet cookie dough! You can use any nut or seed butter as an alternative if desired!
- ½ cup vegan marshmallows fluff (or vegan marshmallows creme)—this ingredient brings us back full circle by adding delightful chewiness within each cookie! Their sweetness contrasts perfectly against chocolate flavors while providing unique texture too!
Equipment You’ll Need:
Before we dive into mixing up this delicious dough, let’s talk about some essential tools that will make your baking experience smooth sailing! Having the right equipment ensures efficiency and helps you achieve consistent results every time.
- Mixing bowls – A set of various sizes is indispensable when preparing different ingredients separately before combining them later on! Opt for stainless steel or glass bowls as they’re easy to clean and won’t retain odors from previous uses.
- Electric mixer (stand or hand) – Mixing dough by hand can be quite labor-intensive; having an electric mixer simplifies this process tremendously! Creaming butter with sugars becomes effortless when using electric power—and trust me—your arms will thank you later!
- Measuring cups & spoons – Precision matters in baking! Invest in good-quality measuring cups (both dry & liquid) along with measuring spoons so you can accurately gauge each ingredient without guesswork involved!
- Baking sheets lined with parchment paper – These sheets prevent sticking while ensuring even heat distribution across all cookies during baking time—resulting in perfect golden edges every single batch!
Preparing the vegan marshmallows and Nutella Stuffed Chocolate Cookies
Step 1: Creaming Butter and Sugars Together
Let’s start by creaming together our softened unsalted butter along with both granulated sugar and packed brown sugar until light and fluffy—it should take approximately 3–5 minutes using an electric mixer set at medium speed. This process known as creaming introduces air into your mixture which creates those heavenly pockets within each cookie when baked—trust me on this step because skipping it would lead straight down a path toward dense disappointment instead! As you beat them together smoothly blend until pale yellow colors develop—that gradual change indicates aeration success!
Step 2: Incorporating Eggs and Vanilla
Once creamed beautifully comes one exciting moment: adding two large eggs along with two teaspoons of vanilla extract into our sugary concoction! Allow them ample time (around another minute!) blending until fully incorporated—you want no visible traces left behind from yolks or whites hanging around awkwardly within mixture either! Vanilla extract permeates through batter enhancing overall taste sensation significantly so don’t rush this step either—enjoy watching things transform before very eyes!
Step 3: Whisking Dry Ingredients
While waiting patiently between steps consider whisking together dry ingredients separately inside another bowl first—this includes all-purpose flour combined alongside cocoa powder alongside baking soda plus salt measured precisely beforehand too? Doing so not only ensures uniform distribution throughout entire dough but helps avoid clumping issues later down line which could lead unfortunate textural surprises post-baking escapades henceforth!
Step 4: Combining Wet & Dry Mixtures
Now comes perhaps one most satisfying parts: slowly pour whisked dry ingredients directly over creamy base created earlier then gently fold everything together until fully combined without overmixing please? Overmixing risks activating gluten unnecessarily leading toughened outcomes rather than tender delights desired instead here today folks…so embrace gentle folding motions allowing their union occur harmoniously within bowl instead!
And there you have just begun crafting these delectable treats filled warm hugs inside embracing luscious fillings waiting get devoured soon after baking perfection achieved…stay tuned because next steps shall unveil how assemble rest masterpiece awaits discovery ahead folks!
Step 5: The Sweet Symphony of Mixing the Wet Ingredients
Now that you have your dry ingredients ready, it’s time to move on to the wet ingredients, which is where the magic really begins! In a large mixing bowl, grab that softened unsalted butter and combine it with both granulated and brown sugars. Using an electric mixer or a sturdy whisk, cream these together until they become light and fluffy—a process that usually takes about 2 to 3 minutes. This step is absolutely paramount because what you’re doing here is incorporating air into your butter and sugar mixture. This air will eventually create a wonderfully tender and airy cookie structure. Trust me, you’ll want this beautiful texture in each bite!
Once your mixture resembles a pale and fluffy cloud, it’s time to add in the eggs one at a time, making sure each one is fully incorporated before adding the next. This gradual process allows for better emulsification, which is crucial for creating a smooth batter. After adding the eggs, gently fold in the vanilla extract—this is where we introduce that rich, aromatic flavor that makes every bite feel like home. As you mix everything together, take a moment to inhale deeply; there’s something so comforting about the smell of sweet vanilla wafting through your kitchen.
Step 6: Uniting Dry and Wet Ingredients – The Heart of Your Dough
Now comes one of my favorite parts—the moment where we bring the dry and wet ingredients together into one harmonious dough! Gently add the flour-cocoa mixture into your creamed butter-sugar blend. I always recommend doing this in batches—about half at a time—so that you can control how well they combine without creating a flour storm in your kitchen! As you fold in the dry ingredients with a spatula or wooden spoon, be mindful not to overmix; we want everything just combined. Overmixing can lead to tough cookies instead of the soft pillows we’re aiming for.
As you stir, you should see your dough starting to come together with that gorgeous deep chocolatey hue peeking through. It’s like watching a beautiful transformation unfold right before your eyes! Once everything is combined and there are no more visible flour streaks, it’s time to fold in those semi-sweet chocolate chips. Not only do they enhance the chocolate flavor, but they also add delightful pockets of sweetness throughout each cookie. Picture yourself biting into one of these cookies later on—a warm melting chocolate chip oozing out as you sink your teeth into it… absolutely divine!
Step 7: The Art of Chilling – Patience Pays Off
Now here comes one of those non-negotiable steps that can truly make or break your cookie experience—chilling the dough! I know waiting isn’t easy (believe me!), but I promise you, taking this extra step is going to yield cookies that are beautifully chewy on the inside with perfectly crisp edges. Wrap your dough in plastic wrap or transfer it to an airtight container and refrigerate for at least 30 minutes—or up to overnight if you’re feeling particularly patient!
Why does chilling matter so much? Well, when you chill cookie dough, you’re allowing the fat (butter) to solidify again after being creamed with sugar. This means when they bake, they won’t spread too much; instead, they’ll hold their shape beautifully while still remaining soft inside. Additionally, letting the flavors meld during this resting period enhances every single bite’s depth and richness—trust me when I say it’s worth every minute of waiting!
Step 8: Assembling Your Chocolate Cookie Wonders
After all that anticipation and patience with chilling your dough, it’s finally time to assemble these delightful treats! Preheat your oven to 350°F (175°C) while you prepare for what’s next—this ensures it’s nice and hot when you’re ready to pop those cookies in for baking magic! Line two baking sheets with parchment paper; this will help prevent any sticking and make cleanup a breeze.
Using a cookie scoop or tablespoon measure (aim for about two tablespoons per cookie), take one scoop of chilled dough and flatten it slightly in your hands—think small disc shapes here! Now comes the fun part: grab about half a teaspoon of Nutella and half a teaspoon of vegan marshmallow fluff (or crème) and place them right in the center of that flattened disk. Carefully fold over the edges around this gooey goodness until it’s completely sealed inside like a treasure chest filled with indulgence. Place these little gems onto your prepared baking sheets with enough space between them because they will spread just slightly as they bake.
Step 9: Baking Your Perfect vegan marshmallows and Nutella Stuffed Chocolate Cookies
Once all your cookies are shaped and ready on the baking sheets, slide them into your preheated oven for about 10-12 minutes. Keep an eye on them during those final moments—a good visual cue is when their edges start looking firm but their centers may still look slightly underbaked; this is perfect because they’ll continue cooking even after they’re out of the oven due to residual heat! You want them soft yet set—they should puff up beautifully during baking but settle down as they cool.
The aroma wafting from your oven will be utterly intoxicating—imagine rich chocolate mingling with hints of toasted nutty goodness from Nutella; it’s enough to make anyone weak at the knees! Let them cool on the baking sheet for about 5 minutes before transferring them onto wire racks to cool completely—this step allows them to firm up just enough so they won’t fall apart upon transferring.
Ahh… finally! You’ve created something truly extraordinary: vegan marshmallows and Nutella stuffed chocolate cookies. Each bite delivers layers of flavor—from rich chocolatey goodness enveloping sweet hazelnut notes paired with gooey marshmallow bliss—it’s simply magical! Enjoy every moment savoring these delights; share some with friends or keep them all for yourself—you deserve it all!
Storage and Enjoyment Tips for Your vegan marshmallows and Nutella Stuffed Chocolate Cookies
Ah, the moment we’ve all been waiting for! Your kitchen is filled with the intoxicating aroma of freshly baked vegan marshmallows and Nutella stuffed chocolate cookies. The temptation to dive right in is real, but before you do, let’s talk about how to store these delightful treats to keep them at their best. Trust me, you’ll want to savor every last crumb, so knowing how to preserve their magic is absolutely paramount.
Storing Leftover vegan marshmallows and Nutella Stuffed Chocolate Cookies
Once you’ve taken a bite of that warm, gooey goodness, you’ll likely want to save some for later—and I don’t blame you! To store your extra cookies, place them in an airtight container; this helps lock in their moisture and keeps them soft and chewy. If you’re feeling particularly clever, consider adding a slice of bread into the container—this little trick helps maintain that perfect texture by absorbing excess moisture. These cookies can be stored at room temperature for about a week, or even longer if you keep them sealed properly. As time passes, the flavors meld beautifully, offering an even more profound satisfaction. When you’re ready to indulge again, just pop them in the microwave for about 10-15 seconds; trust me when I say this will awaken those delicious flavors once more!
Freezing vegan marshmallows and Nutella Stuffed Chocolate Cookies for Later
Now, if you’re like me and tend to over-bake (because who can resist that heavenly dough?), freezing these marvels is an absolute game-changer! To freeze your cookies properly, allow them to cool completely before placing them in a single layer on a baking sheet. Once they’re frozen solid—about an hour—transfer them into a freezer-safe bag or container. They’ll keep wonderfully frozen for up to three months! This method not only conserves their divine flavor but also gives you the convenience of having a delectable treat at your fingertips whenever you crave something sweet. Imagine pulling out a cookie from the freezer, letting it thaw just a bit (or warming it up straight from frozen), and indulging in that familiar taste—it’s simply extraordinary!
As you can see, whether enjoying them fresh out of the oven or savoring leftovers weeks later, these cookies bring joy time and time again.
Vegan Marshmallows and Nutella Stuffed Chocolate Cookies
Indulge in the delightful experience of homemade vegan marshmallows and Nutella stuffed chocolate cookies. This comforting dessert combines soft, chewy cookies bursting with creamy Nutella and fluffy vegan marshmallows, creating a symphony of textures and flavors that will leave you craving more. Perfect for gatherings or late-night cravings, these cookies are not just a treat; they encapsulate the warmth of shared moments with loved ones. With simple ingredients and straightforward preparation, you can easily whip up a batch of these deliciously sweet snacks that everyone will adore. So grab your apron and dive into this mouthwatering adventure!
- Prep Time: 20 minutes
- Cook Time: 12 minutes
- Total Time: 32 minutes
- Yield: Approximately 24 servings 1x
- Category: Dessert
- Method: Baking
- Cuisine: Vegan
Ingredients
- 1 cup unsalted butter, softened
- 1 cup granulated sugar
- 1 cup packed brown sugar
- 2 large eggs (or flax eggs)
- 2 teaspoons vanilla extract
- 2 ½ cups all-purpose flour
- ¾ cup unsweetened cocoa powder
- 1 teaspoon baking soda
- ½ teaspoon salt
- 1 cup semi-sweet chocolate chips (dairy-free if needed)
- ½ cup Nutella (dairy-free option available)
- ½ cup vegan marshmallow fluff
Instructions
- Preheat your oven to 350°F (175°C) and line baking sheets with parchment paper.
- In a mixing bowl, cream together softened butter, granulated sugar, and brown sugar until light and fluffy.
- Add eggs (or flax eggs) one at a time along with vanilla extract; mix until well combined.
- In another bowl, whisk together flour, cocoa powder, baking soda, and salt. Gradually add this mixture to the wet ingredients, folding gently until just combined.
- Stir in chocolate chips until evenly distributed.
- Chill the dough for at least 30 minutes in the refrigerator.
- Scoop out dough portions (about two tablespoons each), flatten slightly, place Nutella and marshmallow fluff in the center, then seal and shape into balls.
- Bake for 10-12 minutes or until edges are firm but centers look slightly underbaked.
- Let cool on baking sheets for about 5 minutes before transferring to wire racks.
Nutrition
- Serving Size: 1 serving
- Calories: 200
- Sugar: 15g
- Sodium: 150mg
- Fat: 10g
- Saturated Fat: 4g
- Unsaturated Fat: 5g
- Trans Fat: 0g
- Carbohydrates: 27g
- Fiber: 2g
- Protein: 2g
- Cholesterol: 30mg