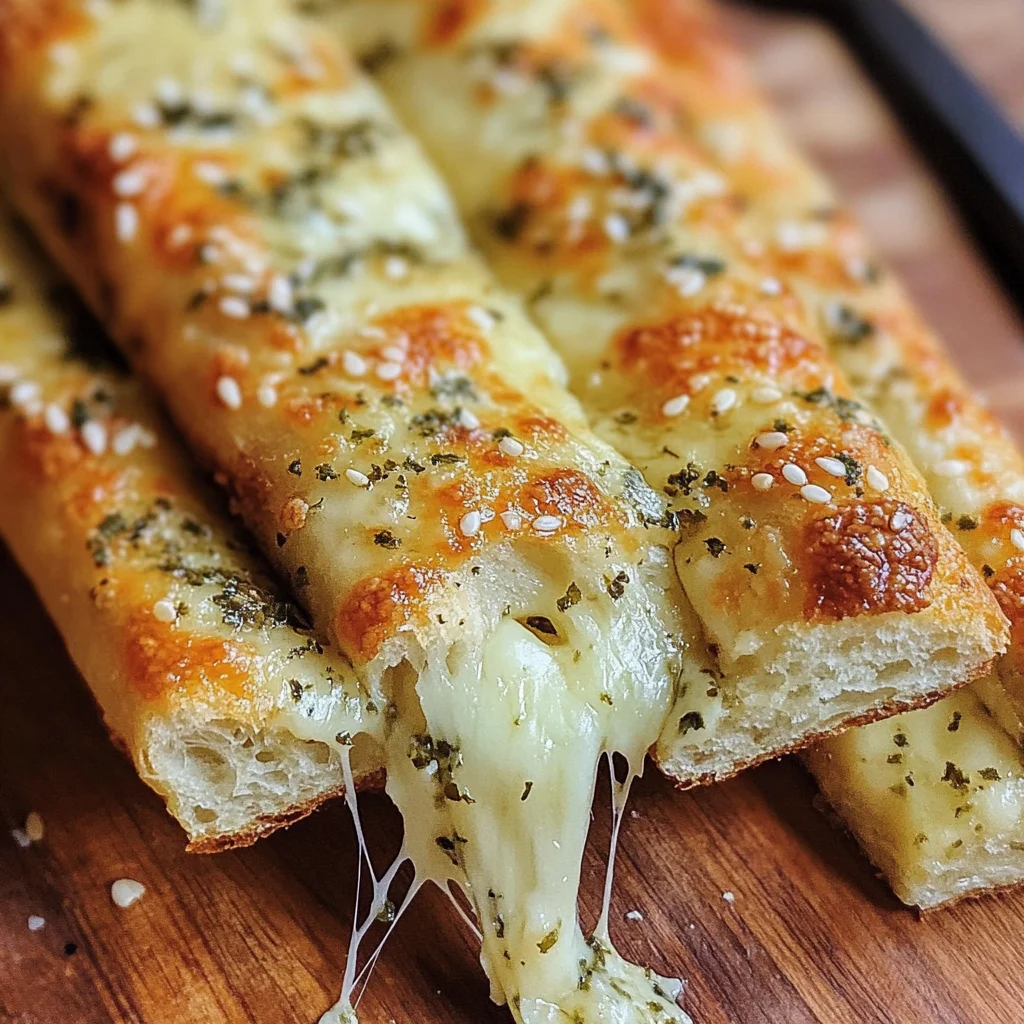
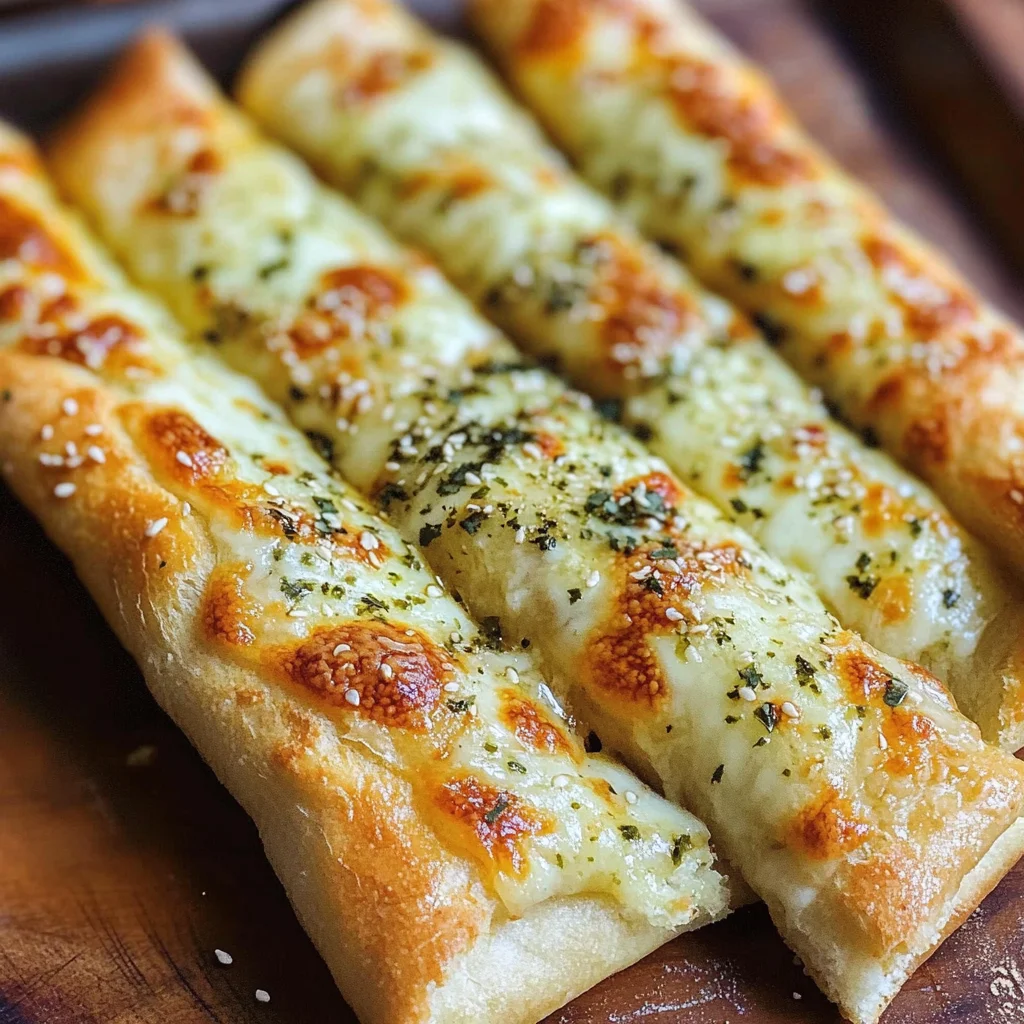
Crispy Sourdough Cheesy Breadsticks
It’s a crisp morning, and the sun peeks through my kitchen window, casting a warm glow on the countertop. I remember the joy of discovering a recipe that not only reduces waste but also creates something utterly delicious. Today, I want to share my Crispy Sourdough Cheesy Breadsticks with you—these delightful treats are not just snacks; they’re an experience, a moment of sheer indulgence wrapped in nostalgia. Imagine biting into a perfectly crispy breadstick, each crunch revealing the buttery layers filled with savory cheese and aromatic herbs. It’s like a symphony of flavors singing in harmony! What makes these breadsticks truly special is their ability to transform sourdough discard—a byproduct of your sourdough baking adventures—into something wonderfully addictive.
Trust me when I say that these crispy treats are perfect for any occasion, whether you’re hosting friends for game night or simply enjoying a cozy evening at home. They’re incredibly versatile too! You can pair them with your favorite dips or enjoy them as they are, each bite leaving you craving more. The beauty of this recipe lies not only in its taste but also in its simplicity. You don’t need to be a seasoned chef to nail this one; all you need is your hands and a little love for the process. So let’s dive into this culinary journey together!
Crispy Sourdough Cheesy Breadsticks: An Irresistible Snack for Any Occasion
These breadsticks are more than just food; they encapsulate the spirit of creativity in the kitchen. As we embark on this journey together, remember that cooking is about exploration and joy. With just a handful of ingredients, we’ll create something extraordinary that transforms ordinary moments into memorable ones.
Ingredients:
As we get started on creating these delightful Crispy Sourdough Cheesy Breadsticks, let’s take a moment to appreciate each ingredient that contributes to their charm.
- 1 cup sourdough discard: This gem is the backbone of our recipe! If you’ve been nurturing your sourdough starter (and I hope you have!), you likely have some discard on hand that’s just waiting to be transformed into something magical. Using sourdough discard not only reduces waste but also infuses your breadsticks with that signature tangy flavor characteristic of sourdough. If you don’t have any on hand, fear not! You can substitute it with 1 cup of plain yogurt or buttermilk—both will add moisture and flavor while keeping things exciting.
- 1 cup all-purpose flour: This is where the magic begins! All-purpose flour provides structure and helps create those beautiful crispy edges that we all adore in breadsticks. For those looking for a healthier twist, feel free to swap it out with whole wheat pastry flour—this will add a slight nuttiness while still delivering tenderness. Just remember that different flours absorb moisture differently, so keep an eye on your dough texture as you mix!
- 1 cup shredded cheese: Ahh cheese—the hero of our story! Whether you choose sharp cheddar for its boldness or gooey mozzarella for its melt factor (or even combine both), cheese brings an irresistible richness to these breadsticks. When selecting cheese, opt for high-quality options without added preservatives for the best flavor. And if you’re feeling adventurous, try adding different cheeses like gouda or pepper jack for an unexpected twist!
- 1/2 teaspoon garlic powder: Garlic powder amplifies flavor in ways we can barely describe! It adds depth and warmth without overwhelming other ingredients—a non-negotiable addition if you ask me. Plus, it melds beautifully with the cheese and herbs you’ll be adding later.
- 1/2 teaspoon salt: This simple ingredient plays an absolutely paramount role in enhancing every single flavor present in our breadsticks. It balances sweetness and brings everything together harmoniously—don’t skip it!
- 1/4 teaspoon black pepper: A touch of black pepper offers subtle heat and complexity to our cheesy creation. Trust me when I say it elevates these breadsticks from ordinary to extraordinary!
- 1/4 cup olive oil or melted butter: Here’s where we bring richness into play! Olive oil lends a lovely fruity note while also ensuring our breadsticks achieve that desirable crispiness during baking. If you’re going dairy-free or simply prefer olive oil’s lighter touch, use it generously! Melted butter, however, adds its own unique depth—so choose based on your preference.
- To taste herbs (rosemary, thyme, or parsley): Fresh herbs are where creativity can shine! Whether you sprinkle in fragrant rosemary for earthiness or bright parsley for freshness, they bring additional layers of flavor that make every bite feel like springtime.
- To taste additional cheese: Because let’s face it—more cheese never hurt anyone! Feel free to sprinkle extra shredded cheese on top before baking; it’ll create an enticing golden crust that’s hard to resist.
- To taste sesame seeds: These little beauties add both crunch and nutty flavor; they’re optional but highly recommended if you’re looking to elevate your snack game.
- To taste everything bagel seasoning: If you’ve ever had everything bagels (who hasn’t?), then you’ll understand why this addition is so delightful! The blend usually includes sesame seeds, poppy seeds, garlic flakes, onion flakes—all things that harmonize beautifully with our cheesy breadsticks.
- To taste red pepper flakes: For those who enjoy an extra kick—red pepper flakes are your friend! Just a pinch can turn up the heat level without overpowering the dish.
Equipment You’ll Need:
Before diving into cooking bliss, it’s essential to gather our trusty kitchen companions—the tools that make creating these crispy delights smoother and more enjoyable!
- Mixing bowl – A sturdy mixing bowl is your canvas here; it should be large enough to comfortably hold all ingredients while allowing ample space for mixing without spills.
- Wooden spoon or spatula – Perfect partners in crime when combining your dry ingredients with wet ones; they help ensure everything comes together seamlessly without overworking your dough.
- Baking sheet lined with parchment paper – This is crucial for easy removal once they’re done baking! Parchment paper ensures even browning and prevents sticking—no one wants half their glorious creation left behind on the pan.
- Grater (if using block cheese) – Should you choose whole blocks rather than pre-shredded bags (which often contain anti-caking agents), having a box grater handy will allow you to effortlessly achieve fluffy strands ready for melting goodness!
Now that we’ve gathered everything we need let’s dive into preparing these Crispy Sourdough Cheesy Breadsticks—a delicious adventure awaits us!
Step 1: Mixing It All Together
Start by placing your sourdough discard into a large mixing bowl along with all-purpose flour and shredded cheese—you want them all cozy together from the get-go! Gently fold them using your wooden spoon until combined; at this point, you might find it feels slightly crumbly—that’s perfectly okay because we’re about to add moisture!
This initial mixing phase is important because it allows each ingredient time to get friendly before introducing liquids like olive oil or butter later on. Don’t rush this step; take care as you fold until there aren’t any visible dry patches left—this helps create uniformity across all flavors while preventing clumps of flour from sneaking through later.
Step 2: Add Your Flavors
Now comes one of my favorite parts—seasoning! Sprinkle garlic powder over your mixture followed by salt and black pepper; I recommend doing this gradually because it allows flavors to meld evenly throughout rather than concentrating solely within specific pockets within the dough itself.
Once you’ve added those potent seasonings into play alongside any desired herbs—it’s time again for some gentle folding action! Keep combining until every morsel feels coated with those fragrant spices dancing amongst bits of melted cheese peeking through…ahh just imagine how incredible it’ll smell once baked!
Step 3: Embrace That Richness
It’s time now for liquid gold—the olive oil or melted butter—to join our party! Drizzle it generously over your mixture before using either spatula or wooden spoon once more to incorporate fully until everything becomes cohesive—that luscious sheen will start forming around every morsel making them glisten under kitchen lights!
This step is crucial since fat plays an essential role in achieving crispiness during baking—it coats individual particles creating barriers against moisture retention whilst simultaneously enriching flavors beyond compare—you won’t regret taking this extra minute here!
Step 4: Shape Those Breadsticks
After ensuring everything has been well combined into one heavenly mixture—it’s shaping time! Lightly flouring clean hands prevents sticking as you grab small portions from within bowl rolling them gently between palms forming elongated shapes roughly resembling traditional breadstick sizes…or whatever size suits YOUR craving best!
Place shaped pieces onto prepared baking sheet lined earlier—and don’t worry about spacing too much since these beauties will expand slightly during baking process—they’re looking forward too much excitement ahead after all!
By molding them now instead of simply dropping blobs onto tray—you ensure consistency across length which leads toward uniform cooking times yielding crispier edges overall—a tip I swear by whenever crafting baked goods like these delightful sticks.
I can assure you there’s nothing quite like pulling out freshly baked crispy sourdough cheesy breadsticks from oven; each bite transports me back home reminding me why cooking evokes such happiness within us all…so let’s continue exploring how we’ll finish off this delicious adventure together!
Step 5: Mixing the Ingredients – Creating the Dough’s Heart
Now that we’ve collected our ingredients, it’s time to bring them together and create the dough that will transform into our crispy sourdough cheesy breadsticks. In a large mixing bowl, start by adding your 1 cup of sourdough discard. This is not just any waste; it’s a treasure trove of flavor and natural fermentation that gives your breadsticks a unique tang. Next, sprinkle in 1 cup of all-purpose flour, followed by 1/2 teaspoon of garlic powder, 1/2 teaspoon of salt, and 1/4 teaspoon of black pepper. The garlic powder adds an aromatic warmth, while the salt enhances every other flavor in this concoction. With a sturdy spatula or wooden spoon, gently mix these dry ingredients with the sourdough until they begin to come together into a shaggy dough.
As you mix, take a moment to enjoy the sensory experience—the aroma wafting up from the bowl is utterly intoxicating! It’s crucial to mix just until combined; overmixing can lead to tough breadsticks instead of the tender texture we desire. Once you see that the ingredients are mostly incorporated but still have some visible flour, it’s time to add your 1 cup of shredded cheese—feel free to use cheddar for its sharpness, mozzarella for its gooeyness, or even a delightful blend! Fold the cheese into your dough gently; this is where the magic begins as each piece of cheese becomes nestled within, promising those glorious pockets of melted goodness when baked.
Step 6: Forming Your Breadsticks – Shaping for Success
With your dough ready and smelling amazing, it’s time to shape these beauties into sticks. Lightly flour your work surface; this step ensures that you won’t end up with an unmanageable sticky mess. Take a portion of your dough—about half—and place it on the floured surface. Using your hands or a rolling pin (if you prefer), gently flatten it out into a rectangle about 1/4 inch thick. Trust me on this one: keeping them uniform in thickness is absolutely paramount if you want evenly baked breadsticks.
Now comes the fun part! Grab a sharp knife or pizza cutter and slice your flattened dough vertically and then horizontally to create strips that are roughly 1 inch wide. You should have delightful little rectangles waiting to be transformed! As you cut, think about how these will become crispy delights; each cut creates edges that will crisp up beautifully in the oven. Don’t rush through this step; take your time ensuring each stick is well-defined because this attention to detail will reward you later with perfectly shaped pieces that are both visually appealing and easy to dip!
Step 7: Prepping for Baking – Elevating Flavor Profiles
Once you’ve shaped all your dough into sticks, it’s essential to brush them with olive oil or melted butter—this step is non-negotiable! Drizzling about 1/4 cup over them will not only enhance their flavor but also help achieve that gorgeous golden brown hue during baking. Use a pastry brush for an even application; you’ll want every surface coated in liquid gold. This oil helps facilitate browning through a process called Maillard reaction—a wonderful phenomenon where sugars and proteins react under heat, creating complex flavors and aromas that fill your kitchen.
At this stage, let’s get creative with toppings! Feel free to sprinkle on additional cheese for extra gooeyness or herbs like rosemary or thyme for an aromatic twist. If you’re feeling adventurous (and I encourage you to be!), add sesame seeds or everything bagel seasoning for that satisfying crunch and flavor explosion with every bite. Mixing it up here really makes each batch unique—what’s not to love? After topping your sticks generously, it’s time for them to rest briefly before baking; letting them sit for about 10 minutes at room temperature allows those flavors to meld beautifully while also giving the gluten in the dough some time to relax.
Step 8: Baking Your Perfect Crispy Sourdough Cheesy Breadsticks
Now we arrive at one of the most exhilarating moments—the baking! Preheat your oven to 400°F (200°C) while we prepare our baking sheet lined with parchment paper (this step prevents sticking and makes cleanup effortless). Carefully transfer each breadstick onto the baking sheet, making sure they have a little space between them—this will ensure they crisp up rather than steam during baking. Pop them into your preheated oven for about 15-20 minutes, but keep an eye on them because ovens can vary widely!
What should you look for? The transformation begins as they bake—those sticks will puff up slightly and turn golden brown around the edges. You’ll know they’re done when they emit an alluring aroma that beckons everyone nearby and have developed an irresistible crunchy exterior while remaining soft inside. A gentle tap on one should yield a hollow sound—that’s how you know they’re ready! Don’t hesitate once they’re done; remove them from the oven promptly because letting them cool too long might result in softening rather than maintaining that coveted crispiness.
Conclusion:
What a journey we’ve taken together through the creation of these crispy sourdough cheesy breadsticks! From transforming humble sourdough discard into something utterly intoxicating to crafting snacks that everyone will love, I hope you feel as inspired as I do. These breadsticks are more than just a recipe; they embody creativity and resourcefulness in the kitchen. Each bite reveals layers of flavor—the richness of melted cheese mingling with the subtle tang of sourdough creates an experience that’s truly extraordinary.
Now, why should you rush to try this recipe? Beyond their enchanting taste lies the sheer joy of making them. Picture yourself pulling these golden-brown sticks from the oven, surrounded by family or friends who can’t wait to dig in. Whether it’s game night, movie marathons, or simple afternoon gatherings, these cheesy delights are perfect companions, bringing people together over shared flavors and laughter. It’s hard not to smile when you’re indulging in something so comforting and delicious!
Imagine savoring one with your favorite dipping sauce—perhaps a creamy marinara or even a zesty hummus that contrasts beautifully with the cheesy goodness. For an afternoon pick-me-up while enjoying tea or coffee, pair one alongside your beverage of choice; the combination is simply divine! And if you’re feeling adventurous on some rainy evening? Consider turning these breadsticks into mini sandwiches stuffed with roasted veggies or even some dairy-free pesto; oh my goodness, can you feel the potential?
Feeling adventurous? This recipe is wonderfully adaptable! Why not try adding different herbs like basil or oregano for an Italian twist? Or sprinkle in some sun-dried tomatoes or jalapeños for added depth and zing? The possibilities are endless! I invite you to explore variations that excite your palate and suit your mood—you never know what delightful surprises await when you get creative in the kitchen! So grab those ingredients today, whip up your own batch of crispy sourdough cheesy breadsticks, share your experience with loved ones, and let’s connect over our mutual passion for good food!
Crispy Sourdough Cheesy Breadsticks

Transform sourdough discard into deliciously crispy sourdough cheesy breadsticks—perfect for sharing! Try this recipe today.
- Prep Time: 15 minutes
- Cook Time: 20 minutes
- Total Time: 35 minutes
- Yield: Approximately 12 servings (24 breadsticks) 1x
- Category: Appetizer
- Method: Baking
- Cuisine: American
Ingredients
- 1 cup sourdough discard
- 1 cup all-purpose flour (or whole wheat pastry flour)
- 1 cup shredded cheese (cheddar, mozzarella, or your choice)
- 1/2 teaspoon garlic powder
- 1/2 teaspoon salt
- 1/4 teaspoon black pepper
- 1/4 cup olive oil or melted butter
- Fresh herbs (rosemary, thyme, or parsley) to taste
Instructions
- Preheat oven to 400°F (200°C) and line a baking sheet with parchment paper.
- In a large mixing bowl, combine the sourdough discard, flour, cheese, garlic powder, salt, and black pepper.
- Gradually mix in the olive oil or melted butter until the dough comes together.
- Shape the dough into sticks of about 1 inch wide and place them on the prepared baking sheet.
- Brush any remaining oil or butter over the tops and sprinkle with herbs or extra cheese if desired.
- Bake for 15-20 minutes until golden brown and crispy.
Nutrition
- Serving Size: 2 breadsticks (50g)
- Calories: 160
- Sugar: 0g
- Sodium: 280mg
- Fat: 9g
- Saturated Fat: 3g
- Unsaturated Fat: 6g
- Trans Fat: 0g
- Carbohydrates: 16g
- Fiber: 1g
- Protein: 5g
- Cholesterol: 10mg