Red, White, and Blue Cheesecake Strawberries
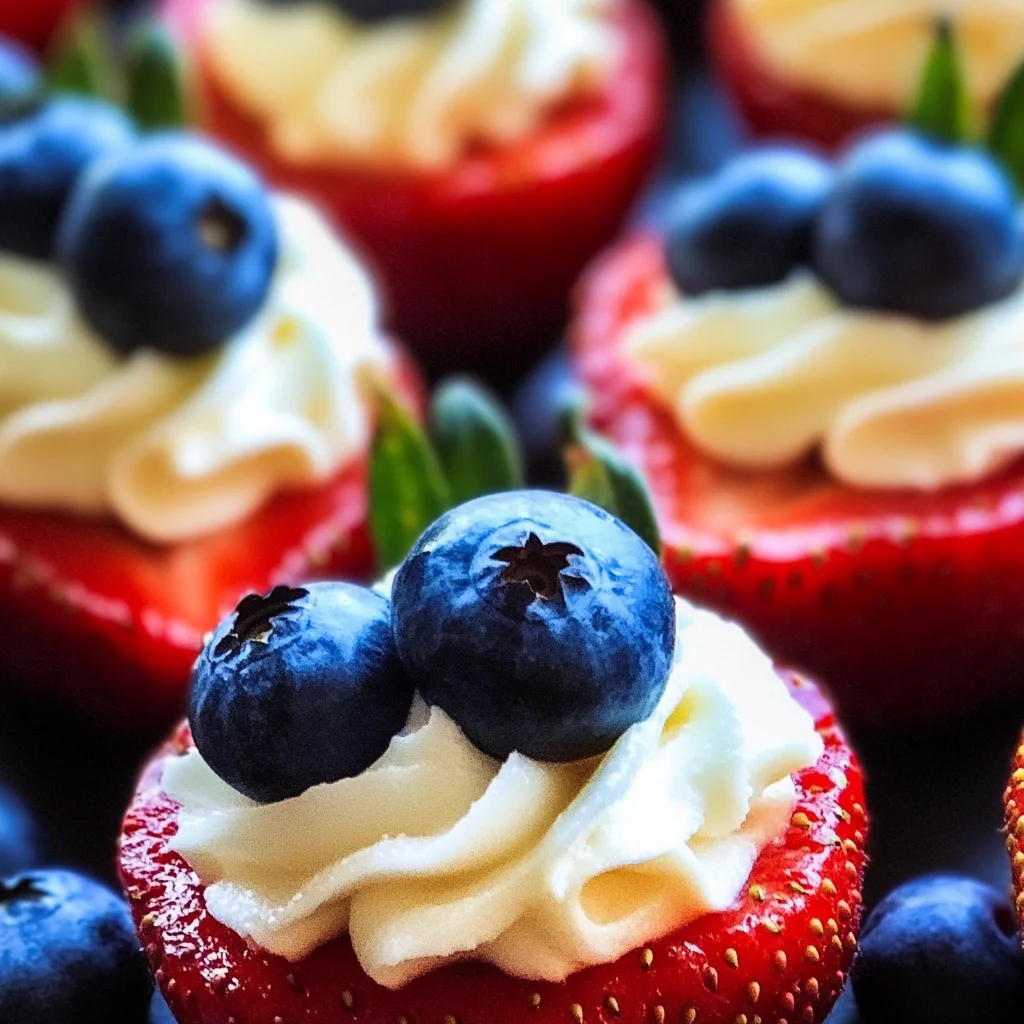
There’s something utterly enchanting about a dessert that captures the essence of summer, isn’t there? The vibrant hues of red, white, and blue come together in a delightful dance, and when you take a bite of these Red, White, and Blue Cheesecake Strawberries, it’s as though you’re savoring sunshine itself. Each bite is an explosion of creamy sweetness contrasted by the fresh juiciness of strawberries and the burst of blueberries, making it not just a treat but an experience to cherish. This recipe is more than just a delicious dessert; it’s a celebration of life’s joyful moments. Imagine serving these at your next gathering or picnic—eyes lighting up with delight as friends and family indulge in this patriotic homage to summer.
As I’ve always been captivated by the way food can bring people together, I can’t help but feel that these cheesecake strawberries are perfect for occasions like Independence Day or any summer barbecue. They embody a spirit of community and festivity while being refreshingly simple to prepare. The cream cheese filling is rich yet light, making it an ideal complement to the strawberries’ natural sweetness. Trust me on this: once you whip these up, they’ll become your go-to summer dessert that everyone will ask for again and again.
Ingredients:
Embarking on this culinary journey requires gathering a few key ingredients that come together to create something truly special. Let’s dive into what you’ll need for our Red, White, and Blue Cheesecake Strawberries.
- 1 (8-ounce) package cream cheese, softened. This ingredient is absolutely paramount in achieving that smooth and luscious filling we crave in our cheesecake strawberries. When softened properly—ideally to room temperature—the cream cheese becomes velvety and blends seamlessly with the other ingredients. You want to avoid cold cream cheese because it won’t mix well; instead, you should have a creamy consistency that will pipe beautifully into those fresh strawberry halves. Consider using full-fat cream cheese for an indulgent richness that enhances every bite.
- 1/2 cup confectioners’ sugar. This sweetener plays a crucial role in balancing the tanginess of the cream cheese while adding a delicate sweetness that complements the fresh fruit. It’s important to use confectioners’ sugar rather than granulated sugar here because it dissolves quickly and creates that silky texture we love in our filling. If you’re looking for alternatives due to dietary preferences or availability, you could experiment with powdered coconut sugar or even stevia-based powdered sweeteners for a lighter option.
- 1 cup whipped topping, thawed. The whipped topping adds airiness and lightness to our filling—it transforms what could be dense into something ethereal! It’s like capturing clouds in your dessert! Be sure it’s fully thawed before mixing so that it incorporates smoothly without deflating too much of its volume. If you prefer homemade whipped cream for its natural flavor and texture, simply whip heavy whipping cream until soft peaks form—just keep an eye on it so it doesn’t turn into butter!
- 1/2 teaspoon almond extract. This ingredient is akin to liquid gold in this recipe; it adds depth and complexity to our filling without overpowering it. Almond extract has such a beautiful aroma that can elevate even simple desserts into extraordinary ones—it’s one of those secret ingredients my friends often ask about! If you’re allergic or prefer something different, feel free to substitute with vanilla extract or even lemon zest for a zesty twist.
- 12 large strawberries, cut in half. Choose plump and vibrant strawberries for maximum flavor—these beauties will serve as the delightful edible vessels for our creamy filling! When selecting strawberries at the market, look for ones that are bright red with no green patches or bruises; they should also have a fragrant aroma that promises sweetness inside. Cutting them in half allows us to create little boats filled with cheesecake goodness—a perfect presentation!
- 36 blueberries. These tiny spheres of flavor provide not only pops of freshness but also an eye-catching contrast against the luscious white filling and red strawberries. Their slight tartness complements the sweetness beautifully while adding nutritional benefits too! Make sure they are firm and free from blemishes when purchasing so they burst beautifully when pressed into each strawberry.
Equipment You’ll Need:
Having the right tools at your disposal makes all the difference when creating your culinary masterpiece! While not ingredients per se, these essential partners in crime will ensure everything goes smoothly as you prepare your Red, White, and Blue Cheesecake Strawberries.
- Electric mixer – This handy appliance is vital for achieving perfectly blended fillings without breaking a sweat! Using an electric mixer allows you to achieve that delightful fluffy texture quickly—just imagine how exhausting mixing by hand would be! Opt for one with multiple speed settings so you can start slow (to avoid splatters!) before ramping up once everything is combined.
- Pastry bag fitted with a large star tip – This tool is essential for piping our luscious filling into each strawberry half elegantly! The star tip creates beautiful swirls that add visual appeal while also making sure every bite has just enough creamy goodness packed inside. If you don’t have one on hand or prefer not to use disposable bags, consider using a sturdy resealable plastic bag instead; just snip off one corner!
- Cutting board & knife – A good cutting board provides stability when slicing those lovely strawberries in half while protecting your counters too! Choose a sharp knife; this makes cutting through fruit effortless—and trust me: clean cuts make for prettier presentations!
Preparing the Red, White, and Blue Cheesecake Strawberries
Step 1: Creating Your Creamy Filling
To begin this delightful process, grab your electric mixer because we’re about to whip up some magic! Start by placing your softened cream cheese into the mixing bowl along with the confectioners’ sugar—this combination will serve as the base of our heavenly filling. What happens next is known as creaming; set your mixer on medium speed until both ingredients meld together beautifully into a smooth mixture devoid of lumps. You’ll know it’s ready when it’s fluffy and has lightened slightly in color—this should take about 2 minutes at most!
Now reduce your mixer speed to LOW before gently folding in the thawed whipped topping along with almond extract—this step brings airiness back into our mixture after incorporating heavier ingredients like cream cheese which can weigh things down if not handled carefully! Mixing slowly helps maintain the volume we created earlier; trust me when I say watching those swirls incorporate is nothing short of mesmerizing!
Step 2: Getting Ready To Pipe
Once you’ve achieved that dreamy texture—we’re talking light yet decadent—it’s time for assembly! Grab your pastry bag fitted with a large star tip (or get crafty with your resealable bag). Carefully spoon all this delicious filling inside; don’t rush this step because ensuring no spills happen here sets us up nicely later on! Once filled snugly but not overstuffed (we still need room at the top), twist closed securely so nothing escapes during piping.
Step 3: Filling Those Strawberry Halves
Now comes one of my favorite parts: transforming those halved strawberries into stunning edible delights! Begin by holding each strawberry half upright—with their cut side facing up—and pipe generously through your star tip onto each berry’s surface until it’s nearly overflowing with glorious cheesecake goodness! Aim high here because who doesn’t love extra filling? Just remember: less mess means less stress!
Step 4: Adding Blueberries
After all strawberries have been filled lovingly with creamy perfection comes another exciting moment—placing blueberries atop each one like little jewels crowning their fruity throne! Gently press three blueberries down into each dollop of cheesecake filling—it’s crucial they stay put without overwhelming their strawberry host but still offer bursts against every creamy bite you’ll take later on!
This whole process allows us not only artistry but also ensures balance between flavors throughout every mouthful—a truly extraordinary experience awaits anyone who indulges!
Step 5: The Joy of Mixing Creamy Dreams
Now that you have your beautiful cream cheese softened to the perfect spreadable consistency, it’s time to introduce it to the confectioners’ sugar. This step is where things start to get really exciting! Using an electric mixer, beat together the softened cream cheese and the half cup of confectioners’ sugar until the mixture reaches a velvety smoothness that almost feels like liquid gold in your hands. You want to ensure that there are no lumps because this cream cheese filling is going to be the heart and soul of your Red, White, and Blue Cheesecake Strawberries.
Trust me on this—if you don’t beat it well enough, those little lumps can turn your otherwise gorgeous strawberries into a less-than-ideal texture experience. So don’t rush this step; take your time! Aim for about 2-3 minutes on medium speed, pausing occasionally to scrape down the sides of the bowl so everything gets thoroughly incorporated. The end result should be a creamy canvas—smooth, sweet, and utterly intoxicating. What makes this step so special is that the sugar dissolves into the cream cheese, creating a delightful balance of sweetness that will perfectly enhance the natural flavors of your strawberries.
Step 6: Whipping Up Delight
Next comes my favorite part—adding in that luscious whipped topping! With your mixer still set on low (we don’t want to splatter our precious creation all over the kitchen), gently fold in one cup of thawed whipped topping along with half a teaspoon of almond extract. The whipped topping not only lightens up this rich filling but also adds an airy quality that will make each bite feel like a soft cloud dancing on your tongue.
As you mix, watch for those beautiful swirls forming as the light and fluffy whipped topping melds with the creamy base—you’ll know you’re almost there when it looks like a cheesecake dream come true! This step is crucial because it helps create that delightful texture we all crave when biting into something sweet yet refreshing. I promise you; the almond extract will envelop your senses with its warm aroma, making these strawberries not just a treat for your taste buds but also an experience for your soul!
Step 7: Filling Your Pastry Bag with Love
With our creamy filling perfectly blended and ready to shine, it’s time to get our pastry bag prepped and ready for action! Grab a pastry bag fitted with a large star tip; if you don’t have one handy, don’t worry—a simple zip-top bag with one corner snipped off will work just fine too! Carefully spoon or transfer your heavenly cream cheese mixture into the bag. I find it helpful to place the bag inside a tall glass or mug while doing this—it keeps everything contained and makes for less mess!
Once filled, twist or seal off the top of your bag and give it a gentle squeeze until you see some delicious filling peeking out from the tip. Now here’s where patience comes into play: before we start piping away onto those strawberries, let’s take a moment to admire our hard work! The reason we put so much love into preparing this filling is that every dollop we pipe will not just serve as decoration but also as an enticing flavor burst when someone takes their first bite. Visualize how gorgeous they will look—each strawberry adorned with fluffy stars of cream cheese goodness!
Step 8: Pipe Away Perfection
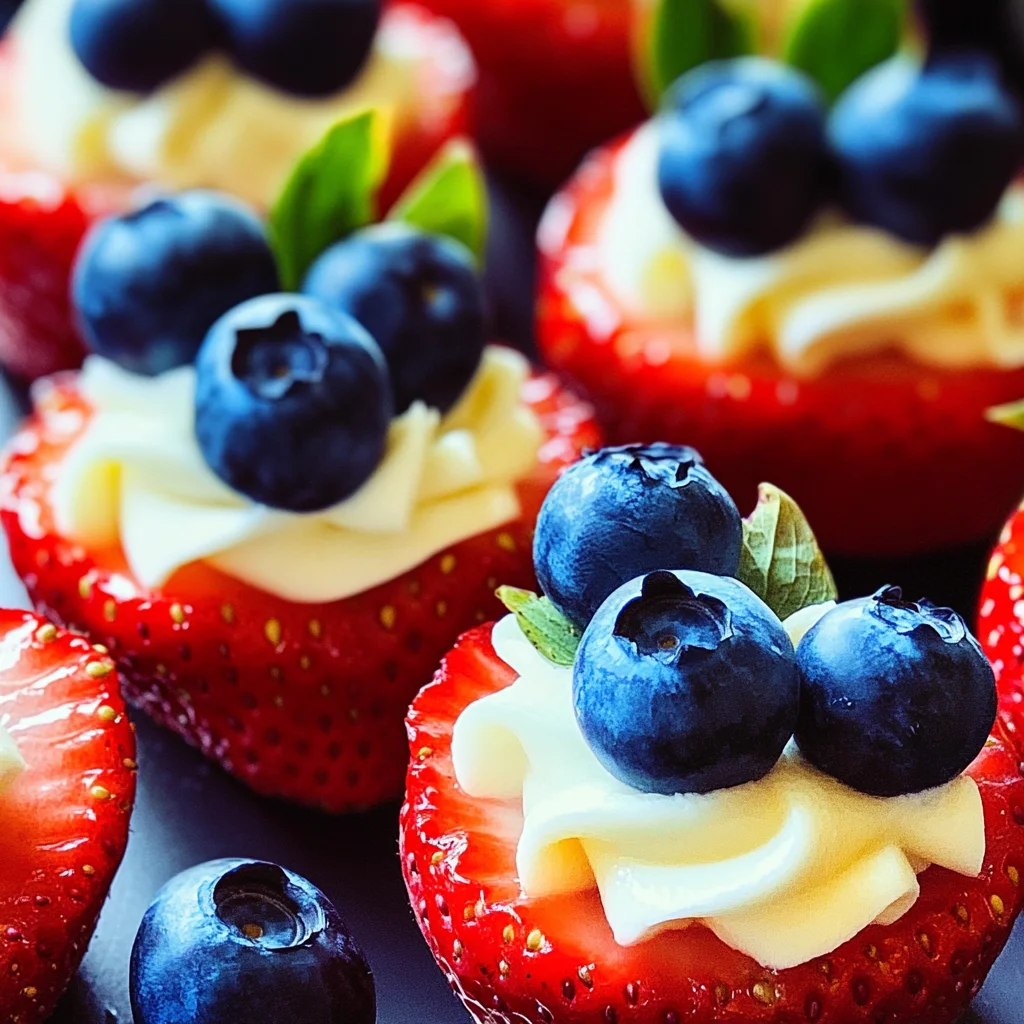
Now comes the fun part—piping those beautiful stars onto each halved strawberry! Start by holding each strawberry firmly in one hand (the cut side facing up) while using your other hand to bring the pastry bag close to its surface. Gently apply pressure on the bag while moving in circular motions to create lovely star shapes atop each berry. Don’t worry if they aren’t perfect; they’ll still taste absolutely extraordinary!
As you pipe away, keep an eye out for how much filling you’re applying—it should mound nicely without spilling over too much (though honestly, who could blame them if they did?). Each strawberry needs just enough of that luscious cheesecake filling to create balance between sweetness and tartness without overwhelming its natural flavor. Once you’ve piped all twelve strawberries (and maybe snuck in a taste or two), take a moment to admire them before moving on—they’re already looking stunning!
Next Major Phase: The Finishing Touches
Let’s wrap up these beauties with some final touches that’ll elevate them from delightful treats to show-stopping desserts at any gathering!
Step 9: A Colorful Crown of Blueberries
Alright my friend, it’s time for those vibrant blueberries—the crown jewels atop our Red, White, and Blue Cheesecake Strawberries! Gently press three blueberries into each piped star of cream cheese filling, arranging them artfully so every strawberry gets its fair share of color and flavor. Not only do these blueberries add vibrant pops of color against the creamy white backdrop, but their burst of juiciness complements each bite perfectly.
This may seem like just decoration at first glance, but trust me—it plays an essential role in balancing flavors between tangy sweetness from strawberries and rich creaminess from our cheesecake filling. Plus, when you take that first heavenly bite and feel those blueberries explode in your mouth? Absolutely paramount! Once done assembling these gorgeous creations, place them on a serving platter or tray.
Step 10: Chill Out Before Serving
Before diving into these scrumptious treats (and oh boy are you going to want to dive right in!), let’s give them some chill time in the refrigerator for at least one hour before serving. Why chill? Well, allowing these Red, White, and Blue Cheesecake Strawberries to rest helps enhance their flavors significantly—the cool temperature also ensures everything stays firm and delightful when served.
As they sit there soaking up all their deliciousness together in harmony inside your fridge—try not to peek too often! It might be tempting—but I promise that patience pays off beautifully here; you’ll be rewarded with chilled perfection when it’s finally time for dessert! Just think about how satisfying it’ll feel watching friends’ eyes light up as they indulge; trust me—they won’t soon forget these little bites of joy.
And voilà! There you have it: irresistible Red, White, and Blue Cheesecake Strawberries ready for any celebration or cozy summer night under twinkling stars. Enjoy every luscious bite knowing you’ve created something truly extraordinary that’s bound to become part of cherished memories shared around good food with great company!
Storage and Enjoyment Tips for Your Red, White, and Blue Cheesecake Strawberries
Oh, my friends, can you just feel the excitement bubbling over as you prepare to serve your stunning Red, White, and Blue Cheesecake Strawberries? These delightful gems are not only a treat for the eyes but also an absolute joy to savor! Whether you’re celebrating a festive occasion or simply indulging in a summer afternoon, these strawberries are nothing short of extraordinary. But let’s talk about what happens when you have a few leftovers—because I promise you, they’re just as delightful the next day!
Storing Leftover Red, White, and Blue Cheesecake Strawberries
To keep your magnificent Red, White, and Blue Cheesecake Strawberries fresh and scrumptious, gently place them in an airtight container lined with parchment paper. This is crucial because it helps absorb any excess moisture while preventing those little beauties from squishing together. Store them in the refrigerator where they will stay fresh for up to three days. Trust me on this one: I’ve done extensive taste tests (for science!) and found that chilling them overnight enhances their flavors even more! If you ever find yourself with extras, try placing a slice of bread in the container; it works wonders in maintaining moisture without letting the strawberries get soggy. As for how they taste after storage? Oh, my goodness! You’ll still experience that refreshing burst of strawberry sweetness mingling with the creamy cheesecake filling—it’s like a delicious encore performance!
Freezing Components for Later
Now let’s chat about freezing these delightful treats for those moments when you want to whip up something special without all the fuss. While I recommend enjoying them fresh for the best texture and flavor experience, if you want to freeze the cheesecake filling separately for later use, you can absolutely do that! Simply transfer the prepared filling into a freezer-safe container or heavy-duty freezer bag. It will keep beautifully frozen for up to three months. When you’re ready to indulge again, just thaw it overnight in the fridge before piping it onto fresh strawberries. Isn’t that convenient? You can have a festive dessert at your fingertips anytime you crave it! Just imagine pulling out that luscious filling on a warm summer day—it’s pure magic!
Red, White, and Blue Cheesecake Strawberries
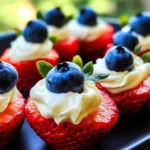
Indulge in the vibrant flavors of summer with these Red, White, and Blue Cheesecake Strawberries. This delightful dessert combines the lusciousness of a creamy cheesecake filling with the freshness of ripe strawberries and blueberries. Perfect for any gathering, these berries are not just visually stunning but also incredibly easy to prepare. The rich cream cheese filling, lightened with whipped topping and infused with almond extract, creates a heavenly contrast to the juicy fruit. Whether you’re celebrating Independence Day or enjoying a sunny picnic, these cheesecake strawberries will surely impress your friends and family!
- Prep Time: 20 minutes
- Cook Time: None
- Total Time: 0 hours
- Yield: Serves 12 1x
- Category: Dessert
- Method: No-Bake
- Cuisine: American
Ingredients
- 1 (8-ounce) package cream cheese, softened
- 1/2 cup confectioners' sugar
- 1 cup whipped topping, thawed
- 1/2 teaspoon almond extract
- 12 large strawberries, cut in half
- 36 blueberries
Instructions
- In a mixing bowl, use an electric mixer to beat softened cream cheese and confectioners' sugar until smooth and fluffy (about 2 minutes).
- Reduce the mixer speed to low, then gently fold in the thawed whipped topping and almond extract until well combined.
- Transfer the filling into a pastry bag fitted with a large star tip.
- Pipe the creamy filling into each halved strawberry generously.
- Top each filled strawberry with three blueberries.
- Chill in the refrigerator for at least one hour before serving for enhanced flavor.
Nutrition
- Serving Size: 1 strawberry (30g)
- Calories: 77
- Sugar: 9g
- Sodium: 45mg
- Fat: 4g
- Saturated Fat: 2g
- Unsaturated Fat: 2g
- Trans Fat: 0g
- Carbohydrates: 9g
- Fiber: 1g
- Protein: 1g
- Cholesterol: 14mg