Fruit Salsa with Baked Cinnamon Sugar Chips
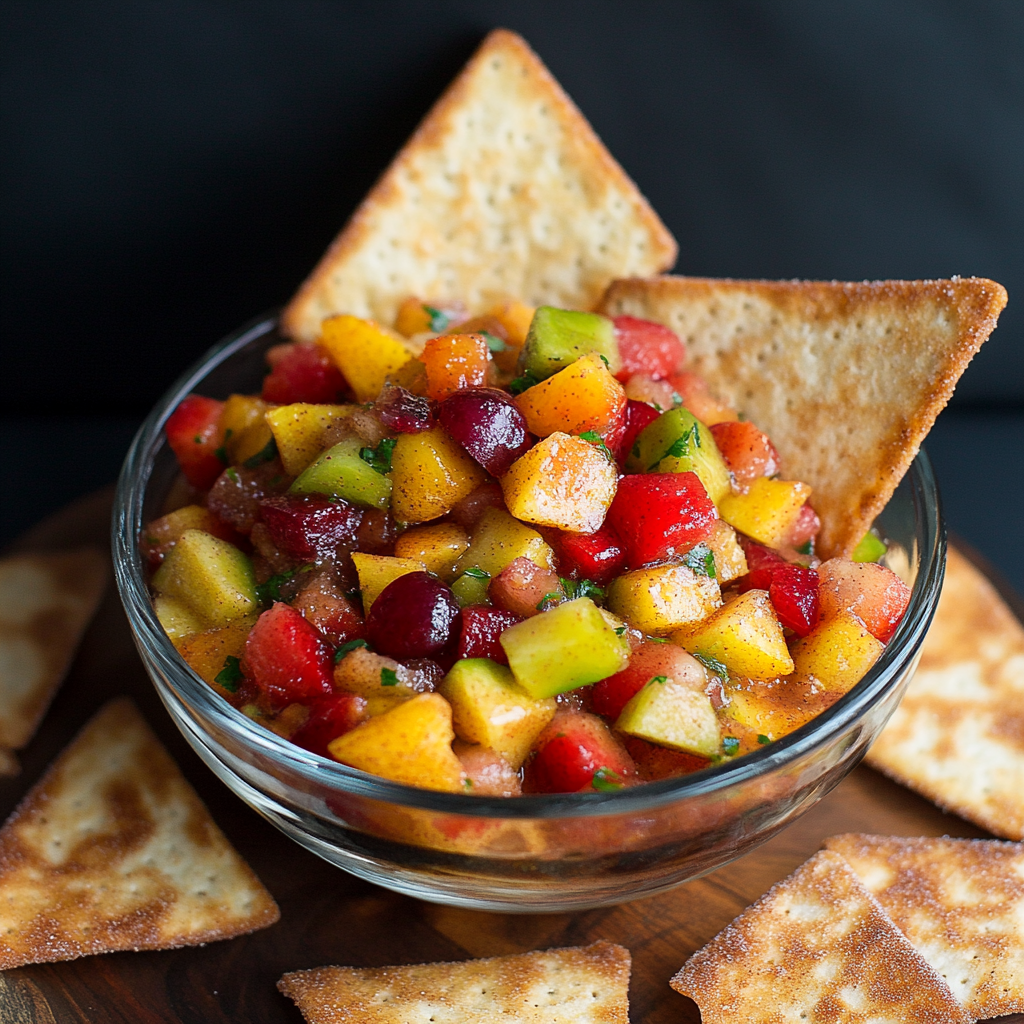
There’s something profoundly satisfying about gathering fresh, vibrant fruits and transforming them into a delightful, colorful salsa. When I think of summer, I picture sun-kissed peaches and juicy strawberries giving way to an explosion of flavor that dances on my tongue. This is more than just a recipe; it’s a celebration of nature’s sweetest offerings, served with a side of nostalgia and warmth. The combination of tangy fruits, blended with the sweetness of strawberry jam, creates a melody that not only tantalizes your taste buds but also brings people together. And trust me when I say that this Fruit Salsa with Baked Cinnamon Sugar Chips will become one of your go-to treats for gatherings, picnics, or simply as a refreshing snack on a warm day.
As you prepare this delightful dish, you’ll find that it resonates with both tradition and creativity—an effortless fusion that can bridge generations. The baked cinnamon sugar chips serve as the perfect crunchy companion to the juicy fruit salsa, adding just the right amount of sweetness and spice to each bite. It’s those little details—the gentle hint of cinnamon mingling with the fresh fruit—that create an experience rather than just a meal. It’s perfect for any occasion: be it a backyard barbecue or a cozy movie night at home. So let’s dive into this culinary journey together!
Fruit Salsa with Baked Cinnamon Sugar Chips: A Sweet Symphony in Every Bite
This vibrant fruit salsa will awaken your senses and make your heart sing!
Ingredients:
As we embark on this delicious adventure together, let’s take a moment to appreciate each ingredient that plays a role in crafting our delightful fruit salsa and its irresistible baked companions.
- 1 peach or nectarine (peeled and diced). Whether you choose a peach or nectarines—both have their own unique charm—this stone fruit adds the perfect balance of sweetness and acidity to our salsa. Look for peaches that yield slightly to pressure; they should feel soft but still firm enough to hold their shape when diced. Peaches bring an aromatic quality that complements other fruits beautifully, while nectarines offer a smooth skin for those who prefer not having to peel. Either way, you’re infusing your salsa with liquid sunshine!
- 1 mango (peeled, cored and diced). Ahh, mango—the tropical jewel that brings its luscious sweetness to the mix! When selecting mangoes, opt for ones that give slightly when squeezed but are not mushy; they should have a sweet fragrance at the stem end too. This fruit is full of flavor and adds a creamy texture that harmonizes beautifully with the crispness of other fruits in our salsa. Trust me when I say this addition is non-negotiable; it transforms the salsa into something extraordinarily special!
- 3 kiwis (peeled and diced). Kiwis are like little green bursts of happiness! Their tangy flavor cuts through the sweetness beautifully while adding a lovely pop of color to our dish. When choosing kiwis, look for ones that are slightly soft and have no blemishes—this means they’re ripe and ready to shine in your salsa. Plus, their vibrant green flesh adds visual appeal alongside all those other gorgeous hues!
- 1 (16 oz) pkg. strawberries (hulled and diced). Strawberries are undoubtedly the stars of any fruity ensemble! Fresh strawberries add juiciness and vibrant red color while bringing an inviting sweetness that’s hard to resist. To select strawberries at peak ripeness, look for bright red berries without any white or green spots—they should smell fragrant too! Don’t forget, hulled strawberries allow you to maximize their deliciousness by removing any undesirable parts before dicing them into beautiful bite-sized pieces.
- 1 1/2 tsp fresh lemon juice. This ingredient may seem simple but believe me—it’s crucial for enhancing flavors! Fresh lemon juice brightens up our fruit mixture by balancing out sweetness with its tart zing while also preventing browning in fruits like apples or bananas—although we aren’t using those here today! Opting for freshly squeezed juice elevates everything; bottled lemon juice lacks that lively essence we’re after.
- 2 Tbsp strawberry jam. This secret ingredient binds all our wonderful fruits together while adding an extra layer of sweetness without overwhelming the natural flavors at play—in fact, it helps highlight them! Use high-quality strawberry jam made from real fruit if possible; it makes all the difference in achieving depth in flavor.
- 1/4 cup granulated sugar. Granulated sugar isn’t just about sweetening; it also plays an essential role in creating our cinnamon sugar mixture later on! It’s important not to skip this step as we want just enough sugar to enhance flavors without overpowering our fruity medley.
- 1 tsp cinnamon. Cinnamon adds warmth—a comforting hug in flavor form—to these chips! Its aromatic qualities lift up all other flavors present while providing an enticing aroma as everything bakes together.
- 6 (6-inch) flour tortillas. Flour tortillas serve as the canvas upon which we’ll create our crunchy chips! They have a soft texture which can be baked until crispy without becoming overly tough or chewy—making them perfect for dipping into our luscious fruit salsa!
- 2 Tbsp butter (melted). Butter is absolutely paramount here; its richness envelops every tortilla slice before baking while allowing sugar and cinnamon to adhere beautifully during cooking—leading us toward perfectly crisped chips every time!
Equipment You’ll Need:
Gathering the right tools is essential for making cooking not only smoother but also more enjoyable—a well-equipped kitchen makes all the difference! Each piece plays its part in helping us create something truly wonderful.
- Baking sheet – A sturdy baking sheet is what we’ll use to bake our cinnamon sugar chips until they reach golden perfection! A larger size allows us ample room for spreading out those tortilla wedges evenly without overcrowding—which ensures even cooking.
- Parchment paper or silicone liner – These non-stick surfaces are God-sent when it comes time for cleanup—no one enjoys scrubbing burnt-on bits off pans after baking! They also help prevent sticking so you can easily remove those gorgeous chips once baked!
- Large mixing bowl – A spacious bowl gives us plenty of room to toss our beautiful fruits together without worrying about spills or messes; plus stirring everything well ensures even distribution among ingredients!
- Small bowl – We need this handy tool for mixing together our cinnamon-sugar topping—it keeps things organized while minimizing mess as we prepare each component separately!
Now let’s dive into preparing our Fruit Salsa with Baked Cinnamon Sugar Chips!
Step 1: Preheat Your Oven & Prepare Your Baking Sheet
First things first—we need to get that oven preheated to 400 degrees Fahrenheit because we’re aiming for perfectly crispy chips by the end of this journey! While it’s heating up, grab your trusty baking sheet and either line it with parchment paper or spray it lightly with non-stick cooking spray—this step ensures nothing sticks during baking (and saves you from future scrubbing!). Remember: preheating is crucial because it allows those tortilla wedges to crisp up quickly once placed inside—which preserves their lovely texture instead of becoming soggy blobs.
Step 2: Tossing Together That Beautiful Fruit Salsa
In your large mixing bowl now lies an array of vibrantly colored fruits waiting eagerly to come together as one harmonious blend! Begin by gently tossing freshly diced peaches (or nectarines), mangoes, kiwis, hulled strawberries along with fresh lemon juice & strawberry jam until everything gets coated evenly—it’s like creating art on canvas except edible! Not only does this step allow flavors from each ingredient meld beautifully but chill time afterward enhances zestiness too—I recommend refrigerating until ready for serving within two hours max so anyone can enjoy every last drop!
Step 3: Butter Those Tortillas & Dust With Cinnamon Sugar
Now comes where things get exciting—the transformation from humble tortillas into divine baked delights awaits us next! Grab your small bowl filled with granulated sugar mixed alongside ground cinnamon readying itself eagerly beside melted butter waiting patiently at hand… Brush both sides lightly ensuring adequate coverage without drowning them entirely since we want just enough richness added here rather than overwhelming them completely—it’s all about balance folks! Afterward sprinkle generously on both sides allowing each tortilla wedge its sweet moment before heading onto prepared sheets proudly awaiting their turn in hot ovens ahead…
Step 4: Cutting Wedges & Baking Perfection
Time flies when you’re having fun—and now we arrive at yet another crucial juncture towards achieving ultimate chip perfection here folks!! Grab sharp knife slicing through these beauties first down center then cutting each half further creating six wedges per circle resembling pizza slices only better because they’ll soon boast warm aromas wafting throughout kitchen space enticing everyone around instantly once placed onto lined baking sheets ahead—arranging evenly allows airflow promoting crispiness throughout final cook cycle ensuring perfect golden edges emerge victorious after approximately ten-twelve minutes total turnaround time turning halfway through keeping alert checking regularly since ovens vary widely based on calibration temperatures achieved…
With these steps laid out lovingly beneath fingertips guiding along culinary path toward glory awaits joyous moment finally unveiling finished masterpiece awaiting eager palates post-baking fun times!! Stay tuned because there’s more magic coming soon…
Step 5: Slice and Bake to Perfection
Now comes the moment where your kitchen will be enveloped in the sweetest aroma of baked goodness. With your tortillas buttered and dusted with that magical cinnamon-sugar mixture, it’s time to cut them into wedges. Grab a sharp knife and lay each tortilla flat on your cutting board. I like to visualize this step as cutting a pizza—you’re aiming for six even wedges from each tortilla. This ensures that every chip is perfectly sized for dipping, allowing everyone at the table to enjoy a delightful crunch without any awkwardness.
Once you’ve cut the tortillas, it’s time to transfer those golden triangles onto your prepared baking sheet. Lay them out in a single layer; yes, they can overlap slightly, but try not to create too much of a pile. The reason for this is simple yet crucial—proper airflow around each chip while baking will lead to an even crispiness that you simply can’t achieve if they’re crowded together. You’ll want to bake these beauties in the preheated oven at 400 degrees Fahrenheit for about 10 to 12 minutes. Watch closely during the last few minutes; you’re looking for that perfect golden-brown color, which indicates delicious crunchiness is just around the corner.
Don’t forget to turn your chips halfway through baking! This technique ensures that both sides receive equal heat exposure, resulting in chips that are uniformly crispy and full of flavor. You’ll know they’re done when they’re fragrant, golden, and crisp enough to snap easily between your fingers. Trust me on this—it’s absolutely paramount for achieving that addictive texture we all crave!
Step 6: Letting Cool – The Anticipation
As soon as those chips are out of the oven, let them cool on the baking sheet for a few minutes before you dive in! While it may be tempting to grab one right away—believe me, I’ve been there—the cooling process is more important than you might think. While cooling, the chips will continue to firm up and reach their final crispy texture. If you bite into them too soon, they might feel a bit chewy rather than delightfully crunchy.
During this cooling period, take a moment to appreciate how beautiful they look—that warm golden hue glistening under the kitchen light—and inhale deeply; those scents of cinnamon and sugar wafting through the air are utterly intoxicating! It’s almost like an invitation for everyone around you to gather closer—because who wouldn’t want a taste? Once cooled slightly, feel free to break off a piece (just one!) and savor it plain; you’ll see why patience is rewarded here.
Step 7: The Grand Assembly
Now that your delectable chips have cooled down sufficiently and are ready for action, it’s time to bring together your fruit salsa masterpiece! Remember that vibrant bowl of fresh fruit we prepared earlier? Take it out from its cozy chill in the refrigerator; it should be nice and refreshing at this point—a perfect contrast against the warm cinnamon-sugar chips.
Spoon generous amounts of fruit salsa into serving bowls or onto plates; you want it visible and inviting! I love using clear glass bowls so guests can admire the colorful symphony of flavors—the bright reds from strawberries, sunny yellows from mangoes, earthy greens from kiwis—all mingling together like old friends at a reunion. There’s something profoundly satisfying about seeing all those gorgeous colors come together; it elevates not just the dish but also your mood!
As you place those beautifully arranged bowls alongside your baked cinnamon sugar chips, imagine how wonderful it’ll be when everyone digs in—the crunch of those warm chips meeting the juicy freshness of the fruit salsa creates an experience that dances on your palate! Don’t forget to keep some extra cinnamon-sugar nearby for anyone who might want an additional sprinkle—because why not?
Step 8: Serve with Love
Finally, it’s time for my favorite part: serving! As everyone gathers around with eager eyes and hungry hearts (you can practically hear their stomachs rumbling!), take a moment to relish this communal experience; food has a magical way of bringing people together. Encourage everyone to dip their crispy cinnamon-sugar chips into the vibrant fruit salsa—you’ll see their faces light up with joy as they savor each bite.
This dish isn’t just about satisfying hunger; it’s about creating connections and memories around the table. Imagine sharing stories while dipping into this delightful treat—each chip loaded with luscious fruit salsa is like little bites of happiness! I promise you this: whether it’s a casual gathering or a special occasion, Fruit Salsa with Baked Cinnamon Sugar Chips will become a beloved staple in your home.
And remember: don’t rush through these moments! Enjoy every crunchy dip and fruity burst because cooking is as much about savoring experiences as it is about enjoying delicious food. So dig in and let every bite remind you of why we gather around tables—to share love through food!
Fruit Salsa with Baked Cinnamon Sugar Chips
Dive into vibrant flavors with Fruit Salsa with Baked Cinnamon Sugar Chips—a delightful treat everyone will adore. Try it today!
- Prep Time: 15 minutes
- Cook Time: 12 minutes
- Total Time: 27 minutes
- Yield: Approximately 8 servings 1x
- Category: Dessert
- Method: Baking
- Cuisine: American
Ingredients
- 1 peach or nectarine, peeled and diced
- 1 mango, peeled, cored, and diced
- 3 kiwis, peeled and diced
- 1 (16 oz) package strawberries, hulled and diced
- 1½ tsp fresh lemon juice
- 2 Tbsp strawberry jam
- 6 (6-inch) flour tortillas
- ¼ cup granulated sugar
- 1 tsp cinnamon
- 2 Tbsp butter (melted)
Instructions
- Preheat your oven to 400°F (200°C) and prepare a baking sheet lined with parchment paper.
- In a large bowl, combine diced peaches, mangoes, kiwis, strawberries, lemon juice, and strawberry jam. Gently toss until well mixed.
- Brush each tortilla with melted butter on both sides. Mix granulated sugar and cinnamon in a small bowl; sprinkle generously over both sides of the tortillas.
- Cut each tortilla into wedges and spread them in a single layer on the baking sheet.
- Bake for 10-12 minutes or until golden brown and crispy, turning halfway through for even cooking.
- Allow chips to cool slightly before serving alongside the fruit salsa.
Nutrition
- Serving Size: Approximately 1/2 cup fruit salsa with 2 baked chips (70g)
- Calories: 130
- Sugar: 12g
- Sodium: 100mg
- Fat: 5g
- Saturated Fat: 2g
- Unsaturated Fat: 2g
- Trans Fat: 0g
- Carbohydrates: 22g
- Fiber: 3g
- Protein: 2g
- Cholesterol: 5mg