Recipe for Scones
In the heart of my kitchen, where flour dust dances in the sunlight and the air is infused with the intoxicating aroma of baked goods, I find myself reminiscing about the simple joys that a warm scone can bring. It’s not just about satisfying a craving; it’s about creating a moment, a memory, and perhaps even a tradition. The Recipe for Scones that I’m about to share with you has become a cherished staple in my home—a delicious bridge between comfort and celebration. Imagine pulling a tray of golden-brown scones from the oven, each one flaky and tender, just waiting to be slathered with butter or jam. Trust me when I say that these beauties are more than just baked goods; they are little pieces of happiness that can turn an ordinary day into something special.
There’s something profoundly satisfying about crafting scones from scratch. This isn’t merely a recipe; it’s an experience filled with tactile joy—mixing, folding, shaping—and I promise you, your kitchen will feel alive as you create these delightful treats. From their golden crusts to their soft interiors, every bite is an invitation to indulge. Whether enjoyed at brunch with friends or as an afternoon pick-me-up with your favorite tea, these scones open up a world of possibilities. And let’s not forget the versatility! You can customize them with an array of add-ins ranging from sweet chocolate chips to fresh berries—each option brings its own story and flavor profile to the table.
Recipe for Scones: A Warm Embrace of Flavor
Let’s embark on this culinary journey together! As we dive into this Recipe for Scones, I want you to feel excited and empowered. Making scones is easier than you might think, and once you master this technique, you’ll find endless opportunities for creativity in your baking endeavors.
Ingredients:
As we gather our ingredients for this delightful adventure in baking, remember that each component plays a pivotal role in crafting the perfect scone—think of them as essential players in our culinary symphony.
- 2 ¼ cups (270g) all-purpose flour: This is the backbone of your scone dough. All-purpose flour provides just the right amount of protein to create structure without being too dense. When selecting flour, look for brands that are finely milled and free from any lumps—this will ensure a smooth texture in your final product. If you’re feeling adventurous or want a nuttier flavor profile, consider substituting part of it with whole wheat flour or almond flour; just keep in mind that this may alter the texture slightly.
- ½ cup (99g) granulated sugar: Sugar does more than just sweeten—it helps create that beautiful golden crust we all love so much while contributing moisture to keep those scones tender. When choosing sugar for your scones, go for granulated sugar to achieve that classic sweetness without any unexpected flavors.
- 1 Tbsp baking powder: This ingredient is absolutely crucial for achieving those tall and fluffy scones we all dream of! Baking powder acts as a leavening agent that gives our dough a lift during baking. Be sure to check the expiration date on your baking powder; old leavening agents can lead to flat scones instead of those perfect rises.
- ½ tsp salt: Salt is often overlooked but is non-negotiable in any baked good! It enhances flavors and balances sweetness while also strengthening gluten structure in our dough. A good quality fine sea salt works beautifully here—just remember: when it comes to salt in baking, less is definitely not more!
- ½ cup (113g) cold unsalted butter (cubed): Butter adds richness and flavor while also contributing to that flaky texture we cherish so much in our scones. Using cold butter is key as it creates pockets within the dough that expand during baking—leading to those airy layers you’re looking for! Opt for high-quality unsalted butter so you have complete control over seasoning; if you’re dairy-free or vegan, coconut oil or plant-based butters can work well too.
- ½ cup (118ml) buttermilk: Buttermilk adds not only moisture but also acidity which reacts with baking soda/baking powder creating tenderness in baked goods! If you don’t have buttermilk on hand, no worries—you can make your own by combining milk with vinegar or lemon juice and letting it sit for about 5-10 minutes until slightly thickened.
- 1 tsp vanilla extract: Ahh…vanilla—the comforting essence that elevates any baked treat! It brings warmth and depth of flavor to our scones. Always opt for pure vanilla extract over imitation vanilla when possible; trust me on this—it truly makes all the difference!
- 1 large egg: The egg acts as both a binder and contributes richness while adding moisture to our dough. Make sure it’s at room temperature before mixing—that way it will incorporate seamlessly into your batter without cooling down everything else!
- 1 cup (170g) chocolate chips (I used mini chocolate chips): Chocolate chips are such an easy way to add sweetness and richness! Mini chocolate chips melt beautifully into pockets throughout the dough adding delightful bursts of chocolatey goodness with every bite—what’s not to love? You could swap these out for other options like nuts or dried fruits if you’re feeling adventurous!
- 1 cup (170g) white chocolate chips: Similar to their darker counterparts but sweeter and creamier! They add another layer of decadence making these scones utterly irresistible—but feel free to mix things up according to your taste buds!
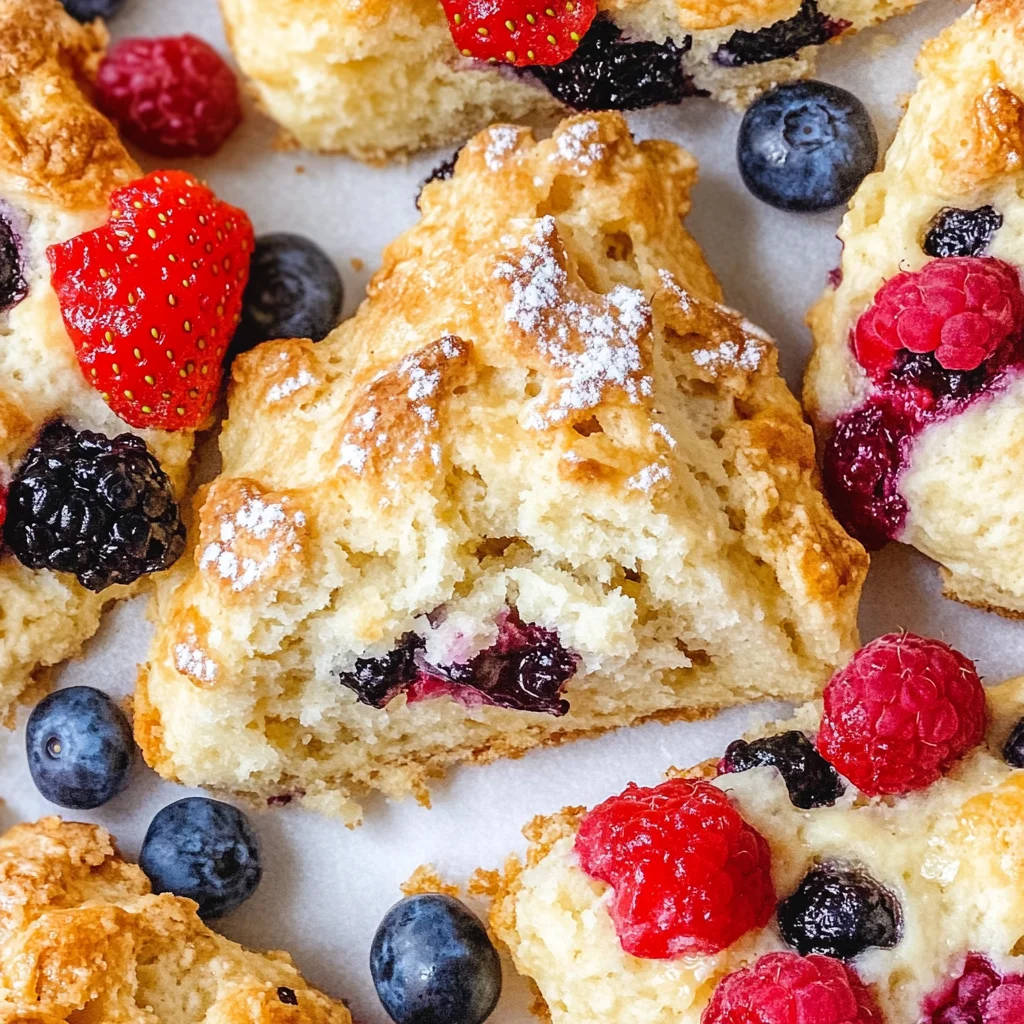
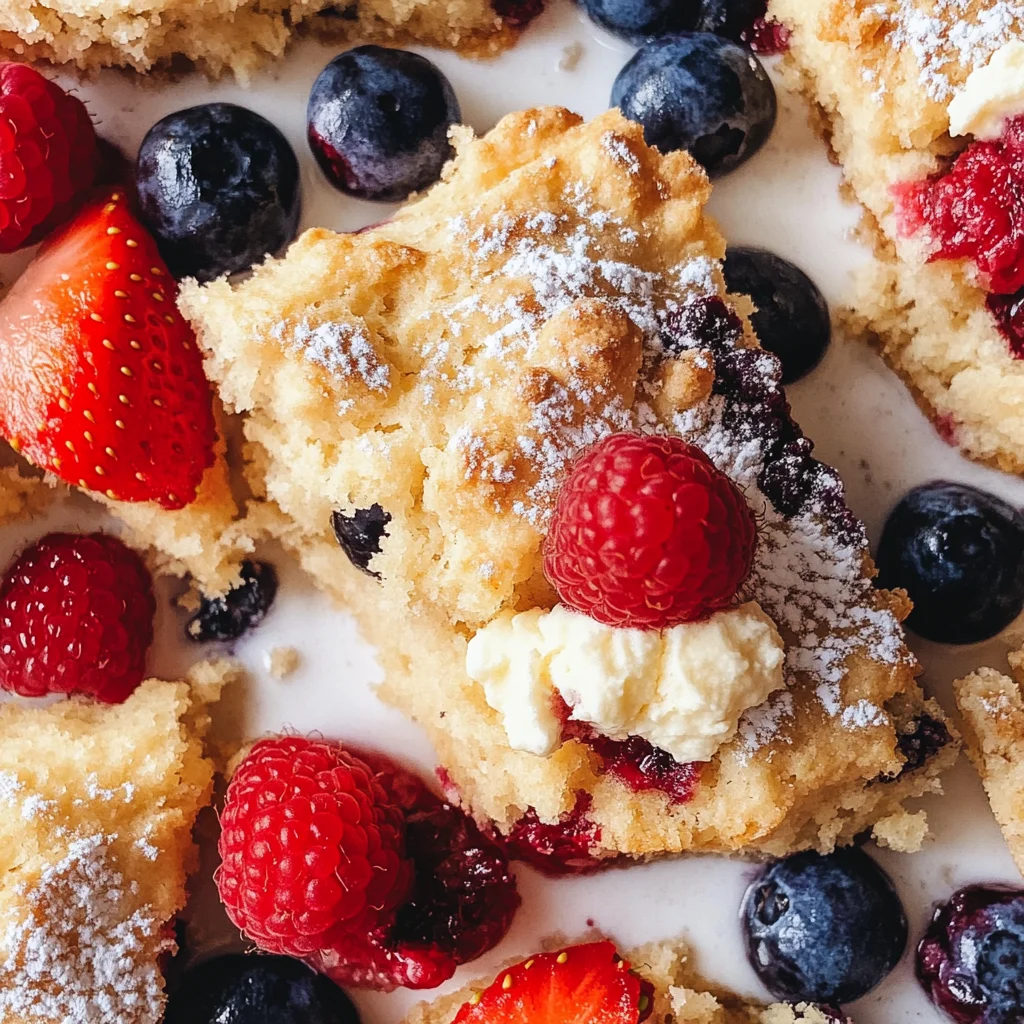
- 1 cup (120g) fresh raspberries (broken into pieces and frozen): Raspberries add bright bursts of tartness which perfectly contrast against rich flavors in our dough! Freezing them first helps maintain their shape during mixing—you’ll be rewarded with delightful fruity pockets throughout!
- 1 cup (150g) blueberries: Juicy blueberries contribute natural sweetness while also providing antioxidants! Fresh ones work best—if using frozen ones instead don’t thaw them beforehand they may bleed into your dough changing its color.
- 1 cup (167g) strawberries (chopped): Sweet strawberries add freshness and vibrant color—it’s like having summertime captured inside each bite! Just be sure they’re chopped small enough so they distribute evenly through out dough without weighing it down too much.
Equipment You’ll Need:
Having the right tools at your disposal truly transforms the cooking experience into something enjoyable rather than overwhelming. Think of these utensils as partners who will help bring out the best flavors from your ingredients!
- Mixing bowls – A set of various-sized mixing bowls allows you to combine dry ingredients separately before incorporating wet ones seamlessly without creating messes everywhere else on counters!
- Pastry cutter or fork – This tool is essential for cutting cold butter into flour ensuring even distribution while maintaining its temperature—key factors affecting flakiness later on!
- Silicone mat or parchment paper – These surfaces prevent sticking while promoting even browning underneath baked goods preventing burnt bottoms—a must-have if you’re aiming for perfection!
- Baking sheet – A sturdy baking sheet ensures even heat distribution plus makes transferring warm goodies from oven hassle-free—look out for insulated pans which offer additional protection against over-browning edges too!
Preparing the Recipe for Scones
Step 1: Setting Up Your Dough Base
First things first! Gather all those lovely ingredients together because we’re about to create something magical. Begin by measuring out 2 ¼ cups of all-purpose flour into your large mixing bowl—it should be light and fluffy rather than compacted down which would affect consistency later on when blending other components together seamlessly into one cohesive mixture. Next, sprinkle half a cup granulated sugar along with one tablespoon baking powder followed by half teaspoon salt directly atop your flour mound before giving everything gentle stir using whisk until evenly combined creating uniform base ready embrace next step ahead.
Step 2: Cutting In Cold Butter
Now comes one of my favorite parts—the butter ritual! Take half a cup cold unsalted butter that’s already been cubed prior safety measures ensuring optimal performance during integration phase ahead; gently drop cubes directly onto dry mixture then utilize either pastry cutter or fork depending preference until pea-sized pieces remain visible within blended array forming crumbly texture reminiscent sandcastles built childhood days spent at beachside vacations far away sunshine soaked shores… This crucial moment allows tiny pockets fat develop throughout dough resulting delightfully flaky outcomes later when exposed high temperatures oven magic happens transforming simple elements mere mortals possess everyday lives extraordinary confections worthy sharing loved ones gathered around tables filled laughter stories told warmth hearts felt all around us united through shared experiences meals created together…
Step 3: Creating Your Well
With our flour-butter mixture now prepared beautifully let’s move forward towards integrating wet ingredients needed bind everything together harmoniously creating luscious batter awaits final touches later down road leading towards mouthwatering delights awaiting eager taste buds hungry souls yearning fulfillment amidst chaos daily routine lives—we’ll begin forming well center dry mix where liquid components reside beneath surface waiting excited emerge once stirred gently combining forces uniting once seemingly separate entities single cohesive ball dough destined greatness awaits upon completion finishing touches added last minute…
Step 4: Mixing It All Together
Once you’ve created yourself nice little well nestled within center dry mixture carefully pour half-cup buttermilk alongside teaspoon vanilla extract plus large egg directly inside said cavity keeping everything contained secure place allowing flavors meld properly instead rushing process causing chaotic splatters everywhere around kitchen making mess unnecessary cleanup afterwards—trust me grace patience yield better results here so take time enjoy process savor moments spent creating something beautiful intended share joy others experiencing pleasure derived simple pleasures life often overlooked amidst hustle bustle world outside…
Stay tuned as we continue assembling steps towards crafting perfect batch these delectable scones worthy any occasion celebration bringing smiles faces gathering friends family alike around tables adorned delightful aromas wafting air enticing everyone join feast laid forth freshly baked treasures awaiting discovery…
Perfecting Your Recipe for Scones: The Transformative Process
Step 5: Creating Flaky Layers through Lamination
Now, let’s talk about one of the most exciting parts of making scones: lamination. This technique is where the magic happens! After you’ve gently kneaded your dough to incorporate all the flour, it’s time to fold it. You want to take the dough and fold it in half, pressing it down slightly with your palms. This action is crucial because it encourages those lovely layers to form, which is exactly what makes a scone light and flaky rather than dense and heavy. After folding it in half, turn the dough 90 degrees, fold it again, and repeat this process four to five times.
Why does this matter so much? Well, each fold traps air pockets in the dough that will expand during baking, helping your scones rise beautifully. It’s essential not to rush this step; take your time and be gentle. You don’t want to overwork the dough as that can develop gluten and lead to a tough scone. A soft touch is key! As you work through this process, you’ll notice how your dough changes from a shaggy mixture into something more cohesive and pliable—this transformation is truly satisfying.
Step 6: Chilling for Optimal Texture
Once you’ve achieved that perfect laminated structure, it’s time to shape your dough into an 8-10 inch disc about 1.5 to 2 inches tall. Now here comes one of my favorite secrets: refrigerating the shaped disc for just 5-10 minutes. Why chill? Refrigeration not only helps solidify the butter once again but also allows the gluten to relax after all that folding and kneading you just did. This little moment of patience is absolutely paramount; I promise you’ll thank me when you take those tall, buttery scones out of the oven.
As you prepare to chill your disc, make sure it’s evenly shaped; this will ensure even baking later on. Some bakers might be tempted to skip this step in their excitement—trust me; don’t do it! The cold butter will create steam as it melts during baking, allowing those flaky layers to rise and separate beautifully instead of merging into one dense mass. You want to see those golden-brown edges peeking through—a sign of perfectly baked scones!
Step 7: Cutting into Perfect Wedges
After chilling, it’s time for another fun part—cutting those beautiful scones into wedges! Using a sharp knife or pizza cutter (my personal favorite), slice your chilled disc into eight equal wedges. Make sure you cut straight down without dragging the knife across the surface; this helps maintain that lovely layered structure we worked so hard on earlier! If you prefer round scones or want a different aesthetic altogether, feel free to use a biscuit cutter instead; just remember that they might bake a little differently due to size variations.
Once cut, place each wedge on a lined baking sheet with about 2-3 inches space between them. This spacing is crucial because as they bake, they’ll expand and need room to grow; crowded scones can lead to uneven cooking and less-than-stellar results. At this point, take a moment to admire your handiwork—you’re already well on your way to creating something extraordinary!
Step 8: The Art of Freezing
Now comes an essential step that many home bakers overlook: freezing your scones before baking them! Pop those cut wedges into the freezer for about 30 minutes while you preheat your oven to 400°F (200°C). Freezing serves multiple purposes—it not only firms up the butter again but also enhances those flaky layers we’ve been working on by minimizing melting during baking. Plus, colder dough produces higher rising scones with a tender crumb.
While waiting for them in the freezer, you can prepare an egg wash (if you’re using one) by whisking together one large egg with one tablespoon of water or buttermilk—this adds a beautiful golden sheen when baked! If you prefer not using egg wash, brushing with buttermilk or cream works wonderfully too! Don’t forget about adding coarse sanding sugar on top; this gives each bite an extra layer of crunch that’s simply delightful against the soft interior.
And there you have it—a complete guide on how to create tender yet fluffy scones that are sure to impress anyone fortunate enough to enjoy them! Whether you’re enjoying them at breakfast with jam or serving them at afternoon tea alongside friends, I promise these little delights will bring joy with every bite. Don’t hesitate to experiment with different mix-ins too; after all, every batch can tell its own story through flavor! Happy baking!
Storage and Enjoyment Tips for Your Recipe for Scones
Ah, the moment has arrived! Your scones are golden brown, puffed up, and simply irresistible. The aroma wafting through your kitchen is enough to make anyone’s mouth water, and I promise you, the joy of sharing these delights is just as sweet as the first bite. But what happens when you have leftovers? Fear not, my friends! These scones can be stored and enjoyed well beyond their initial bake.
Storing Leftover Recipe for Scones
To keep your freshly baked scones in tip-top shape, store them in an airtight container at room temperature. This keeps them moist while preserving that delightful texture we all adore. They’ll stay fresh for about 2-3 days, but I promise you they won’t last long once everyone gets a whiff of them! A little pro tip: if you want to maintain that tender crumb, toss in a slice of bread into the container; it works wonders in keeping everything soft and delicious. As for the taste after storage? While they may lose a bit of that flaky crust charm, they still remain profoundly satisfying with each bite. When you’re ready to indulge again, simply pop them in a warm oven for a few minutes or microwave them briefly—trust me on this one; it brings back that fresh-out-of-the-oven experience!
Freezing Scones for Later
If you’ve made a big batch or simply want to plan ahead (which is such a smart move!), freezing scones is an excellent option. To do this right, place your cut but unbaked scones on a baking sheet lined with parchment paper and freeze them until solid—about 30 minutes will do the trick. Once frozen, transfer them into an airtight freezer bag or container. They can be stored like this for up to 3 months! When you’re ready to enjoy some warmth from the oven again, there’s no need to thaw; just bake straight from frozen! This means you can have freshly baked scones any time you desire—a truly convenient and exciting option that makes your mornings brighter or your afternoon teas more special.
Recipe for Scones

Discover how to make delicious scones at home with my easy Recipe for Scones—perfectly flaky and customizable for every palate. Get baking today!
- Prep Time: 15 minutes
- Cook Time: 25 minutes
- Total Time: 40 minutes
- Yield: About 8 servings 1x
- Category: Dessert
- Method: Baking
- Cuisine: American
Ingredients
- 2 ¼ cups all-purpose flour
- ½ cup granulated sugar
- 1 Tbsp baking powder
- ½ tsp salt
- ½ cup cold unsalted butter (cubed)
- ½ cup buttermilk
- 1 tsp vanilla extract
- 1 large egg
- 1 cup chocolate chips or fresh berries (optional)
Instructions
- Preheat the oven to 400°F (200°C) and line a baking sheet with parchment paper.
- In a large mixing bowl, whisk together flour, sugar, baking powder, and salt.
- Cut in the cold butter until the mixture resembles coarse crumbs.
- Create a well in the center and add buttermilk, vanilla extract, and egg.
- Mix gently until combined; fold in chocolate chips or berries if using.
- Turn dough onto a floured surface and knead gently before shaping into an 8-10 inch disc.
- Chill the disc for 5-10 minutes then cut into wedges or use a biscuit cutter for round scones.
- Freeze for about 30 minutes before baking for optimal texture.
- Bake for 20-26 minutes until golden brown.
Nutrition
- Serving Size: 1 scone (70g)
- Calories: 250
- Sugar: 12g
- Sodium: 150mg
- Fat: 11g
- Saturated Fat: 7g
- Unsaturated Fat: 4g
- Trans Fat: 0g
- Carbohydrates: 34g
- Fiber: 1g
- Protein: 4g
- Cholesterol: 30mg