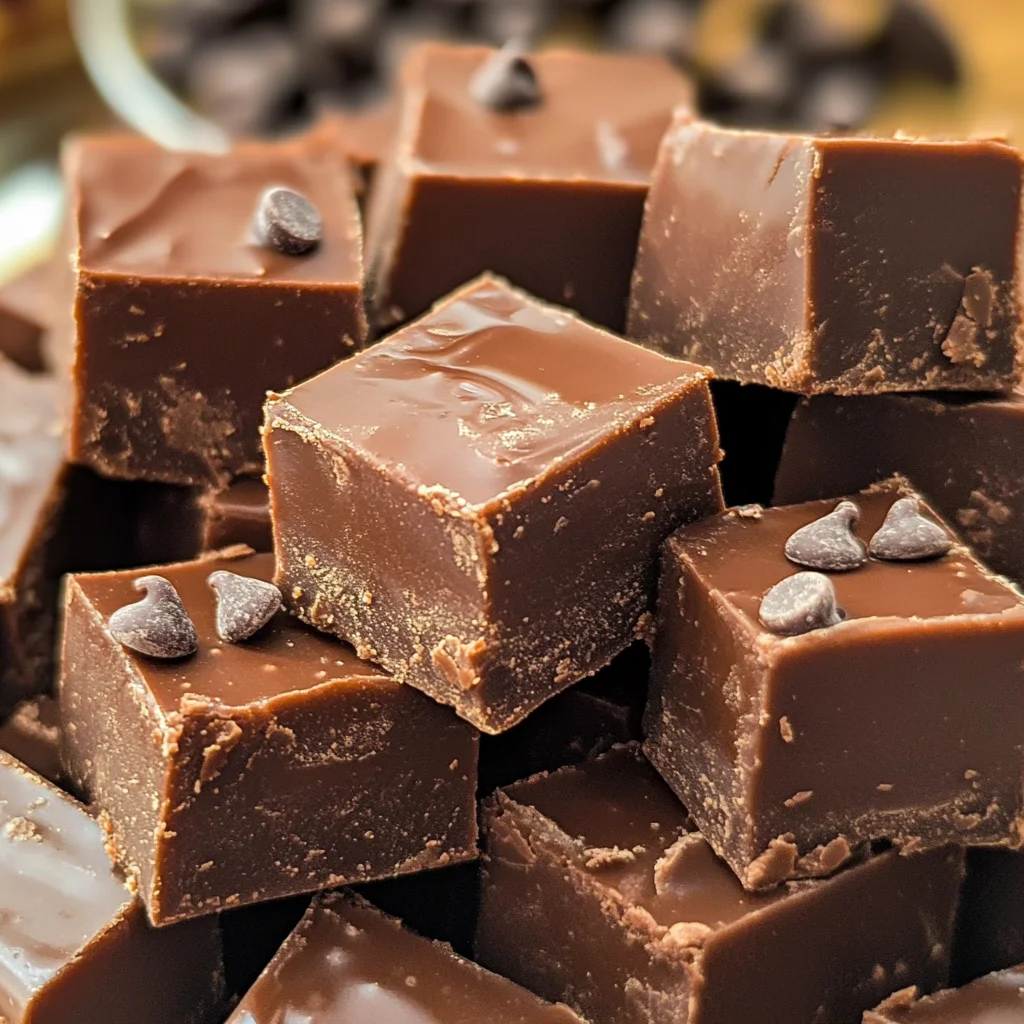
Bailey’s Fudge
There’s something truly magical about the process of creating Bailey’s Fudge, isn’t there? It goes beyond just a recipe; it’s an experience that brings people together, seduces the senses, and evokes memories of cozy gatherings and sweet indulgences. Picture this: a rich, velvety fudge that melts in your mouth, its sweetness perfectly balanced by a hint of warmth and a luscious chocolate embrace. The moment you take that first bite, it’s like a symphony of flavors dancing on your palate—each note echoing the love and care that went into making it. This Bailey’s Fudge is not just dessert; it’s a heartfelt gift for friends and family, an invitation to share joy and laughter over something utterly delightful.
In many ways, this recipe embodies the spirit of comfort food while weaving innovation into its fabric. With each silky piece, you’re not only tasting chocolate but also experiencing the rich history of fudge-making—a tradition that has been passed down through generations. You might wonder what makes this fudge so special compared to others. Well, my friend, it’s the combination of quality ingredients that elevate this treat from ordinary to extraordinary. The milk chocolate chips blanket each morsel in creamy goodness, while sweetened condensed milk brings in that perfect touch of sweetness and texture. Trust me on this; once you make this Bailey’s Fudge, you’ll find yourself craving it for every occasion—be it a casual weeknight treat or as a centerpiece at festive gatherings.
Bailey’s Fudge: A Sweet Indulgence for Every Occasion
Let’s dive into this wonderful journey of creating Bailey’s Fudge together! I promise that with just a few simple ingredients and steps, we’ll conjure up something truly delicious that will make your heart sing with joy. This recipe is approachable for anyone—whether you’re an experienced baker or trying your hand at dessert-making for the first time. So grab your apron and let’s get started!

Ingredients:
Every great recipe starts with high-quality ingredients, and this Bailey’s Fudge is no exception! Each one plays a crucial role in crafting those delectable bites we all love.
- 3 1/2 cups (about 21 ounces) milk chocolate chips. Milk chocolate chips are the star of our show here! They provide that irresistible sweetness and creamy texture that makes fudge feel luxurious in every sense. When selecting chocolate chips, look for brands with high cocoa content—this will ensure richer flavor. Avoid any products labeled “semi-sweet” if you want to keep things on the sweeter side. Remember, quality matters here; don’t skimp on your chocolate as it will define the taste of your fudge!
- 1 cup sweetened condensed milk. This ingredient is absolutely paramount to achieving the right consistency and creaminess in our fudge. Sweetened condensed milk acts as a binder while adding an extra layer of sweetness without being overpowering—it’s like liquid gold! Whether you’re using it straight from the can or measuring out homemade versions (if you’re feeling adventurous), ensure it’s fresh because expired condensed milk can affect not only the flavor but also the texture of your fudge.
- 1/4 cup Irish cream liqueur (or non-alcoholic substitute). While traditionally made with Irish cream liqueur for its unique flavor profile, there are fantastic non-alcoholic alternatives available today! Look for brands offering creamy coffee-flavored beverages or use an equal amount of vanilla coffee creamer as a substitute—it provides similar richness while giving you all those comforting notes without any alcohol. The key is to incorporate something that enhances that warm sensation without overpowering the chocolate.
- 1 tsp vanilla extract. This humble ingredient is often overlooked but let me tell you—it’s essential! Vanilla extract adds depth to our fudge by enhancing other flavors while providing aromatic complexity that’s simply enchanting when paired with chocolate. Always choose pure vanilla extract over synthetic options if possible; it makes a noticeable difference in both aroma and taste.
- 1/2 cup Andes baking chips. These delightful minty treats add an unexpected twist to our fudge! Their bright green hue isn’t just pretty—they bring refreshing notes that complement the richness beautifully. If you’re unable to find Andes baking chips in stores or prefer a different flavor profile altogether, consider using crushed peppermint candies or even dark chocolate chunks for a more intense experience.
Equipment You’ll Need:
Now that we have our ingredients assembled, let’s gather our trusty kitchen companions! Having the right tools can truly make or break your cooking experience—and I promise it’ll make everything smoother and more enjoyable.
- 8×8 inch baking pan – This size is perfect for creating thick chunks of fudge that are satisfying to bite into! If you don’t have one on hand, feel free to use any similarly sized pan; just be mindful that thinner pans may yield faster-setting fudge—keep an eye on those cooking times!
- Aluminum foil – Using aluminum foil is essential for lining your pan before pouring in your mixture—it creates an easy release surface so you can lift out your fudge effortlessly after chilling. Plus, if you fold over some excess foil at the edges before pouring in your mixture, you’ll have handy handles for easy extraction later!
- Microwave-safe bowl – We’ll be utilizing our microwave extensively for melting those luscious chocolate chips alongside sweetened condensed milk! Ensure whatever bowl you choose is large enough to hold all ingredients comfortably—I recommend glass or ceramic bowls over plastic ones since they melt easily.
- Spatula or wooden spoon – Whether you opt for silicone spatulas or sturdy wooden spoons doesn’t matter much here; both will serve you well when blending those decadent ingredients together smoothly without leaving behind any clumps.
Step 1: Preparing Your Pan
The first step in crafting your Bailey’s Fudge involves preparing your baking pan properly—a crucial task indeed! Take your aluminum foil and line an 8×8 inch baking pan with it carefully; make sure it hangs over the edges slightly so you can easily lift out your finished product later on. This step helps prevent sticking while ensuring every last morsel is accessible once set; trust me—you don’t want any sticky remnants left behind! Also consider lightly greasing the foil with cooking spray—it adds another layer of protection against sticking which ensures smooth slicing later on when we’re ready to enjoy these delightful bites!
Step 2: Melting Chocolate Chips
Now comes one of my favorite parts—the melting process! In a large microwave-safe bowl (which we prepared earlier), combine those glorious milk chocolate chips with sweetened condensed milk—they will create such rich liquid goodness together! Microwave them for one minute initially—that should start softening them nicely—but don’t rush ahead just yet; give them a good stir after this first minute before returning them back into the microwave in short 30-second increments until everything melts completely smooth without any lumps remaining visible (usually takes around 2 minutes total). Remember: patience pays off here! If overheated too quickly at higher power settings can lead to burnt bits which ruin all our efforts thus far—the goal is creamy perfection!
Step 3: Infusing Flavor
Once melted smoothly together into velvety blissful mixture—oh my goodness just wait until you smell this heavenly aroma filling up your kitchen—you’re going to want to dive right in immediately! But hold onto those horses because we still need to add our flavorful components before pouring everything into our prepared pan! Stir in one lovely quarter cup of Irish cream liqueur along with one teaspoon pure vanilla extract—both elevate flavors beautifully beyond mere sweetness alone—creating balance between richness while adding depth throughout each bite taken later down road ahead… It’s absolutely paramount not skip these steps as they define character behind what distinguishes “just okay” from “truly extraordinary”!
Step 4: Pouring Into Pan
Finally ready now—we’re eager about getting this delightful mixture poured into our lined baking pan where magic begins solidifying soon enough! Gently pour everything into prepared pan allowing gravity do its work spreading evenly across bottom surface area—use spatula if necessary coaxing edges towards corners making sure no gaps exist preventing uneven setting issues later down line either… Now sprinkle those gorgeous Andes baking chips generously atop (don’t forget pressing down gently making sure they adhere firmly) creating beautiful accents visually stunning upon cutting slices later post-chill period when serve guests—or more importantly when treating yourself afterwards too… How could anyone resist?
As we wrap up these initial steps preparing Bailey’s Fudge rest assured knowing you’ve laid foundation towards something profoundly satisfying awaiting completion shortly thereafter… Stay tuned for further instructions soon diving deeper into chilling process plus slicing techniques ensuring utmost enjoyment indulging every bite created together here today!
Creating Your Bailey’s Fudge: The Sweet Symphony Begins
Step 5: Pouring the Mixture into the Pan
Once you have blended your chocolate mixture to a luscious, velvety smoothness, it’s time to transfer this sweet elixir into your prepared pan. This step is where the magic truly begins! Using a spatula, gently scrape out every last bit of that decadent fudge mixture from your bowl, ensuring not to leave any behind—trust me, you’ll want every morsel. As you pour it into the lined 8×8 inch pan, take a moment to appreciate how wonderfully thick and glossy it looks. The warmth of the fudge will slightly melt the Andes baking chips when you sprinkle them on top, creating little pockets of melty goodness that will elevate each bite to something extraordinary.
Now, don’t rush this step! Using the spatula, spread the fudge evenly across the pan. It should be about an inch thick; if it’s not quite there yet, just take a deep breath and coax it into place. This even distribution is crucial for achieving that perfect texture throughout—the last thing you want is a thick layer on one side and a thin layer on another. Once you’ve smoothed it out, gently press those Andes chips in so they nestle beautifully into the fudge surface. This not only enhances its appearance but also ensures those delightful bursts of minty chocolate are present in every single bite.
Step 6: The Importance of Chilling
Now comes one of the most critical phases in making your Bailey’s Fudge: chilling. Cover your pan with plastic wrap or aluminum foil, allowing no air to sneak in—this is absolutely paramount for achieving that firm texture we all crave in fudge. Pop it into the refrigerator and let it chill for at least four hours; however, if you can manage it, I encourage you to wait overnight if possible! During this time, the fudge undergoes a transformative process where it firms up beautifully, allowing all those rich flavors to meld together harmoniously.
Why is chilling such a big deal? Well, while you’re waiting patiently (and trust me on this—it will be worth every second), the cooling process allows the sugars and fats to crystallize properly. This results in that silky-smooth mouthfeel that makes fudge so irresistible! If you cut into your fudge too soon, you’ll end up with a gooey mess instead of those perfectly cut squares we’re aiming for. So grab your favorite book or put on a cozy movie—distraction is key here while you let your creation set!
Step 7: Slicing Up Sweet Perfection
After what feels like an eternity (but I promise is worth it), it’s finally time to unveil your Bailey’s Fudge masterpiece. Once it’s fully chilled and firmed up—check by gently pressing against the center—you can lift it out of the pan using the edges of your foil liner as handles. Place it onto a cutting board and take a moment to admire its glossy surface speckled with Andes chips before reaching for your sharp knife.
When slicing, use long, clean strokes rather than sawing back and forth; this will keep those edges crisp and beautiful. Aim for about 1-inch squares—after all, presentation matters! Each cut should reveal that gorgeous layering and glistening sheen that makes homemade fudge so special. If you find yourself struggling with sticking or uneven edges, running your knife under hot water can help ease through without tearing apart your lovely creation.
Step 8: The Final Touches
Now that you’ve cut your Bailey’s Fudge into neat little squares (which I’m sure are calling out to you), let’s talk about how best to store these delicious bites—or how to serve them if you’re planning on sharing! A good rule of thumb is to keep them in an airtight container at room temperature if you’ll be enjoying them within a week; otherwise, storing them in the fridge extends their life significantly while maintaining that divine texture we’ve worked so hard for.
If you’re feeling particularly generous or festive (or just want an excuse to indulge!), consider drizzling some melted dark chocolate over each square before serving—they’ll look utterly intoxicating and taste even better! Alternatively, dusting with powdered sugar or cocoa powder can add an elegant touch without overpowering their rich flavor profile. Remember, these little squares are more than just treats; they represent love poured into cooking—and I promise they’ll bring joy to anyone lucky enough to enjoy them!
Conclusion:
As we wrap up our journey through this delightful recipe for Bailey’s Fudge, I hope you’re feeling just as excited as I am about creating this treat! There’s something profoundly satisfying about making something so simple yet utterly extraordinary with just a few ingredients. The combination of smooth milk chocolate mingling with the sweetness of condensed milk creates an irresistible harmony that dances on your palate, while the hint of Baileys adds that unmistakable depth—it’s like tasting pure joy wrapped in chocolate!
This recipe is an absolute must-try not only because of how delicious it is but also due to the joy you’ll experience while crafting it. It’s perfect for cozy nights in, celebrations with friends, or even as a thoughtful homemade gift. Picture pulling out that glossy pan from the fridge: the moment when you slice into its rich texture and watch those shiny squares reveal themselves is nothing short of magical. You’ll find smiles all around when you share these decadent bites with loved ones—they’re sure to become new favorites!
As for serving suggestions? Imagine savoring one piece alongside your morning coffee—what a luxurious way to start your day! Or perhaps after dinner, paired with a scoop of vanilla ice cream; talk about elevating dessert time! For an afternoon pick-me-up while catching up with friends over tea or coffee, these fudgy delights are just perfect. And let’s not forget about gifting—everyone loves receiving homemade treats during the holidays or special occasions; there’s truly no sweeter gesture.
Feeling adventurous? This recipe is wonderfully adaptable! You might consider swapping out some ingredients or adding mix-ins—how about throwing in some chopped nuts or swirling in some peanut butter? Even experimenting with different flavored extracts could elevate this already phenomenal treat into new realms of deliciousness! I invite you to dive into this world of possibilities and make this recipe your own—you’ll discover how rewarding cooking can be when you infuse it with personal touches. So go ahead and give Bailey’s Fudge a whirl; I can’t wait to hear about your experiences and variations!
Bailey’s Fudge
Discover the joy of making Bailey’s Fudge, a rich and creamy chocolate treat that melts in your mouth. This delightful dessert is perfect for sharing with friends and family or savoring on your own. Made with simple ingredients like milk chocolate chips and sweetened condensed milk, this no-bake fudge recipe is not only easy to prepare but also an indulgent experience that evokes warmth and happiness. With the added touch of minty Andes baking chips, each bite offers a harmonious blend of flavors, making it a go-to choice for any occasion—be it casual gatherings or festive celebrations. So grab your apron and let’s create something truly delicious together!
- Prep Time: 15 minutes
- Cook Time: 5 minutes
- Total Time: 20 minutes
- Yield: Approximately 16 servings 1x
- Category: Dessert
- Method: No-Bake
- Cuisine: American
Ingredients
- 3 1/2 cups milk chocolate chips
- 1 cup sweetened condensed milk
- 1/4 cup non-alcoholic coffee cream substitute
- 1 tsp vanilla extract
- 1/2 cup Andes baking chips
Instructions
- Line an 8×8 inch baking pan with aluminum foil, leaving some overhang for easy removal.
- In a large microwave-safe bowl, combine milk chocolate chips and sweetened condensed milk. Microwave in one-minute intervals, stirring until smooth (approximately 2 minutes total).
- Stir in the coffee cream substitute and vanilla extract until fully incorporated.
- Pour the mixture into the prepared pan, smoothing it out evenly with a spatula. Gently press Andes baking chips into the top.
- Cover tightly and chill in the refrigerator for at least 4 hours, or overnight for best results.
- Once set, lift the fudge from the pan using the foil overhang and cut into squares.
Nutrition
- Serving Size: 1 square (30g)
- Calories: 140
- Sugar: 18g
- Sodium: 30mg
- Fat: 7g
- Saturated Fat: 4g
- Unsaturated Fat: 3g
- Trans Fat: 0g
- Carbohydrates: 18g
- Fiber: 0g
- Protein: 2g
- Cholesterol: 5mg