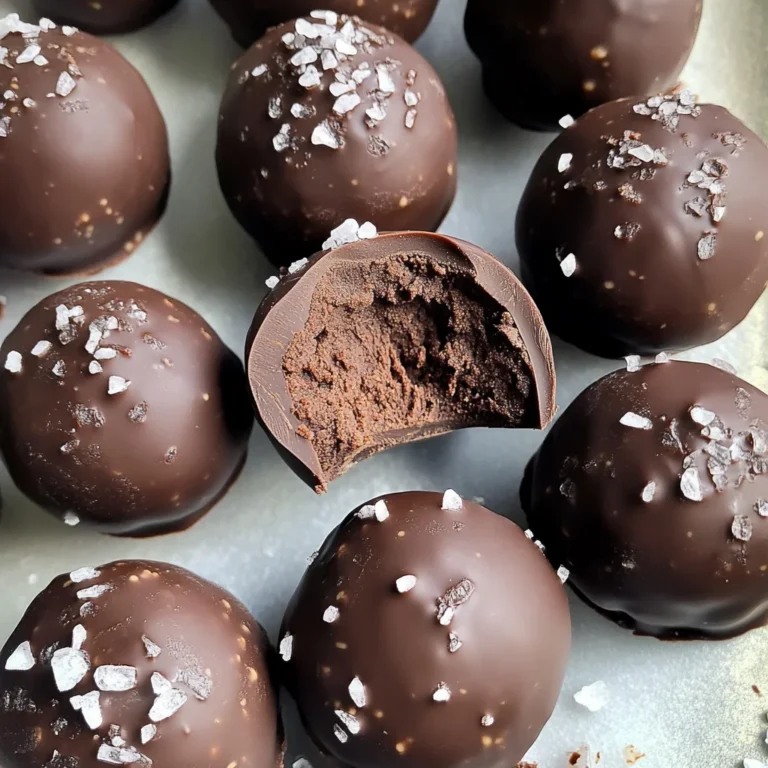
No Bake Peanut Butter Buckeye Bars
There’s something absolutely magical about creating a treat in the kitchen that lingers on your taste buds long after the last bite. The experience of making No Bake Peanut Butter Buckeye Bars is not just about the ingredients or even the technique; it’s about the joy, the laughter, and the sweet nostalgia that fills the air while you whip up these delightful bars. With their rich, creamy peanut butter base enveloped in a luscious chocolate blanket, they evoke memories of childhood treats and joyous family gatherings. I can almost hear the laughter and chatter as we gather around to enjoy these decadent delights, sharing stories and savoring every crumb together. Trust me when I say that each bite is an experience—a perfect melding of flavors that creates a truly extraordinary moment.
These No Bake Peanut Butter Buckeye Bars are a modern twist on the classic Buckeyes—those delightful little candies that so many of us know and love. But let’s be honest: who has time to roll balls when you can simply press everything into a pan? This recipe takes just five simple ingredients, and in mere minutes you can have a batch of these scrumptious bars ready to chill. It’s all about embracing simplicity while allowing those familiar flavors to shine through. Whether it’s a cozy night in or a festive gathering with friends, these bars are sure to impress and disappear quickly!
No Bake Peanut Butter Buckeye Bars: A Sweet Symphony of Flavor
These No Bake Peanut Butter Buckeye Bars are not only simple to make but also an absolute crowd-pleaser! With just five ingredients, they come together effortlessly, making them perfect for any occasion. I promise you; once you take your first bite of these rich bars, you’ll be transported straight back to those carefree days filled with joy and sweetness.
Ingredients:
As we embark on this delicious journey together, it’s essential to understand what each ingredient contributes to our No Bake Peanut Butter Buckeye Bars. Each component plays its part beautifully, ensuring that every bite is a harmonious blend of flavor and texture.
- 1/2 cup (1 stick or 113g) unsalted butter, softened. Softened butter is crucial for achieving that creamy texture we desire in our bars. When it’s at room temperature, it mixes beautifully with the peanut butter and sugar without struggling. If your butter is too cold, it will clump instead of blending smoothly; if it’s too warm or melted, you’ll lose some of that delightful structure we’re after. Remember to choose high-quality butter for richer flavor—this step is non-negotiable!
- 2 cups creamy peanut butter. Oh, the wonderful world of peanut butter! The star of our show! Creamy peanut butter not only provides that iconic nutty flavor but also contributes to the smooth texture that’s so satisfying. Look for natural varieties without added sugars or hydrogenated oils—this allows the pure essence of peanuts to shine through. And if you’re feeling adventurous, consider swapping half for crunchy peanut butter for an added textural surprise!
- 3 1/2 cups powdered confectioners sugar. This sweet dusting serves two vital purposes in our recipe: it adds sweetness and helps bind everything together into that divine dough we’ll press into our pan. Be sure to sift your powdered sugar if it’s lumpy; we want everything perfectly blended for a smooth finish! It’s amazing how this seemingly simple ingredient elevates our bars from good to utterly intoxicating.
- 1 1/2 teaspoons vanilla extract. Vanilla extract is like magic in baking—it enhances flavors and adds depth! It complements both the chocolate topping and peanut butter base beautifully, bringing balance to our dessert. Choose pure vanilla extract over imitation for a richer aroma and flavor; trust me on this one! Just a splash makes all the difference.
- 2 cups chocolate chips or chunks (12 ounces). This is where things get really exciting! Rich chocolate melts into liquid gold when heated—creating an indulgent layer atop our peanut buttery goodness. Choose high-quality chocolate chips for better melting properties; they’ll create that smooth finish we crave without becoming overly thick or gritty when melted down.
- 1 tablespoon unsalted butter (or coconut oil). This final touch helps achieve a silky-smooth chocolate finish when melted with your chips—it’s key for spreading across those luscious peanut butter bars! If you’d prefer coconut oil’s subtle tropical hint or need a dairy-free option, feel free to substitute here!
Equipment You’ll Need:
Having the right tools at hand makes all the difference in creating your masterpiece in the kitchen—and believe me, I’ve learned this lesson well over time! While these items may not be ingredients, they are essential partners in crafting something truly wonderful.
- Mixing bowl – A sturdy mixing bowl is essential for combining all your ingredients efficiently without worrying about spills or messes. Opt for one that’s large enough to accommodate thick doughs easily—trust me; it’ll save you from frustration later!
- Electric mixer – An electric mixer takes away any elbow grease needed for creaming those ingredients together smoothly (and quickly!). If you don’t have one handy, don’t fret—you can always mix by hand using a sturdy spatula or wooden spoon—but prepare yourself for quite the workout!
- 9×13-inch baking pan – This size pan is perfect for pressing down your mixture evenly so every square gets its fair share of deliciousness! Lining it with parchment paper makes removal easy later on—who wants crumbled edges?
- Microwave-safe bowl – This is crucial when melting chocolate; using glass ensures even heating without risk of burning (which can happen quite easily). Just remember to stir regularly—it’s worth taking those extra seconds!
- Sharp knife – A sharp knife ensures clean cuts while slicing your finished bars into perfectly portioned squares—no one wants uneven pieces disrupting their enjoyment!
Preparing the No Bake Peanut Butter Buckeye Bars
Step 1: Creaming Together Our Base
To start making these delightful bars, grab your mixing bowl and add in your softened unsalted butter along with two cups of creamy peanut butter—you’ll feel like you’re diving into pure comfort food right from the get-go! Using your electric mixer on medium speed will help cream these two together until they’re combined smoothly—this process known as creaming helps incorporate air into our mixture which contributes positively toward texture down the line. You’re aiming for an almost fluffy consistency here; however, don’t worry if it remains slightly thick—it should hold its shape somewhat but still blend well with other ingredients.
Step 2: Sweetening Our Creation
Next up comes adding three-and-a-half cups of powdered confectioners sugar along with one-and-a-half teaspoons of vanilla extract directly into that luscious mixture we just created! As you beat everything together again using your mixer until fully combined—you’ll notice how much sweeter this dough becomes alongside those nutty notes from earlier steps dancing harmoniously within each other’s presence—it truly feels like magic unfolding before your eyes! Don’t rush through this step; let yourself enjoy watching as everything transforms into something special before moving forward.
Step 3: Pressing Into Perfection
Now comes one of my favorite parts: transferring this gorgeous dough into your lined 9×13-inch baking pan! Gently spoon dollops across its surface before using clean hands (or perhaps an offset spatula if preferred) to firmly press down evenly until you’ve created an even layer throughout—the goal here being solidified surfaces ready for indulgent toppings later on! Trust me when I say that taking care during this step pays off later since uneven layers could lead towards messy results post-chilling—we want beautiful presentation after all!
Step 4: Melting Chocolate Bliss
Let’s melt our chocolate next because what would these bars be without that heavenly topping? In a microwave-safe bowl combine two cups worth (or twelve ounces) chocolate chips alongside one tablespoon unsalted butter—or coconut oil if you’re opting for dairy-free options here—and pop them into your microwave set at medium heat! Heat them up incrementally every thirty seconds while stirring between intervals until completely smooth—that glossy sheen means you’re ready now! But be cautious—overheating can lead towards burnt bits ruining everything so keep vigilant watch over this process carefully.
I can’t wait for you all to experience making these No Bake Peanut Butter Buckeye Bars—their deliciousness will surely light up any gathering or simply bring warmth during quiet evenings spent at home indulging solo… So go ahead—get started today—you deserve this sweet treat in your life!
Step 5: Melting the Chocolate Magic
Now that your peanut butter mixture is firmly pressed into the pan, it’s time to turn our attention to the chocolate topping—a step that’s not just about flavor but about creating a beautiful finish that elevates these bars to a whole new level. In a microwave-safe bowl, combine the chocolate chips and the remaining tablespoon of butter or coconut oil. Why do we add this extra fat? It’s absolutely paramount for achieving a silky smooth chocolate finish; it prevents the chocolate from seizing and gives it that glossy sheen that makes every bite look utterly divine. Microwave this mixture in 30-second increments, stirring vigorously in between each session. This process allows for even melting, ensuring that every morsel of chocolate transforms into a luxurious liquid gold.
You’ll want to monitor closely as you melt, since different microwaves can vary in intensity—typically, it should take about one and a half minutes total. When you see the chocolate beginning to melt but still have some solid pieces left, resist the urge to rush! Stirring will allow those residual chunks to dissolve completely into a smooth ganache-like consistency. This step is crucial because overcooking can lead to graininess, which we definitely want to avoid. Trust me on this; when you pour this velvety chocolate over your peanut butter base, it will create an irresistibly rich contrast, both visually and flavor-wise.
Step 6: Spreading the Chocolate Delight
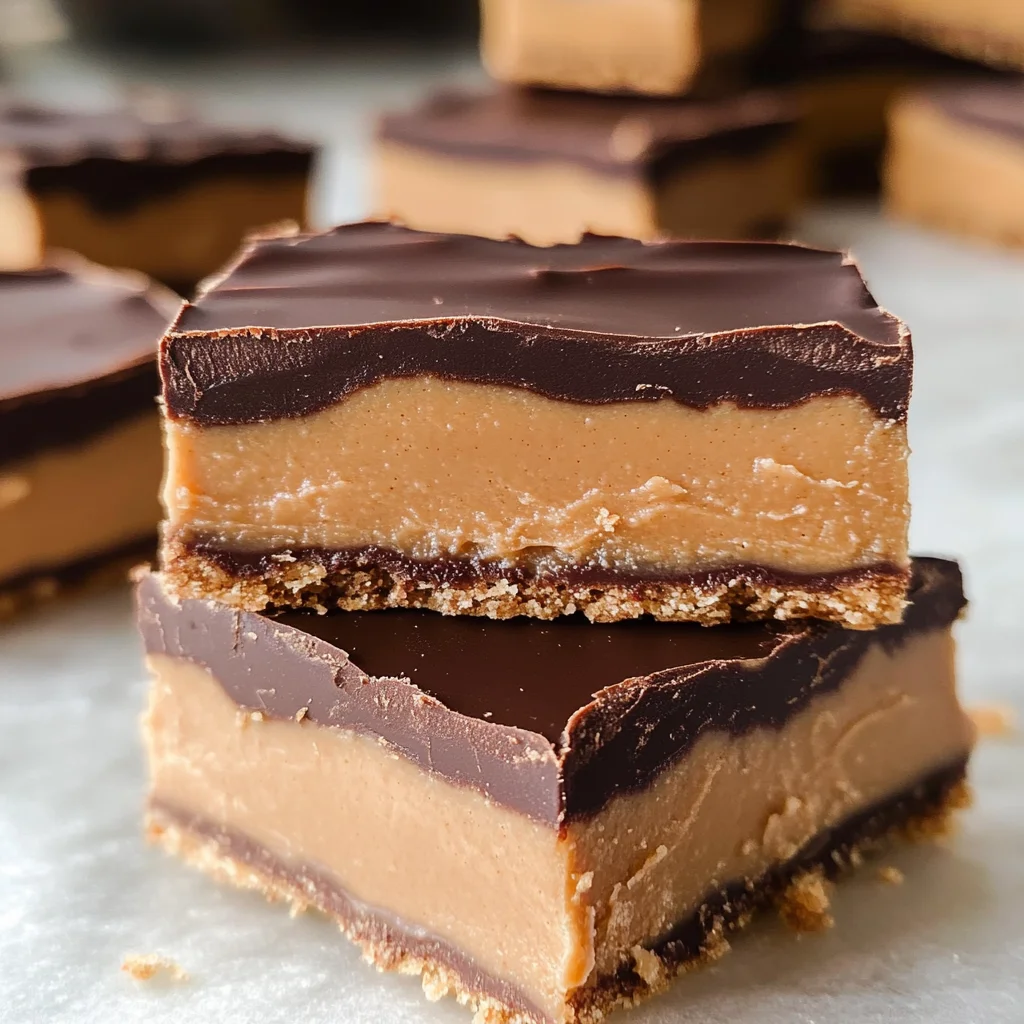
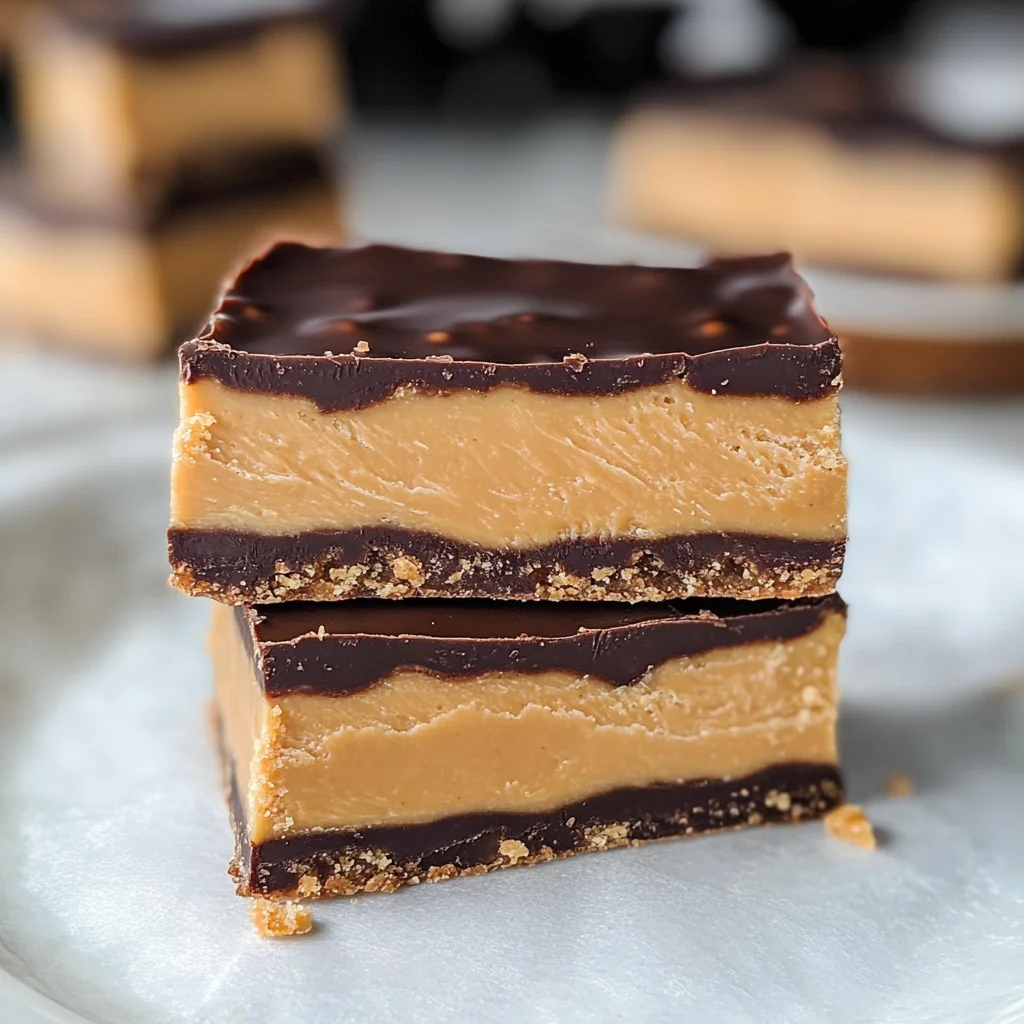
Once your chocolate is perfectly melted and glossy, it’s time for the fun part—pouring it over your peanut butter layer. Carefully drizzle the warm chocolate onto the pressed peanut butter dough, allowing it to cascade down like a beautiful waterfall of sweetness. Now, using an offset spatula or simply the back of a spoon, start spreading it evenly across the top of the bars. Take your time here; don’t rush this step! A careful spread ensures that every single bite has that delightful combination of creamy peanut butter and rich chocolate.
As you spread, feel free to get creative! If you want to create swirls or patterns with your spatula, go for it! It adds a personal touch that really makes these bars feel like they’re coming straight from your heart—and isn’t that what cooking is all about? Make sure that you’ve covered all corners and edges well so no peanut butter peeks through; trust me when I say you want every square inch coated in this luscious chocolate blanket. Once you’re satisfied with how it looks (and tastes—it’s hard not to sneak a little!), let it sit at room temperature until the chocolate has set completely; this usually takes about 30-60 minutes.
Step 7: Patience is Key—Chilling Your Bars
Now comes one of the most important yet often overlooked steps: chilling! After allowing your bars to come together at room temperature, it’s essential to transfer them into the refrigerator for at least one hour before cutting. Why chill? Well, this cooling period allows everything—the peanut butter filling and chocolate topping—to firm up beautifully, making them easier to slice without crumbling or losing their shape. Plus, chilling enhances those incredible flavors by allowing them time to meld together—a true symphony of flavors waiting to be savored!
When you first place them in the fridge, ensure they’re covered loosely with plastic wrap or another piece of parchment paper. This prevents any unwanted odors from infiltrating your masterpiece while they cool down. During this hour—or even longer if you can resist—the bars’ texture transforms into something profoundly satisfying: firm yet creamy with that perfect snap when you cut through them later on. Remember: good things come to those who wait! So grab a book or indulge in a little self-care while these beauties come together in harmony.
Step 8: The Grand Finale—Cutting into Perfection
After patiently waiting for what might feel like an eternity (but trust me—it’s worth it!), it’s time for the grand reveal! Carefully remove your No Bake Peanut Butter Buckeye Bars from the refrigerator and gently pull up on the excess parchment paper; they should slide out easily if you’ve lined your pan well—a non-negotiable step for easy removal! Now place them onto a cutting board for slicing. Use a sharp knife for clean cuts; I recommend warming the knife slightly under hot water beforehand and drying it off—that way you’ll get those gorgeous squares without any sticky mess sticking to your blade.
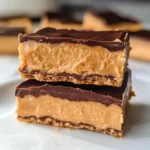
Aim for generous portions because let’s be real—once someone takes their first bite of these decadent bars, they’ll be coming back for more! As you cut through those layers of creamy peanut butter and luscious chocolate, take a moment to appreciate how beautiful they look. The contrast between dark chocolate and golden peanut butter is absolutely stunning—a visual treat before they even hit your taste buds! If any crumbs happen along the way (and they likely will), don’t fret; just nibble on them as a little teaser before serving!
Final Touches: Serving Your Delectable Bars
Your No Bake Peanut Butter Buckeye Bars are now ready for their debut! Place these tempting squares onto a lovely serving platter or individual wrappers if you’re gifting them—they make such thoughtful treats for friends or family gatherings! As guests take their first bites, watch as smiles bloom across faces; there’s something truly extraordinary about sharing food made with love. And remember: these bars can be stored in an airtight container in the refrigerator for up to two weeks (if they last that long!), though I highly doubt they will survive beyond a few days!
So there you have it—an incredibly simple yet delectable recipe that transforms five ingredients into pure bliss with minimal effort. Each bite offers an explosion of flavor and texture that will leave everyone asking for seconds (or thirds!). Whether you’re whipping these up as an after-school snack or showcasing them at celebrations, I promise you’ll fall head over heels in love with these No Bake Peanut Butter Buckeye Bars just as much as I have! Enjoy every heavenly morsel—you’ve earned it!
Storage and Enjoyment Tips for Your No Bake Peanut Butter Buckeye Bars
Now that you’ve whipped up a batch of these decadent No Bake Peanut Butter Buckeye Bars, it’s time to chat about enjoying them as well as how to keep them fresh for your snacking pleasure! These bars are not only an absolute treat to prepare but also a delight to share (or keep all to yourself, no judgment here!). With their rich, creamy peanut butter base topped with silky chocolate, they are bound to become a staple in your dessert repertoire. So let’s make sure you savor every last crumb and keep them as delightful as the day they were made!
Storing Leftover No Bake Peanut Butter Buckeye Bars
When it comes to preserving your precious creations, proper storage is key. I recommend placing your leftover No Bake Peanut Butter Buckeye Bars in an airtight container; this helps maintain that luscious texture while keeping out unwanted moisture. If you’re feeling extra cautious, you can even layer parchment paper between the bars to prevent any sticky situations – trust me, it’s worth it. Stored in the refrigerator, these bars will stay delicious for about one week, but I promise you, they won’t last that long! If you’re looking for a pro tip to ensure maximum freshness, consider adding a slice of bread into the container; it helps absorb excess moisture and keeps your bars beautifully chewy. After a few days in the fridge, they might get even more indulgent as the flavors meld together beautifully; the peanut butter becomes more pronounced and deeply satisfying. When you’re ready to indulge again, simply take one out and let it sit at room temperature for a few minutes before enjoying that first heavenly bite.
Freezing for Later
If you’re lucky enough to have leftovers (or if you want to make a big batch ahead of time), freezing these bars is an excellent option! To freeze properly, cut the bars into squares and place them in a single layer on a baking sheet lined with parchment paper until they’re firm. Then transfer them to an airtight container or zip-top bag, layering parchment paper between the squares if desired. They can be kept frozen for up to three months! This is such a fantastic option because it allows you to have homemade treats on hand whenever those cravings strike or when unexpected guests pop by. When you’re ready to enjoy them again, just pull out as many pieces as you’d like and let them thaw in the fridge or at room temperature—no need for fancy defrosting methods here! The convenience of having these delightful treats on hand makes life just a little sweeter.
No Bake Peanut Butter Buckeye Bars
Whip up indulgent No Bake Peanut Butter Buckeye Bars with just 5 ingredients! Easy and delicious—try this sweet treat today!
- Prep Time: 20 minutes
- Cook Time: 10 minutes
- Total Time: 30 minutes
- Yield: 16 servings 1x
- Category: Dessert
- Method: No Bake
- Cuisine: American
Ingredients
- 1/2 cup unsalted butter, softened
- 2 cups creamy peanut butter
- 3 1/2 cups powdered confectioners sugar
- 1 1/2 teaspoons vanilla extract
- 2 cups chocolate chips or chunks
Instructions
- In a mixing bowl, cream together softened butter and peanut butter until smooth.
- Gradually add powdered sugar and vanilla extract, mixing until fully combined.
- Press the mixture evenly into a lined 9×13-inch baking pan.
- Melt chocolate chips with an additional tablespoon of butter or coconut oil in a microwave-safe bowl, stirring every 30 seconds until smooth.
- Spread the melted chocolate over the peanut butter layer and let it set at room temperature for about 30-60 minutes.
- Chill in the refrigerator for at least one hour before cutting into squares.
Nutrition
- Serving Size: 1 square (45g)
- Calories: 210
- Sugar: 18g
- Sodium: 80mg
- Fat: 12g
- Saturated Fat: 5g
- Unsaturated Fat: 7g
- Trans Fat: 0g
- Carbohydrates: 24g
- Fiber: 1g
- Protein: 4g
- Cholesterol: 15mg