Easy Sheet Pan Tortellini and Kielbasa
There’s something utterly delightful about the simplicity of a sheet pan meal, isn’t there? It’s as if all the stress of dinner-time melts away with every sizzling sound and aromatic waft that fills your kitchen. The Easy Sheet Pan Tortellini and Kielbasa is more than just a recipe; it’s an experience that weaves together comfort, convenience, and vibrant flavors. Imagine pulling that golden-brown pan from the oven, where the tortellini has plumped up beautifully amidst perfectly roasted vegetables and savory kielbasa. The colors are stunning, the textures inviting, and the smell? Oh my goodness! It’s like a warm embrace after a long day. This dish is truly a celebration of fuss-free dining without sacrificing taste or heart.
I’ve always been captivated by meals that bring people together around the table without requiring hours in the kitchen. This Easy Sheet Pan Tortellini and Kielbasa is one of those gems that makes even the busiest weeknight feel special. The beauty lies in its versatility—feel free to mix and match your favorite frozen vegetables or even switch up the seasonings based on what you have on hand! You’ll find that every bite bursts with flavor while keeping things refreshingly uncomplicated. Trust me when I say this dish will inspire you to gather friends or family for shared meals that create lasting memories. So let’s dive into this culinary journey together!
Easy Sheet Pan Tortellini and Kielbasa: A Cozy Dinner Made Simple
Welcome to one of my absolute favorite easy dinners! This Easy Sheet Pan Tortellini and Kielbasa recipe is not just quick; it’s also incredibly satisfying, making it perfect for those nights when you want something hearty yet effortless. With just a handful of ingredients, you’ll have a complete meal that looks as gorgeous as it tastes—all while spending minimal time in the kitchen.

Ingredients:
As we embark on this culinary adventure, let me share what makes each ingredient shine in our Easy Sheet Pan Tortellini and Kielbasa recipe. Each component plays a vital role in creating that harmonious blend of flavors.
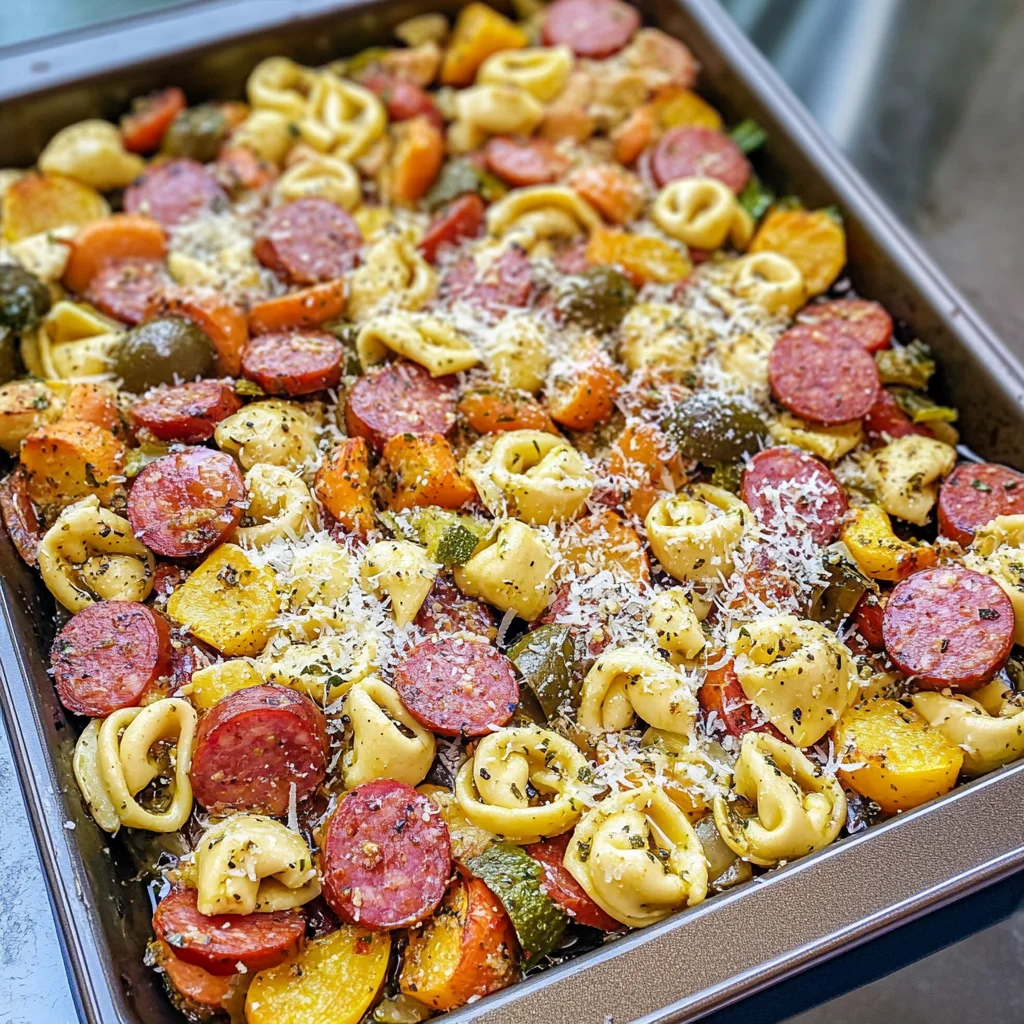
- 28 oz kielbasa (sliced). This smoky sausage brings depth and richness to our dish, transforming a simple meal into something extraordinary. When choosing kielbasa, look for high-quality brands that use natural spices; they add an authentic flavor profile that’s hard to beat. Slicing it allows for maximum surface area to caramelize beautifully during baking—this step is crucial because those crispy edges are where much of the flavor resides!
- 20 oz frozen tortellini. Frozen tortellini are a lifesaver for busy weeknights! They cook up quickly and soak up all the delicious juices from the other ingredients while roasting in the oven. I recommend going for cheese-filled tortellini for added creaminess or spinach-filled for a touch of earthiness. If you happen to have fresh tortellini on hand, don’t hesitate to use it instead—just make sure to boil it according to package instructions first!
- 32 oz frozen vegetables (broccoli or a sheet pan mix). Vegetables add not only nutrition but also color and texture to your meal! I adore using a mix because it adds variety, but broccoli has such a lovely crunch when roasted—it becomes tender yet retains some bite, which is absolutely delightful alongside our other ingredients. Plus, using frozen veggies means we can enjoy this dish any time of year without worrying about freshness.
- 3-4 Tbsp olive or avocado oil. Ah, liquid gold! Oil is essential here; it helps everything roast evenly while contributing richness to the overall flavor profile. Olive oil lends an earthy note, while avocado oil has a neutral taste with higher smoke points—both are fantastic choices! You can choose based on your preference or what you have available at home.
- 1 tsp garlic powder. Garlic powder works wonders in this recipe by infusing each bite with its warm aroma without needing fresh garlic prep work—who doesn’t love that? It’s one of those pantry staples that can elevate even the simplest dishes into something magical, providing warmth and comforting familiarity.
- 1 tsp onion powder. Similar to garlic powder, onion powder adds depth without any fuss involved in chopping onions! It brings sweetness and complexity into play here: two qualities that meld beautifully with our kielbasa and veggies.
- 1/2 tsp paprika. Paprika introduces a subtle smokiness along with vibrant color—what’s not to love? Opting for smoked paprika can deepen those flavors even further if you’re feeling adventurous! Just remember: it’s all about balancing flavors so none overpower another.
- 1 tsp salt & 1/2 tsp pepper. Seasoning is non-negotiable in any recipe! Salt enhances every single ingredient’s flavor while pepper adds just enough kick without overwhelming your palate—trust me when I say this balance is absolutely paramount for achieving perfection!
- 1/2 cup parmesan cheese (shredded). The finishing touch! Parmesan melts beautifully over everything during roasting, creating an irresistible crust full of umami goodness—a little sprinkle goes such a long way toward elevating this already delightful dish!
Equipment You’ll Need:
Having the right tools can truly transform your cooking experience from stressful chaos into smooth sailing, allowing you to focus on what’s important: enjoying delicious food with loved ones! Here’s what you’ll need:
- Sheet pan – A good quality sheet pan provides ample space for roasting all your ingredients evenly without overcrowding them—a crucial factor if you want everything crispy rather than soggy! If you’re looking for alternatives, consider using two smaller pans if that’s what you have available at home.
- Large mixing bowl – Perfect for tossing everything together before transferring it onto your sheet pan; this ensures each piece gets coated nicely with oil and seasonings!
- Spatula or wooden spoon – Essential for mixing everything together before baking as well as stirring halfway through cooking—don’t skip this step if you want uniform results throughout!
Now that we’ve gathered our ingredients and tools together let’s dive into preparing this scrumptious Easy Sheet Pan Tortellini and Kielbasa dish!
Step 1: Prepping Your Ingredients
Begin by gathering all your beautiful ingredients! If you’re using fresh tortellini instead of frozen (which I definitely encourage if you have access), boil them according to package instructions until al dente before adding them later on in our process—you want them perfectly cooked but not mushy! While waiting for water to boil or tortellini prepping begins (whichever applies), slice your kielbasa into bite-sized pieces; aim for uniformity here so they cook evenly during roasting time.
Step 2: Assembling Everything
Once your tortellini is ready (or just out-of-the-freezer-mode), grab that trusty large mixing bowl mentioned earlier—and toss in sliced kielbasa along with frozen veggies straightaway! Drizzle everything generously with olive oil before sprinkling garlic powder, onion powder, paprika, salt & pepper over top —don’t be shy here; we want bold flavors dancing across every surface area possible! Give everything a good toss until each piece resembles an enticing medley bursting forth from within—a little mess never hurt anyone when culinary magic awaits ahead!
Step 3: Baking Bliss
Transfer this vibrant mixture onto prepared sheet pan(s) ensuring they’re spread out nicely across surface area instead of piled high upon one another—that’s key here folks; overcrowding will leave us sad soggy bites rather than crisp delights later down line… Place these beauties into preheated oven set at 350°F (175°C) —let them bask there undisturbed initially until timer hits around 10 minutes mark then take time stir things gently allowing even browning throughout entire mixture ensuring nothing gets left behind undercooked…
Step 4: Adding That Cheesy Goodness
After stirring halfway through baking time (around 10 minutes), allow additional 15 more minutes pass until everything reaches golden perfection before pulling out from oven —and now comes final touch folks—the glorious shredded parmesan cheese sprinkled atop just prior returning back into heat once again wow wow wow!!! This step becomes utterly intoxicating as melted cheese envelops everything creating layers upon layers rich heavenly texture unlike anything else found elsewhere…
I can’t wait for you all to dive into this recipe and create joyous memories around your dining table! Keep reading as we explore more detailed steps as they unfold…
Step 5: Bringing It All Together on the Sheet Pan
Now that your tortellini is ready (whether you’ve chosen frozen or fresh), it’s time to assemble this beautiful medley of flavors on a sheet pan. I can’t emphasize enough how wonderful it is to have everything in one place, creating an easy cleanup and allowing those flavors to meld beautifully together. Grab your sheet pan—make sure it’s large enough to hold all of the ingredients without crowding them too much, as this is crucial for achieving that delightful roasted finish. You want the vegetables and tortellini to have space to breathe and roast evenly instead of steaming together.
Place the sliced kielbasa, frozen tortellini, and your chosen vegetables onto the pan like a colorful canvas. The vibrant greens from the broccoli or mixed veggies paired with the golden-brown sausage create a visual feast before they even hit the oven! Drizzle 3-4 tablespoons of olive or avocado oil over everything; this liquid gold is not just for flavor but also essential for ensuring each component roasts beautifully—allowing them to crisp up, which adds that delightful texture contrast we all crave. And let’s not forget about seasoning! Sprinkle your garlic powder, onion powder, paprika, salt, and pepper evenly over the entire mixture. These spices are not merely decorative; they will infuse every bite with a symphony of flavors that will tantalize your taste buds. Trust me; this step is absolutely paramount in elevating your dish from ordinary to extraordinary.
Step 6: Baking Your Beautiful Creation
With everything beautifully arranged on the sheet pan, it’s time to slide it into your preheated oven set at 350°F (175°C). The inviting aroma will start wafting through your kitchen almost immediately, making it hard to resist peeking in! However, resist that urge for at least ten minutes—patience really does pay off here. Bake for 25-30 minutes while stirring the mixture every ten minutes. This stirring is more than just a gentle nudge; it ensures an even roast across all ingredients. You want every piece of kielbasa to get that lovely caramelization on its surface while ensuring the tortellini cooks through without becoming mushy.
As you take those initial peeks at around 25 minutes in, look for signs of doneness: are the vegetables starting to soften? Is there a slight browning on the edges? That’s exactly what you want! If they’re still looking a little shy and haven’t reached that golden hue yet, don’t hesitate to leave them in for another five minutes. Each oven behaves differently; some may run hotter or cooler than others, so keep an eye out for those vibrant colors developing—it’s truly magical!
Step 7: The Transformative Power of Resting
Once you’ve pulled your sheet pan masterpiece out of the oven—a moment worth celebrating—you might be tempted to dive right in. But let me encourage you: allow it to rest for just five minutes before serving. This step might seem trivial but hear me out! Allowing your meal a brief moment of respite helps all those incredible flavors settle together more harmoniously. It lets any residual steam escape so you’re not left with soggy tortellini but rather perfectly cooked morsels infused with flavor.
During this short resting period, take a moment to set your table or plate up those gorgeous servings—this small act prepares both you and your family for what’s coming next: pure comfort food bliss! Plus, when you finally dig into your creation after letting it rest, you’ll experience an explosion of flavors as they’ve had time to mingle and deepen during this brief pause.
Step 8: Serving Up Your Easy Sheet Pan Tortellini and Kielbasa
Finally! It’s time for that first bite of your Easy Sheet Pan Tortellini and Kielbasa! As you serve up generous portions onto plates or bowls, consider garnishing with a sprinkle of freshly chopped parsley or extra parmesan cheese if you’re feeling decadent—those finishing touches elevate not only the dish visually but also add layers of flavor that make dining truly special. The vibrant colors paired with delightful textures are sure to impress everyone at the table.
When ready to enjoy, take a moment—just one breath—to inhale deeply because trust me; that intoxicating smell will transport you straight into culinary heaven! As you dig in with fork (or spoon!) in hand, notice how each mouthful has its own story—from the juicy kielbasa bursting with flavor with every bite to tender tortellini enveloped in warmth alongside perfectly roasted vegetables. I promise you; it’s going to be profoundly satisfying!
Next Major Phase – Final Touches
Now that you’ve conquered this easy dinner recipe that’s sure to become a staple in your household, I invite you to share any tweaks or variations you try out as well! The beauty of this dish lies in its versatility—you can swap out vegetables according to seasonality or personal preference without losing its essence. Feel free to experiment because cooking should always feel like an adventure! What will you pair next? Let me know in the comments what twists you’ve added and what other easy dinners have captured your heart like this one has captured mine! Happy cooking!
Storage and Enjoyment Tips for Your Easy Sheet Pan Tortellini and Kielbasa
Now that your Easy Sheet Pan Tortellini and Kielbasa is piping hot and ready to be devoured, let’s talk about how to savor every last bite, even if you happen to have some leftovers! This dish is not only a meal that delights the senses while you’re enjoying it fresh from the oven, but it also has staying power when it comes to storage. The beauty of this recipe lies in its simplicity and versatility, making it an excellent candidate for meal prep or quick reheating during those busy weeknight dinners. I can almost see you smiling as you dig in, but don’t worry; there’s plenty of joy left for later!
Storing Leftover Easy Sheet Pan Tortellini and Kielbasa
When it comes to storing your delicious creation, I recommend transferring any leftovers into an airtight container—this is absolutely crucial for keeping the flavors locked in. Pop your dish into the refrigerator where it will stay fresh for about 3 to 4 days. Now, here’s a little pro tip: if you want to maintain that delightful texture of the tortellini while preventing sogginess, consider placing a slice of bread inside the container. It works wonders by absorbing excess moisture! After a day or two in the fridge, don’t be surprised if the flavors deepen even more, creating a symphony of tastes that might just surprise you when you take your first bite upon reheating. To enjoy again, simply pop it in the microwave or reheat on the stovetop until warmed through—trust me; it’s like bringing a piece of warmth back into your kitchen.
Freezing Your Easy Sheet Pan Tortellini and Kielbasa for Later
If you find yourself with extra portions (or perhaps you’ve made a double batch because it’s just that good), freezing is another fantastic option! To freeze properly, allow your tortellini and kielbasa concoction to cool completely before placing it into freezer-safe containers or bags. Be sure to remove as much air as possible before sealing them up tight to prevent freezer burn—this step is non-negotiable for preserving quality! When stored correctly, this dish can last up to 3 months in the freezer without losing its charm. When you’re ready to enjoy it again, simply thaw overnight in the fridge and reheat as mentioned earlier. Having this meal on hand means you’ll always have something comforting waiting for you on those hectic days, making life just a bit easier while still providing that home-cooked goodness we all crave.
Easy Sheet Pan Tortellini and Kielbasa

Easy Sheet Pan Tortellini and Kielbasa is a delightful one-pan meal that combines the rich flavors of savory sausage with tender tortellini and vibrant vegetables, all roasted to perfection. This dish is not only quick to prepare but also offers an easy cleanup, making it a fantastic choice for busy weeknights. Simply toss your ingredients together, let the oven do the work, and enjoy a comforting dinner that brings warmth and satisfaction to your table. With its colorful presentation and bursting flavors, this sheet pan meal is bound to become a favorite in your household.
- Prep Time: 15 minutes
- Cook Time: 30 minutes
- Total Time: 45 minutes
- Yield: Serves approximately 6 portions 1x
- Category: Dinner
- Method: Baking
- Cuisine: Italian
Ingredients
- 28 oz chicken or turkey kielbasa (sliced)
- 20 oz frozen cheese-filled or spinach tortellini
- 32 oz frozen broccoli or mixed vegetables
- 3–4 Tbsp olive oil or avocado oil
- 1 tsp garlic powder
- 1 tsp onion powder
- 1/2 tsp paprika
- 1 tsp salt
- 1/2 tsp pepper
- 1/2 cup shredded parmesan cheese
Instructions
- Preheat the oven to 350°F (175°C).
- In a large mixing bowl, combine sliced kielbasa, frozen tortellini, and vegetables.
- Drizzle with oil and sprinkle garlic powder, onion powder, paprika, salt, and pepper. Toss until evenly coated.
- Spread the mixture on a baking sheet in a single layer.
- Bake for approximately 25-30 minutes, stirring halfway through.
- In the last five minutes of baking, sprinkle shredded parmesan cheese over the mixture before returning it to the oven until melted and golden.
Nutrition
- Serving Size: 1 plate (approximately 300g)
- Calories: 420
- Sugar: 3g
- Sodium: 950mg
- Fat: 22g
- Saturated Fat: 8g
- Unsaturated Fat: 12g
- Trans Fat: 0g
- Carbohydrates: 40g
- Fiber: 6g
- Protein: 20g
- Cholesterol: 35mg