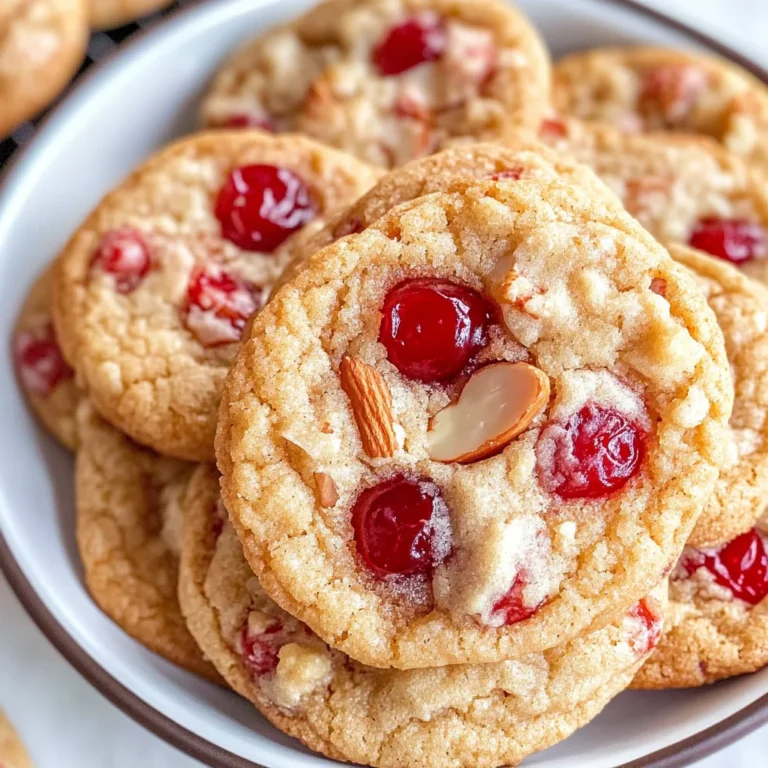
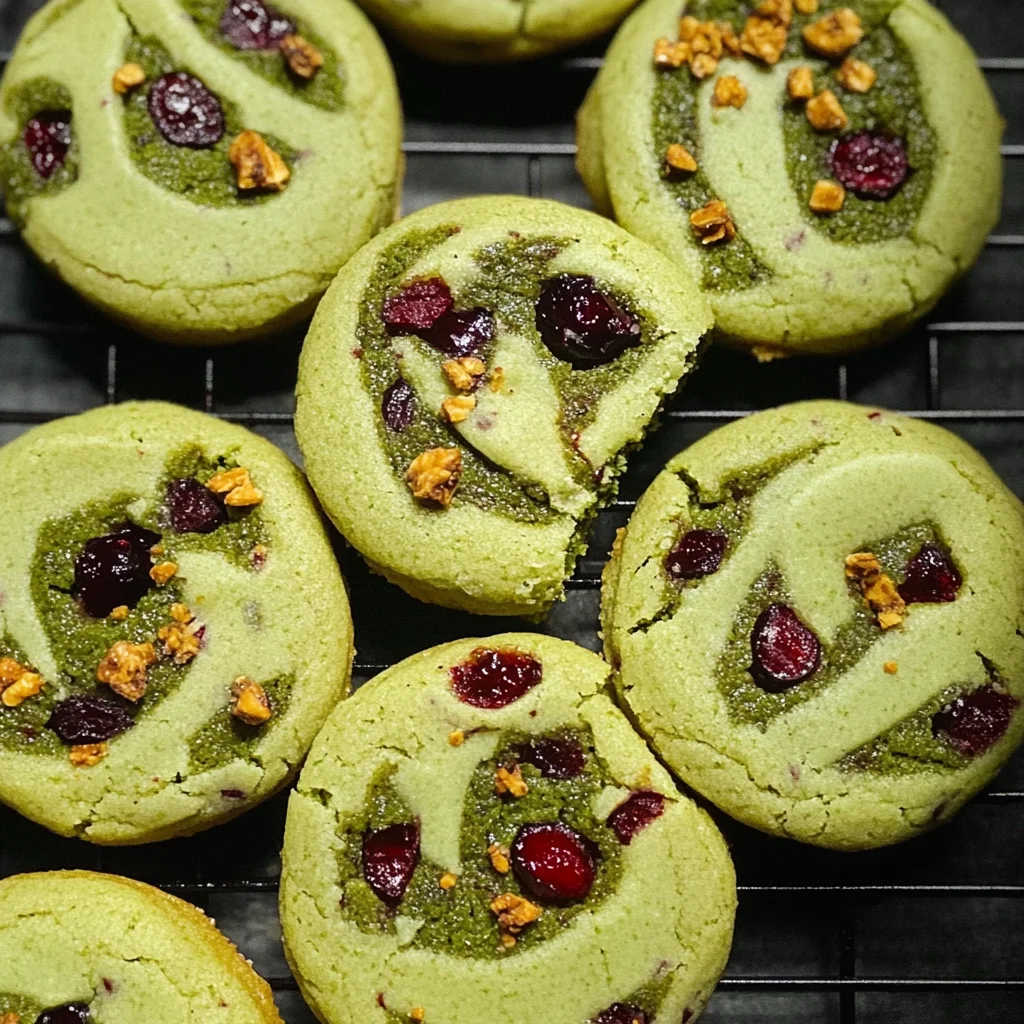
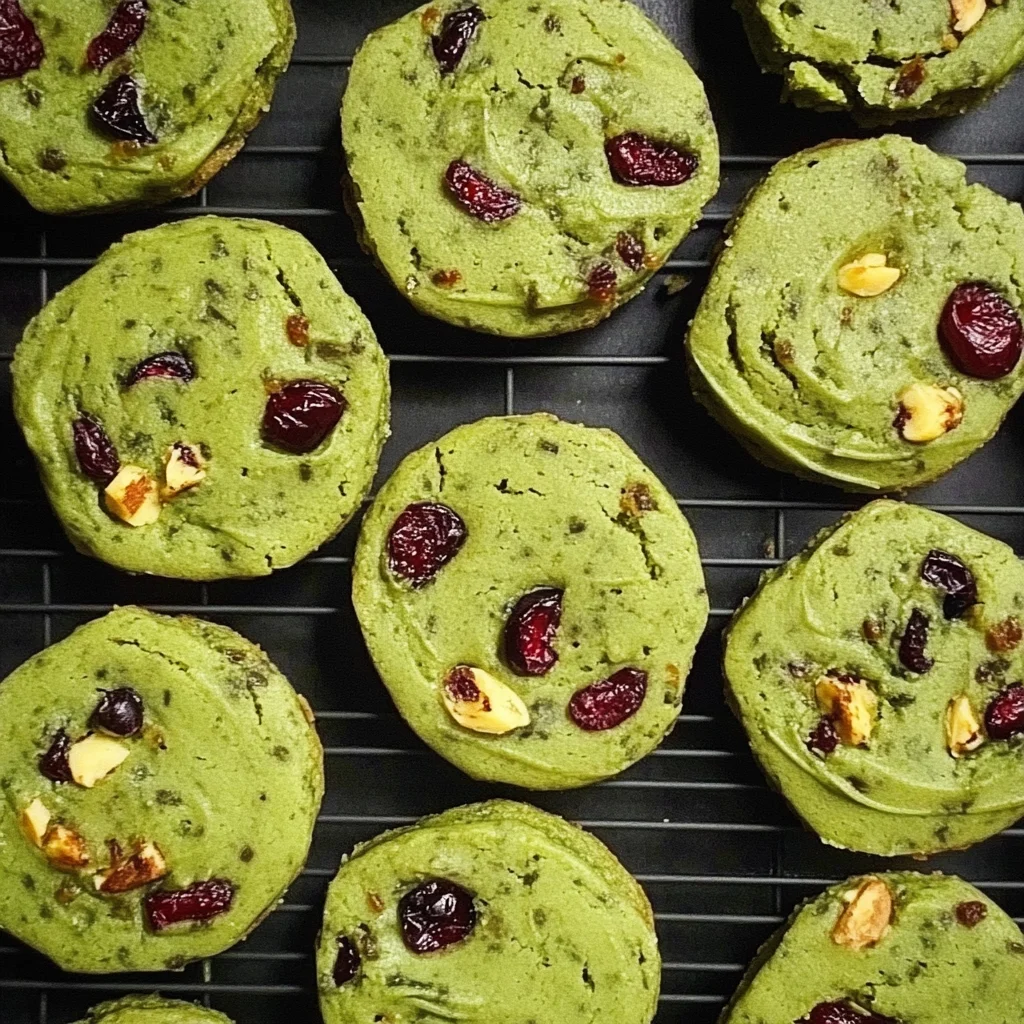
Easy Baked Matcha Cookies With Cranberries
There’s something utterly magical about the process of baking, isn’t there? It transforms simple ingredients into delightful treats that fill your home with warmth and comfort. Today, I’m thrilled to share with you a recipe for Easy Baked Matcha Cookies With Cranberries, which is not just about enjoying a scrumptious cookie; it’s about embracing a moment of creativity in your kitchen. These cookies boast a vibrant green hue from matcha powder, harmoniously complemented by the tart sweetness of dried cranberries, creating an arresting visual and flavor experience. As they bake, the aroma wafts through your space, promising a delightful treat that’s both satisfying and refreshing.
This recipe is more than just a sweet indulgence; it’s a celebration of flavors that bridge tradition and modernity. Matcha has long been revered in Japanese culture for its health benefits and unique taste, while cranberries add a burst of fruity brightness. Together, they create an extraordinary cookie that feels like a little piece of art. Imagine serving these at your next gathering or simply enjoying them during a quiet moment with a cup of tea; they’re perfect for any occasion. Trust me when I say, once you take that first bite, you’ll understand why this duo is so special.
Easy Baked Matcha Cookies With Cranberries: A Delightful Treat Awaits!
Baking these Easy Baked Matcha Cookies With Cranberries is not just about following steps—it’s about immersing yourself in the joy of creating something beautiful and delicious. The simplicity of the ingredients allows each component to shine while also coming together in perfect harmony. The crunchiness of these cookies paired with their delicate flavor profile will leave everyone asking for seconds (or thirds!). So roll up your sleeves, gather those ingredients, and let’s embark on this culinary adventure together!
Ingredients:
As we embark on this delightful baking journey, let’s take a moment to appreciate each ingredient that plays its part in creating these extraordinary cookies.
- 100 grams of butter (softened at room temperature). Butter is truly the star ingredient in our Easy Baked Matcha Cookies With Cranberries! It provides richness and flavor—think of it as liquid gold melting into every morsel. Softened butter is essential because it helps incorporate air into our dough when creamed with sugar, leading to those lovely, fluffy textures we crave in cookies. Just remember: if you accidentally melt it, you might end up with flat cookies instead of those beautiful bites we desire!
- 45 grams of powdered sugar. This fine sugar dissolves effortlessly into the butter compared to granulated sugar, allowing us to achieve that silky-smooth batter that makes these cookies so special. Plus, powdered sugar adds a touch of sweetness without making things overly sugary—just enough to balance out the earthy notes from the matcha and the tart cranberries.
- 25 grams of room-temperature beaten egg (approximately half an egg). Eggs are often used as binding agents in baking; however, here they serve to enrich our dough with moisture and help it hold together beautifully during baking. By using only half an egg (or whisking one fully and saving some for another recipe), we ensure our cookie dough remains perfectly balanced—not too dry or too wet. Trust me on this one; precision matters!
- 165 grams of all-purpose flour. Flour acts as the backbone of our cookie structure. This kind provides just the right amount of gluten development needed for texture while ensuring our cookies have enough body to hold their shape without being tough or dense. When measuring flour, I recommend fluffing it up first before scooping it into your measuring cup—this prevents packing too much flour into your dough.
- 35 grams of dried cranberries. These little gems bring bursts of natural sweetness along with tangy flavor pops that elevate our matcha experience to new heights! When selecting cranberries, look for ones that are plump and not overly dried out; they should feel somewhat moist but not sticky—this ensures they’re fresh and flavorful.
- 4 grams of matcha powder. Ahh… matcha! This finely ground green tea powder not only gives our cookies their stunning color but also infuses them with deep earthy notes rich in antioxidants—what’s not to love? Look for high-quality ceremonial grade matcha if possible; its vibrant green color indicates freshness and will make your cookies sing with flavor!
Equipment You’ll Need:
Having the proper tools can make all the difference in ensuring your baking process flows seamlessly! While these items may not be ingredients themselves, think of them as trusty companions that help bring our delicious creation to life.
- Mixing bowls – These are essential for combining ingredients smoothly without causing any messes! Consider investing in various sizes: one large bowl for mixing dough and smaller ones for preparing individual components like eggs or sugar.
- Silicone spatula – This versatile tool is perfect for folding ingredients gently without deflating your batter—a crucial step when incorporating air into our mixture! Plus, it scrapes every last bit from the bowl so nothing goes to waste—a win-win!
- Electric mixer – While mixing by hand is possible, an electric mixer does wonders when it comes to creaming butter and sugar together until light and fluffy—a key step towards achieving cookie perfection!
- Sieve – For sifting flour and matcha powder! This process aerates them while removing any lumps, ensuring an even blend throughout your dough. Don’t skip this step—trust me; clumps can lead to uneven textures.
- Plastic gloves – They might seem optional but using gloves can make kneading easier while preventing dough from sticking relentlessly to your hands! Plus, who doesn’t love clean hands after baking?
Now that we have everything ready—the ingredients laid out beautifully before us along with our essential tools—it’s time to dive into making these scrumptious Easy Baked Matcha Cookies With Cranberries!
Step 1: Soften That Butter Right!
The first step might seem simple but trust me when I say it’s absolutely paramount: bring 100 grams of butter to room temperature until softened! This isn’t merely about convenience; softening enables better incorporation during creaming alongside powdered sugar later on—a process known as emulsification where fat molecules mix thoroughly with water-based ones (like eggs). You want your butter pliable enough so you can press down easily without melting it away completely!
If you’re short on time—or if you forget to take it out early—you can quickly soften cold butter by cutting it into cubes or grating it using a box grater before letting it sit at room temperature for about 15 minutes.
Step 2: The Creamy Dream
Once that butter feels soft under pressure from your fingers (but still intact!), grab your mixing bowl along with 45 grams of powdered sugar—the key player here! Using either an electric mixer or silicone spatula (if you’re feeling adventurous), blend these two together until they resemble smooth paste-like consistency—this should take just around two minutes max!
This creaming process introduces air bubbles into what will become our rich cookie base—a crucial element leading towards lightness once baked off later on! Pay attention here; if you overmix or skip this stage entirely… well let’s just say flat cookies aren’t exactly what anyone dreams about!
Step 3: Egg-citing Times Ahead!
Now comes my favorite part: introducing our 25 grams worth (about half) beaten egg into this buttery concoction gradually—let’s do this in three increments! Why three? It’s all about building layers within our batter while allowing proper emulsification between fats & liquids without curdling—it creates light fluffiness instead!
After each addition mix briefly using an electric mixer until fully combined before proceeding onwards—you’ll notice things starting becoming glossy & cohesive as we go along.
Step 4: Sift Away!
Here’s where we get clever. Grab that beloved sieve again because now we’ll be adding 165 grams worth all-purpose flour—gently sifted directly overtop existing mixture within bowl below! Not only does sifting prevent clumping but also aerates flour resulting in lighter texture throughout final product—a non-negotiable detail folks!
Once sifted through gently fold using silicone spatula until no dry spots remain visible—that means everything should appear uniformly mixed together seamlessly throughout its entirety without overworking dough either!
This initial phase sets up foundation necessary towards ensuring success later down line so take care when executing each step diligently…remember every little detail counts toward crafting delicious memories shared amongst family friends alike!
And there you have it—we’re already off on such an exciting journey toward deliciousness together! In my next steps we’ll delve deeper into shaping & rolling aspects alongside freezing techniques which truly elevate overall outcome toward extraordinary results ahead…stay tuned my dear friend as we continue crafting magic within those charmingly inviting kitchens worldwide!
Step 5: Forming the Dough — The Heart of Your Cookies
Now that you’ve sifted in the flour, it’s time to bring everything together into a cohesive dough. This step is where you’ll feel the magic begin to happen; it’s almost like an alchemical transformation. Gently fold the mixture using your silicone spatula until no dry spots remain—this is crucial because you want every bit of flour to be fully incorporated into your buttery bliss. The folding technique helps maintain the airiness you’ve achieved with your egg mixture, which is absolutely paramount for light and tender cookies. Trust me on this; if you mix too vigorously, you risk developing gluten, which could lead to a denser cookie instead of the delicate crunch we’re aiming for.
Once the dough feels uniform—smooth yet slightly tacky—you’ll want to use your hands to form it into a ball. This tactile engagement allows you to gauge the dough’s texture and ensure it’s just right. If you find it too sticky, don’t worry! A sprinkle of flour will help, but keep it minimal. I recommend wearing plastic gloves during this stage; not only does this prevent stickiness on your hands, but it also keeps the dough clean and manageable. As you knead it gently, savor this moment; you’re creating something that will fill your kitchen with warmth and delight soon enough!
Step 6: Dividing Your Dough — The Duality of Flavor
With your beautifully formed dough ready, it’s time to divide it into two equal parts—one for our vibrant matcha layer and one for the sweet cranberry infusion. Using a kitchen scale here can truly elevate your baking game, ensuring that each half is precisely balanced. Why is this important? Well, equal portions guarantee that each cookie has a harmonious distribution of flavors and textures when baked together; after all, we want every bite to be an extraordinary experience!
Once divided, set one half aside while we focus on creating the cranberry dough first. Gently mix in those delightful dried cranberries with your hands or spatula until they are evenly distributed throughout the dough. This is where those little bursts of tartness come into play; they will contrast beautifully against the earthy matcha layer later on. Make sure every cranberry is nestled within the dough so that each cookie tells its own story through flavor—a symphony of sweetness and tang!
Step 7: Crafting Your Matcha Masterpiece
Now onto our matcha dough! Take that second half of your divided dough and knead in 4 grams of matcha powder until it’s evenly distributed, resulting in a stunning green hue throughout. This step isn’t just about color; matcha brings a unique depth of flavor that pairs exquisitely with the sweetness of sugar and butter. As you work in the matcha, take a moment to appreciate how the aroma evolves—it’s utterly intoxicating! Each knead transforms not just the appearance but also infuses your cookies with that distinct umami richness.
It’s essential to ensure that this vibrant powder is well combined without any streaks left behind; otherwise, you’ll end up with patches of flavor instead of uniform taste. You want every bite to echo that lovely green tea essence! Once fully mixed and vibrant in color, shape this matcha-infused dough into a rectangle as we prepare for assembly—this will make wrapping around our cranberry log much easier later.
Step 8: Shaping for Success — Wrapping Up Flavors
Now comes one of my favorite parts—the shaping process! Start by preparing two sheets of parchment paper: one for rolling out the matcha rectangle and another for wrapping our cranberry log snugly. Place your matcha dough between these sheets and gently roll it out using a rolling pin until it forms an even rectangle about ¼ inch thick. The technique here is all about even pressure; ensure you’re not pressing down too hard or unevenly because we want our cookies to bake uniformly.
After achieving that perfect shape (you’ll know it’s ready when you see nice straight edges), carefully peel back one side of parchment paper and place your cranberry log at one edge of the matcha rectangle. Here’s where patience becomes indispensable—gently lift and roll up your matcha sheet over the cranberry log like you’re wrapping a present! This part requires finesse; don’t rush it! Take time ensuring you’re compressing gently but firmly as you go along so everything binds together seamlessly.
Once wrapped, give it a good press along its length to ensure it’s tight but not overdone—you don’t want any cracks forming at this stage! After all, we aim for a beautiful cross-section when sliced later—those contrasting colors should be visible and inviting!
Conclusion:
As we wrap up this delightful culinary journey together through making Easy Baked Matcha Cookies With Cranberries, I can’t help but feel a surge of excitement! We’ve created something truly special here—these cookies are not just any ordinary treat; they are a beautiful symphony of flavors that dance on your palate. The earthy notes of matcha combined with the vibrant bursts of dried cranberries create a texture that’s both crunchy and chewy—a combination that makes each bite profoundly satisfying. It’s amazing how such simple ingredients come together to form something so extraordinary!
Now, why should you absolutely try this recipe? Well, aside from being incredibly delicious, it offers sheer joy in making them—from blending those colors together to shaping the dough into logs and rectangles. Picture pulling these beauties from the oven: golden edges glistening with anticipation as they cool down on your countertop, filling your space with warmth and happiness. Perfect for sharing on cozy afternoons or serving at gatherings with friends and family, these cookies elevate any occasion effortlessly!
Imagine savoring one alongside your afternoon tea—its flavors harmonizing beautifully with every sip—or indulging in one as an evening snack while snuggled up with your favorite book. For an even more decadent experience, consider pairing it with a scoop of dairy-free vanilla ice cream—a match made in dessert heaven! Feel free to experiment as well; perhaps enjoy them crumbled over yogurt or alongside fresh fruit for breakfast bliss.
Feeling adventurous? This recipe is wonderfully adaptable! You could swap out dried cranberries for chopped nuts or even other dried fruits like apricots or cherries if you’re feeling bold—each variation offers its own unique twist while still embracing that enchanting matcha flavor. So go ahead! Dive into this baking adventure, share your creations online or with loved ones, and connect over this wonderful experience we’ve crafted together. Trust me when I say: once you make these cookies, they’ll become a cherished favorite!
Easy Baked Matcha Cookies With Cranberries

Indulge in the delightful experience of baking with these Easy Baked Matcha Cookies With Cranberries. These vibrant green treats combine the earthy richness of matcha powder with the sweet-tart burst of dried cranberries, creating a perfect harmony of flavors and textures. Each cookie offers a satisfying crunch on the outside while remaining chewy on the inside, making them ideal for any occasion—whether you’re hosting a gathering or simply enjoying a quiet moment with your favorite cup of tea. With their visually appealing colors and invigorating taste, these cookies are not just a treat; they’re a celebration of creativity in your kitchen.
- Prep Time: 20 minutes
- Cook Time: 20 minutes
- Total Time: 40 minutes
- Yield: Approximately 12 cookies 1x
- Category: Dessert
- Method: Baking
- Cuisine: Japanese/Fusion
Ingredients
- 100 grams softened butter
- 45 grams powdered sugar
- 25 grams room-temperature beaten egg (approximately half an egg)
- 165 grams all-purpose flour
- 35 grams dried cranberries
- 4 grams matcha powder
Instructions
- Preheat your oven to 160°C (320°F).
- In a mixing bowl, cream together the softened butter and powdered sugar until smooth.
- Gradually add half the beaten egg, mixing until fully combined.
- Sift in the all-purpose flour and gently fold until no dry spots remain.
- Mix in the dried cranberries until evenly distributed.
- Divide the dough in half; knead matcha powder into one half until fully combined.
- Roll out both doughs into rectangles and wrap one around the other.
- Chill in the freezer for about 30 minutes, then slice into 1/4-inch thick cookies.
- Bake for approximately 20 minutes or until edges are golden brown.
Nutrition
- Serving Size: 1 cookie (30g)
- Calories: 135
- Sugar: 6g
- Sodium: 45mg
- Saturated Fat: 4g
- Unsaturated Fat: 2g
- Trans Fat: 0g
- Carbohydrates: 17g
- Fiber: 1g
- Protein: 2g
- Cholesterol: 15mg