Cauliflower Shawarma Bowl (Easy Sheet Pan Dinner)
There’s something utterly captivating about the scents and flavors of Mediterranean cuisine, isn’t there? It’s as if each dish tells a story, blending history and tradition with vibrant ingredients that sing of sunshine and warmth. This Cauliflower Shawarma Bowl (Easy Sheet Pan Dinner) is more than just a meal; it’s an experience that transports you to bustling markets filled with spices and the joyous laughter of friends gathered around a table. Imagine the roasted cauliflower, its edges beautifully caramelized, mingling with the earthy chickpeas and sweet red onions, all enveloped in a symphony of spices that brings every bite to life. I promise you, this bowl will become a staple in your home, a go-to for when you crave something both comforting and nourishing.
Now, let me tell you why this particular recipe resonates so deeply with me. It’s not only quick to prepare but also budget-friendly—perfect for those busy weeknights when time is of the essence but good food is still a priority. Each bite is packed with fiber and protein, making it a truly satisfying option that doesn’t compromise on flavor or health. And let’s not forget about the creamy sauce that ties everything together—a luscious drizzle that takes the whole dish from delightful to extraordinary. This isn’t just cooking; it’s crafting memories and sharing love through food.
Cauliflower Shawarma Bowl (Easy Sheet Pan Dinner): A Vibrant Fusion of Flavors
This delicious recipe is all about ease without sacrificing taste. Perfectly roasted vegetables combined with hearty grains create a balanced meal that everyone will enjoy. Plus, it looks beautiful on the plate!
Ingredients:
As we embark on this culinary journey together, let’s dive into the ingredients that make this Cauliflower Shawarma Bowl so special. Each component plays its part in creating layers of flavor and texture that are simply irresistible.
- 1 large cauliflower (cut into florets, about 6 cups or 700 g): Cauliflower serves as the star of our show! Its unique ability to absorb flavors makes it an ideal canvas for our shawarma spices. When you roast it, the heat transforms its natural sweetness while providing those gorgeous golden edges that add depth to each bite. Look for cauliflower heads that are firm and heavy for their size, ensuring you’re getting fresh produce full of flavor.
- 1 can chickpeas (15 oz or 400 g drained and rinsed): Chickpeas add not only heartiness but also a wonderful creaminess to our bowl. They’re rich in protein and fiber, making them an excellent complement to our roasted veggies while ensuring this dish is filling enough for dinner. When purchasing canned chickpeas, opt for low-sodium varieties if possible; they’ll blend seamlessly into our flavorful shawarma mix.
- 3 medium red onions (sliced): The sweetness of red onions when roasted makes them utterly delightful! They caramelize beautifully in the oven, offering a soft texture that contrasts wonderfully with the crispness of our cauliflower. Choose onions that feel heavy for their size with tight skins; this indicates freshness and sweetness.
- 4 tablespoons extra virgin olive oil: This liquid gold is essential not just for roasting but also for infusing our vegetables with rich flavor while keeping everything moist during cooking. Always go for high-quality extra virgin olive oil—it has a robust taste that’s non-negotiable in Mediterranean cooking!
- 2 tablespoons lemon juice: Fresh lemon juice brightens up every aspect of this dish! Its acidity cuts through the richness while enhancing all those lovely flavors. I always recommend using freshly squeezed juice over bottled; it makes a significant difference!
- 3 cloves garlic (grated): Garlic brings aromatic warmth and depth to our shawarma mix. Grating ensures it’s finely incorporated throughout the dish, giving us bursts of flavor rather than chunks of raw garlic—trust me on this one!
- 3 teaspoons paprika (sweet or smoked): Paprika adds warmth and color to our bowl. Sweet paprika lends subtle sweetness while smoked paprika gives us those deep, smoky tones reminiscent of street vendors grilling meat over open flames—perfect for enhancing our veggie feast!
- 2 teaspoons ground coriander: This spice carries a citrusy undertone which pairs perfectly with our other spices, enriching the overall flavor profile without overpowering it—subtle yet essential!
- 1 teaspoon ground cumin: Cumin has an earthy aroma that brings depth to any dish. Its warm notes complement both the cauliflower and chickpeas beautifully.
- ½ teaspoon cinnamon: Adding cinnamon may seem unusual at first sight, but its warmth rounds out the savory spices perfectly and adds complexity without dominating—this touch balances everything out wonderfully.
- 1 teaspoon salt (+ black pepper and red pepper flakes to taste): Salt enhances all flavors but be sure to adjust based on your personal preference! A sprinkle of black pepper adds heat while red pepper flakes introduce an extra kick; feel free to adjust based on how spicy you like things!
- 1 cup cooked quinoa (sub rice or any grain of your choice): Quinoa provides a nutty flavor combined with protein—a fantastic alternative if you’re looking for gluten-free grains! Cooking it properly ensures fluffy grains that soak up all those pan juices beautifully.
- 1 cucumber (+ tomato diced): Fresh cucumbers provide crunch while tomatoes add juiciness; both bring brightness to every bite! Choose ripe tomatoes—they enhance the freshness factor immensely.
- ¼ cup chopped parsley (+ lemon wedges): Parsley isn’t just garnish—it adds freshness! Tossing in some chopped parsley gives your bowl a pop of color along with vibrant taste. Lemon wedges allow diners to squeeze fresh juice on top before enjoying—an absolute must!
- ½ cup Greek yogurt: This creamy element serves as both a cooling agent against spices while adding richness! Opt for full-fat yogurt if you can; it’s thicker which helps achieve that velvety texture perfect for drizzling over your bowl.
Equipment You’ll Need:
Before we dive into creating this culinary masterpiece together, let’s gather some essential tools that will make your cooking experience smoother—and trust me when I say having these tools ready is half the battle won!
- Large sheet pan: An absolute must-have for roasting! A generous-sized sheet pan allows even spacing between ingredients so they can roast evenly without steaming each other—this is crucial for achieving those delicious charred edges we’re after!
- Mixing bowls: You’ll need at least two mixing bowls—one for whisking together your shawarma mix and another one for combining your sauce later on. Having separate bowls keeps things organized while avoiding cross-contamination between raw veggies and sauces.
- Whisk or fork: To create emulsions like our shawarma mix effortlessly! A whisk helps blend oil into other liquids smoothly and creates an inviting texture that’ll coat all veggies evenly.
- Sharp knife & cutting board: Essential tools for slicing vegetables efficiently—sharp knives not only save time but also ensure safety since they require less force than dull ones! A sturdy cutting board keeps everything stable as you chop away joyfully.
Now we’re fully equipped to create something truly extraordinary together—the kind of meal that fills hearts as much as bellies!
Preparing the Cauliflower Shawarma Bowl (Easy Sheet Pan Dinner)
Step 1: Create Your Flavorful Shawarma Mix
Let’s start by crafting our enticing shawarma mix—a crucial step where magic begins! In a small bowl, whisk together four tablespoons of extra virgin olive oil with two tablespoons of fresh lemon juice until they meld beautifully into one cohesive blend. Add in three grated cloves of garlic alongside two teaspoons ground coriander, three teaspoons paprika (choose between sweet or smoked depending on what you’re feeling!), one teaspoon ground cumin, half a teaspoon cinnamon, one teaspoon salt plus freshly cracked black pepper according to taste—you want this mix bursting with flavor! This process allows all those aromatic elements to release their oils while combining seamlessly—a true testament to how simple ingredients come alive when treated right!
Step 2: Roast Those Vegetables
Preheat your oven to 425°F (220°C), allowing it ample time to get nice and hot—which is key for achieving perfectly roasted veggies! Meanwhile, grab your large sheet pan again; toss in one large head’s worth of cauliflower florets along with one drained can’s worth of chickpeas plus three sliced red onions—all bundled together under your freshly whisked shawarma mix drizzle generously across them before tossing well until every surface glistens enticingly in savory goodness! Spread everything out evenly across your pan—this spacing is vital since overcrowding leads to steaming rather than roasting—we definitely want those golden brown edges here! Roast away for approximately twenty-five minutes until everything turns delightfully golden brown around edges—don’t forget halfway through give them another toss so nothing burns too quickly!
Step 3: Whip Up Your Creamy Sauce
While your veggies are roasting away into glorious perfection inside bubbling heat from heaven above us—it’s time we turn focus onto creating our luscious sauce that’ll crown these beauties later on lovingly! In another mixing bowl whisk together half cup Greek yogurt along with another splash from earlier’s lemon juice plus just enough salt until smooth consistency forms—feel free at this point adding cold water tablespoon by tablespoon until desired pourable creaminess achieved—that silky texture will elevate each bite beyond belief once drizzled atop roasted goodness shortly thereafter!
Step 4: Assemble Your Beautiful Bowls
Once everything roasts up gloriously golden brown—from fragrant aroma wafting throughout kitchen beckoning everyone closer—it’s finally assembly time folks! Start by adding one cup cooked quinoa directly onto baking sheet alongside quarter cup chopped parsley plus generous squeeze from remaining lemon juices over entire affair here—toss gently allowing quinoa soak up leftover flavors scattered around evenly! Spoon portions lovingly into individual bowls topped off then diced cucumber chunks alongside juicy tomato pieces nestled atop along generous drizzles from earlier’s creamy sauce finished off final flair garnished lightly sprinkles more parsley—you now have crafted something utterly intoxicating worthy applause upon first bite shared amongst loved ones gathered round table savoring moments created through food shared amongst hearts alike!
I hope you’re just as excited as I am about trying out this Cauliflower Shawarma Bowl (Easy Sheet Pan Dinner)! It’s more than just dinner—it’s an embrace on a plate filled with joy-filled memories waiting to happen.
Step 5: Create the Creamy Sauce That Ties It All Together
Now that your vegetables are roasting beautifully in the oven, it’s time to whip up a sauce that will elevate this Cauliflower Shawarma Bowl (Easy Sheet Pan Dinner) from delicious to downright extraordinary. Grab a small bowl and add in ½ cup of creamy Greek yogurt. If you prefer a nutty flavor profile, feel free to swap the yogurt for tahini; both options are absolutely delightful! Next, you’ll want to squeeze in about one tablespoon of fresh lemon juice. This tangy addition not only brightens the flavors but also helps balance the richness of the yogurt or tahini. Sprinkle in a pinch of salt—this is crucial—because it enhances all those lovely flavors you’re about to create.
Now, here comes the fun part: add cold water, one tablespoon at a time, whisking vigorously after each addition until your sauce reaches that perfect creamy consistency. You want it pourable but not too runny; think of it as liquid gold that will drizzle over your roasted veggies and quinoa like a warm hug on a chilly day. Don’t rush this step; take your time to achieve that silky texture. If you find it’s still too thick after two or three tablespoons of water, just keep going! This sauce is your canvas for flavor, so feel free to taste and adjust with more lemon or salt as desired. Trust me on this—the right sauce will bring this dish together in a way that makes every bite utterly intoxicating.
Step 6: Assemble Your Bowls Like a Culinary Artist
Once your roasted vegetables are out of the oven—golden brown and slightly charred at the edges—you’ll be eager to assemble your masterpiece. But before you dive in, let’s take a moment to appreciate what we’ve created so far. Those beautifully roasted cauliflower florets, chickpeas glistening with shawarma spice, and sweet caramelized onions are waiting to dance together in perfect harmony. Start by adding 1 cup of cooked quinoa directly into the sheet pan with the roasted veggies; this is where all those lovely flavors meld together. Quinoa is not just a filler—it’s packed with protein and fiber, making it an essential component for this wholesome meal.
Now for some fresh brightness! Toss in ¼ cup of chopped parsley and a generous squeeze of fresh lemon juice right into that glorious mix. The parsley adds vibrancy and freshness while the lemon juice lifts everything up with its zesty zing. Gently combine everything using your spatula—don’t mash anything, as you want those textures to shine through. What you’re aiming for is a colorful symphony where each ingredient complements the other beautifully. Make sure every grain of quinoa gets coated with those roasting juices; it’s those little details that make each bite profoundly satisfying.
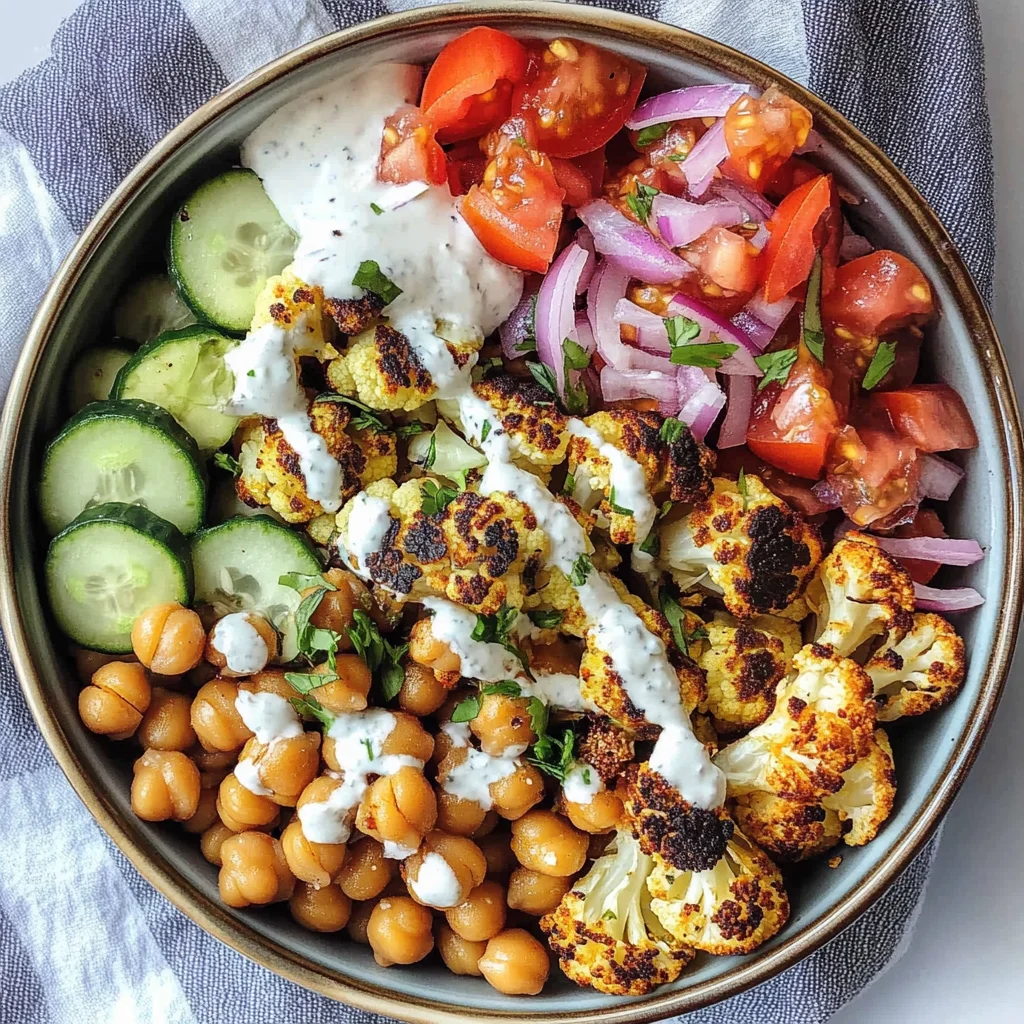
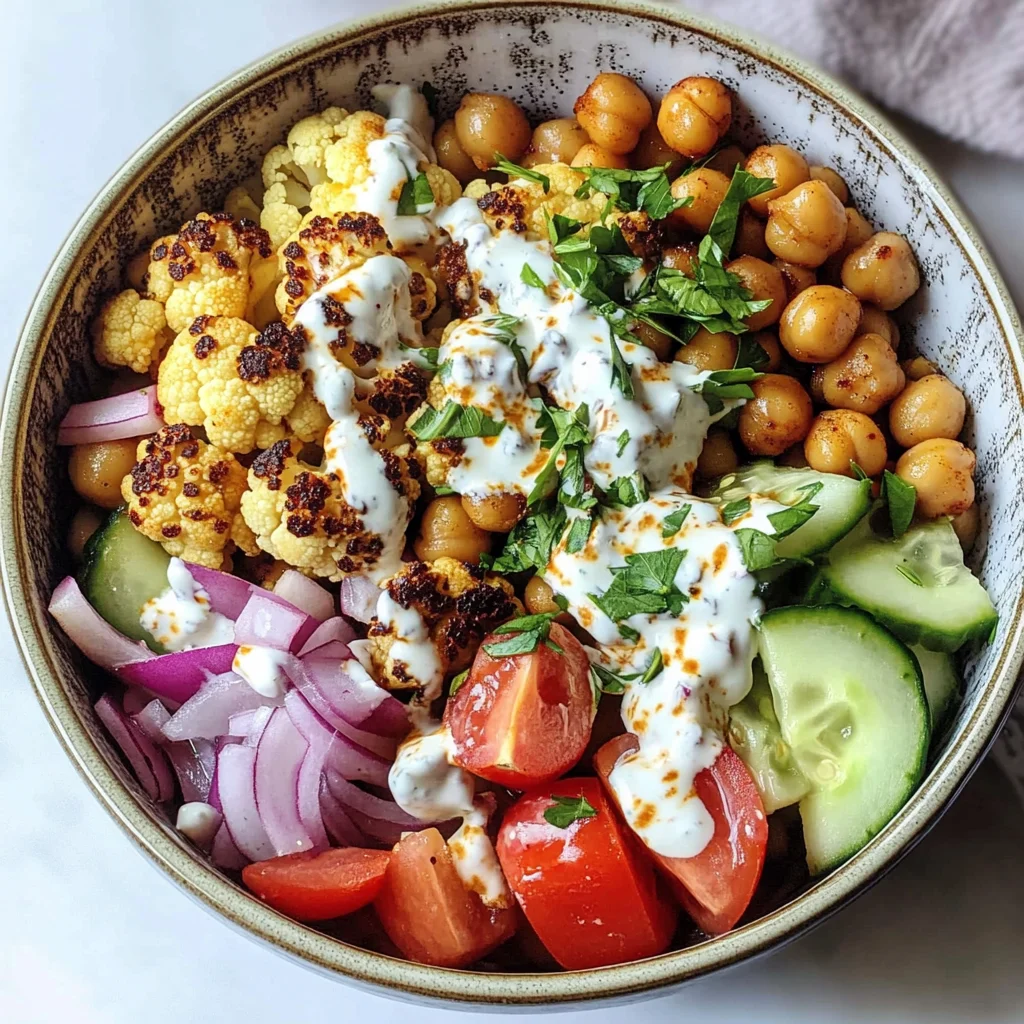
Step 7: The Final Assembly – A Feast for Both Eyes and Palate
With your vibrant mixture ready to go, it’s time to plate up these truly extraordinary bowls! Using individual serving bowls or plates, scoop generous portions of your roasted vegetable-quinoa mixture into each dish—you deserve to see all those colors popping on your table! Now comes the fun part: top each bowl with diced cucumber and tomato for that fresh crunch we crave. These additions don’t just look beautiful; they offer contrasting textures that enliven each bite. I always remind my friends how vital these elements are—they provide balance and elevate the dish from good to unforgettable.
Now, don’t forget about that luscious sauce we made earlier! Drizzle it generously over each bowl—this is where everything comes together like an orchestra reaching its crescendo. The creamy sauce envelops every ingredient in its velvety embrace while adding an extra layer of flavor dynamism that simply cannot be overlooked. It’s non-negotiable! I promise you; once you experience that first bite—the cooling creaminess mingling with warm spices—you’ll understand why this step is so essential.
Step 8: Enjoying Your Cauliflower Shawarma Bowl – A True Celebration
Ahh, at last! You’ve reached the moment we’ve all been waiting for—the first bite! Take a moment before diving in; let yourself revel in the beautiful colors and aromas surrounding you. This Cauliflower Shawarma Bowl (Easy Sheet Pan Dinner) isn’t merely food—it’s a celebration of flavors and textures crafted from simple ingredients transformed through love and care. As you take your first forkful, notice how the warmth of roasted cauliflower contrasts beautifully with crunchy cucumber and juicy tomatoes—all tied together by that dreamy sauce.
If there’s one thing I want you to remember from making this dish, it’s this: savor each bite mindfully! Feel how each element plays off one another—the spices coaxing out hidden depths in the veggies while the quinoa provides grounding comfort against all that vibrancy. This dish isn’t just meant to be consumed; it’s meant to be experienced fully—from aroma wafting through your kitchen to those final bites echoing warmth long after dinner’s over.
So gather around with loved ones or enjoy it solo on a quiet evening—it’s versatile enough for any occasion! And remember: food made with passion tastes infinitely better than anything rushed or half-heartedly prepared. I hope this Cauliflower Shawarma Bowl brings as much joy to your table as it has brought mine over countless dinners shared among friends and family alike! Enjoy every moment—and don’t hesitate to share leftovers because trust me, they taste even better the next day!
Storage and Enjoyment Tips for Your Cauliflower Shawarma Bowl (Easy Sheet Pan Dinner)
Now that you’ve put your heart and soul into creating this vibrant Cauliflower Shawarma Bowl, it’s time to dig in and savor every bite! I promise you, each forkful is a delightful crescendo of flavors, textures, and aromas that will transport you straight to the bustling streets of the Mediterranean. But before you dive in, let’s talk about how to preserve this culinary masterpiece so you can continue enjoying it long after dinner is over.
Storing Leftover Cauliflower Shawarma Bowl (Easy Sheet Pan Dinner)
To store your leftover Cauliflower Shawarma Bowl, reach for airtight glass containers or sturdy plastic ones—these are perfect for keeping everything fresh while allowing you to peek inside at your colorful creations. Store the bowl in your refrigerator, where it will happily stay fresh for about 3 to 4 days. If you want to maintain that divine texture of the roasted veggies and chickpeas, I recommend placing a slice of bread inside the container; it will absorb excess moisture and help keep everything deliciously crisp. As for taste, don’t worry—this dish only gets better with time as the flavors meld together, creating an even more profound experience when you finally serve it up again! When you’re ready to indulge once more, simply reheat it gently in the oven or microwave until warmed through—trust me on this step; there’s nothing like the smell of roasted garlic wafting through your kitchen again.
Freezing Components for Later
If you’ve made a big batch or simply want to save some for those busier evenings when cooking feels like climbing Everest, freezing is a fantastic option! To freeze your Cauliflower Shawarma Bowl components properly, let them cool completely first; then transfer them into freezer-safe bags or containers. Make sure to squeeze out as much air as possible before sealing—this little trick prevents freezer burn from stealing away that incredible flavor! You can expect these delicious ingredients to remain in peak form for about 2-3 months. And when you’re ready to enjoy again, just thaw them overnight in the fridge or pop them directly into a hot skillet; they’ll heat up beautifully while retaining their deliciousness. Having portions of this bowl waiting in your freezer means easy weeknight meals are just a few minutes away—a truly liberating feeling!
Cauliflower Shawarma Bowl (Easy Sheet Pan Dinner)
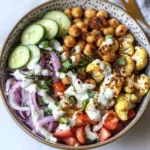
Cauliflower Shawarma Bowl (Easy Sheet Pan Dinner) is a vibrant and flavorful dish that brings the essence of Mediterranean cuisine right to your table. Bursting with roasted cauliflower, earthy chickpeas, and sweet red onions, this bowl is seasoned with aromatic shawarma spices that create a symphony of flavor in every bite. The addition of creamy Greek yogurt drizzled on top adds a luscious finish, making this dish not only satisfying but also nourishing. Ideal for busy weeknights or meal prep, this easy one-pan dinner is packed with protein and fiber, ensuring you feel full and satisfied without compromising on taste.
- Prep Time: 15 minutes
- Cook Time: 25 minutes
- Total Time: 40 minutes
- Yield: Serves 4
- Category: Main
- Method: Baking
- Cuisine: Mediterranean
Ingredients
- 1 large cauliflower (cut into florets)
- 1 can chickpeas (drained and rinsed)
- 3 medium red onions (sliced)
- 4 tablespoons extra virgin olive oil
- 2 tablespoons lemon juice
- 3 cloves garlic (grated)
- 3 teaspoons paprika
- 2 teaspoons ground coriander
- 1 teaspoon ground cumin
- ½ teaspoon cinnamon
- 1 cup cooked quinoa
- 1 cucumber (diced)
- 1 tomato (diced)
- ½ cup Greek yogurt
Instructions
- Preheat oven to 425°F (220°C).
- In a bowl, whisk together olive oil, lemon juice, garlic, paprika, coriander, cumin, cinnamon, salt, and pepper.
- On a sheet pan, toss cauliflower florets, chickpeas, and sliced onions with the spice mixture until evenly coated. Spread out evenly.
- Roast for about 25 minutes until golden brown and tender, stirring halfway through.
- In another bowl, mix Greek yogurt with a splash of lemon juice and salt until smooth.
- Assemble bowls: Start with cooked quinoa as the base, add roasted veggies on top, then garnish with diced cucumber and tomato. Drizzle with yogurt sauce.
Nutrition
- Serving Size: 1 bowl (approximately 350g)
- Calories: 480
- Sugar: 8g
- Sodium: 300mg
- Fat: 18g
- Saturated Fat: 3g
- Unsaturated Fat: 15g
- Trans Fat: 0g
- Carbohydrates: 62g
- Fiber: 15g
- Protein: 14g
- Cholesterol: 10mg