Peach Upside-Down Cake Recipe
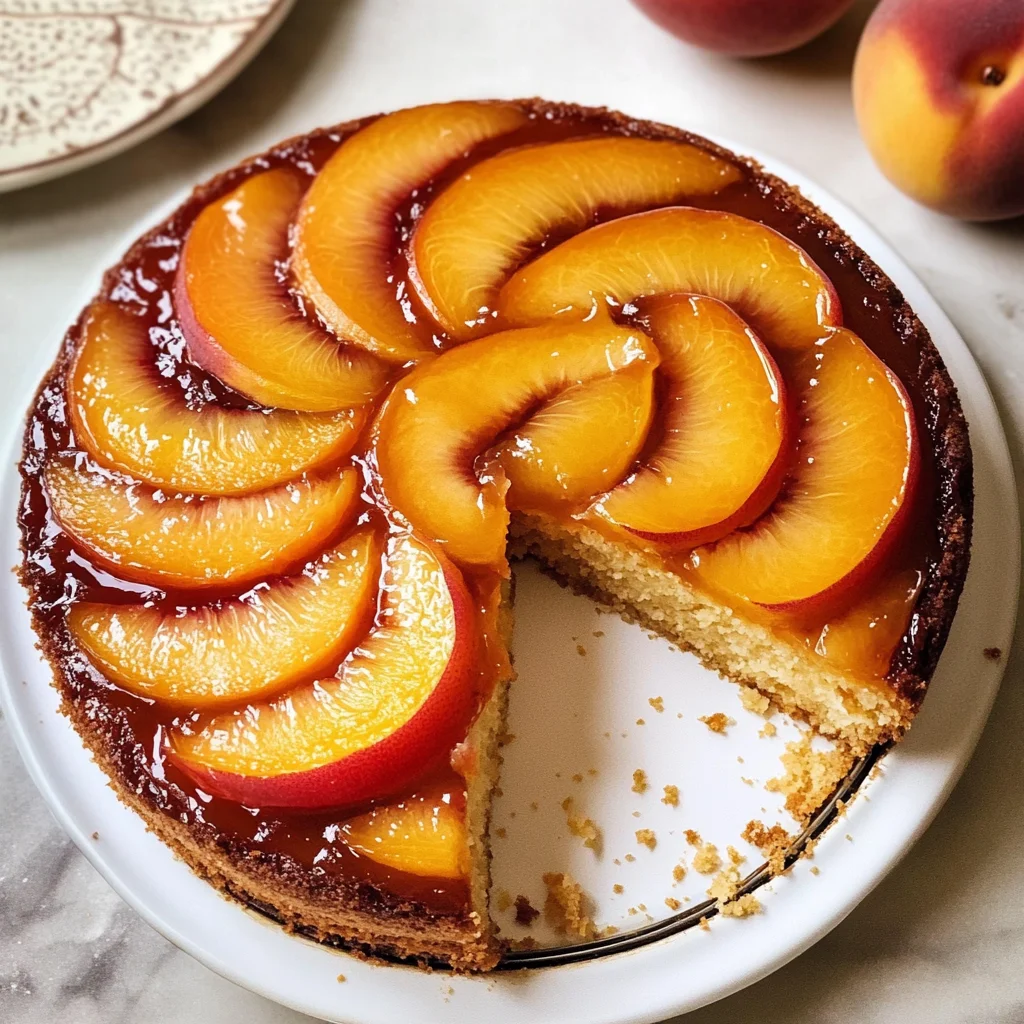
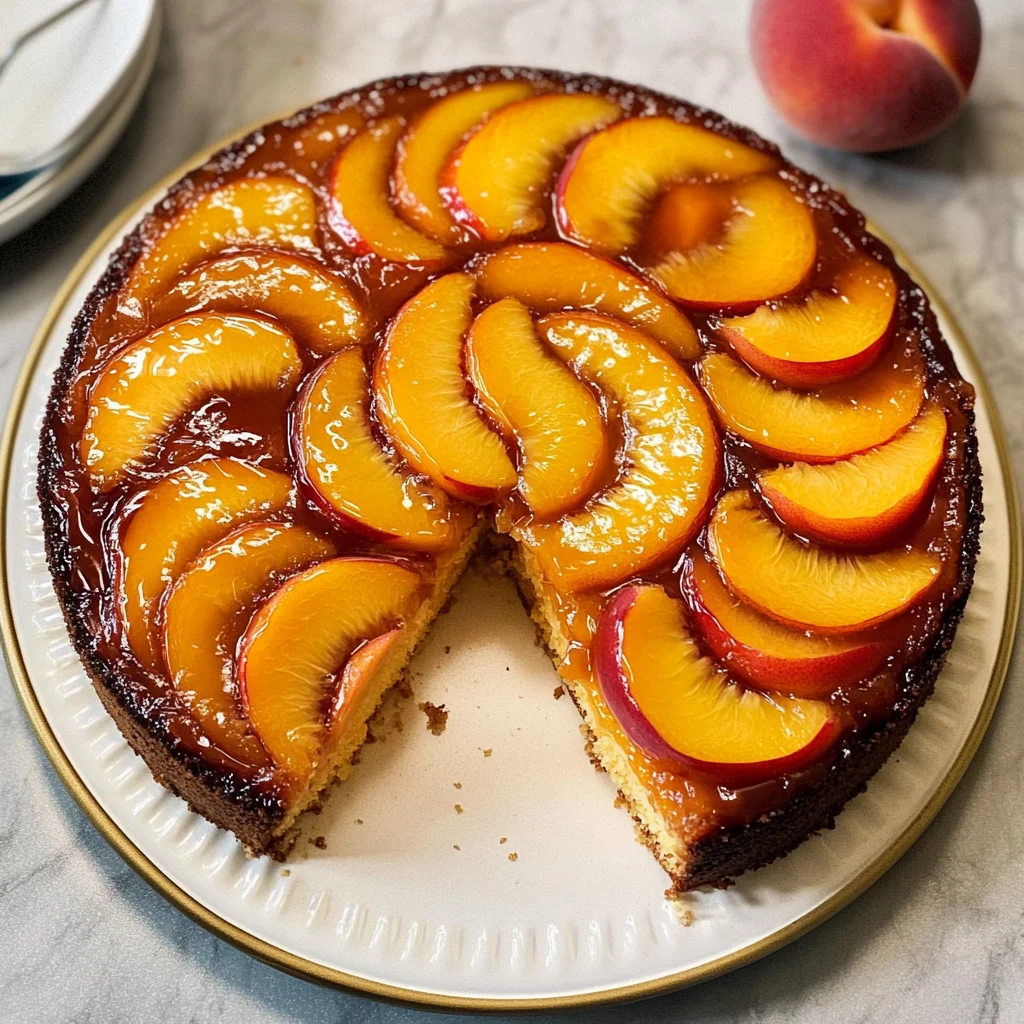
There’s something truly magical about the way a simple cake can evoke memories and emotions, isn’t there? The aroma wafting through the kitchen, the anticipation of that first slice, the joy of sharing it with loved ones—each aspect turns a recipe into an experience. This Peach Upside-Down Cake Recipe is not just a dessert; it’s a fragrant homage to summer’s bounty, where each bite reminds us of sun-kissed afternoons and laughter-filled gatherings. Imagine biting into a perfectly baked cake, the tender peaches glistening like jewels atop a golden canvas, their sweetness mingling with the rich buttery notes of the cake itself—it’s nothing short of culinary poetry. I promise you, this cake will become a cherished staple in your home, as it has in mine.
When you think about dessert, what comes to mind? For many of us, it’s about comfort and nostalgia. The beauty of this Peach Upside-Down Cake lies in its simplicity and ability to bring people together. It hails from a tradition that celebrates seasonal fruits and transforms them into something truly extraordinary. This cake is perfect for any occasion—from casual weeknight dinners to festive family gatherings—its versatility is part of its charm. And while it may seem humble at first glance, trust me when I say that it’s packed with flavor and warmth that resonates deeply with anyone fortunate enough to indulge in it.
Peach Upside-Down Cake Recipe: A Slice of Summer Bliss
Let’s embark on this delightful journey together! This Peach Upside-Down Cake is straightforward yet offers an explosion of flavors that even novice bakers can master. As we dive into the ingredients and instructions, remember that each step is infused with love and intention—don’t rush; savor each moment as if you were sharing it with me in my kitchen.
Ingredients:
As we prepare to create this beautiful cake, let’s gather our ingredients. Each one plays a crucial role in crafting not just a dish but an experience filled with flavor and warmth.
- 6 tablespoons salted butter. Butter is more than just fat; it’s the heart of our cake! Using salted butter here elevates the flavor profile by providing a lovely contrast to the sweetness of our peaches and sugar. When melted for our topping, it creates a rich base that caramelizes beautifully while baking. Always go for high-quality butter—it makes all the difference! If you’re looking for an alternative due to dietary preferences, you could use vegan butter or coconut oil with similar results.
- 2/3 cup packed brown sugar. Ah, brown sugar—the secret weapon for achieving that moist and rich texture we desire! It brings not only sweetness but also depth thanks to its molasses content. When it mingles with melted butter, they create this luscious syrupy layer that will cradle our peach slices as they bake. Make sure you press it firmly into your measuring cup to get an accurate amount; too little won’t provide enough sweetness or moisture.
- 1/4 teaspoon cinnamon. Cinnamon adds warmth and complexity to our cake—a whisper of spice that enhances every element without overwhelming them. Its aromatic profile pairs perfectly with peaches, making each bite feel like a cozy hug on a plate. You might even consider experimenting with nutmeg or allspice if you’re feeling adventurous!
- 3 large peaches, peeled and sliced large (about 2 cups). Fresh peaches are truly the star of this show! Their juicy sweetness transforms during baking into something utterly intoxicating as they soften and release their natural sugars. When selecting peaches, look for those that yield slightly when pressed—they should be fragrant and vibrant in color. If fresh peaches aren’t available, feel free to substitute canned or frozen ones; just make sure they’re well-drained!
- 1 1/4 cups flour. Flour is essential for structure—it’s what gives our cake its delightful crumb! All-purpose flour works beautifully here as it balances strength and tenderness in our batter. If you’re looking for gluten-free alternatives, almond flour or a gluten-free blend could work nicely; just keep an eye on baking times as these can vary.
- 1/4 teaspoon baking powder. This ingredient is non-negotiable! Baking powder acts as our leavening agent; it’s responsible for creating those airy pockets within our dense cake batter that make each slice light and fluffy instead of heavy like a brick (which we definitely want to avoid). Always check your baking powder’s expiration date—it should be fresh for optimal results.
- 1/4 teaspoon salt. Salt enhances flavors across the board—it’s absolutely paramount! In baked goods like cakes, it helps balance sweetness while highlighting other flavors present in your ingredients so they don’t get lost in sugary excess.
- 1/2 cup butter (softened). Just like before with our salted butter but used differently here—this softened butter will be creamed into sugar creating air pockets essential for lift during baking! When creaming your butter later on, aim for room temperature so it combines smoothly without being greasy or clumpy.
- 3/4 cup sugar. Granulated sugar is sweetening power central! It sweetens our batter while contributing to browning during baking which lends itself beautifully to both flavor and appearance once baked—just imagine how golden brown our cake will look when we flip it over!
- 1 egg. Eggs provide richness along with binding power in any good cake recipe—they help hold everything together while adding moisture too! Room temperature eggs mix better than cold ones straight from the fridge; try leaving yours out for about 30 minutes before starting.
- 1 teaspoon vanilla. Vanilla extract brings warmth like no other ingredient can—it deepens flavors subtly while imparting its signature fragrance throughout every bite! Always opt for pure vanilla extract rather than imitation if possible; you’ll appreciate those nuanced notes more keenly.
- 1/2 cup milk. Milk introduces moisture into our batter helping achieve desired consistency while ensuring tenderness within every slice once baked up nicely golden-brown & fluffy! Whole milk tends to work best here but feel free to swap out plant-based alternatives like almond or oat milk if preferred—the differences are minimal!
Equipment You’ll Need:
Having the right tools at your disposal makes all the difference when whipping up this splendid Peach Upside-Down Cake! While these aren’t ingredients per se, they’re essential partners in creating something wonderful from scratch.
- 8×8 inch baking dish – This size is perfect because it allows for even cooking throughout your cake while keeping those juicy peach slices front and center where they belong! Glass or metal works well—you’ll want something sturdy enough not to warp under heat.
- Mixing bowls (medium & large) – A good set ensures you have enough space when mixing dry versus wet ingredients separately—this prevents clumping later on after everything’s combined which could lead us down an undesirable path towards dense cakes instead of light fluffy ones!
- Electric mixer – Trust me on this—an electric mixer saves time AND effort when creaming butter & sugar together until light & fluffy (a crucial step!). Hand-whisking works too but requires more elbow grease!
- Rubber spatula – An often-overlooked hero in any baker’s arsenal—a rubber spatula helps scrape down sides ensuring no ingredient gets left behind while folding things together seamlessly without over-mixing!
Now that we’ve gathered everything needed let’s dive headfirst into preparing this incredible Peach Upside-Down Cake Recipe together—it’s time to let your kitchen fill with warm aromas reminiscent of summer bliss!
Step 1: Prepping Your Oven and Baking Dish
To kick things off right, preheat your oven to 350 degrees Fahrenheit—it’s important because we want everything ready once we finish mixing up our batter! A hot oven ensures proper rising occurs quickly so don’t skip this step; trust me on this one! While that’s happening spray an 8×8-inch baking dish generously with cooking spray or line it with parchment paper; both methods help prevent sticking but I find parchment gives extra insurance against any mishaps during inversion later on!
Step 2: Creating Your Topping
Now comes one of my favorite parts—the peach topping! In a microwave-safe bowl combine those glorious six tablespoons of salted butter along with two-thirds cup packed brown sugar & just a pinch (or quarter teaspoon) cinnamon—all three elements meld together beautifully creating liquid gold once heated through until melted completely (usually takes about thirty seconds). Stir gently until fully combined then pour evenly across prepared pan before arranging sliced peaches atop like precious jewels waiting patiently their turn beneath soft sponge awaiting them below…sighs blissfully imagining how heavenly they’ll taste after baking away happily together!
Step 3: Mixing Dry Ingredients
In another bowl (medium-sized should do), combine flour measured precisely at one-and-a-quarter cups alongside quarter-teaspoon baking powder plus quarter-teaspoon salt—this mixture creates structure providing lift allowing air bubbles form during rising process yielding great texture throughout final product once baked properly). Whisk gently until blended then set aside momentarily while focusing attention back onto larger bowl soon filled deliciousness ahead…
Step 4: Creaming Together Butter & Sugar
In that trusted large mixing bowl grab half cup softened butter (remember it’s crucially important being at room temperature) paired up three-quarter cup granulated sugar then whip them vigorously using electric mixer set medium speed until mixture turns paler almost fluffy consistency resembling clouds floating above us—that’s what we’re aiming towards here folks…it’ll usually take roughly three minutes max depending upon power level involved so watch carefully not overmix either lest run risk making tough final result instead light airy delight we desire most!
Stay tuned as we continue crafting this delightful dessert together—I can’t wait for you all to taste how wonderfully satisfying each slice will be once complete!
The Magic of Mixing and Baking
Step 5: Combine with Care for a Perfectly Fluffy Cake
Now that we’ve got our dry ingredients waiting patiently, it’s time to focus on the creamy, dreamy butter mixture that will form the heart of our Peach Upside-Down Cake Recipe. You’ll want to take your large mixing bowl filled with the light and fluffy creamed butter—this is where the magic begins. Using an electric mixer set to medium speed, beat in the granulated sugar until it’s well combined; you’re aiming for that silky texture that means you’ve incorporated enough air into the mix. This step is crucial because it not only sweetens your cake but also helps create those lovely air pockets that will make your cake rise beautifully.
Once your sugar is blended in smoothly, crack in one large egg and pour in a teaspoon of rich vanilla extract. Beat this together until it’s fully combined—trust me, the aroma of vanilla wafting through your kitchen is utterly intoxicating! It’s these small details that make all the difference. If you haven’t yet taken a moment to appreciate how wonderfully this batter is coming together, now is absolutely the time! After all, baking is not just about following steps; it’s about creating joy and anticipation as you smell those flavors melding together.
Step 6: Alternating Ingredients for Maximum Flavor
With our butter-sugar-egg mixture ready to go, it’s time to bring those dry ingredients back into play. Here’s where we’ll incorporate our flour mixture and milk in a little dance of alternating layers; start by adding about one-third of your flour blend into the wet mixture and beat gently on low speed. Why low speed? This helps prevent flour clouds from taking over your kitchen! Mix just until you see no more flour streaks—overmixing can lead to a dense cake, which we definitely don’t want.
Next, pour in half of the milk and gently mix again until just combined. Repeat this process: add another third of flour, more milk, finishing with any remaining flour. Each addition should be treated like a cherished ingredient—don’t rush this step! By alternating wet and dry, you ensure that every component integrates seamlessly without losing that precious air you’ve whipped into the batter. This method not only ensures even moisture throughout but also contributes to a cake that’s both tender and fluffy when baked.
Step 7: Spreading Your Joyful Batter
Now comes one of my favorite moments—the spreading of the batter over our luscious peach topping! You’ve already poured your heart into creating a delicious batter; now it’s time to share it with those gorgeous peaches waiting below. Gently spread your cake batter evenly over the arranged peach slices using a spatula; this might feel like an art project rather than cooking! Take care to cover all the slices so they’re hidden beneath a cloud of batter—this ensures every bite will be a delightful surprise bursting with flavor.
When you look at your pan now, it should be a beautiful canvas—a golden batter blanketing those sweet peaches like a warm hug. The anticipation builds as you prepare to slide this beauty into the preheated oven, where science takes over! The heat will transform everything—those peaches will caramelize beautifully under that layer of golden cake while releasing their juices to meld with the sugars and butter above, creating an utterly divine topping.
Step 8: Baking Until Golden Brown Perfection
As you place your pan into the oven set at 350 degrees Fahrenheit, get ready for some sensory magic! You’ll want to bake this Peach Upside-Down Cake for about 40-45 minutes; however, keep an eye on it during these last few minutes—the aroma wafting through your kitchen will be nothing short of heavenly. To check if it’s done, insert a wooden toothpick near the center; if it comes out clean or with just a few moist crumbs attached (but no wet batter), then congratulations—you’ve nailed it!
During baking, note how your cake puffs up beautifully and turns golden brown around the edges—a visual cue that tells you it’s reaching its peak potential! If you’re unsure about doneness or if you’re using an older oven model (which can often have hot spots), consider rotating your cake halfway through baking for even color and texture. Remember, patience here is non-negotiable; allowing it to bake thoroughly ensures that each bite is perfectly balanced between fluffy cake and juicy peach topping.
And there you have it—your very own Peach Upside-Down Cake Recipe made with love! Whether enjoyed warm right out of the oven or at room temperature later on (though I promise warm is best!), each slice will take you on an unforgettable journey through sweet nostalgia and delightfully comforting flavors. So gather around friends and family because this dessert isn’t merely food; it’s about sharing love and laughter around your table! Happy baking! 🍑✨
Storage and Enjoyment Tips for Your Peach Upside-Down Cake Recipe
Now that your Peach Upside-Down Cake is out of the oven, golden and glistening like a sweet summer sunset, it’s time to enjoy this delightful creation! The aroma wafting through your kitchen is sure to elevate your spirits, filling the air with a tantalizing promise of the deliciousness to come. But let’s be real; we often make more than we can devour in one sitting, and that’s perfectly okay! Knowing how to properly store this sugary masterpiece ensures you can savor it for days to come.
Storing Leftover Peach Upside-Down Cake Recipe
To keep your leftover Peach Upside-Down Cake fresh and scrumptious, I recommend placing it in an airtight container. This will help trap in moisture and keep the cake from drying out—trust me, you want every bite to be as moist and flavorful as the first! If you don’t have an airtight container handy, you can also cover it tightly with plastic wrap or aluminum foil. Stored this way at room temperature, your cake should maintain its delightful texture for about three days. For longer storage, consider placing it in the refrigerator where it will last up to a week. A little pro tip: if you’re worried about the cake becoming too dry, pop a slice of bread into the container with it; this simple trick helps maintain that perfect level of moisture! When you’re ready to indulge again, simply reheat individual slices in the microwave for about 15 seconds or warm them gently in a toaster oven—this brings back that freshly baked warmth that is utterly intoxicating.
Freezing Peach Upside-Down Cake for Later
If you find yourself with extra cake or simply want to save some for a future treat (you clever baker!), freezing is an excellent option! To freeze your Peach Upside-Down Cake properly, allow it to cool completely before wrapping it tightly in plastic wrap. Then place it inside a heavy-duty freezer bag or an airtight container. This method keeps freezer burn at bay and preserves all the lovely flavors you’ve worked so hard to create. Your cake will stay deliciously intact for up to three months in the freezer—perfect timing for those spontaneous dessert cravings or surprise guests! When you’re ready to enjoy again, just remove it from the freezer and let it thaw in the refrigerator overnight. If you’re feeling especially patient (and I promise you’ll thank yourself later), you can even let it sit at room temperature for about an hour before serving; this allows all those flavors to come alive once more. Isn’t having delicious desserts on hand such a game-changer?
Peach Upside-Down Cake

Indulge in the sweetness of summer with our Peach Upside-Down Cake Recipe. This delightful dessert showcases juicy peaches caramelized to perfection atop a tender, fluffy cake that’s sure to become a family favorite. The rich buttery notes and hints of cinnamon create a warm, inviting aroma in your kitchen, making it the perfect treat for any occasion—from casual weeknight dinners to festive celebrations. With simple ingredients and easy-to-follow instructions, even novice bakers can master this deliciously nostalgic recipe. Gather your loved ones around the table and share in the joy of this charming cake, where each slice is filled with sweet memories waiting to be made.
- Prep Time: 20 minutes
- Cook Time: 45 minutes
- Total Time: 1 hour 5 minutes
- Yield: Serves approximately 9
- Category: Dessert
- Method: Baking
- Cuisine: American
Ingredients
- 6 tablespoons salted butter
- 2/3 cup packed brown sugar
- 1/4 teaspoon cinnamon
- 3 large peaches, peeled and sliced
- 1 1/4 cups flour
- 1/4 teaspoon baking powder
- 1/4 teaspoon salt
- 1/2 cup softened butter
- 3/4 cup granulated sugar
- 1 egg
- 1 teaspoon vanilla extract
- 1/2 cup milk
Instructions
- Preheat your oven to 350°F. Grease an 8×8-inch baking dish.
- In a microwave-safe bowl, combine salted butter, brown sugar, and cinnamon; heat until melted and stir until combined. Pour into the prepared pan.
- Arrange peach slices over the sugar mixture.
- In a medium bowl, whisk together flour, baking powder, and salt; set aside.
- In a large mixing bowl, cream softened butter and granulated sugar until fluffy. Add egg and vanilla; mix well.
- Alternately add dry ingredients and milk to the creamed mixture, beginning and ending with flour; mix until just combined.
- Spread batter evenly over peaches and bake for 40-45 minutes or until a toothpick comes out clean.
- Let cool for 5 minutes before inverting onto a serving plate.
Nutrition
- Serving Size: 1 slice (90g)
- Calories: 305
- Sugar: 28g
- Sodium: 205mg
- Fat: 13g
- Saturated Fat: 7g
- Unsaturated Fat: 5g
- Trans Fat: 0g
- Carbohydrates: 45g
- Fiber: 1g
- Protein: 3g
- Cholesterol: 33mg