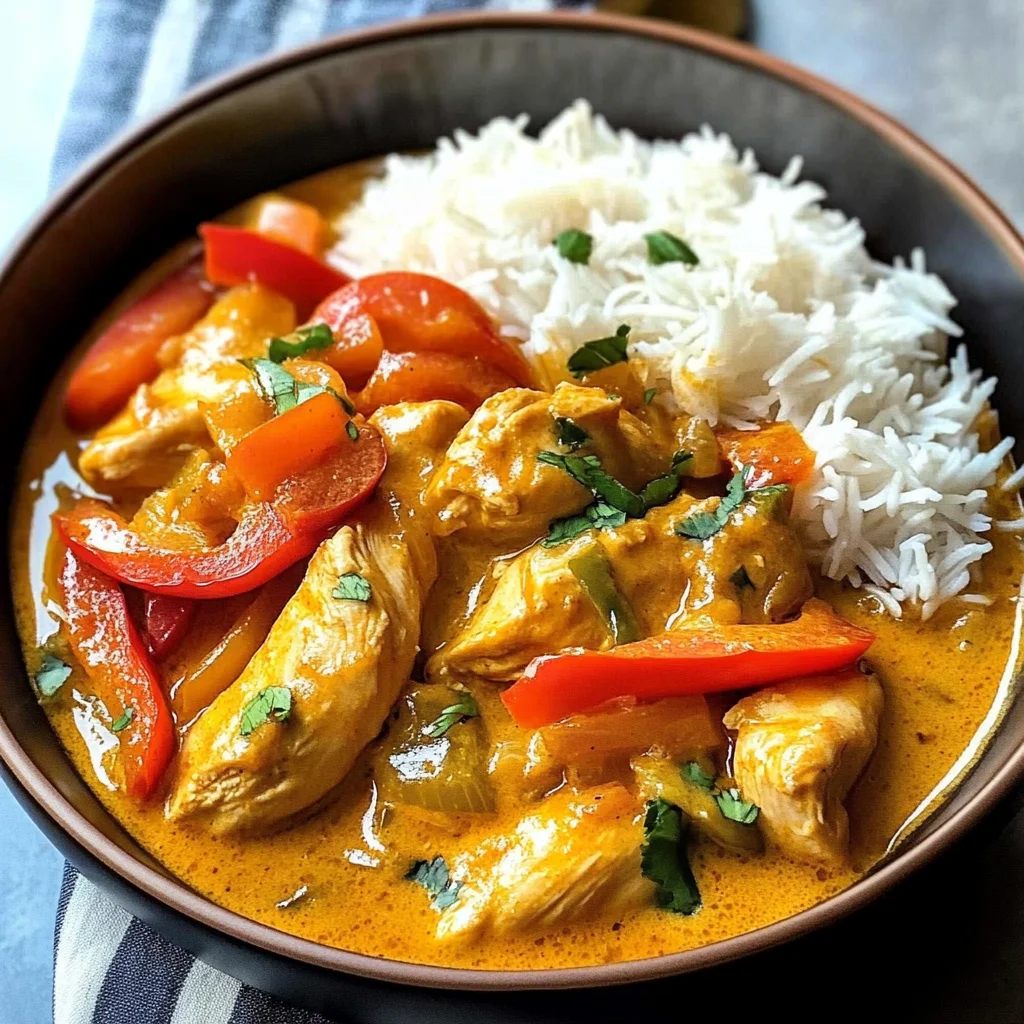
Coconut Chicken Curry
There’s something utterly enchanting about a bowl of Coconut Chicken Curry. The moment you take that first bite, the creamy coconut envelops your senses like a warm hug, while the spices dance playfully on your palate. It’s more than just a meal; it’s an experience that brings together the comfort of home cooking and the exotic allure of Southeast Asian flavors. This recipe is a cherished gem in my kitchen—one I’ve turned to countless times when I want to prepare a nourishing dish that feels extraordinary without taking hours. Trust me when I say, once you try this Coconut Chicken Curry, you’ll find yourself daydreaming about it long after dinner is over.
As we embark on this culinary journey together, let’s not forget that food is inherently personal. Each ingredient plays a vital role in creating a symphony of flavors that tells a story—a story steeped in tradition yet infused with modern ease. This dish is perfect for busy weeknights, allowing you to whip up something deeply satisfying and healthy in under 30 minutes! So grab your apron, and let’s dive into the beautiful world of Coconut Chicken Curry!
Coconut Chicken Curry: A Creamy Comfort That Warms the Soul
Welcome to one of those recipes that feels like a warm embrace on a chilly evening. It’s not just about throwing ingredients together; it’s about crafting an array of flavors that blend harmoniously, resulting in a dish that makes your heart sing. The creamy coconut milk melds beautifully with aromatic spices and tender chicken, creating an irresistible sauce that’s perfect for spooning over fluffy rice. I guarantee this will become one of your go-to dinners, as it’s comforting yet vibrant enough to make any night feel special.
Ingredients:
As we gather our ingredients for this delightful Coconut Chicken Curry, think of each item as a key player contributing to the overall flavor profile and texture of the dish. Let’s explore what makes these ingredients so special!
- 3 tablespoons oil: This is essential for sautéing our aromatics and forming the base of our curry. I prefer using vegetable or coconut oil due to their high smoke points and neutral flavors. They allow your spices to bloom beautifully without burning, which is crucial for developing depth in our curry.
- 1 large onion (chopped): Onions are the backbone of many dishes, offering sweetness and complexity as they caramelize. Chop them finely so they soften quickly during cooking. The goal here is to coax out their natural sugars while building a robust foundation for our curry.
- 2 tablespoons minced garlic (about 6 cloves): Garlic adds layers of flavor and fragrance to our dish—it’s almost magical how it transforms as it cooks down! Freshly minced garlic releases oils that create an intoxicating aroma in your kitchen, making it hard not to sneak tastes along the way.
- 3 tablespoons curry powder: Here lies the heart of our dish—the curry powder! A blend often containing turmeric, cumin, coriander, and more; it imparts warmth and vibrancy. When selecting curry powder, seek out quality brands for richer flavor—your taste buds will thank you!
- 1/3 cup tomato paste: Tomato paste offers concentrated sweetness and acidity that helps balance out the creaminess from the coconut milk. It thickens our sauce too! Opt for high-quality tomato paste for an intense flavor punch; it’s worth it!
- 1 (14-ounce) can coconut milk: Ahh, liquid gold! This creamy staple adds richness and an unmistakable tropical flair to our curry. Choose full-fat coconut milk for a luscious texture; low-fat versions can sometimes leave you wanting more creaminess.
- 2 cups chicken stock: Homemade stock would be ideal here, but store-bought works just fine! The stock serves as the liquid base for our curry—infusing it with savory depth as everything simmers together beautifully.
- 2 teaspoons sugar: Don’t overlook sugar—it plays an important role in balancing flavors by enhancing sweetness without tasting overtly sugary. It harmonizes with both the tomatoes and coconut milk perfectly.
- 1 ½ pounds boneless skinless chicken thighs (cut into chunks): I love using chicken thighs because they’re juicy and tender even after cooking—perfectly suited for simmering in delicious sauces! If you prefer chicken breasts for health reasons or personal taste, feel free to substitute them here.
- 2 medium bell peppers (any color; sliced): These vibrant beauties add color, crunch, and freshness! They also provide a slight sweetness that complements the spices beautifully. Plus, adding vegetables increases nutrition—win-win!
- 1-1 ½ teaspoons salt (to taste): Salt is non-negotiable—it enhances every other flavor in your dish while ensuring everything pops just right! Start with less; you can always add more later if needed.

Equipment You’ll Need:
Before we start cooking up this Coconut Chicken Curry masterpiece, let’s talk about having the right tools at your disposal! While they might not be ingredients, these pieces of equipment are indispensable partners in creating something truly wonderful.
- Large pot or Dutch oven: A sturdy pot allows even heat distribution while simmering all those flavors together beautifully. A Dutch oven is particularly great for its ability to retain heat well—trust me; you’ll want enough room to stir everything without spilling!
- Wooden spoon or spatula: This tool will become your best friend as you sauté aromatics and stir in all those delicious ingredients! Wooden spoons are gentle on cookware surfaces and help prevent scratching—a must-have when working with non-stick pots.
- Chopping board & knife: A good cutting board provides stability while chopping vegetables—and trust me; having a sharp knife makes all the difference when slicing through onions or bell peppers swiftly!
- Measuring spoons/cups: Precision matters when cooking—especially with spices! Having measuring tools handy will ensure you’re adding just enough curry powder or sugar for optimal flavor balance.
Now that we’re all set up with our ingredients and tools let’s dive into preparing this incredible Coconut Chicken Curry!
Step 1: Sautéing Aromatics
Heat those three tablespoons of oil in your large pot over medium heat—allow it time to get hot enough before proceeding. Once shimmering but not smoking (you’ll see tiny ripples), toss in your chopped onion along with minced garlic. As they sauté together for about 4–5 minutes until softened and fragrant, enjoy watching them transform into aromatic jewels dancing around your pot! This step is absolutely paramount because these foundational elements build layers upon layers of flavor that are essential in any great curry.
Step 2: Blooming Spices
After allowing those onions and garlic to become translucent and fragrant—oh my goodness—the smell alone could transport anyone straight into culinary bliss—you’ll want to add three tablespoons of curry powder directly into this aromatic mixture. Stirring constantly for around thirty seconds will release volatile oils within those spices—a process known as blooming—which intensifies their flavor profile immensely! Then comes in your tomato paste; cook this alongside everything else for another thirty seconds until it’s thoroughly mixed through so we can achieve maximum impact from every single ingredient involved here.
Step 3: Building Our Sauce
Now comes one of my favorite parts! Pour in that luxurious can of coconut milk followed by two cups of chicken stock—all at once—to create what looks like pure comfort waiting patiently. Stir gently until combined thoroughly—that velvety texture already beckoning us closer—and then sprinkle those two teaspoons of sugar directly into this heavenly concoction along with chunks of boneless skinless chicken thighs nestled snugly within its depths. Bring everything up to a gentle boil before reducing heat so it bubbles away consistently without boiling over too violently—that’s where magic happens over approximately ten to twelve minutes while allowing flavors meld harmoniously together…
Step 4: Adding Vegetables
After letting your beautiful mixture simmer away patiently (and filling your kitchen with irresistible scents!), it’s time now to introduce sliced bell peppers into this flavorful embrace! Cook them alongside everything else just until softened—about two minutes should do nicely—to maintain some crunch amidst all this creaminess surrounding them… Oh dear friend…this step adds vibrant color & freshness whilst elevating overall nutrition levels too—not only are we enjoying deliciousness but also wholesome goodness wrapped neatly within each spoonful!
Stay tuned because there are still plenty more steps ahead as we finish crafting this comforting Coconut Chicken Curry that’s destined to impress everyone at dinner tonight… I’m so excited for you to experience this wonder firsthand!
Step 5: Letting the Flavors Marry
Now that you’ve got that beautiful mixture bubbling away, it’s time to really let the magic happen. Bring your pot to a gentle boil; this is where the excitement begins! It’s crucial to reduce the heat afterward, allowing the curry to simmer gently. Trust me when I say that patience is key here. You want those chicken thighs to soak up all the flavors from the sauce and spices, creating a symphony of tastes that will dance on your palate. This simmering process usually takes around 10-12 minutes, but don’t just set a timer and walk away—keep an eye on it!
As it simmers, you might notice the sauce thickening slightly and becoming more aromatic. That’s the coconut milk melding with the spices and chicken, creating a rich, creamy texture that is utterly intoxicating. You’ll want to stir occasionally during this time; not only does this help distribute all those luscious flavors evenly, but it also prevents any sticking or burning at the bottom of your pot—a disaster we want to avoid at all costs! Look for your chicken to be cooked through; it should register at least 165°F (74°C) internally if you’re using a meat thermometer. But if you don’t have one handy, just cut into a piece and check that it’s no longer pink inside.
Step 6: Adding Vibrant Vegetables
With your chicken fully cooked and bathing in that heavenly sauce, it’s time to introduce some color and crunch by adding those sliced bell peppers. This step is so important because not only do they add a beautiful pop of color—think vibrant reds, yellows, or greens—but they also contribute a delightful sweetness and freshness that balances out the richness of the curry. Toss them into your pot and give everything a good stir. You’ll want these beauties to soften just enough while still retaining their structure; after all, we love a bit of bite in our dishes!
Cook these peppers for about 2 minutes, stirring occasionally until they’re tender but still vibrant and lively in color. The goal here is to keep that freshness intact while allowing them to soak up some of that luscious sauce—it’s truly magical how they transform in just a couple of minutes! Watch as they absorb some of that incredible flavor from the curry; it’s like they become little gems swimming in liquid gold! A word to the wise: if you leave them too long, they can lose their crispness, so keep an eye on them!
Step 7: Seasoning for Perfection
Now comes one of my favorite parts—the seasoning! It might seem simple, but this step is absolutely paramount in elevating your Coconut Chicken Curry from good to extraordinary. Sprinkle in salt gradually—start with about 1 teaspoon—and give everything a good stir. The salt acts like a spotlight for those flavors we’ve been developing throughout cooking; it enhances each note and brings them together harmoniously. Remember, different brands of broth can vary in saltiness; I often encourage tasting as you go.
If you’re feeling adventurous (and I hope you are!), consider adding other seasonings at this point too—a pinch of black pepper or even a sprinkle of red pepper flakes can bring an exciting kick if that’s your vibe! But always remember: start small and adjust according to your taste preferences because what tastes perfect for one person might be too much for another. Once you’ve seasoned it to perfection, turn off the heat and let it sit for just a moment before serving—it allows those flavors one last chance to mingle together as they cool slightly.
Step 8: The Perfect Pairing – Serve with Love
Finally, it’s time for the grand reveal—the moment where all your hard work pays off, and your kitchen fills with aromatic bliss! Ladle generous portions of Coconut Chicken Curry over fluffy white rice or perhaps even some warm naan bread—both options are fantastic at soaking up every last drop of that delectable sauce! As you serve, take a moment to admire those vibrant colors—the rich golden hue from coconut milk dancing alongside deep reds from tomato paste and beautiful greens from bell peppers.
Imagine how satisfying it will be when everyone gathers around the table—the enticing aroma wafting through your home will draw them in like moths to a flame! Encourage everyone to dig in while it’s warm; freshly cooked curry truly shines when served hot. And don’t forget about garnishing! A sprinkle of fresh cilantro or green onions can elevate your dish even further—a final touch that adds brightness both visually and in flavor.
As you enjoy this dish together with loved ones, I promise you’ll feel an overwhelming sense of satisfaction knowing you’ve created something utterly extraordinary with love and care. So go ahead—dive into this Coconut Chicken Curry experience; it’s not just food—it’s memories waiting to happen! Enjoy every bite!
Final Touches: Embracing Tradition
Before we wrap up our culinary journey through this Coconut Chicken Curry recipe, let’s take a moment to talk about leftovers because trust me—you’ll want some! This dish stores beautifully; simply transfer any leftover curry into an airtight container once cooled down slightly. It should keep well in the refrigerator for up to four days or can be frozen for later use—perfect for busy weeknights when you’re craving something comforting but quick!
When reheating, remember that gentle heat is essential; whether using the stovetop or microwave, approach it slowly so as not to scorch those lovely flavors you’ve cultivated. I recommend adding a splash of water or extra coconut milk while reheating—it helps restore moisture and creaminess that may have been lost during storage.
So there you have it—a deeply satisfying Coconut Chicken Curry that’s not only easy but also bursting with flavor and warmth. Don’t hesitate to make this recipe your own by experimenting with different veggies or spices based on what you have on hand! Cooking is all about creativity after all.
I can’t wait for you all to try this recipe—I know you’ll fall head over heels just like I did! Happy cooking!
Storage and Enjoyment Tips for Your Coconut Chicken Curry
Now that your Coconut Chicken Curry is bubbling away, filling your kitchen with an utterly intoxicating aroma, it’s time to think about how you’ll enjoy the leftovers—if there are any! Trust me, this dish is one that you’ll want to savor over and over again. The creamy coconut base paired with the warming spices creates a symphony of flavors that only gets better with time. If your family doesn’t devour every last bite, you’ll be thrilled to know that storing it properly can keep those delightful flavors intact for future meals.
Storing Leftover Coconut Chicken Curry
To ensure your Coconut Chicken Curry stays fresh and tasty, transfer any leftovers into an airtight container. Glass containers work wonders as they don’t absorb odors or stains, plus they’re microwave-safe for easy reheating. If you’re using plastic, make sure it’s labeled BPA-free to avoid any unwanted chemicals leaching into your food. You can store this delicious curry in the refrigerator for up to three days. To maintain its luscious quality, I recommend placing a slice of bread on top before sealing—this little trick absorbs excess moisture and keeps the chicken tender. Reheating is simple; just pop it in the microwave or warm it gently on the stovetop until it’s heated through again, bringing back that comforting aroma that makes your heart sing!
Freezing Coconut Chicken Curry for Later
If you find yourself with an abundance of this mouthwatering curry or simply want to prepare meals ahead of time, freezing is an excellent option! Allow the curry to cool completely before transferring it into freezer-safe containers or heavy-duty freezer bags. Be sure to leave some space at the top of the container because liquids expand when frozen. Your Coconut Chicken Curry will stay fresh in the freezer for up to three months! When you’re ready to indulge again, just thaw it overnight in the fridge, and reheat it on low heat until it’s warmed throughout. This convenient method not only saves you cooking time but also means you can enjoy a taste of home-cooked love any day of the week!
Coconut Chicken Curry
Coconut Chicken Curry is a delightful one-pot meal that brings together the creamy richness of coconut milk with aromatic spices, creating an unforgettable dish that’s both satisfying and healthy. Perfect for busy weeknights, this recipe allows you to whip up a comforting dinner in under 30 minutes. With tender chicken thighs simmered in a luscious sauce and colorful bell peppers adding freshness, each bite is a warm embrace of flavor. This curry pairs beautifully with fluffy rice or warm naan, making it an excellent choice for family gatherings or cozy dinners at home.
- Prep Time: 10 minutes
- Cook Time: 20 minutes
- Total Time: 30 minutes
- Yield: Serves approximately 6
- Category: Dinner
- Method: One-pot cooking
- Cuisine: Southeast Asian
Ingredients
- 3 tablespoons oil (vegetable or coconut)
- 1 large onion (chopped)
- 2 tablespoons minced garlic
- 3 tablespoons curry powder
- 1/3 cup tomato paste
- 1 (14-ounce) can coconut milk
- 2 cups chicken stock
- 2 teaspoons sugar
- 1 ½ pounds boneless skinless chicken thighs (cut into chunks)
- 2 medium bell peppers (sliced)
- Salt to taste
Instructions
- Heat oil in a large pot over medium heat. Sauté chopped onions and minced garlic for 4–5 minutes until softened.
- Add curry powder and tomato paste; cook for another minute while stirring constantly to bloom the spices.
- Pour in coconut milk and chicken stock, then add sugar and chicken thighs. Bring to a gentle boil, then reduce heat and simmer for about 10–12 minutes until chicken is cooked through.
- Stir in sliced bell peppers and cook for an additional 2 minutes until they are tender but still vibrant.
- Season with salt to taste before serving over rice or with naan.
Nutrition
- Serving Size: 1 cup (245g)
- Calories: 385
- Sugar: 6g
- Sodium: 715mg
- Fat: 23g
- Saturated Fat: 12g
- Unsaturated Fat: 9g
- Trans Fat: 0g
- Carbohydrates: 16g
- Fiber: 2g
- Protein: 28g
- Cholesterol: 110mg