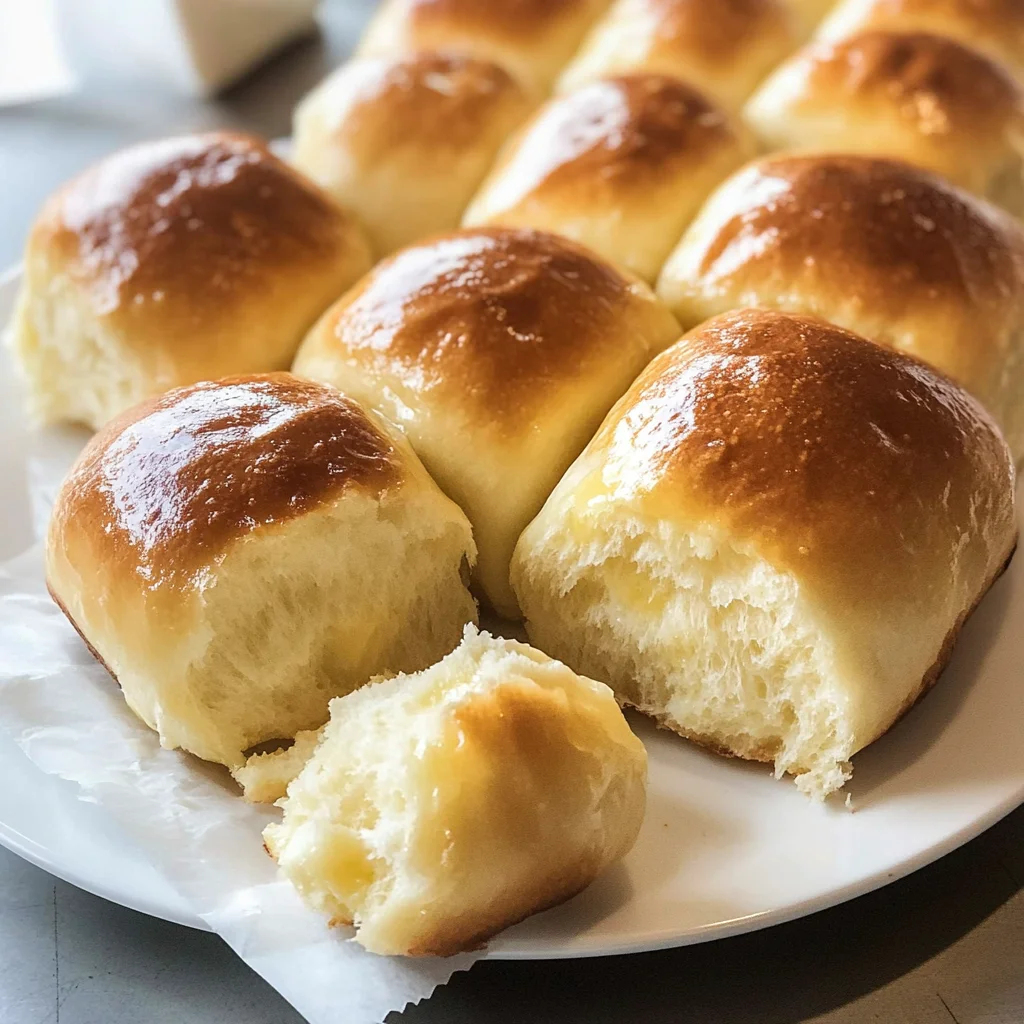
SOFT NO KNEAD Dinner Rolls
There’s a certain magic that happens in the kitchen when you decide to bake bread. The warm, inviting aroma that fills your home, the anticipation of the first golden-brown roll being pulled from the oven, and the pure joy of sharing these creations with loved ones make it an extraordinary experience. Today, I want to share with you my cherished recipe for SOFT NO KNEAD Dinner Rolls—a delightful treat that’s not just about filling your stomach but also about nourishing your soul. These rolls are soft, fluffy, and have a beautifully balanced flavor profile: a hint of sweetness paired with a touch of saltiness. Trust me when I say, once you master this recipe, it will become a staple at every family gathering and weeknight dinner.
What I adore about these dinner rolls is their simplicity; they are almost effortless to prepare. No fancy equipment is needed—just a bowl and a wooden spoon. It’s all about allowing time for the dough to rise and transform into something truly special. Think of it as giving your ingredients the space they need to mingle and create harmony amongst themselves. And the best part? You don’t even have to knead! The magic lies in patience, and I promise you, it’s worth every minute spent waiting for them to puff up into fluffy clouds of goodness.
Let’s jump into this culinary journey together!
SOFT NO KNEAD Dinner Rolls: Cloud-Like Comfort in Every Bite
These SOFT NO KNEAD Dinner Rolls are perfect for any occasion—be it a casual family dinner or an elegant holiday feast. They’re not just side dishes; they are little pillows of comfort that complement any meal beautifully.

Ingredients:
As we embark on this delightful baking adventure, let’s take a moment to appreciate each ingredient that plays its part in creating these heavenly rolls.
- 1 tbsp dry yeast. This little powerhouse is what brings our dough to life! Yeast is a living organism that ferments sugars in our dough, producing carbon dioxide gas that makes it rise. When choosing dry yeast, look for packets labeled “instant” or “active dry.” Both work wonders here; just be sure it’s fresh! If you’re looking for alternatives due to dietary restrictions or preferences, you can explore using sourdough starter or even baking powder in some quick breads—but trust me on this one: yeast gives us that beautiful texture we desire.
- 1/4 cup caster/superfine sugar (or normal white sugar). Sugar does more than just sweeten; it feeds our yeast and encourages it to grow, resulting in those lovely airy pockets within our rolls. Caster sugar dissolves easily and helps achieve an even sweetness throughout, but regular granulated sugar works just fine if that’s what you have on hand. Just remember: balance is key!
- 1/2 cup warm water. This is crucial because yeast thrives in warmth—it gets all cozy and starts bubbling away when introduced to warm liquids (think bath temperature!). Too hot? You’ll kill the yeast; too cold? It won’t activate properly. Aim for around 100°F (38°C) for optimal yeast happiness.
- 4 cups bread flour + extra for dusting. Bread flour has higher protein content compared to all-purpose flour, which gives our rolls structure and chewiness—two qualities we want in soft dinner rolls! When measuring flour, fluff it up first before scooping; this way, you avoid packing it down too much. Have extra flour ready for dusting as we shape our dough later on—it helps keep things from sticking without adding too much weight.
- 1 1/2 tsp salt (cooking/kosher salt). Salt is essential not only for flavor enhancement but also for controlling yeast activity. It strengthens gluten formation while providing depth to the overall taste of your rolls. Opting for kosher salt here allows larger grains that dissolve slowly during mixing—giving you better control over seasoning.
- 1 cup milk (lukewarm, whole or low fat). Milk enriches our dough with fat and proteins which contribute to tenderness and moisture in our final product. Lukewarm milk helps maintain the temperature necessary for yeast activation without shocking it! Whole milk yields richer results compared to low-fat options but feel free to use what suits your pantry best.
- 50g / 3 1/2 tbsp unsalted butter, melted and cooled. Butter brings richness and flavor—we’re talking liquid gold here! It coats the flour particles ensuring tenderness while also aiding browning during baking. Be sure it cools slightly after melting so as not to scald our precious yeast when combined.
- 2 eggs, at room temperature, beaten with fork. Eggs act as binders while providing moisture and richness—their proteins help strengthen our dough as well! Room temperature eggs mix more easily compared to cold ones straight from the fridge, preventing any unwanted lumps.
- 1 tbsp butter, melted (for brushing). This final touch adds glossiness as well as flavor once they come out of the oven—who doesn’t love shiny rolls?
Equipment You’ll Need:
Now that we’ve gathered all our ingredients like old friends reuniting for a cozy dinner party, let’s talk about some essential tools you’ll need along the way! Having reliable equipment makes every step smoother and allows you to focus on crafting these delightful rolls rather than worrying about whether your tools are up to par.
- Large mixing bowl – A sturdy mixing bowl is key here since we’ll be combining everything into one glorious mixture before letting it rise. Choose one that’s big enough so there’s ample space for expansion as your dough rises—trust me; things can get messy if you underestimate size!
- Wooden spoon or spatula – For mixing without introducing too much air into our batter—a gentle approach keeps everything blended beautifully while avoiding tough gluten development.
- Measuring cups and spoons – Accuracy is paramount when baking! Invest in good-quality measuring tools; precision can mean the difference between an epic success or a disappointing flop.
- Plastic wrap or clean kitchen towel – To cover our dough during its rising phase—this keeps humidity in while preventing crust formation on top of your beautiful creation!
With these foundational tools ready at hand, we’re one step closer to pulling those dreamy SOFT NO KNEAD Dinner Rolls from our ovens!
Preparing the SOFT NO KNEAD Dinner Rolls
Step 1: Activate Your Yeast
Let’s kick things off by activating our yeast—a vital step that sets everything else in motion! In a medium bowl, combine your dry yeast with 2 teaspoons of caster sugar before pouring in half a cup of warm water (remember: bath temp!). Set aside this mixture for about five minutes until it froths like little bubbles dancing on top—a clear sign your yeast is alive and happy! This foaming action indicates fermentation has begun; trust me on this—it’s like watching magic unfold right before your eyes!
Step 2: Combine Dry Ingredients
In another large bowl (and yes—size matters!), blend together four cups of bread flour along with remaining sugar and salt until evenly mixed throughout. The salt here acts as both flavor enhancer AND gluten strengthener—non-negotiable elements ensuring perfect texture down the line! Once combined thoroughly using either whisk or spatula (whatever feels right), create a well right at center—think of an inviting pool waiting patiently for its guests!
Step 3: Add Wet Ingredients
Now comes an exhilarating moment: pour lukewarm milk along with melted cooled butter directly into that well we made earlier alongside beaten eggs AND frothy yeast mixture—everything goes in together like old friends meeting again after years apart! Gently mix everything using your wooden spoon until fully incorporated—you’re aiming for something akin to thick muffin batter here—not pourable but definitely thick & sticky enough where some resistance occurs as you stir away lovingly.
Step 4: Let It Rise
Now we play patience game—the fun part begins! Cover tightly with plastic wrap or clean kitchen towel then place somewhere warm away from drafts; ideally around room temperature works perfectly fine too! Allow this beautiful mass of dough roughly two hours or so until doubled—it may take longer depending on environmental conditions—but trust me—the wait pays off immensely when those gorgeous fluffy rolls emerge later!
Each step brings us closer together towards achieving soft perfection—the excitement builds inside me just thinking about how delightful they’ll taste once baked golden brown! Remember: don’t rush through any steps—each one contributes significantly toward crafting something truly extraordinary!
Stay tuned—you won’t want miss how these bubbly beauties turn out next…
Step 5: The Art of Rising
Now, let’s move on to one of the most magical parts of this process—allowing our dough to rise. With your thick, sticky mixture now combined, we need to cover it and let it rest in a warm place for about 1 to 2 hours. This is where the yeast works its magic, transforming mere ingredients into something profoundly satisfying. You’ll notice that the dough will swell and become puffy, almost like a fluffy cloud waiting for you to dive into it.
Why is this step so crucial? Well, during this resting period, yeast cells consume the sugars and produce carbon dioxide gas, which creates those lovely little bubbles in your dough. This is what gives your rolls their airy texture. So don’t rush this step! An ideal environment is somewhere warm—around 75°F to 80°F (24°C to 27°C)—but if your kitchen is a bit cooler, don’t worry! Just give it a little extra time; patience here really pays off. Cover the bowl with a damp cloth or plastic wrap to prevent the surface from drying out. Watching the dough puff up and transform is like witnessing a miracle right before your eyes!
Step 6: Shaping Your Rolls
Once your dough has risen and doubled in size—this usually takes about an hour but can vary—it’s time to shape our rolls. Flour your work surface generously; you want enough flour there to keep things from getting too sticky as you handle the dough. Gently scrape the dough out of the bowl using a spatula or your hands; be mindful not to deflate it too much as you do this because we want all those beautiful air pockets intact!
Now comes the fun part: dividing the dough into equal portions. I typically use a sharp knife or bench scraper for this task, cutting it into twelve pieces for perfectly sized rolls that fit snugly into a baking dish. Each piece should weigh about 70 grams (or just shy of 2.5 ounces) if you want to be precise! Once divided, gently stretch each piece into a smooth ball by folding the edges toward the center and rolling them on the counter until they’re nice and round. This technique, often called shaping, helps create surface tension on each roll, which means they’ll rise beautifully in the oven. Don’t rush through this; take your time! The more love you put into shaping these rolls now, the better they will turn out.
Step 7: Second Rise—The Patience Payoff
After you’ve shaped each roll into a delightful little orb, it’s essential to give them another rise before baking—they’re going to need that little extra boost of airiness! Place them snugly in a greased baking dish so they’re almost touching but not quite because they will expand even more as they bake. Cover them gently with a clean kitchen towel or plastic wrap again and let them rest at room temperature for about 30 minutes to an hour.
This second rise allows our beautiful little rolls to develop even more flavor and structure before heading into the oven—it’s like giving them one last chance to gather strength! You’ll notice that they’ll puff up again, filling any gaps between them as they rise together in perfect harmony. What you’re looking for here is that they’ve expanded significantly; they should feel soft and pillowy when you poke them lightly with your finger—a gentle touch will leave an indentation that bounces back slowly if they’ve risen enough.
Step 8: Baking Your Perfect SOFT NO KNEAD Dinner Rolls
Preheat your oven to 375°F (190°C). As your rolls rise one last time, this is an excellent moment for anticipation—they’ll soon transform from fluffy clouds of dough into golden-brown pillows of perfection! Once preheated, brush melted butter over each roll generously; this adds flavor and creates that gorgeous golden crust we all desire.
Place your baking dish in the middle rack of your preheated oven and set a timer for about 15-18 minutes, but keep an eye on them because ovens can vary widely! You’ll know they’re done when they’re beautifully golden brown on top and sound hollow when tapped lightly on the bottom—a true auditory cue that tells you they’ve reached their pinnacle of deliciousness! If you’re unsure, using an instant-read thermometer can confirm doneness; aim for around 190°F (88°C) inside each roll.
As they bake away, the aroma wafting through your home will be utterly intoxicating—trust me when I say it’s practically impossible not to hover around that oven with excitement! When you finally pull them out—and don’t forget oven mitts—you’ll want to let them cool slightly before serving. But honestly? You might be too tempted by their buttery warmth and soft texture that you can’t resist snatching one right away!
Final Touches: The Finishing Flourish
Now that your rolls are baked to perfection, it’s time for some finishing touches that elevate these SOFT NO KNEAD Dinner Rolls from delightful accompaniments to truly extraordinary stars of any meal! Brush another layer of melted butter over their tops while they’re still warm; this imparts an irresistible sheen and adds richness that’ll have everyone reaching for more.
Let’s talk storage because I promise you’ll want these rolls around longer than just today’s dinner! They can be stored at room temperature in an airtight container for up to three days or frozen for up to a month if well-wrapped in plastic wrap and then foil—just pop them straight from frozen into a warm oven for about ten minutes when you’re ready to enjoy again.
So there you have it—the complete journey of crafting these heavenly SOFT NO KNEAD Dinner Rolls from simple ingredients into something truly delightful! Whether you’re serving them alongside soups or slathering them with butter at breakfast, every bite promises comfort wrapped in warmth and love. Enjoy each moment spent making these rolls because cooking should always be as joyful as eating!
Storage and Enjoyment Tips for Your SOFT NO KNEAD Dinner Rolls
Now that you’ve pulled those delightful rolls from the oven, golden and fragrant, it’s time to savor the fruits of your labor! The smell wafting through your kitchen is nothing short of intoxicating, and I can already envision you gathering loved ones around the table, eager to share these soft little clouds of joy. But what if you find yourself with leftovers? Fear not, because I have some fantastic storage tips that will keep your SOFT NO KNEAD Dinner Rolls just as scrumptious for days to come!
Storing Leftover SOFT NO KNEAD Dinner Rolls
To keep your soft dinner rolls fresh and delicious, it’s essential to store them properly. I recommend placing them in an airtight container or wrapping them tightly in plastic wrap. This method will help retain their moisture, so they stay fluffy and tender. You can keep them at room temperature for about 2-3 days—perfectly acceptable for a quick snack or sandwich! If you want to maintain their quality even longer, consider popping them into the refrigerator; while this might slightly alter the texture, they will still be delectable. A fabulous pro tip? Place a slice of bread inside the container; it draws moisture and keeps everything wonderfully soft! After storage, when you’re ready to enjoy them again, simply pop them in a warm oven for a few minutes; trust me on this one—it revives their heavenly texture beautifully.
Freezing SOFT NO KNEAD Dinner Rolls for Later
If you want to prepare ahead or just love having these rolls on hand (and who wouldn’t?), freezing is an excellent option! To freeze your SOFT NO KNEAD Dinner Rolls perfectly, allow them to cool completely first, then arrange them in a single layer on a baking sheet. Freeze until solid before transferring them to a freezer-safe zip-top bag or wrapping tightly in aluminum foil. They’ll keep well for up to three months—how convenient is that? When you’re ready to indulge, simply take out as many rolls as you want and let them thaw at room temperature or pop them directly into a preheated oven. The beauty of this method is that you can enjoy fresh-baked-like rolls anytime without all the work! Imagine the joy of pulling out a warm roll from the oven on a busy weekday; it adds such an element of comfort to any meal.
SOFT NO KNEAD Dinner Rolls

Discover how easy it is to make SOFT NO KNEAD Dinner Rolls that are fluffy and delicious—perfect for any meal! Try this recipe today!
- Prep Time: 10 minutes
- Cook Time: 18 minutes
- Total Time: 28 minutes
- Yield: Makes approximately 12 dinner rolls 1x
- Category: Dinner
- Method: Baking
- Cuisine: American
Ingredients
- 1 tbsp dry yeast
- 1/4 cup caster sugar
- 1/2 cup warm water
- 4 cups bread flour + extra for dusting
- 1 1/2 tsp salt
- 1 cup lukewarm milk
- 50g unsalted butter, melted and cooled
- 2 eggs, beaten
- 1 tbsp melted butter (for brushing)
Instructions
- Activate the yeast by combining it with sugar and warm water in a bowl. Let it froth for about five minutes.
- In a large bowl, mix the bread flour, remaining sugar, and salt. Create a well in the center.
- Pour the lukewarm milk, melted butter, beaten eggs, and activated yeast into the well. Stir gently until combined.
- Cover the dough with plastic wrap and let it rise in a warm place for 1 to 2 hours until doubled in size.
- Flour your surface and gently turn out the dough. Divide into twelve pieces and shape each into a ball.
- Place shaped rolls into a greased baking dish, cover again, and let rise for an additional 30 minutes.
- Preheat oven to 375°F (190°C). Brush rolls with melted butter before baking for about 15-18 minutes until golden brown.
Nutrition
- Serving Size: 1 roll (70g)
- Calories: 180
- Sugar: 3g
- Sodium: 200mg
- Fat: 5g
- Saturated Fat: 3g
- Unsaturated Fat: 2g
- Trans Fat: 0g
- Carbohydrates: 30g
- Fiber: 1g
- Protein: 4g
- Cholesterol: 40mg