Sweet Potato and Sage Pie
Ah, the Sweet Potato and Sage Pie! When I think of this dish, I’m reminded of cozy autumn evenings spent gathered around the table with loved ones, the air rich with the aroma of sweet potatoes mingling with the earthy notes of sage. This isn’t just a recipe; it’s an experience that transcends mere nourishment. It speaks to warmth, comfort, and that indescribable feeling of home. Each bite is like a warm hug on a chilly day—every forkful is bursting with flavor, a delightful symphony of sweetness and earthiness that dances on your palate. I promise you, once you try this pie, you will find yourself coming back to it time and again. It’s not just food; it’s a heartfelt connection to tradition and innovation wrapped in golden pastry.
The beauty of this Sweet Potato and Sage Pie lies not only in its taste but also in its versatility. It’s perfect for gatherings during the fall harvest season or even as a comforting weeknight meal. You can serve it as a main course alongside a crisp salad or paired with your favorite roasted vegetables for a satisfying dinner. The contrasting flavors—the sweetness of the potatoes harmonizing with the herbal essence of sage—make it irresistible. Plus, it’s straightforward to prepare, allowing even novice cooks to shine in the kitchen. Trust me when I say this pie will become one of your go-to recipes for every occasion!
Sweet Potato and Sage Pie: A Cozy Fall Delight
Welcome to what might just become your new favorite comfort dish! This Sweet Potato and Sage Pie is not only easy to make but also incredibly satisfying—a true crowd-pleaser that brings together simple ingredients in such an exquisite manner. The combination of creamy sweet potatoes enveloped in flaky pastry, along with the fragrant hint of sage and the richness from cheese and cream, creates an unforgettable experience. So grab your apron and let’s embark on this delicious culinary journey together!

Ingredients:
Before we dive into the cooking process, let’s gather our ingredients! Each element plays an essential role in crafting our Sweet Potato and Sage Pie, contributing unique flavors and textures that come together beautifully.
- 2 ½ cups (300 g) all-purpose flour (plus extra). This humble ingredient is absolutely paramount for our pie crust. Flour provides structure while allowing us to create that tender yet flaky texture we all adore in pies. When selecting all-purpose flour, look for a brand that’s finely milled; this will ensure smooth mixing and prevent lumps in your dough. And don’t forget—having some extra flour on hand is crucial for dusting surfaces during rolling out!
- 1 tsp (6 g) kosher salt. Salt enhances every flavor in our dish—it’s like magic! In baking, particularly for pastry doughs like ours, salt not only seasons but also strengthens gluten formation, resulting in a more desirable texture. Kosher salt is preferred because its larger grains provide better control when measuring.
- 1 stick (113 g) cold butter (diced). Butter is where we unlock that luxurious richness! Using cold butter is crucial because it helps create those lovely flaky layers we crave in pie crusts. When cold butter pieces are cut into the flour mixture, they melt during baking to create steam pockets—resulting in beautiful flakiness. Always opt for high-quality butter; its flavor will elevate our pie.
- ½ cup (125 ml) ice water. Water acts as a binding agent that brings our dough together without making it tough—too much water can lead to dense pastry! By using ice-cold water, we maintain the temperature of our butter throughout mixing which keeps everything tender as it bakes.
- 1 lb (454 g) sweet potatoes (peeled). These vibrant orange gems are naturally sweet and creamy when cooked—perfect for adding depth to our filling! Look for firm sweet potatoes without blemishes or soft spots; they should feel heavy for their size. Sweet potatoes are rich in vitamins A and C; they not only taste fantastic but also contribute nutritional goodness.
- 1 lb (454 g) yellow flesh potatoes (such as Yukon Gold). Yukon Golds bring a buttery flavor to our filling while providing an incredible creamy texture when mashed or mixed. Their consistency balances perfectly with sweet potatoes—offering subtle earthy notes against that sweetness. Choose ones that are firm with smooth skin; they’ll hold up beautifully during cooking.
- 1 cup (250 ml) heavy whipping cream. This liquid gold adds richness and creaminess to our filling—it makes everything come together so luxuriously! Heavy cream has a higher fat content than regular cream which contributes significantly to the velvety texture we’re aiming for here.
- 1 tbsp (7.5 g) all-purpose flour. We’re using just a touch more flour here as a thickening agent in our filling—it helps bind everything together without making it gummy or too dense.
- 1 tbsp (15 ml) chopped fresh sage. Fresh herbs can elevate any dish from ordinary to extraordinary! Sage has an aromatic quality that’s reminiscent of autumn—its earthy flavor complements both sweet and savory components beautifully here.
- 1 ½ tsp (9 g) kosher salt. Yes, another dose of salt! In this stage, it’s essential for seasoning our filling effectively so every bite bursts with flavor—don’t skip or skimp on this step!
- ½ tsp (3 g) ground nutmeg. Nutmeg adds warmth—a dash goes a long way in enhancing those cozy flavors inherent in fall dishes like this pie! Its slightly sweet yet spicy profile works wonders alongside both types of potatoes.
- ¼ tsp (1 g) pepper. A pinch of black pepper adds complexity without overpowering other flavors—think balance!
- 1 ½ cups (150 g) shredded cheddar cheese (preferably white cheddar). Cheese isn’t just about adding richness; it’s about marrying all elements together harmoniously! White cheddar offers sharpness balanced by creaminess—it melts beautifully into our filling creating pockets of gooey goodness.
- 1 large egg (beaten). The egg serves two purposes: it enriches our filling while also acting as an adhesive when brushing over the crust before baking—it gives us that lovely golden finish everyone loves!
Equipment You’ll Need:
Now that we have everything at hand let’s talk about tools—the unsung heroes of any kitchen adventure! Having good equipment doesn’t just make cooking easier; it enhances your entire experience by allowing you to focus on what matters most—creating something delicious!
- Mixing bowls – at least two medium-sized: These are essential for combining ingredients without making too much mess on your countertop—you’ll appreciate having enough space to mix things thoroughly without spilling!
- Pastry cutter or fork: This tool is crucial for cutting cold butter into flour effectively—it allows you to achieve that crumbly texture needed for flaky crusts without melting the butter prematurely.
- Rolling pin: A good rolling pin helps you roll out dough evenly so each piece bakes uniformly—that’s key when aiming for perfect piecrusts!
- 9-inch pie dish: Look for something sturdy but not too heavy; glass or ceramic options allow you to see how well your crust is browning while ensuring even heat distribution throughout baking.
- Potato masher: This handy tool makes mashing cooked sweet potatoes quick work—you want them smooth yet fluffy enough so they don’t turn gummy!
With these cherished tools by your side and ingredients prepped before diving into preparation steps ahead—we’re ready to create magic together!
Preparing the Sweet Potato and Sage Pie
Step 1: Create Your Flaky Pie Crust
Let’s start by making the star foundation—the pie crust! In a mixing bowl, combine 2 ½ cups all-purpose flour along with 1 teaspoon kosher salt, whisking them together until well blended—this ensures every bite has uniform seasoning throughout your crust! Next comes the fun part: incorporating our diced cold butter into this mixture using either a pastry cutter or fork until you achieve pea-sized crumbs resembling coarse sand—trust me on this technique; it’s crucial for flakiness! You want those little bits of butter intact as they will melt during baking creating steam pockets which lead us right down Flaky Crust Lane!
Once you’ve achieved that beautiful crumbly texture, gradually add ice-cold water one tablespoon at a time while gently stirring until combined—it shouldn’t be too wet nor too dry; aim for something cohesive yet soft enough not stick excessively onto fingers when touched lightly! Here’s my tip: don’t rush this step by dumping all water at once unless you want tough pastry; patience pays off here immensely.
When combined properly form dough into two discs wrap securely in plastic wrap then refrigerate them while preparing fillings—this resting time allows gluten relaxation yielding tender results later upon rolling out!.
Step 2: Cook Your Potatoes
Now let’s turn our attention towards those lovely potatoes—we need them soft before mashing them into creamy perfection! Begin by peeling both types: sweet & Yukon Gold then chop them into equal-sized chunks ensuring uniform cooking times throughout boiling process ahead!. Place these beauties into large pot filled with salted water bringing everything up quickly over medium-high heat until reaching boil point then reduce temperature down slightly keeping gentle simmer moving forward through next stages…
Cook gently until tender when pierced easily via fork typically taking around 15–20 minutes depending on size—but do check occasionally since overcooking leads mushy results instead desired fluffy textures important here!. Once done draining excess water carefully return back cooked chunks pot then mash away liberally until silky-smooth consistency forms slowly adding heavy whipping cream bit-by-bit along ensuring integrated evenly throughout mixture creating luscious filling base meant awaits next exciting additions!.
Step 3: Flavor Infusion
Next comes transforming basic potato mash into something truly extraordinary—time add remaining star players including freshly chopped sage followed closely behind by additional seasonings like remaining kosher salt ground nutmeg black pepper & finally those beautiful shreds white cheddar cheese!. Each ingredient contributes distinct layer complexities elevating overall profile enticing everyone who encounters slice later down line… Mix thoroughly after each addition taking care incorporate flavors evenly across entire batch creating harmonious union among textures tastes present now within bowl waiting patiently before final assembly begins shortly thereafter!.
Step 4: Assemble Your Pie
Finally—we’ve arrived at assembly—the moment everything comes together beautifully forming masterpiece destined delight palates around table tonight!. Retrieve chilled pie dough from refrigerator unwrapping carefully then roll out evenly between sheets parchment paper dusted lightly additional flour preventing sticking while working through various stages involved getting ideal thickness around quarter inch thick ideally shaping round disc fitting snugly inside prepared greased dish previously selected earlier onto counter surface directly below awaiting placement next few steps ahead… Lay carefully inside press gently against edges allowing excess hang over rim trimming afterward neatly once filled completely afterwards ensuring proper sealing later before journey begins oven foil covering area exposed initially leading bake times per instructions outlined below finishing touches added later last minute deep golden color forms outer shell promising perfection bites well worth effort put forth today!.
In these steps we’ve embarked upon together already lays groundwork success story unfolding soon enough trust me it’ll be worth wait from first slice savoring flavors mingling blissfully creating memories linger long after plates cleared away… I couldn’t be more excited sharing this journey with you today—and can’t wait until those forks hit plates alongside laughter shared friends family leading joyful moments pass down generations ahead… Happy cooking friends!!
Creating Your Sweet Potato and Sage Pie: The Heart of Comfort Food
Oh, my dear friends, the aroma that fills the kitchen when you start crafting this Sweet Potato and Sage Pie is nothing short of magical! Each layer of flavor tells a story, and I can assure you that once you take your first bite, you’ll feel a warm embrace from the inside out. Now, let’s dive into the next steps of this wonderful journey together, shall we?
Step 5: Boiling and Mashing Your Potatoes
The heart of any great pie lies in its filling, and for our Sweet Potato and Sage Pie, we’re going to ensure that it sings with flavor. Start by placing your peeled sweet potatoes and yellow flesh potatoes into a large pot. Cover them with cold water; this is crucial because starting with cold water ensures even cooking. You want to bring these beauties to a gentle boil over medium-high heat. Once boiling, reduce the heat slightly and let them simmer for about 15-20 minutes until they are fork-tender.
Now here comes the fun part: draining them well and allowing them to cool just enough so you can handle them without burning your fingers! Trust me on this — mashing them while they’re still warm helps release their natural sweetness and creaminess. Use a potato masher or even a ricer if you have one for an ultra-smooth texture. Add in half a cup of heavy whipping cream along with a tablespoon of all-purpose flour to help bind everything together. The flour acts as a stabilizer in our creamy filling, ensuring it holds up beautifully once baked. Season with salt, nutmeg, and ground pepper — don’t be shy! This seasoning is where you give your filling its personality. It’s pivotal because it transforms what could be a bland mash into a symphony of flavors that will dance on your palate.
Step 6: Infusing Flavor with Fresh Sage
Ah, sage — the aromatic herb that adds depth and warmth to our pie! Take your chopped fresh sage (make sure it’s finely chopped to release those essential oils) and fold it gently into your creamy potato mixture after mashing. This step is absolutely paramount because it not only infuses the filling with an exquisite earthy note but also adds an aromatic quality that elevates your dish from ordinary to extraordinary. As you mix, take a moment to breathe in that intoxicating scent; it’s truly invigorating!
Now, at this point, it’s important to taste your filling before moving on. Adjust the seasoning if necessary; remember that each potato can vary slightly in its flavor profile. Just think about how satisfying it will be when you discover that perfect balance! If you’re feeling adventurous, consider adding some grated cheese into the mixture for an extra layer of richness — white cheddar is my go-to choice here as it melts beautifully.
Step 7: Preparing Your Pie Crust
With our sumptuous filling ready to go, it’s time to focus on the crust — quite possibly one of my favorite parts! Preheat your oven to 350°F (175°C), as this will ensure we have an appropriately hot environment waiting for our pie later on. Now grab that chilled dough from earlier; if you’ve followed my advice about letting it rest after mixing, you’ll find it’s significantly easier to handle now—what a relief! Roll out the dough on a lightly floured surface until it’s about 1/8 inch thick; aim for just large enough to fit your pie dish comfortably without tearing.
This step requires some finesse; don’t rush through it! Gently drape the rolled-out dough over your pie dish (you want something deep enough to hold all that deliciousness). Trim any excess dough hanging over the edges—you can save these scraps for decorative touches later if you’d like! Press down lightly so the dough adheres well to the dish’s sides; this creates a sturdy base for our comforting filling later on.
Step 8: Bringing It All Together
Now comes the moment we’ve been waiting for: combining our luscious filling with that stunning crust! Spoon your potato mixture into the prepared crust, smoothing out the top gently so it looks invitingly plush. And don’t forget about those visual cues—aim for a level surface so every slice reveals beautiful layers when served!
Before we seal this masterpiece with its top crust or egg wash (the latter gives us that lovely golden finish), sprinkle about one-and-a-half cups of shredded white cheddar cheese across the top of our filling—this is non-negotiable! The cheese will melt into gooey perfection during baking while creating an irresistible crust whose salty sharpness complements the sweetness of our potatoes beautifully.
Once everything looks glorious in your pie dish, brush an egg wash made from one beaten egg across the edges or top crust (if you’re adding one). This simple act enhances both flavor and color—it’s like giving your pie a little golden crown before sending it off into the oven!
Baking Your Perfect Sweet Potato and Sage Pie
This is truly where all your hard work comes together in delicious harmony.
Step 9: The Final Bake
Slide your Sweet Potato and Sage Pie into that preheated oven and let it bake away for approximately 45-50 minutes. You might want to position it on a baking sheet just in case there are any drips – we don’t want any messes ruining this beautiful creation! Keep an eye on it as it bakes; look for that alluring golden-brown hue developing around the edges as well as bubbling from within—that’s when you know magic is happening.
After about 30 minutes have passed, resist opening the oven door too frequently because temperature fluctuation can impact how evenly everything cooks—trust me on this one! When it’s nearing completion, use a toothpick or knife inserted into the center as a doneness test; if it comes out clean or with just a few moist crumbs attached (but no raw batter!), then rejoice because it’s done!
Allowing your pie to cool slightly before serving is essential; not only does this help set everything nicely together but also lets those flavors mingle further—a patient wait often leads to profound satisfaction when you’re finally ready to dig in!
And there you have it—your very own Sweet Potato and Sage Pie awaits! Each slice promises warmth wrapped up in every bite—a true comfort food masterpiece destined to become part of family gatherings or quiet evenings at home filled with love and laughter. Enjoy every moment created around this dish just as I’ve enjoyed sharing each step with you today!
Storage and Enjoyment Tips for Your Sweet Potato and Sage Pie
Now that your Sweet Potato and Sage Pie has baked to perfection, filling your kitchen with the most intoxicating aroma, it’s time to savor each bite! But if you find yourself with leftovers (and trust me, it’s hard not to indulge in seconds), you’ll want to know how to store this delightful creation for maximum enjoyment later on. After all, the comforting flavors of sweet potatoes harmonized with fragrant sage deserve to be cherished long after the last forkful has disappeared!
Storing Leftover Sweet Potato and Sage Pie
To keep your leftover Sweet Potato and Sage Pie as scrumptious as the moment it was pulled from the oven, I suggest storing it in an airtight container. This helps maintain its moisture and keeps those delightful flavors intact. Ideally, you should place it in the refrigerator, where it can last for up to 3-4 days. If you’re concerned about keeping that divine crust crisp, consider placing a slice of bread inside the container – this little trick will absorb any excess moisture and keep your pie from becoming soggy. When you’re ready for another taste sensation, simply reheat it in the oven at 350°F (175°C) until warmed through—just enough time for the cheese to melt into that luscious filling once more. Trust me; every bite will transport you right back to that first slice!
Freezing Sweet Potato and Sage Pie for Later
If you find yourself with more pie than you can eat (which is a lovely predicament!), freezing is a fantastic option. To freeze your Sweet Potato and Sage Pie, allow it to cool completely before wrapping individual slices tightly in plastic wrap or aluminum foil, followed by placing them in a freezer-safe container. This way, they’ll stay fresh for up to three months! When you’re ready for a cozy meal, simply pull out a slice straight from the freezer—no need to thaw—and pop it into a preheated oven set at 375°F (190°C) until piping hot. The convenience of having this comfort food at your fingertips is absolutely wonderful; just imagine those chilly evenings when all you want is something warm and satisfying without any fuss!
With all these storage tips in hand, I hope you feel inspired to make this Sweet Potato and Sage Pie part of your culinary routine—not just as something special but as an everyday delight that warms both heart and home.
Sweet Potato and Sage Pie

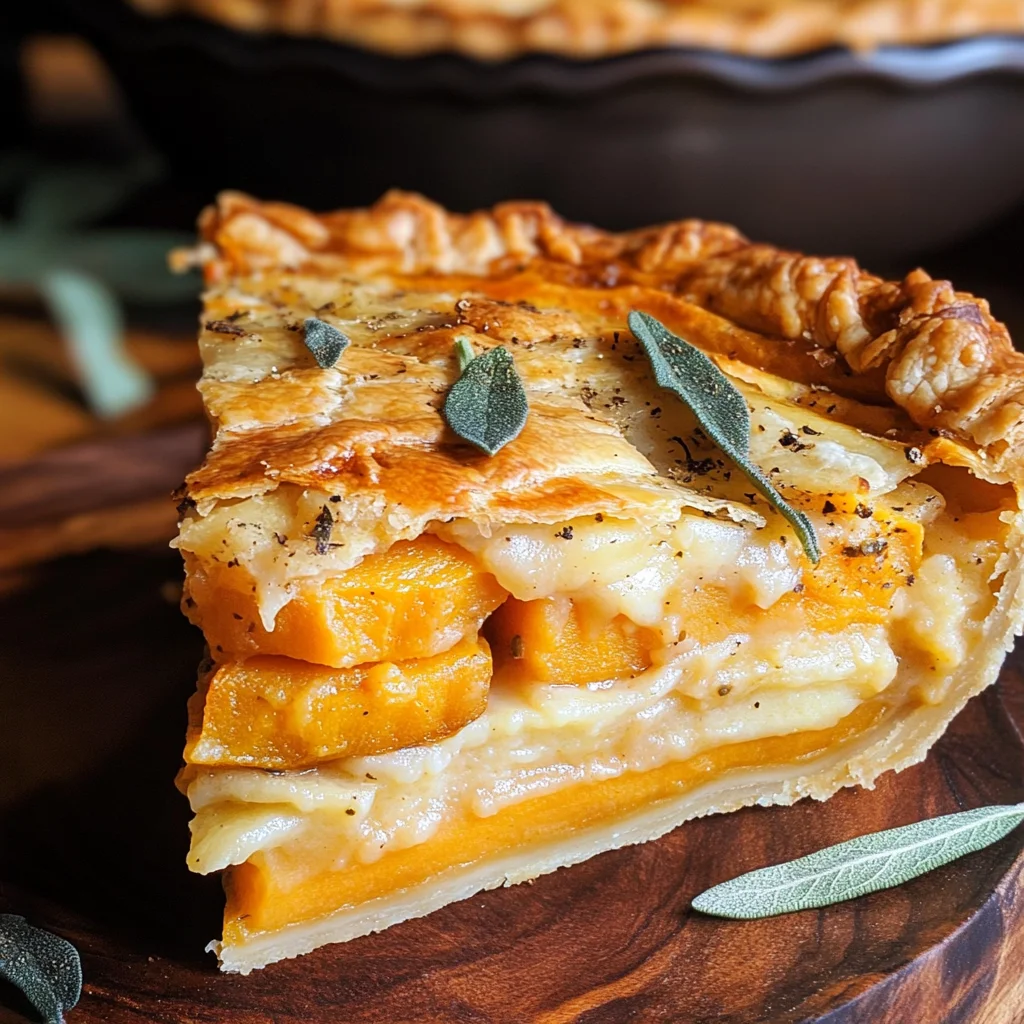
Sweet Potato and Sage Pie is the epitome of comfort food, combining the natural sweetness of tender sweet potatoes with the earthy aroma of fresh sage, all enveloped in a flaky crust. This delightful dish not only warms your heart but also becomes a centerpiece at any gathering. Perfect for fall evenings or cozy family dinners, each slice reveals a creamy filling harmonized with rich cheddar cheese, ensuring every bite is a burst of flavor that transports you to the comfort of home. Easy to make and incredibly satisfying, this pie will become a staple for any occasion, inviting memories shared around the table.
- Prep Time: 30 minutes
- Cook Time: 50 minutes
- Total Time: 1 hour 20 minutes
- Yield: Serves approximately 8 people 1x
- Category: Main
- Method: Baking
- Cuisine: American
Ingredients
- 2 ½ cups all-purpose flour
- 1 stick cold butter (diced)
- 1 lb sweet potatoes (peeled)
- 1 lb yellow flesh potatoes (such as Yukon Gold)
- 1 cup heavy whipping cream
- 1 tbsp chopped fresh sage
- 1 ½ cups shredded white cheddar cheese
- 1 large egg (beaten)
- 1 tsp kosher salt
- ½ cup ice water
- 1 tbsp all-purpose flour
- 1 ½ tsp kosher salt
- ½ tsp ground nutmeg
- ¼ tsp pepper
Instructions
- Preheat oven to 350°F (175°C).
- For the crust, mix flour and salt in a bowl. Cut in cold butter until crumbly. Gradually add ice water until dough forms. Chill for at least 30 minutes.
- Boil sweet and yellow potatoes in salted water until tender, about 15-20 minutes. Drain and mash together with heavy cream and flour.
- Stir in sage, salt, nutmeg, pepper, and cheese until well combined.
- Roll out the chilled dough into a circle and place it into a pie dish. Fill with the potato mixture.
- Brush edges with beaten egg and bake for 45-50 minutes until golden brown.
Nutrition
- Serving Size: 1 slice (approx. 150g)
- Calories: 320
- Sugar: 6g
- Sodium: 380mg
- Fat: 19g
- Saturated Fat: 11g
- Unsaturated Fat: 7g
- Trans Fat: 0g
- Carbohydrates: 30g
- Fiber: 3g
- Protein: 7g
- Cholesterol: 60mg