Strawberry Swirl Cheesecake Recipe
It’s hard to put into words the joy that comes from sharing something you’ve lovingly crafted in your kitchen, especially when it’s a dessert as enchanting as Strawberry Swirl Cheesecake. This isn’t just a recipe; it’s a tender embrace of creamy goodness and sweet, tangy strawberry sauce, swirling together in a beautiful dance that tantalizes your taste buds and warms your heart. The moment you crack open the springform pan and reveal that perfect marbled top, you’ll feel as if you’ve unearthed a hidden treasure. Each slice reveals layers of velvety cheesecake and vibrant strawberry swirls, promising an experience that’s not just about flavor but also about the memories we create around dessert – laughter shared with friends, celebrations marked with sweetness, or quiet evenings spent indulging in something truly extraordinary.
In my home, desserts like this Strawberry Swirl Cheesecake are more than just food; they’re stories waiting to be told. I’ve always been captivated by the way desserts can evoke emotions and memories. Perhaps it reminds you of summer days spent picking strawberries, or family gatherings where everyone eagerly awaited dessert. This cheesecake is perfect for those moments – birthdays, holidays, or even just because you deserve a treat. Trust me on this: once you serve it to your loved ones, they will be talking about it long after the last bite is gone!
Strawberry Swirl Cheesecake Recipe: A Taste of Joy
Let’s roll up our sleeves and embark on this delightful culinary journey together! Making a Strawberry Swirl Cheesecake might seem like a daunting task at first glance, but I promise you it’s easier than it looks and oh-so-rewarding. With each step, you’ll learn some handy tips that will make this dessert not only successful but also an absolute showstopper at any gathering.
Ingredients:
As we gather our ingredients for this luscious cheesecake, let’s take a moment to appreciate each one’s role in crafting such an exquisite dessert.
- 1 ½ cups fresh or frozen strawberries, hulled. Strawberries are the heart and soul of our sauce; their natural sweetness and bright acidity bring life to the rich creaminess of the cheesecake. When selecting fresh strawberries, look for plump berries with a vibrant red color and no signs of bruising – these will yield the best flavor. If you’re using frozen strawberries, make sure they’re unsweetened to control how much sugar we add later.
- ¼ cup granulated sugar. This sugar plays multiple roles in our recipe; it sweetens both the strawberry sauce and the cheesecake filling while helping to achieve that silky smooth texture we crave in cheesecake. Granulated sugar dissolves beautifully during mixing and cooking processes, enhancing flavors without adding grit.
- 1 tablespoon lemon juice. A splash of lemon juice brightens up our strawberry sauce by balancing its sweetness with just a hint of acidity. It not only enhances the flavor profile but also helps maintain that vibrant red hue in our strawberries during cooking.
- 1 tablespoon cornstarch mixed with 1 tablespoon water. This mixture acts as our thickening agent for the strawberry sauce, ensuring it has just the right consistency to swirl through our cheesecake without making it soggy. It’s important to mix them separately so that the cornstarch dissolves completely before being added to avoid any clumps.
- 1 ½ cups graham cracker crumbs. These crumbs form the foundation of our cheesecake crust. They provide a delightful crunch that complements the creamy filling perfectly! Look for finely crushed crumbs for an even texture when pressed into your springform pan; you can use store-bought or crush your own from whole graham crackers.
- ⅓ cup granulated sugar (for crust). Yes, a little extra sugar goes into our crust too! This addition balances out the slight saltiness of butter while giving our crust a lovely sweetness that mirrors what’s inside.
- ½ cup unsalted butter, melted. Unsalted butter is crucial here because it allows us to control the salt levels in our dish precisely – we want all flavors shining through! Melted butter binds everything together in our crust while contributing richness and flavor.
- 24 ounces (3 blocks) cream cheese, softened. The star ingredient! Cream cheese is responsible for that luxurious texture we all adore in cheesecakes; its creamy richness provides stability while allowing us to whip air into it for fluffiness when combined with sugar.
- 1 cup granulated sugar (for filling). We need this sugar for sweetening up our filling perfectly! Remember – quality matters here too; using fine granulated sugar ensures it dissolves seamlessly into your cream cheese mixture without any grittiness.
- 3 large eggs. Eggs lend structure to our cheesecake while adding richness as well; they help bind everything together beautifully during baking. Make sure they’re at room temperature – this helps them incorporate better into your batter!
- 1 teaspoon vanilla extract. Pure vanilla extract adds depth to your cheesecake flavor – think of it as adding warmth and nostalgia to each bite! It’s non-negotiable if you want that classic dessert aroma wafting through your kitchen.
- 1 cup sour cream. Sour cream adds tanginess which balances out all that sweetness from earlier ingredients while enhancing creaminess! Plus, it makes for an incredibly smooth texture that melts in your mouth.
- ¼ cup heavy cream. Heavy cream rounds out our filling with extra richness – trust me when I say there’s nothing quite like whipping this into your batter for achieving peak creaminess!
Equipment You’ll Need:
Before diving into making this delightful Strawberry Swirl Cheesecake Recipe, let’s gather some essential tools that will ensure everything runs smoothly in your kitchen adventure! Having these pieces at hand makes all the difference between stress and ease.
- 9-inch springform pan – This special type of pan is designed specifically for cheesecakes; its removable sides allow easy release once your dessert is baked and cooled without damaging those gorgeous edges you’ve worked so hard on!
- Mixing bowls (various sizes) – A good set of mixing bowls is vital since we’ll be combining different elements separately before bringing them together into one harmonious mixture.
- Electric mixer (handheld or stand) – Mixing by hand can be quite labor-intensive when dealing with cream cheese! An electric mixer saves time while ensuring everything blends smoothly without lumps.
- Rubber spatula – This handy tool will help scrape every last bit of batter from bowls and ensure thorough mixing without losing precious ingredients along the way!
- Potato masher or fork – We’ll use this simple tool to mash down those deliciously soft strawberries once cooked! It’ll give us control over how chunky or smooth we want our sauce.
With everything ready—ingredients prepped & tools gathered—it’s time to dive into creating this stunning Strawberry Swirl Cheesecake Recipe! Let’s walk through each step together so you feel confident every step of the way…
Step 1: Create Your Strawberry Sauce
In a small saucepan over medium heat, combine those luscious hulled strawberries with sugar and lemon juice. As they begin to heat up over those gentle flames—oh my goodness—their natural juices start flowing out like liquid gold! You’ll see them soften within about 5–7 minutes until they transform into something truly magical—a thickened puree bursting with vibrant color and flavor! Be patient here—this process allows their sweetness to bloom beautifully under heat rather than rush straight ahead into blending—trust me on this one!
Once softened enough (you should see some bubbling action), grab either a potato masher or fork and break down those strawberries until they reach your desired level of puree consistency; whether you prefer some chunks left behind or want silky-smooth perfection—it’s entirely up to you! Next comes stirring in that cornstarch slurry—a mixture made beforehand—and cook again briefly until thickened (just another couple minutes!). Now remove from heat completely and let cool down completely before straining if smoother sauce is preferred—a little flexibility here based on personal preference!
Step 2: Prepare Your Crust
While waiting for those juicy beauties to cool down nicely (patience pays off!), let’s shift gears towards preparing our graham cracker crust base—the solid foundation upon which everything else rests perfectly balanced above! Preheat your oven first at 325°F (160°C) so it’s nice & hot when we’re ready later on—this step ensures even baking throughout while keeping things crisp rather than soggy!
Now grab yourself another bowl—you know how much I love having plenty around—and mix together those graham cracker crumbs along with additional granulated sugar plus melted unsalted butter until evenly combined—like magic! You want every crumb coated nicely here since they’ll meld together beautifully once pressed firmly against the bottom surface of the springform pan—creating an even layer across its entirety—all about craftsmanship!
Press down firmly using hands (or maybe even another flat object if feeling fancy!) aiming for compactness—this part matters significantly since we want stability throughout baking phase later on too… Bake away for approximately 8–10 minutes until golden brown edges pop up slightly crispy yet still soft inside—remove from oven then set aside cool completely before moving onto next steps ahead…
Step 3: Whip Up That Creamy Filling
Now comes my favorite part—the dreamy filling itself awaits us eagerly as we begin assembling all components together toward completion soon enough! In yet another large mixing bowl (yes—I’m serious about needing these), beat together softened blocks of cream cheese along with granulated sugar using electric mixer till smooth & fluffy—aiming roughly about 2–3 minutes here should do nicely! This process known as creaming ensures air gets incorporated properly resulting ultimately fluffy texture after baking rather than dense cake-like outcome which nobody desires whatsoever!
Next step involves carefully adding eggs one by one—mixing well after each addition so nothing curdles unexpectedly along way… Then sprinkle vanilla extract followed closely behind by sour cream plus heavy cream ensuring everything blends effortlessly without overmixing—too much agitation could lead unwanted cracking later during bake cycle—we definitely don’t want any cracks ruining beautiful aesthetics now do we?
Step 4: Assemble Your Masterpiece
Pour this luscious creamy concoction right atop pre-baked graham cracker crust smoothing out top gently using rubber spatula—it should spread evenly across entire surface creating inviting canvas ready shortly soon meet delightful strawberry sauce awaiting patiently beside… Drop spoonfuls generously atop freshly laid cheesecake layer—don’t worry if they’re unevenly scattered—that’s part charm here after all!
Using either knife/skewer swirl gently through both layers creating mesmerizing marbled effect reminiscent artistic masterpiece gracing gallery walls instead mere food tray moments later—they’ll rave about sight alone before taking first bites thereafter promised blissful euphoria celebrating flavors merging splendidly together harmoniously whilst enjoying every morsel savoringly too!
Stay tuned as we continue stepping forward towards baking perfection…
Step 5: The Creamy Dream – Mixing the Cheesecake Filling
Now that your crust is cool and ready to cradle the luscious cheesecake filling, it’s time to create a mixture that truly embodies the phrase creamy dream. Take a large mixing bowl and add your softened cream cheese—this is crucial, as softened cream cheese blends effortlessly into a smooth texture without any lumps. Using an electric mixer, beat the cream cheese on medium speed for about 2-3 minutes until it becomes fluffy and pale. You want to achieve a consistency that feels light and airy; this airiness is what will make your cheesecake so delightfully rich yet not too dense.
Once your cream cheese is beautifully whipped, it’s time to slowly incorporate the granulated sugar. This step not only sweetens but also helps further break down the cream cheese, creating that velvety texture we’re all after. Beat again for another minute or so until fully combined—just keep an eye out for any lingering clumps because nobody wants a surprise chunk in their slice! Now, here’s where it gets exciting: add your eggs one at a time, mixing on low speed right after each addition. This gradual process prevents incorporating too much air, which could lead to cracks during baking; trust me when I say you want a perfect surface for this show-stopper dessert.
Next up is a splash of vanilla extract, which adds warmth and depth to our filling—don’t skip this step! Following that, gently fold in sour cream and heavy cream until just combined. This combination creates an incredibly rich flavor profile and gives your cheesecake its signature creamy consistency. Overmixing can lead to air bubbles forming in your batter, which might cause cracks while baking; so remember: gentle is key here! Once you’ve achieved a smooth mixture devoid of lumps, you’re ready to pour this heavenly concoction over your cooled crust.
Step 6: Pouring Perfection – Filling the Crust
With your cheesecake filling perfectly blended, it’s time to pour this divine mixture onto the prepared crust. Start by smoothing the filling gently with a spatula or the back of a spoon, ensuring that it spreads evenly across the crust. This step is not just about aesthetics; ensuring an even layer allows for uniform cooking throughout. As you pour, take note of how creamy and thick the batter is—it should flow smoothly but hold its shape well enough not to spill over the edges of the crust. If you see any air bubbles rising to the surface after pouring (you’ll know they’re there because they’ll be little pockets trying to escape), don’t fret! A gentle tap on the counter will help release them before they turn into unwanted holes in your lovely cheesecake.
Why is this step so important? Well, think about it: every layer contributes to that perfect slice we all crave at dessert time! An even distribution allows every piece of cheesecake you serve to be consistently creamy and flavorful from edge to center. Take a moment here—breathe in that rich aroma of vanilla and cream; you’re building something extraordinary! Once you’ve smoothed out your filling, let’s move on to adding those beautiful strawberry swirls.
Step 7: The Art of Swirling – Adding Strawberry Sauce
Now comes one of my favorite parts—the artistic creation of swirls using our homemade strawberry sauce! With spoonfuls of cooled strawberry sauce waiting patiently beside your cheesecake batter, begin dropping dollops randomly onto the surface of the filling. You might feel like an artist painting on canvas; each swirl you create adds not only visual appeal but bursts with flavor when tasted. Use a knife or skewer to gently swirl through both fillings—be careful not to overdo it! A few gentle strokes back and forth are all you need; you’re aiming for marbling rather than complete incorporation.
This swirling technique is absolutely paramount as it creates those stunning streaks of ruby red against the creamy backdrop—a feast for both eyes and palate! It’s about balancing flavors too; with every slice served, guests will enjoy bites infused with velvety cheesecake followed by bursts of fresh strawberry sweetness—a true symphony of flavors! Keep in mind that if you mix too vigorously, you’ll lose those gorgeous swirls and risk having pink-tinted cheesecake instead—so trust me when I say delicate movements are best here!
Step 8: Baking with Love – The Water Bath
With our masterpiece ready for baking, it’s essential now to set up a water bath—a technique that sounds fancy but is quite simple and incredibly effective for achieving cheesecakes without cracks. To do this, place your springform pan filled with cheesecake into a larger baking dish or roasting pan. Carefully fill this outer dish with hot water until it reaches about 1-2 inches up the sides of your springform pan; this moisture-rich environment helps maintain even temperature throughout baking while preventing dryness.
Why bother with this extra step? Well, during baking cheesecakes can be sensitive little wonders—they love gentle heat! By surrounding our cake with steaming water while baking at 325°F (160°C), we allow it an environment akin to an oven filled with humidity—a non-negotiable factor for achieving that perfectly creamy texture we all adore without unsightly cracks appearing on top as they cool down too quickly from sudden temperature changes. Bake for about 55-65 minutes until you see that beautiful jiggle in the center—it’s like watching magic happen right before your eyes!
You’ll know it’s done when the edges appear set but still slightly wobbly in the middle—it should look somewhat like Jell-O when shaken gently (but please resist shaking too vigorously!). Once baked to perfection, turn off that oven but leave your door ajar—this slow cooling process allows residual heat from within to gradually reduce temperature around our delicate dessert while reducing shock from outside cooler air hitting directly against it; patience pays off here! Let it cool in there for an hour before removing it from its cozy water bath.
Final Touches: Chill Out Before Serving
As tempting as it may be to dive right into slicing up this beauty after cooling down in the oven—hold those horses! Chilling is where some serious magic happens—it allows flavors to meld beautifully while transforming our once-loose batter into luscious firm perfection worthy of any special occasion or simple family gathering alike. Cover with plastic wrap (or simply pop it into an airtight container) and refrigerate for at least six hours—or better yet—overnight if possible!
This chilling period allows everything inside—that lovely strawberry swirl mixed with creamy richness—to settle comfortably together while firming up nicely so every slice reveals gorgeous layers without falling apart upon serving. I promise you won’t regret giving this cake its due time in chill-town—it makes all difference between good cheesecakes versus unforgettable ones!
When you’re finally ready to serve up slices adorned perhaps with additional strawberry sauce drizzled artfully atop or garnished fresh strawberries alongside each plate—trust me when I say you’ll see smiles light up faces as guests take their first bites into heaven itself! Enjoy every moment spent sharing such joy together around dessert—it’s these heartwarming experiences shared over food that create lasting memories we hold dear forevermore!
Now go forth my dear friend—create magic within those kitchen walls using this Strawberry Swirl Cheesecake Recipe!
Storage and Enjoyment Tips for Your Strawberry Swirl Cheesecake Recipe
Now that your Strawberry Swirl Cheesecake has been lovingly crafted, it’s time to savor the fruits of your labor! This dessert, with its creamy filling and delightful swirls of strawberry sauce, is not only a feast for the eyes but also a treat for the palate. What’s even more exciting? You can enjoy this masterpiece over several days or even freeze portions for later indulgence. Let’s dive into how to properly store those delicious leftovers while maintaining all that luscious flavor and texture.
Storing Leftover Strawberry Swirl Cheesecake Recipe
To keep your Strawberry Swirl Cheesecake as fresh as the moment it came out of the oven, I recommend using an airtight container. A glass or plastic container with a snug-fitting lid will work wonders in preventing any unwanted odors from invading your cheesecake’s delicate flavor. When stored in the refrigerator, your cheesecake will stay deliciously fresh for up to five days. For those who want to preserve its quality even longer, you can place a slice (or two!) in a freezer-safe container. A helpful tip: if you’re concerned about keeping the crust intact, slide a piece of wax paper between slices before sealing them up; it works like magic! Trust me when I say that after a few days in the fridge, this cheesecake still tastes utterly divine—each bite remains rich and creamy with vibrant strawberry notes.
Freezing Your Strawberry Swirl Cheesecake for Later
If you’re feeling like you might not finish that whole cheesecake (though I wouldn’t blame you if you did!), freezing is an excellent option. To freeze your cheesecake properly, allow it to cool completely at room temperature before wrapping each slice tightly in plastic wrap or aluminum foil. Then place them in a freezer-safe bag or container. This way, they can be stored for up to three months without losing their incredible taste or texture! When you’re ready to enjoy a slice from frozen, simply transfer it to the fridge and let it thaw overnight. You’ll find that this method preserves the flavor beautifully; it’s like having a little piece of summer waiting for you whenever you crave something sweet! Plus, there’s something so satisfying about pulling out a frozen delight and enjoying it on a whim—it’s convenience at its finest!
Strawberry Swirl Cheesecake
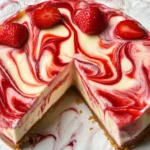
Indulge in the delightful experience of making a Strawberry Swirl Cheesecake that marries creamy cheesecake with vibrant strawberry sauce, creating a dessert that’s perfect for any occasion. This luscious treat is not just a visual masterpiece but also a delicious celebration of flavors. Each slice reveals layers of velvety cheesecake and irresistible swirls of sweet-tart strawberry sauce, ensuring every bite is an enchanting delight. Whether it’s for birthdays, holidays, or simply a reason to indulge, this Strawberry Swirl Cheesecake will leave your guests raving long after the last slice is gone.
- Prep Time: 30 minutes
- Cook Time: 65 minutes
- Total Time: 1 hour 35 minutes
- Yield: Serves approximately 12 slices 1x
- Category: Dessert
- Method: Baking
- Cuisine: American
Ingredients
- 1 ½ cups fresh or frozen strawberries, hulled
- ¼ cup granulated sugar (for sauce)
- 1 tablespoon lemon juice
- 1 tablespoon cornstarch mixed with 1 tablespoon water
- 1 ½ cups graham cracker crumbs
- ⅓ cup granulated sugar (for crust)
- ½ cup unsalted butter, melted
- 24 ounces cream cheese, softened
- 1 cup granulated sugar (for filling)
- 3 large eggs
- 1 teaspoon vanilla extract
- 1 cup sour cream
- ¼ cup heavy cream
Instructions
- Prepare the strawberry sauce: In a saucepan over medium heat, combine strawberries, sugar, and lemon juice. Cook for about 5–7 minutes until softened. Mash to desired consistency and stir in cornstarch slurry; cook until thickened. Let cool.
- Preheat oven to 325°F (160°C). Make the crust: Mix graham cracker crumbs, sugar, and melted butter until combined. Press mixture into the bottom of a springform pan and bake for 8–10 minutes. Set aside to cool.
- Make the filling: Beat softened cream cheese with sugar until fluffy. Add eggs one at a time, mixing well after each addition. Stir in vanilla extract, sour cream, and heavy cream until smooth.
- Assemble: Pour filling into cooled crust and drop spoonfuls of strawberry sauce on top. Swirl gently with a knife.
- Bake: Place springform pan in a larger baking dish filled with hot water (about halfway up). Bake for 55–65 minutes until set but still slightly jiggly in the center.
- Cool: Turn off oven and leave cheesecake inside with door ajar for an hour before removing it from the water bath. Chill in the refrigerator for at least six hours or overnight before serving.
Nutrition
- Serving Size: 1 slice (approximately 100g)
- Calories: 360
- Sugar: 25g
- Sodium: 220mg
- Fat: 26g
- Saturated Fat: 15g
- Unsaturated Fat: 10g
- Trans Fat: 0g
- Carbohydrates: 28g
- Fiber: 1g
- Protein: 5g
- Cholesterol: 95mg