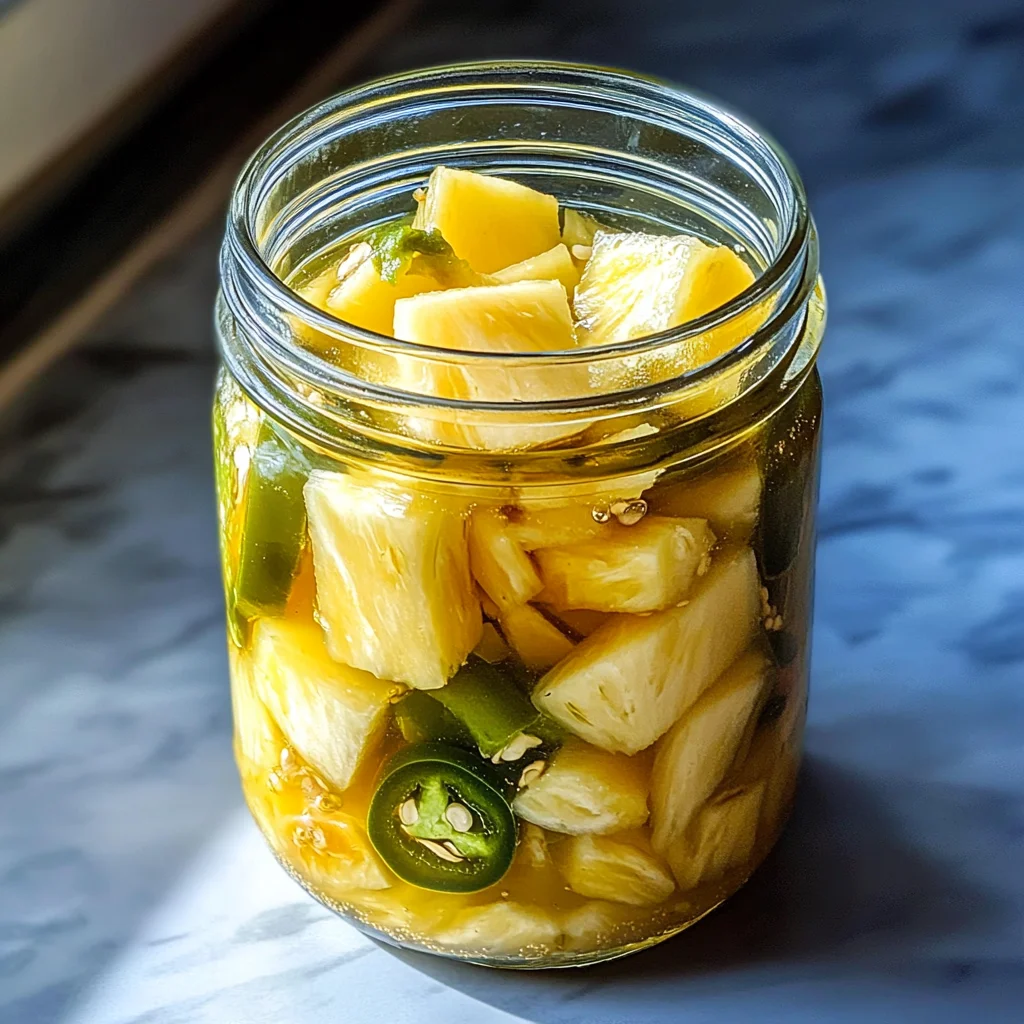
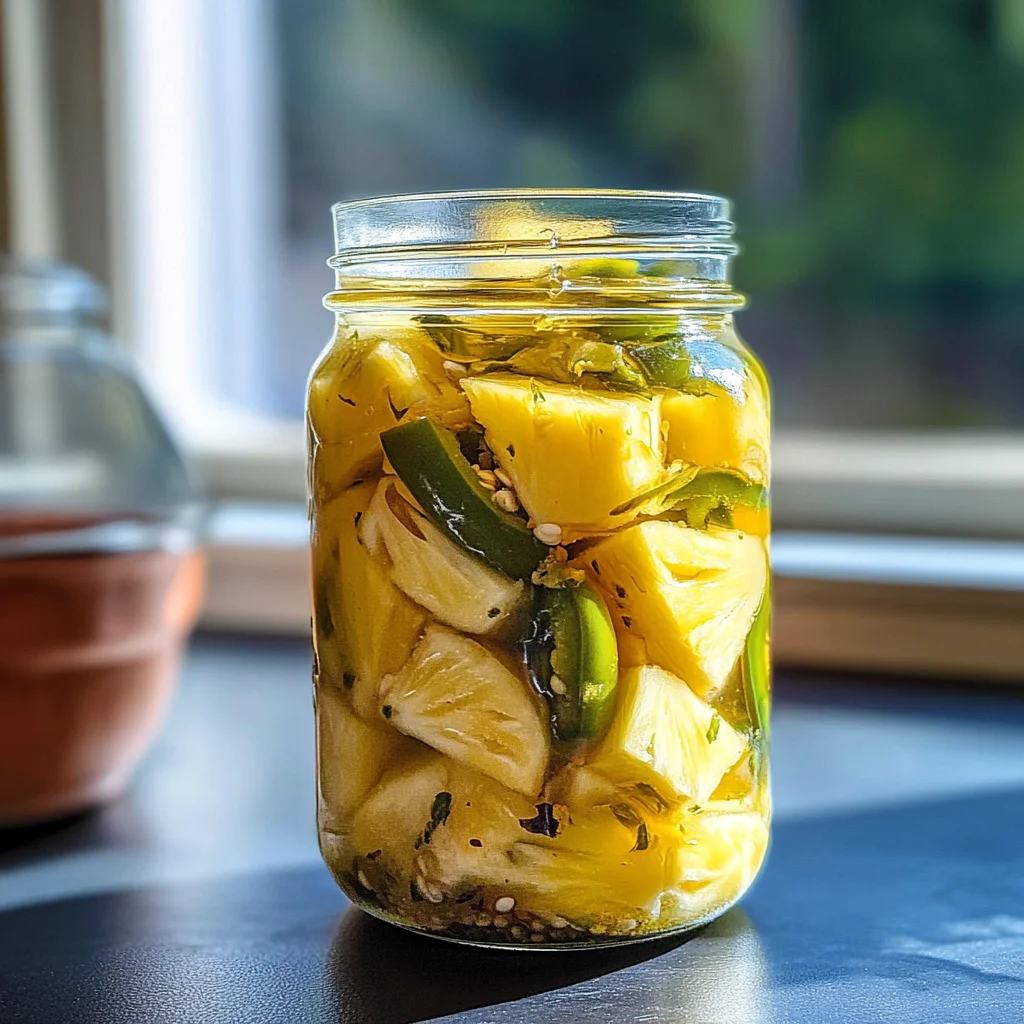
Pickled Pineapple
There’s something utterly enchanting about the art of pickling. It’s like capturing a moment in time, preserving the essence of bright flavors and vibrant colors for you to savor later. This Pickled Pineapple recipe does just that; it takes the sweet, juicy goodness of fresh pineapple and elevates it into a tangy, spicy delight that dances on your palate. Imagine biting into a piece of pineapple that’s been kissed by zesty lime and warmed with a hint of jalapeño – it’s a sweet and spicy revelation! Each bite is not just a taste but an experience, transforming your everyday meals into something extraordinary.
This recipe is more than just a way to preserve fruit; it’s a celebration of flavors that harmoniously blend together. I’ve always been captivated by how pickling brings out the best in ingredients, turning them into something more than the sum of their parts. This simple process requires no fancy equipment—just your trusty refrigerator and a few ingredients you might already have on hand. Whether you’re adding this pickled pineapple to tacos for a zesty twist, serving it alongside grilled meats for an exciting contrast, or even spooning it over creamy desserts for an unexpected flair, I promise you, this creation will elevate any dish it graces.
The Irresistible Allure of Sweet and Salty
Pickled Pineapple has become one of those recipes that I turn to again and again because it offers such versatility—it can fit seamlessly into various cuisines and occasions. The balance between sweet, salty, and spicy creates a flavor profile that’s undeniably addictive! Additionally, this recipe captures the essence of summer in every jar; it’s perfect for barbecues or picnics but equally delightful during winter months when you crave something bright and refreshing. Friends often ask me how I come up with these unique combinations, and honestly, it’s all about experimenting with what you love!
Now, let’s embark on this culinary journey together! The beauty of making your own Pickled Pineapple is not only in the final product but also in the process itself – each step is infused with love and care. You’ll quickly find that this condiment becomes your new favorite go-to for adding excitement to meals or simply enjoying on its own as a snack.
Pickled Pineapple: A Sweet-Spicy Sensation
As we dive into creating this delightful recipe together, you’ll see how easy it is to make something so special right at home!
Ingredients:
Gathering quality ingredients is the first step in our delicious adventure! Each component plays a vital role in crafting that perfect symphony of flavors.
- 1 1/2 cups (360 ml) white distilled vinegar (5%). This ingredient is crucial for creating the brine that transforms our fresh pineapple into pickled perfection. White distilled vinegar offers a sharp acidity that balances beautifully with the sweetness of the pineapple while allowing other flavors to shine through without overpowering them. When selecting your vinegar, look for one labeled as 5% acidity, which ensures just the right level of tartness for effective pickling.
- 1 tablespoon pickling OR Kosher salt. Salt is essential not just for flavor but also as a preservative in our pickling process. It draws out moisture from the pineapple and helps create that satisfying crunch we all love from pickles! When choosing salt, opt for non-iodized varieties like Kosher salt or pickling salt because they dissolve easily without imparting any off-flavors.
- 1 tablespoon sugar. While sugar may seem like an odd addition in this savory endeavor, trust me—it’s absolutely paramount! Not only does it enhance the natural sweetness of our pineapple, but it also balances out the acidity from the vinegar. This delicate equilibrium is what makes each bite so profoundly satisfying; too much sugar would mask other flavors while too little could leave our brine tasting overly harsh.
- 4 cups chopped fresh pineapple. Ahh, the star of our show! Fresh pineapple brings an undeniable juiciness and tropical allure to this pickle recipe. When selecting your pineapple, look for one that’s fragrant at its base with firm yet slightly yielding flesh; this indicates ripeness and sweetness. Chopping it into manageable chunks allows more surface area to absorb our enchanting brine fully.
- 1 sliced jalapeño. Here comes the spice! Adding sliced jalapeños introduces warmth without overwhelming heat—the kind that lingers pleasantly on your tongue rather than burning. Feel free to adjust how many slices you add based on your spice tolerance; removing seeds can also help tone down their fiery nature if desired.
- Juice from 1 lime. The zestiness from fresh lime juice adds brightness to our brine while complementing both sweet and savory notes in an extraordinary way! It’s best to use freshly squeezed lime juice here; bottled versions often lack depth and freshness that truly elevates our dish.
Equipment You’ll Need:
Before we get started whipping up these tantalizing flavors, let’s ensure we have all our essential tools ready at hand! Having the right equipment makes cooking smoother and allows us to focus on creativity rather than scrambling around searching for items mid-process.
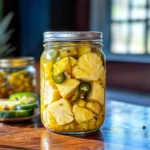
- Quart-sized glass jar with lid – This is where all the magic happens! A glass jar helps maintain cleanliness while allowing you to see those gorgeous layers of colorful pineapple and jalapeño as they soak up every drop of flavor from our brine. Make sure it’s thoroughly cleaned before use; sterilizing ensures no unwanted bacteria interferes with our creation.
- Small saucepan – This trusty tool will be used to create our flavorful brine by boiling together vinegar, salt, sugar, and lime juice until everything melds perfectly together! Ensure it’s large enough so there’s room for stirring without spilling over—a pot that’s too small might lead to messy results!
- Cutting board & knife – These are essential partners when prepping our ingredients like chopping fresh pineapple or slicing jalapeños precisely. A sturdy cutting board will make your prep work easier while keeping everything organized as we slice away!
With everything gathered together—the ingredients are prepped beautifully alongside necessary tools—we’re ready to dive into creating something truly unforgettable: Pickled Pineapple!
Preparing the Pickled Pineapple
Step 1: Crafting Your Brine
First things first—let’s create our signature brine! In a small saucepan over medium heat, begin by pouring in 1 1/2 cups of white distilled vinegar along with 1 tablespoon each of pickling salt and sugar as well as juice from one freshly squeezed lime. As you bring this mixture to a gentle boil while stirring diligently (this is crucial!), watch as those granules dissolve completely into liquid gold; consider every stirring motion an invitation for well-balanced flavors waiting patiently within their cozy confines!
Once everything’s dissolved harmoniously—your kitchen should start smelling heavenly—remove it from heat immediately so cooling can commence before proceeding further down this flavorful path ahead!
Step 2: Chopping Time!
While our brine cools down gracefully (don’t rush this step!), let’s prepare those beautiful chunks of fresh pineapple alongside vibrant slices from jalapeños! Start by slicing off both ends followed by carefully peeling away outer skin until yielding golden flesh remains intact within reach—aiming high quality here truly matters since ripe fruit enhances overall taste immensely!
Chop your luscious pineapple into bite-sized pieces—about 1-inch cubes work best—and set aside alongside neatly arranged rounds from jalapeños awaiting their turn at flavorful immersion within cooled brine shortly thereafter!
Step 3: Assembling Your Jar
Now comes one super fun part: assembling everything within one quart-sized glass jar! Begin layering half-pieces filled with juicy pineapples followed closely behind by enticing rings made from jalapeños until space starts running low near top edge—remember leaving some headspace provides room needed when pouring over subsequent delicious liquids next!
Once you’ve layered thoughtfully through ingredient options available while maintaining color throughout visually appealing presentation—it really pays off later trust me—it becomes time at last…to pour cooled brine over these colorful creations ensuring every morsel finds its place submerged within tantalizing mix below!
Step 4: Weighty Matters
After pouring brine lovingly atop layered fruits inside glass jar—which should look positively gorgeous now—it’s time we secure contents firmly using either fermenting weight placed gently upon mixture or alternatively cover loosely using reusable lid paired nicely against parchment paper underneath metal lid above protecting against oxidation whilst allowing air circulation necessary during initial refrigeration phase about occur post-haste!
With everything snugly secured inside place within refrigerator where temperatures remain cool enabling optimal infusion opportunities ahead…wait patiently overnight until magic starts happening fully infusing those flavors deeply enhancing overall enjoyment levels once ready enjoy finally after day passes before tasting blissful goodness achieved after such patience shown beforehand!
And there you have it—a journey through taste awaits just around corner once completion arrives tomorrow morning when anticipation finally fades away revealing exquisite rewards found therein jars filled joyously awaiting discovery soon ahead…trust me friends—you won’t regret embarking upon such delightful adventure together today through simple act preparation leading inevitably toward greater culinary triumphs achieved swiftly thereafter!
Step 5: The Art of Layering Flavors
Now that your brine is cooling, it’s time to turn our attention to the star of this show—the pineapple and jalapeño. Begin by chopping your fresh pineapple into bite-sized chunks. I find that roughly one-inch pieces work beautifully, striking a perfect balance between tenderness and bite. As you slice through the golden flesh, inhale deeply; the sweet aroma will transport you to a tropical paradise and tease your taste buds with anticipation. Remember, choosing ripe pineapple is crucial here; look for vibrant, fragrant fruit that yields slightly when pressed. If it’s firm as a rock, give it a few more days on your countertop to reach its full potential.
Next comes the jalapeño! Slice it into circles, removing the seeds if you’re looking to tame the heat. Trust me on this: if you like a little kick in your condiments, leaving some seeds will elevate the experience to new heights! Layering these spicy slices with your sweet pineapple creates an alluring contrast that tantalizes both the palate and the nose. Once you’ve prepared both ingredients, place them into a quart-size glass jar—but don’t rush! Take your time arranging them so every bite will have a harmonious mix of sweetness and spice. Leaving some headspace at the top is absolutely paramount; this will allow for expansion as they soak in all those incredible flavors.
Step 6: Embrace the Brining Magic
With our pineapple and jalapeño nestled cozily in their jar, it’s time to pour over our beautiful brine. If you’ve been patient enough to let it cool completely—trust me, we don’t want any melted fruit here—it’s time for the magic to happen! Carefully pour the cooled brine over your layered fruits until they are completely submerged. Watch as the vinegar cascades down like liquid gold, enveloping each piece of pineapple and jalapeño in its tangy embrace. This step is incredibly important because brining not only infuses those lovely flavors but also helps preserve your ingredients in a safe way without any need for fancy canning techniques.
Don’t forget about those bubbles! As you pour, you might see little air bubbles escaping from between your fruits—this is perfectly normal and totally expected. It’s almost like they’re cheering you on! Once everything is submerged, place a fermenting weight on top—this can be anything from a clean stone or glass weight—making sure everything stays nestled under that beautiful brine. Then loosely cover your jar with either a reusable lid or parchment paper between the jar and metal lid; this allows any gases produced during fermentation to escape while keeping contaminants out.
Step 7: The Waiting Game – A Lesson in Patience
Ah, patience—the secret ingredient in every great recipe! Now that we’ve completed our preparation steps, we need to let our pickled pineapple mingle in the fridge for about 24 hours. Yes, I know waiting can feel agonizing sometimes, but trust me when I say this step is non-negotiable; it’s where all those delightful flavors begin to meld together into something utterly intoxicating.
During this time in refrigeration, you’ll notice how the bright acidity of the vinegar combines with the natural sweetness of the pineapple and just enough heat from those jalapeños creates what I can only describe as an alchemy of flavor. You’ll want to keep an eye on it (without opening!)—after about 12 hours, sneak a peek through the glass jar and admire how beautifully vibrant everything looks; it’s like watching art come alive! And don’t worry if you see some color changes or slight softening; these are signs that magical transformations are taking place within your jar!
Step 8: Enjoying Your Condiment Creation
Once those 24 hours have passed—and believe me when I say you’ll be counting down—I promise you’ll be rewarded with something truly extraordinary! Carefully remove your pickle jar from its chilly sanctuary and take a moment to appreciate how stunningly colorful it has become. The vibrant yellows of the pineapple contrasting against the green rings of jalapeño create an inviting visual feast that’s hard to resist.
At this point, feel free to dive right in! You can enjoy this pickled pineapple right away if you’re feeling daring; however, letting it sit for up to two weeks will deepen those flavors even more profoundly—a true testament to time’s power in cooking! Feel free to use it atop grilled chicken or fish—what an incredible pairing—or toss some into salads for a zingy brightness that cuts through richness beautifully.
And remember: this pickled treasure is versatile beyond belief! Use it as an exciting topping for tacos or even as an unexpected garnish for cocktails (without alcohol!). Your culinary adventures are just beginning with this vibrant condiment that promises joy with every bite.
Conclusion:
As we wrap up our journey through this recipe for pickled pineapple, my heart swells with excitement—I truly hope yours does too! There’s something profoundly satisfying about transforming simple ingredients into a jar full of vibrant flavors that brighten any dish. The harmony between the sweet notes of fresh pineapple and the zesty hints from lime juice and jalapeño creates a symphony that elevates everything from grilled fish tacos to a refreshing summer salad. It’s amazing how such uncomplicated steps lead to something so extraordinary!
This recipe is absolutely a must-try—not just because of its tantalizing flavor profile but also due to the sheer joy it brings while making it. Imagine pulling open the fridge door at your next gathering and presenting this stunning jar filled with colorful goodness; it’s sure to be an instant conversation starter! Whether you’re hosting friends for brunch or simply looking for a way to elevate weeknight dinners, having pickled pineapple on hand adds an exciting twist that leaves everyone eager for seconds.
Serving suggestions are where your creativity can truly flourish! Picture savoring bright chunks of pickled pineapple atop grilled chicken sandwiches, where every bite bursts with flavor. For an afternoon pick-me-up, toss some pieces into yogurt alongside granola—a simple yet utterly delightful treat that dances on your palate. And for those moments when you’re craving something special at dinner? Try pairing it with seared salmon; imagine each forkful bringing together flaky fish and sweet-tangy pickle bliss—a match made in culinary heaven.
Feeling adventurous? This recipe is wonderfully adaptable! You could infuse additional spices like coriander or even swap out jalapeños for another pepper variety if you’re craving different heat levels! Or perhaps consider adding herbs such as cilantro or mint once it’s done fermenting—each variation opens new avenues for exploration and delight. So go ahead—give this recipe a try! I warmly invite you to share your experiences, variations, and any delightful twists you’ve added along the way—let’s connect through our love of food!
Pickled Pineapple
Pickled Pineapple is a delightful condiment that beautifully marries sweet, tangy, and spicy flavors. This easy refrigerator pickle transforms fresh pineapple into a vibrant addition to your meals, enhancing everything from tacos to grilled meats. The bright acidity of vinegar paired with the warmth of jalapeño creates a refreshing burst of flavor that can elevate any dish. Perfect for summer barbecues or cozy winter dinners, this recipe captures the essence of tropical goodness in every bite. With just a few simple ingredients and minimal prep time, you’ll have a jar of pickled pineapple ready to enjoy in no time!
- Prep Time: 15 minutes
- Cook Time: 5 minutes
- Total Time: 20 minutes
- Yield: About 4 servings 1x
- Category: Condiment
- Method: Refrigerator Pickling
- Cuisine: Tropical
Ingredients
- 1 1/2 cups white distilled vinegar (5%)
- 1 tablespoon pickling salt
- 1 tablespoon sugar
- 4 cups chopped fresh pineapple
- 1 sliced jalapeño
- Juice from 1 lime
Instructions
- In a small saucepan over medium heat, combine the vinegar, salt, sugar, and lime juice. Stir until dissolved and bring to a gentle boil. Remove from heat and let cool.
- While the brine cools, chop the fresh pineapple into bite-sized chunks and slice the jalapeño into rings.
- Layer half of the pineapple in a quart-sized glass jar followed by half of the jalapeño slices. Repeat with the remaining fruit.
- Pour the cooled brine over the layered fruits until completely submerged.
- Place a weight on top, if available, or loosely cover with parchment paper and lid to allow air circulation.
- Refrigerate for at least 24 hours before enjoying.
Nutrition
- Serving Size: 1 serving
- Calories: 30
- Sugar: 7g
- Sodium: 310mg
- Fat: 0g
- Saturated Fat: 0g
- Unsaturated Fat: 0g
- Trans Fat: 0g
- Carbohydrates: 8g
- Fiber: 1g
- Protein: <1g
- Cholesterol: 0mg