Coconut Cake with Pineapple Filling
There’s something truly magical about the fusion of flavors in a Coconut Cake with Pineapple Filling. Each bite transports you to a sun-soaked beach, where the gentle breeze carries whispers of coconut palms swaying lazily under an azure sky. This cake is not just a dessert; it’s a celebration, an experience that beckons friends and family to gather together, share stories, and create memories. The soft, fluffy layers of coconut cake are lovingly embraced by a tangy pineapple filling that adds just the right amount of zest, while the creamy coconut cream cheese frosting envelops it all in a sweet embrace. I promise you, this isn’t just another cake—it’s an invitation to indulge in a slice of paradise.
When I first discovered this recipe, it felt like uncovering a treasure map leading me to a world filled with tropical delights. The combination of rich coconut and vibrant pineapple creates a symphony of flavors that dance on your palate. The lightness of the cake paired with the luscious filling embodies everything we love about desserts: they should evoke joy, comfort, and a sense of adventure. Whether you’re celebrating a birthday or simply savoring the day, this Coconut Cake with Pineapple Filling will make any occasion feel extraordinary.
Coconut Cake with Pineapple Filling: A Tropical Escape in Every Slice
Get ready to embark on an exciting culinary adventure! This Coconut Cake with Pineapple Filling is not only delicious but also surprisingly simple to make. With each step, you’ll be crafting layers of flavor that come together to create something truly special. So roll up your sleeves and let’s dive into this delightful recipe together!
Ingredients:
As we gather our ingredients for this delightful tropical treat, let’s take a moment to appreciate each component that will contribute to our masterpiece. Every ingredient plays its part in creating that unforgettable flavor profile and texture we adore in our Coconut Cake with Pineapple Filling.
- 2 cups all-purpose flour. Flour is the backbone of our cake; it provides structure and stability while allowing our cake to rise beautifully. When choosing your flour, I recommend going for unbleached all-purpose flour as it has more protein content which helps achieve that tender crumb we’re aiming for. Make sure to sift it before measuring—this aerates the flour and prevents any lumps from forming in your batter.
- 1 tbsp baking powder. This little powerhouse is what gives our cake its lift and lightness. It introduces tiny air bubbles into the batter as it bakes, creating that fluffy texture we crave. Always check your baking powder’s expiration date; if it’s old, it may not react properly and can lead to a dense cake instead of the airy delight we’re after.
- 1 tsp salt. Salt is often overlooked but trust me when I say it enhances all flavors in baked goods. It balances out sweetness and brings depth to your coconut flavor profile without making the cake taste salty at all—just perfectly balanced!
- 0.5 cup unsalted butter (room temperature). Butter adds richness and moisture to our cake while also contributing to its tender crumb when creamed properly with sugar until light and fluffy – this process is crucial! Room temperature butter blends seamlessly into the batter for optimal texture; if it’s too cold or melted, you’ll lose out on achieving that airy lift.
- 2 cups granulated sugar. Sugar isn’t just for sweetness; it also helps with browning due to caramelization during baking which gives us that lovely golden crust on our cakes! When beaten with butter, sugar creates air pockets which contribute further to fluffiness—so don’t rush this step!
- 1.25 cups unsweetened coconut milk (canned). This creamy liquid adds moisture as well as deep coconut flavor throughout the layers of your cake—it’s like capturing sunshine in a can! Be sure you choose unsweetened coconut milk so you can control the sweetness level yourself; otherwise, your cake might end up overly sweet.
- 1.5 tsp coconut extract. Using coconut extract amplifies that irresistible coconut flavor without being overpowering! A little goes a long way here; just think of it as enhancing what’s already there!
- 5 large egg whites. Egg whites are essential for achieving that lofty rise we want in our cake layers! They add structure without adding extra fat from yolks which keeps things light—a vital consideration for this tropical delight.
- 20 oz crushed pineapple (with juice). This bright fruit adds a refreshing zing along with natural sweetness! Not only does it bring moisture but also infuses bursts of flavor throughout every bite—just imagine sinking your teeth into those juicy nuggets amidst fluffy coconut layers.
- 0.66 cup granulated sugar (for filling). Sweetening our pineapple filling balances out its tartness beautifully! The added sugar will help thicken up our mixture while maintaining the fresh fruity essence we desire.
- 2 tbsp cornstarch. Cornstarch acts as a thickening agent for our pineapple filling; it’s what transforms those juicy bits into a spreadable filling rather than just syrupy fruit chunks! Make sure you mix this well into your pineapple before cooking—it’s crucial for achieving that perfect consistency.
- 0.5 cup unsalted butter (room temperature) (for frosting). Just like before, using room temperature butter ensures easy blending into creamy perfection when combined with cream cheese later on!
- 8 oz cream cheese (room temperature). Cream cheese lends richness and tanginess to our frosting while providing structure—the key here is ensuring it’s softened so we avoid any lumpy textures!
- 4 cups powdered sugar (up to 5 cups if needed). Powdered sugar sweetens our frosting while ensuring it reaches that perfect spreadable consistency without being overly thick or runny—add gradually until you reach your desired thickness!
- 1 tbsp coconut milk or milk (1–2 tablespoons, adjust as needed). A splash will help loosen up your frosting if needed; add incrementally until you find that perfect creamy texture—this step allows customization based on preference!
- 1 cup shredded sweetened coconut. Last but certainly not least, shredded coconut brings both texture and visual appeal! It creates an inviting finish atop our beautiful creation—it feels like putting sprinkles on top of happiness itself!
Equipment You’ll Need:
Before diving headfirst into baking bliss, let’s ensure we have all our tools handy! Having the right equipment makes every step smoother and ensures we achieve stellar results every time.
- Two 8-inch round cake pans – These will be essential for creating those gorgeous layers we’re after! Opt for pans made from heavy-duty materials so they conduct heat evenly—you want perfectly baked cakes without burnt edges or raw centers.
- Parchment paper – Lining your pans prevents sticking and makes removing those delicate layers easier than ever! Cut circles out for each pan bottom before greasing them lightly—it’s non-negotiable if you want cleanly sliced pieces!
- Mixing bowls – You’ll need at least two good-sized mixing bowls: one for dry ingredients and one for wet mixtures—keeping them separate ensures even mixing later on!
- Whisk/hand mixer or stand mixer – A whisk works wonderfully if you’re feeling energetic but using an electric mixer saves time while ensuring fluffy results when creaming butter and beating egg whites—it’s worth investing in quality tools here!
- Rubber spatula – This versatile tool helps scrape down sides effectively during mixing stages—we don’t want any stubborn clumps hiding away unnoticed!
With everything gathered together—the ingredients prepped beautifully alongside essential equipment—we’re ready now more than ever to dive deep into preparing this Coconut Cake with Pineapple Filling from scratch!
Step 1: Prepping Your Oven & Pans
First things first: preheat your oven to 350°F (175°C) because starting off strong sets us up for success! While that’s warming up nicely, grab those two 8-inch round cake pans you’ve prepared earlier—and line them with parchment paper before greasing their sides thoroughly too—it’ll save us heartache later when removing those beautiful cakes post-baking!
Step 2: Mixing Dry Ingredients
Now let’s turn attention towards combining dry ingredients by whisking together flour, baking powder, and salt inside one large bowl until evenly mixed—that’s important because we want these leavening agents dispersed properly throughout every bite later on! Set aside once completed so we can focus solely on creaming our butter next…
Step 3: Creaming Together Butter & Sugar
In another bowl (ideally using an electric mixer), cream room temperature unsalted butter along with granulated sugar until it’s lightened significantly—a process known as “creaming.” This step incorporates air bubbles creating lift during baking which leads us closer towards achieving fluffy perfection; don’t rush through this—it could take anywhere between 3–5 minutes depending upon mixer speed used—keep going until fully incorporated without any graininess remaining visible whatsoever!
Step 4: Incorporating Wet Components
Once creamed properly now pour in both canned unsweetened coconut milk alongside glorious fragrant coconut extract—beat everything together until smooth again ensuring no lumps remain visible before transitioning gradually towards adding dry mixture bit by bit until fully integrated—aiming here should focus primarily upon smooth batter consistency giving us confidence moving forward knowing we’ve handled each component thoughtfully thus far!
Stay tuned as I guide you through crafting luscious fillings alongside whipping up dreamy frostings soon enough—but trust me when I say every effort put forth now paves way towards ultimate tropical satisfaction ahead!
Step 5: Whipping Up the Egg Whites to Fluffy Perfection
Now comes a truly magical moment in our Coconut Cake with Pineapple Filling journey—the whipping of the egg whites. This step is absolutely paramount because it’s what gives our cake its light and fluffy texture, creating that irresistible melt-in-your-mouth experience we all crave. Grab your clean mixing bowl and electric mixer, then begin beating those egg whites on medium speed until they start to froth. This usually takes about 1-2 minutes. Once they reach soft peaks—those lovely billowy clouds that hold their shape but are still glossy—it’s time to turn up the speed to high. Keep an eye on them as you whisk; you want to stop beating once you see stiff peaks forming, which means when you lift your beaters out, the peaks should stand tall and proud without drooping.
This process is not just about whipping air into the egg whites; it’s about transforming them into a structural component of your cake. The proteins in the egg whites create a network that traps air, leading to a beautifully risen cake. If you accidentally overbeat them (which can happen if you get distracted), you risk drying out those precious clouds, resulting in a denser cake than intended. So trust me on this—take your time and really watch for those perfect stiff peaks before gently folding them into the batter. This gentle folding is crucial; we want to maintain all that airy goodness, so use a spatula and fold from the bottom of the bowl up and over, rotating as you go until just combined.
Step 6: Dividing and Baking Your Cake Layers
With our fluffy batter ready, it’s now time to divide it between our prepared cake pans. This step might seem straightforward, but it holds significance! Make sure each pan gets an even amount of batter so that your cake layers bake uniformly—this ensures they’ll stack beautifully later on without any awkward lopsidedness. I often find that using a kitchen scale can help here for precision; aim for about 1 ¾ cups of batter in each pan for perfect symmetry. Gently smooth the tops with an offset spatula or back of a spoon before placing them into your preheated oven.
Baking at 350°F (175°C) allows for an even rise and prevents the cakes from browning too quickly—a common pitfall when baking cakes at higher temperatures. Set your timer for 25 minutes but keep a close watch as baking times can vary based on your oven’s quirks. You’ll know they’re ready when the edges start pulling away slightly from the sides of the pan and a toothpick inserted into the center comes out clean or with just a few moist crumbs attached. Don’t be tempted to open that oven door too early; let those cakes rise uninterrupted! Once baked, allow them to cool in their pans for about 10 minutes before transferring them onto wire racks—this cooling phase allows steam to escape while helping set their structure, preventing any sogginess.
Step 7: Crafting Your Heavenly Pineapple Filling
While our cakes are cooling down to perfection, let’s shift our focus to crafting the utterly intoxicating pineapple filling—a showstopper all on its own! Start by combining your crushed pineapple (juice included), granulated sugar, and cornstarch in a medium saucepan over medium heat. Stir everything together until well combined; this mixture will form the base of your filling. As it heats up, keep stirring gently—it’s important to prevent any sticking or burning at this stage while also ensuring even cooking throughout.
You’ll notice that as it cooks for about 5-8 minutes, things will start to thicken up beautifully! This thickening occurs due to the cornstarch activating under heat—a little culinary magic that transforms juicy pineapple into a luscious filling that embodies tropical sunshine in every bite! Once it reaches a pudding-like consistency (think creamy but pourable), remove it from heat and allow it to cool completely before using it between those cake layers. Trust me on this one: letting this filling cool not only deepens its flavor but ensures it won’t melt through the delicate layers of cake when we assemble later.
Step 8: The Creamy Coconut Cream Cheese Frosting
As we venture into frosting territory—a vital component that ties everything together—let’s prepare ourselves for some serious indulgence with our coconut cream cheese frosting! In a large mixing bowl, combine room temperature butter and cream cheese using an electric mixer on medium speed until you achieve a smooth and creamy consistency—this usually takes around 2-3 minutes. The reason we’re using softened ingredients is simple: cold butter or cream cheese will lead to lumpy frosting instead of that silky smooth finish we desire.
Gradually add powdered sugar one cup at a time—you’ll want to mix on low speed at first until it’s incorporated before turning up the intensity. This approach prevents clouds of sugar from enveloping your kitchen! As you mix, add coconut milk little by little until you reach your desired frosting consistency; you want something spreadable but still firm enough to hold its shape when decorating. Remember that frosting should be rich yet balanced; it should complement rather than overwhelm our coconut cake layers’ delightful flavors.
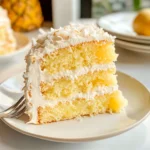
Final Touches: Assembling Your Tropical Delight
Now comes perhaps my favorite part—the assembly! It’s where all those individual components come together into one magnificent creation worthy of any celebration (or just because Tuesday feels like a good day!). Start by torting each cooled cake layer into two halves if you’re feeling adventurous; this not only adds height but also provides more opportunity for delicious filling in every slice! Place one layer on your serving platter or cake stand, then generously spread half of your tangy pineapple filling over its surface—this juxtaposition of sweet coconut against zesty pineapple creates such an extraordinary flavor dance!
Next up is frosting—spread a layer over the pineapple filling before adding another layer of cake on top. Repeat this process until all layers are stacked beautifully together! Don’t forget to frost around the sides as well as on top—this final coat is what gives us that stunning finish crowned with shredded sweetened coconut for decoration! I love pressing some onto the sides gently so each slice has bits peeking through like confetti celebrating this tropical delight!
Before slicing in, I highly recommend chilling your masterpiece for at least an hour if possible—it allows all those gorgeous flavors meld together harmoniously while firming up your frosting slightly for easier cutting later on. When you’re ready to serve this Coconut Cake with Pineapple Filling masterpiece, slice through with confidence—you’ve created something truly special worthy of sharing with friends and family over laughter-filled gatherings or cozy evenings at home!
And there we have it—a recipe brimming with love, memories, and flavors straight from paradise itself! Enjoy every bite knowing you’ve poured heart and soul into making something undeniably beautiful—and utterly delicious!
Storage and Enjoyment Tips for Your Coconut Cake with Pineapple Filling
Now that you’ve poured your heart into crafting this Coconut Cake with Pineapple Filling, it’s time to revel in its tropical splendor! Picture the fluffy layers, the tangy pineapple filling, and that creamy frosting—it’s an experience that wraps you in warmth like a hug from a dear friend. But what happens when you have leftovers? No worries! This delightful cake is just as fantastic the next day (or even after) if stored properly. Let’s dive into how to keep this masterpiece fresh for your future enjoyment.
Storing Leftover Coconut Cake with Pineapple Filling
To preserve every luscious bite of your Coconut Cake with Pineapple Filling, I recommend storing it in an airtight container at room temperature if you plan to enjoy it within a couple of days. However, if you’re like me and want to ensure its freshness lasts longer, refrigeration is the way to go. Wrapped tightly in plastic wrap or placed in a sealed container, this lovely cake can last up to about a week in the fridge. If you’re concerned about maintaining its moistness, try placing a slice of bread in the container alongside your cake; it works wonders! Not only will it keep the cake from drying out, but it’ll also impart a delightful softness that makes every slice feel fresh as the day it was baked. After storage, you may notice that the flavors meld beautifully together—almost like they’re enjoying their own little vacation! For serving, simply let it sit at room temperature for about 30 minutes before slicing; this little trick enhances those delightful flavors and textures we all adore.
Freezing Components for Later
If you find yourself wanting to save some of this tropical goodness for another day—or perhaps you just want to be prepared for an impromptu gathering—freezing is your best friend! To freeze your Coconut Cake with Pineapple Filling effectively, slice it into individual pieces and wrap each slice tightly in plastic wrap before placing them in a freezer-safe bag or container. This way, each piece will be protected from freezer burn and maintain its delicious integrity. When properly stored, your cake can stay fresh in the freezer for up to three months! When you’re ready to indulge again, simply take out a slice and let it thaw in the refrigerator overnight or at room temperature for a few hours. The convenience of having this delectable dessert ready to go is truly fantastic—you’ll feel like a superstar baker every time you pull out a slice!
Coconut Cake with Pineapple Filling
Indulge in a slice of paradise with our Coconut Cake with Pineapple Filling! This delightful dessert combines fluffy layers of coconut cake with a zesty pineapple filling and creamy coconut cream cheese frosting, creating a symphony of tropical flavors. Perfect for birthdays, summer gatherings, or simply treating yourself, this cake invites friends and family to share joyful moments together. The refreshing combination of sweet coconut and tangy pineapple will transport you to sun-soaked beaches with every bite. Easy to make and beautifully layered, this cake is not just a dessert; it’s an experience that promises to add sunshine to any occasion.
- Prep Time: 30 minutes
- Cook Time: 25 minutes
- Total Time: 55 minutes
- Yield: Serves approximately 12 slices 1x
- Category: Dessert
- Method: Baking
- Cuisine: Tropical
Ingredients
- 2 cups all-purpose flour
- 1 tbsp baking powder
- 1 tsp salt
- 0.5 cup unsalted butter (room temperature)
- 2 cups granulated sugar
- 1.25 cups unsweetened coconut milk (canned)
- 1.5 tsp coconut extract
- 5 large egg whites
- 20 oz crushed pineapple (with juice)
- 0.66 cup granulated sugar (for filling)
- 2 tbsp cornstarch
- 8 oz cream cheese (room temperature)
- 4 cups powdered sugar
Instructions
- Preheat your oven to 350°F (175°C). Grease and line two 8-inch round cake pans with parchment paper.
- In a bowl, whisk together flour, baking powder, and salt; set aside.
- In another bowl, cream room temperature butter and sugar until light and fluffy. Gradually mix in coconut milk and coconut extract until smooth.
- Add the dry ingredients gradually to the wet mixture, mixing until just combined.
- Whip egg whites in a separate bowl until stiff peaks form; gently fold into the batter.
- Divide the batter evenly between the prepared pans and bake for about 25 minutes or until a toothpick comes out clean.
- While cooling, prepare the pineapple filling by combining crushed pineapple, sugar, and cornstarch in a saucepan over medium heat until thickened.
- For frosting, beat room temperature cream cheese and butter together before gradually adding powdered sugar until creamy.
- Assemble the cake by layering with pineapple filling between layers and frosting on top.
Nutrition
- Serving Size: 1 slice (90g)
- Calories: 320
- Sugar: 34g
- Sodium: 180mg
- Fat: 12g
- Saturated Fat: 7g
- Unsaturated Fat: 3g
- Trans Fat: 0g
- Carbohydrates: 48g
- Fiber: 1g
- Protein: 3g
- Cholesterol: 35mg