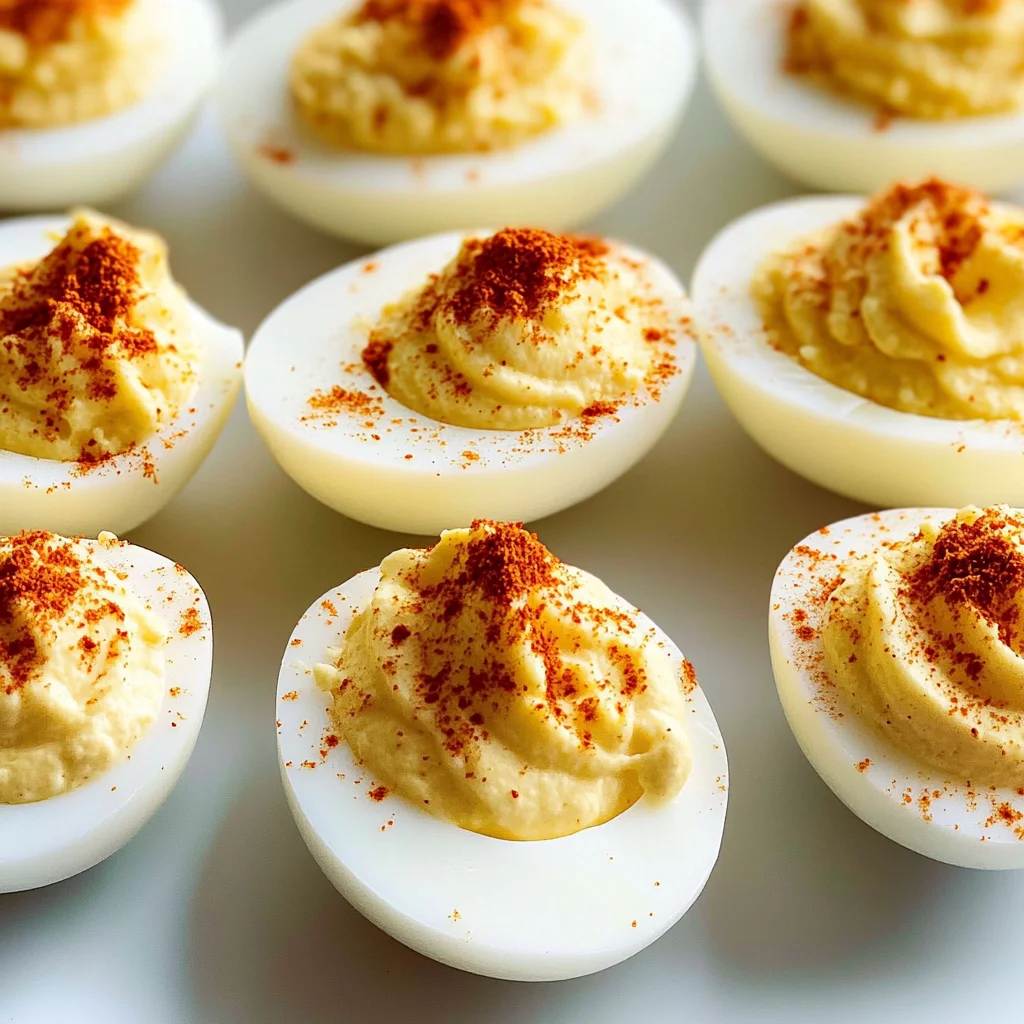
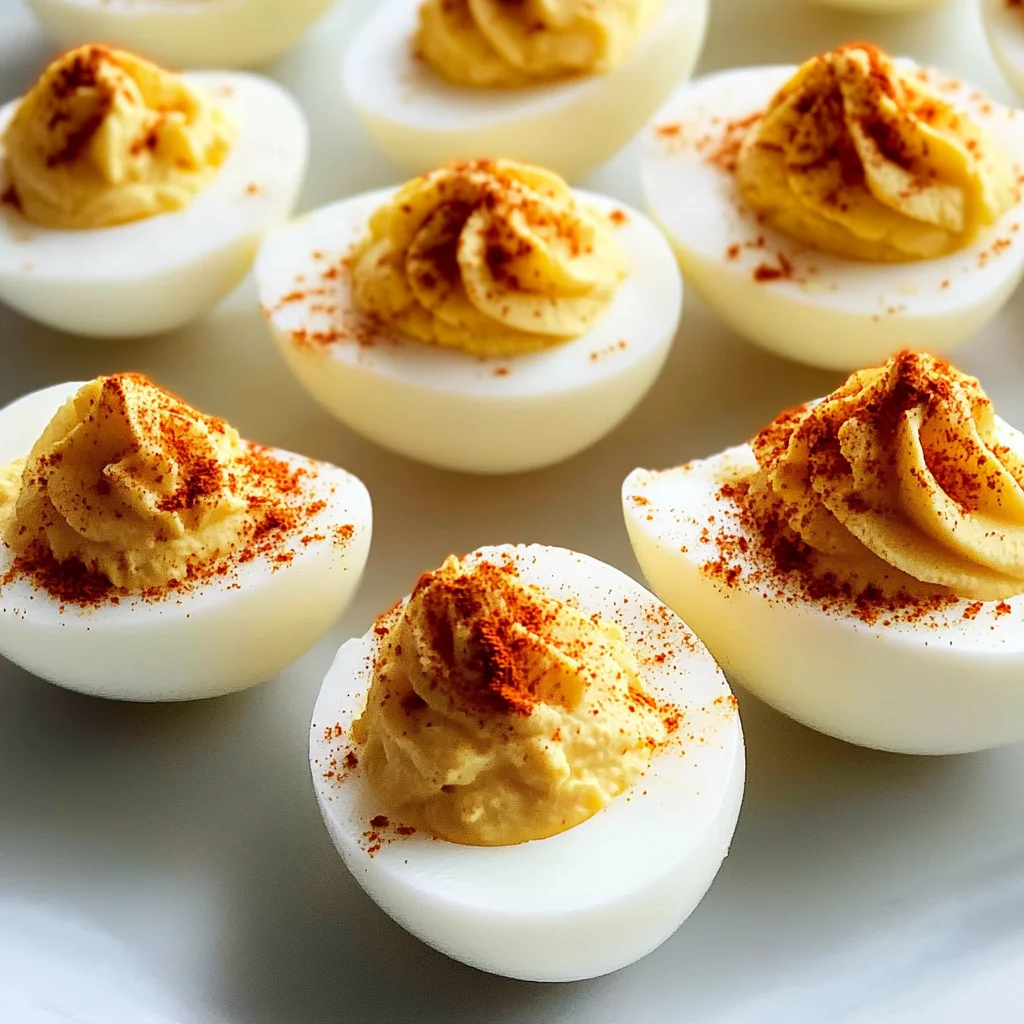
BEST Deviled Eggs Recipe
There’s something profoundly satisfying about biting into a deviled egg, don’t you think? Those creamy yolks nestled in delicate whites are more than just a snack; they evoke memories of family gatherings, picnics in the sun, and celebrations that linger long after the last bite. My heart has always been captivated by how this humble dish can bring people together, merging simplicity with flavor in a way that feels utterly extraordinary. The BEST Deviled Eggs Recipe is not just about the eggs; it’s a journey through taste and texture, each element playing its part in a delightful symphony. Imagine the smoothness of the yolk mingling with the richness of mayonnaise and the zing of mustard—each mouthful is like a little gift to your senses.
As we delve into this recipe, I want you to embrace the experience fully. It’s more than just following steps; it’s about understanding why each ingredient matters and how they come together to create something truly special. Whether you’re serving them at your next party or simply enjoying them as a snack at home, I promise you will find joy in every aspect of making these deviled eggs. Trust me on this—it’s an adventure worth taking!
BEST Deviled Eggs Recipe: A Classic with a Twist
Deviled eggs are an all-time favorite in many households, and this version is my go-to for their perfect balance of creaminess and tanginess. Each bite is like a warm hug from the inside, and they work wonderfully as appetizers or snacks at any gathering. Let’s embark on this culinary journey together!
Ingredients:
As we prepare to whip up these delectable deviled eggs, let’s take a moment to appreciate each ingredient’s role in creating our masterpiece.
- 6 large eggs. These beauties are the star of our show! When selecting eggs, freshness is key. Look for eggs with clean shells, as any cracks can lead to bacteria entering. Large eggs are ideal here because they yield a good amount of yolk for that luscious filling we’re aiming for. When boiled perfectly, the whites should be tender yet firm without being rubbery—a texture that makes every bite melt in your mouth.
- 3 tablespoons mayonnaise. This ingredient adds that rich creaminess we crave in our deviled eggs. It acts as the binding agent that holds everything together while also bringing moisture and flavor to the filling. I recommend using high-quality mayonnaise; trust me when I say it makes all the difference! If you’re feeling adventurous or want to make it lighter, consider substituting with avocado or Greek yogurt for an equally delightful twist.
- 1 teaspoon Dijon mustard. Ahh, Dijon mustard—the secret weapon! Its sharpness cuts through the richness of the mayo and yolks beautifully, adding depth to our flavor profile. It provides a zesty kick that enhances every component without overpowering it. If you prefer something milder, yellow mustard works too but expect a different flavor nuance.
- 1 teaspoon apple cider vinegar. This tangy addition elevates our filling by brightening up all those rich ingredients with its acidity—think of it as adding sunshine to your dish! It balances out flavors while also enhancing overall freshness. If you don’t have apple cider vinegar on hand, white wine vinegar can be a great substitute.
- Kosher salt and ground black pepper (to taste). These seasonings are essential for enhancing flavors without overwhelming them; they bring out the best in every bite! Kosher salt is preferred here due to its coarser texture which allows for even seasoning throughout without clumping. Ground black pepper adds warmth and complexity—don’t skip these!
- Paprika (for garnish). The finishing touch! A sprinkle of paprika not only adds color but infuses a subtle smokiness that complements all those creamy elements perfectly—it’s what makes your deviled eggs look as good as they taste! You could even experiment with smoked paprika for an added dimension.
Equipment You’ll Need:
Having the right tools makes all the difference between cooking being a chore or an absolute joy! Each piece of equipment plays its role like trusted companions on this culinary journey.
- Medium-sized pot – This will be your trusty vessel for boiling those precious eggs! Choose one that comfortably fits all six eggs without cramming them together; overcrowding can lead to uneven cooking.
- Skimmer or slotted spoon – An essential tool for safely lowering those fragile eggs into boiling water without cracking them. It’s gentle yet effective—just like cradling something precious!
- Ice bath bowl – You’ll need a large bowl filled with ice water ready to go when your timer dings! This step cools down the eggs rapidly after boiling which prevents overcooking and results in perfectly tender whites.
- Mixing bowl – A simple yet vital component where you’ll combine yolks and other ingredients into luscious filling perfection!
- Spoon (or piping bag) – To fill those egg whites back up with our delicious mixture! A spoon works perfectly well if you’re going for simplicity; however, if you want that professional touch, using a piping bag will give you beautiful swirls every time.
Now that we’ve gathered everything we need let’s dive into preparing our BEST Deviled Eggs Recipe!
Step 1: Bring Water to Boil
Start by filling your medium-sized pot with enough water to cover all six large eggs by an inch or so when they’re added—this ensures even cooking throughout each egg’s surface area. Place it over high heat until it reaches a vigorous boil; then reduce heat slightly but maintain strong bubbles—that’s crucial for achieving firm yet tender whites! Once boiling consistently, lower each egg gently using your skimmer or slotted spoon; this prevents sudden shocks that might crack their delicate shells.
Step 2: Set Your Timer
After placing those lovely eggs into boiling water, increase heat back up slightly until it resumes bubbling vigorously again—and here’s where timing becomes paramount! Set your timer for precisely 14 minutes—this duration ensures perfect hard-boiling while allowing sufficient cooking time for yolks without risking greenish discoloration around their edges from overcooking.
Step 3: Create Your Ice Bath
While waiting patiently (and maybe dreaming about how delicious these deviled creations will be), prepare an ice bath by mixing equal parts cold water and ice cubes in your large bowl—it should feel icy cold upon touching! As soon as those 14 minutes have passed (trust me—you’ll know!), use your skimmer once more to carefully transfer each boiled egg straight into this frosty oasis—this shockingly cold treatment stops cooking instantly while aiding peeling later on!
Step 4: Peel & Slice
Once cooled completely (about 10 minutes), take one egg at a time from its icy bath—you’ll notice how effortlessly they peel thanks to our earlier efforts! Gently tap each egg against hard surface before rolling lightly until cracks form evenly around entire shell—it should come off quite smoothly revealing pristine white layers beneath! Carefully slice them lengthwise down center using sharp knife ensuring clean cuts so yolks stay nestled within halves nicely intact waiting patiently till filled with decadence ahead!
Continuing through these steps will set you on track toward creating something truly memorable—not just any deviled egg but rather the BEST Deviled Eggs Recipe you’ve ever tasted! Stay tuned as we craft our luscious filling next…
Step 5: The Art of Filling the Eggs
Now that your yolk mixture is beautifully smooth and creamy, we’ll dive into the delightful process of filling those egg whites. Trust me, this step is not just about spooning the yolk mixture into the halves; it’s a moment to showcase your creativity! Using a simple spoon, gently scoop a generous portion of that luscious deviled egg filling and place it back into the hollow center of each egg white. You want to aim for a nice rounded mound—think of it as a little peak of joy waiting to be devoured!
But if you’re feeling adventurous and want those eggs to look extra fancy, consider using a piping bag. Fill it with your yolk mixture, cut off a small section at the tip, and pipe it into the egg whites for an elegant presentation. This adds a professional touch that will surely impress your friends and family. Remember, there’s no right or wrong way here; what matters most is that you have fun with the process! The creamy filling will nestle perfectly into the whites, creating a visual feast that mirrors the flavor explosion awaiting each bite.
Step 6: The Perfect Paprika Finishing Touch
Ahh, now we arrive at one of my favorite parts—the garnish! It might seem like a small detail, but I promise you, sprinkling paprika on top is absolutely paramount for achieving that final layer of flavor and visual appeal. Just take a pinch between your fingers and let it gently cascade over each filled egg. Not only does paprika add a beautiful splash of color—turning these deviled eggs into eye-catching little works of art—but it also contributes an earthy warmth that complements the creamy filling splendidly.
Why is this step so important? Well, think about how our taste buds are activated long before we take that first bite; they respond to visuals too! That sprinkle of paprika invites anticipation and excitement. Plus, there’s something undeniably charming about a classic deviled egg dressed in its signature seasoning. Make sure to choose high-quality paprika for maximum flavor impact—smoked paprika can also add an extra depth if you’re feeling daring!
Step 7: Chilling Out—The Importance of Resting Time
Once your deviled eggs are adorned with their paprika crowns, it’s time to give them some love by allowing them to chill in the refrigerator for at least 15-20 minutes before serving. I know we live in an age where instant gratification is key, but trust me on this: patience is essential here! Chilling not only enhances flavors but also allows the texture to firm up slightly, making every bite even more satisfying.
As they chill, think about what happens during this transformative period. The cool environment allows all those delicious flavors to meld together beautifully—they start to harmonize like notes in a symphony! When you finally serve them after this resting period, you’ll notice how much richer and more cohesive each taste has become. It’s like giving your dish some time to breathe before presenting it—a non-negotiable step if you want truly extraordinary results!
Step 8: The Grand Finale—Serving Your BEST Deviled Eggs Recipe
Now comes perhaps the most exciting moment—the grand unveiling of your glorious deviled eggs! Carefully remove them from the refrigerator and present them on an enticing platter or individual serving plates. You can even dress up your platter with fresh herbs or colorful veggies around them—it’s all about making this dish visually captivating! As you set them down at your gathering (or just for yourself!), take a moment to appreciate all the love and care that went into creating these beauties.
When your guests take their first bites—and I can’t stress this enough—you’ll witness pure joy in their expressions as they experience that perfect balance of creaminess from the yolk mixture paired with the lightness of the egg white. Each mouthful will send waves of flavor dancing across their taste buds! So gather everyone around, share stories while savoring these delightful treats together—and remember: cooking isn’t just about food; it’s about connection. Enjoy every moment because you’ve created something truly special!
Conclusion:
As we wrap up this culinary journey through my BEST Deviled Eggs Recipe, I can’t help but feel excited about the simple yet profound pleasure they bring. From boiling those perfect eggs to mixing up that creamy filling spiked with just the right amount of tanginess from apple cider vinegar, every step is infused with love and care. These deviled eggs are more than just an appetizer; they’re an experience—a beautiful harmony of textures and flavors that dance on your palate and leave everyone smiling.
This recipe truly is a must-try not only because they taste fantastic but also because making them is such a joyous activity. Imagine gathering your loved ones around as you whip up these delectable bites together; it’s an opportunity to bond over cooking while creating something that will surely impress at any gathering—from casual picnics at the park to elegant holiday dinners. Picture pulling out that platter filled with gorgeous deviled eggs; it’s sure to create an atmosphere filled with laughter and conversation as everyone digs in!
For serving suggestions, imagine savoring one with a refreshing cucumber salad on a warm summer day or pairing them alongside crispy veggie sticks for an afternoon pick-me-up. They also shine brilliantly when served next to grilled meats or seafood during backyard barbecues—adding that perfect touch of creaminess amid all those bold flavors. And if you’re feeling adventurous? Consider serving these beauties with spicy sriracha drizzled on top or experimenting by folding in some finely chopped herbs like dill or chives into the filling—it elevates each bite into something truly extraordinary!
Feeling adventurous? This recipe is wonderfully adaptable! You could swap out mayo for Greek yogurt for a healthier twist or sprinkle some crumbled feta cheese atop for added richness. Maybe even try adding diced jalapeños for a spicy kick or incorporating avocado into your yolk mixture for that creamy texture without any guilt! Each variation brings its own flair while still honoring that classic flavor we all adore so much. I wholeheartedly invite you all to dive into this experience—create your version of these deviled eggs and share your delightful creations with friends and family! Let’s connect over our shared love for food; I simply can’t wait to hear about your adventures in making this fabulous dish!
BEST Deviled Eggs Recipe

Experience the joy of creating the BEST Deviled Eggs Recipe—a delightful blend of creamy yolks, zesty mustard, and tangy apple cider vinegar. Perfect for parties, picnics, or simply as a tasty snack, these deviled eggs are a crowd-pleaser that brings warmth and comfort to any gathering. Each bite offers a harmonious balance of flavors that will leave your guests raving and asking for more. Easy to prepare and endlessly adaptable, this classic dish can also accommodate various dietary preferences with simple ingredient substitutions. Let’s dive into this culinary adventure and whip up a batch of these irresistible bites!
- Prep Time: 15 minutes
- Cook Time: 14 minutes
- Total Time: 29 minutes
- Yield: Makes 12 deviled egg halves (serves 6) 1x
- Category: Appetizer
- Method: Boiling
- Cuisine: American
Ingredients
- 6 large eggs
- 3 tablespoons mayonnaise
- 1 teaspoon Dijon mustard
- 1 teaspoon apple cider vinegar
- Kosher salt and ground black pepper (to taste)
- Paprika (for garnish)
Instructions
- Boil the eggs in a medium-sized pot for precisely 14 minutes.
- Transfer the boiled eggs to an ice bath for about 10 minutes to cool.
- Peel the eggs gently and slice them in half lengthwise.
- Scoop out the yolks into a mixing bowl; add mayonnaise, mustard, vinegar, salt, and pepper. Mix until smooth.
- Spoon or pipe the yolk mixture back into the egg whites.
- Garnish with paprika before serving.
Nutrition
- Serving Size: 1 egg half (25g)
- Calories: 70
- Sugar: 0 g
- Sodium: 60 mg
- Fat: 5 g
- Saturated Fat: 1 g
- Unsaturated Fat: 4 g
- Trans Fat: 0 g
- Carbohydrates: 1 g
- Fiber: 0 g
- Protein: 6 g
- Cholesterol: 186 mg