Carrot Cake Cobbler
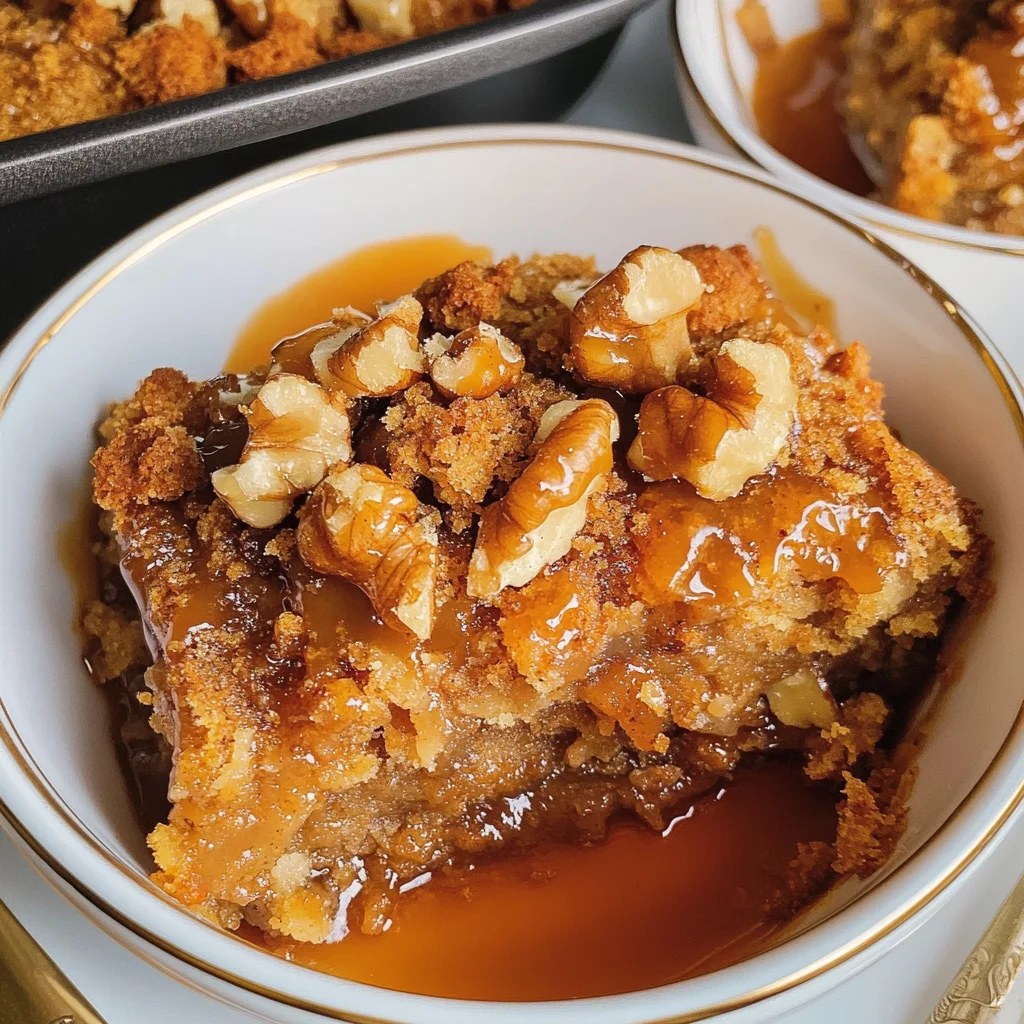
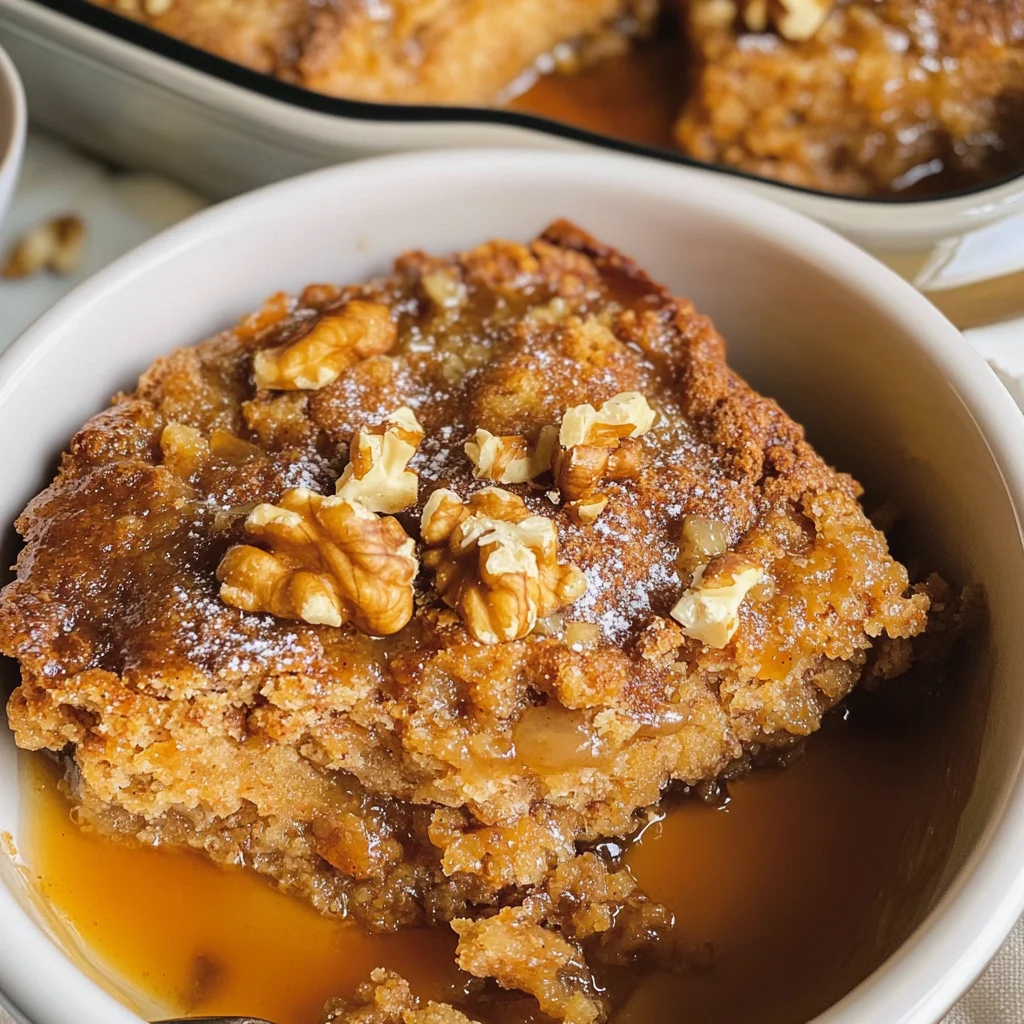
Carrot Cake Cobbler is more than just a dessert; it’s an experience that beautifully intertwines the warmth of tradition with a delightful twist. Imagine this: a soft, spiced cake layer that floats gently on top of a luscious pool of hot caramel sauce. As I take my first bite, the sweetness of the carrot mingles with the aromatic spices—cinnamon, nutmeg, and cloves—that dance on my palate, reminding me of joyful family gatherings and laughter-filled kitchens. This Carrot Cake Cobbler is not just for Easter; it’s a celebration of life itself, perfect for any gathering where you want to impress your loved ones while indulging in something utterly delicious.
What I love most about this recipe is its simplicity paired with its profound richness in flavor. The beauty lies in its contrasting textures—the fluffy cake juxtaposed against the gooey caramel sauce creates a symphony of flavors that is both comforting and exciting. I promise you, once you serve this at your next family feast or friendly get-together, it will vanish faster than you can say “seconds, please!” The joy of watching your friends and family savor each bite will warm your heart as much as the cobbler warms your kitchen.
Carrot Cake Cobbler: A Heavenly Fusion of Cake and Caramel
Welcome to your new favorite dessert! This Carrot Cake Cobbler brings together the best elements of carrot cake and cobbler into one delightful dish that feels like a warm hug on a plate. With its fragrant spices and sweet notes, every bite feels like springtime has bloomed right in your mouth!
Ingredients:
As we embark on this culinary journey together, let’s take a moment to appreciate each ingredient that plays a vital role in creating this masterpiece. Each component contributes uniquely to the flavor profile and texture, ensuring that every bite is nothing short of extraordinary.
- 1 cup all-purpose flour (+ 3 tablespoons). Flour serves as the backbone of our cobbler. It provides structure to our cake layer while ensuring it has a lovely crumb. When selecting flour, opt for all-purpose flour without any additives for optimal results—this ensures your cake has just the right amount of lift without being overly dense or dry. If you’re looking to add a little more depth to the flavor, consider using whole wheat flour mixed with regular flour; just remember to adjust the liquid slightly since whole wheat absorbs more moisture.
- 2 teaspoons baking powder. This ingredient is crucial for creating that light and airy texture we all crave in baked goods. Baking powder releases carbon dioxide when activated by moisture and heat, helping our cake rise beautifully while avoiding any heaviness. Always check the expiration date before using baking powder; if it’s old or expired, you won’t achieve that fluffy result we’re aiming for.
- 1/2 teaspoon salt. Salt might seem minor in desserts, but it enhances flavors remarkably well! It balances out sweetness and brings forth the natural flavors in our other ingredients—think of it as a secret weapon every baker should have at their disposal! Use fine sea salt for better blending within the batter—coarse salt can create unexpected bursts.
- 3/4 cup granulated sugar. Sugar isn’t just about sweetness; it helps retain moisture within our cobbler, resulting in an incredibly tender texture. Granulated sugar also aids in browning during baking due to caramelization—a key factor in achieving that golden top layer we adore! If you’re looking for alternatives, coconut sugar can provide a unique flavor twist while being slightly less sweet.
- 1 teaspoon cinnamon. Ahh, cinnamon—the spice that whispers comfort! It adds warmth and depth to our dessert with its aromatic notes that evoke cozy memories around holiday tables. Freshly ground cinnamon will elevate your dish even further; try to avoid pre-ground varieties if possible as they often lose potency over time.
- 1/2 teaspoon nutmeg. Nutmeg adds complexity and intrigue with its slightly sweet yet spicy essence—it’s like adding magic dust! A little goes a long way here; too much can overpower other flavors. If you have whole nutmeg on hand, grate it fresh for an unparalleled aroma!
- 1/2 teaspoon cloves. Another powerhouse spice! Cloves bring an earthy richness that’s simply irresistible when combined with carrots and sugar—they play wonderfully off each other! Just like nutmeg, use sparingly so it doesn’t dominate.
- 1/2 cup unsweetened applesauce. This delightful ingredient not only replaces some fat but also imparts natural sweetness and moisture into our batter without overwhelming it! Plus, applesauce gives us beautiful tenderness—trust me when I say this ingredient is non-negotiable if you’re after perfection!
- 1/4 cup milk. Milk enriches our batter while providing additional moisture needed for successful baking—it helps bind everything together harmoniously! Choose whole milk or even oat milk for dairy-free options; both will produce fantastic results.
- 1/4 cup melted butter (or vegetable oil). Butter brings richness along with flavor—it creates those gorgeous buttery notes we expect from baked goods while aiding browning as well! If opting for vegetable oil instead, go for refined versions so they don’t interfere with flavors; grapeseed oil works excellently here!
- 1 1/2 teaspoons vanilla extract. Vanilla adds an unmistakable warmth—a must-have ingredient that rounds out flavors beautifully while also enhancing sweetness perception subtly but effectively!
- 1 cup grated carrot. Freshly grated carrots lend natural sweetness while adding moisture content—plus they contribute vibrant color too! Aim for finely grated pieces so they integrate seamlessly into batter without clumping together later during baking.
- 1/3 cup granulated sugar (for topping). This additional sprinkle atop ensures extra sweetness paired perfectly against any slight bitterness from spices used earlier—it’s all about balance here!
- 1/3 cup brown sugar (for topping). Brown sugar introduces molasses notes which further deepen flavor profiles—it works wonders alongside walnuts bringing texture contrasts too!
- 1/4 cup chopped walnuts (or pecans). Nuts offer crunchiness against softness found within cake layers plus add delightful earthy undertones too! Choose toasted nuts whenever possible—they’ll amplify those already wonderful aromas throughout baking process!
- 1 1/2 cups very hot water. Yes—you read correctly! Hot water poured over everything magically transforms our mixture into something truly spectacular during baking; don’t skip this step because without it we’d miss out entirely on sumptuous caramel sauce beneath!
Equipment You’ll Need:
Having the right tools can truly transform your cooking experience from daunting to delightful! Let’s gather some essential equipment that will be our trusty companions on this culinary adventure—each tool plays its part in crafting perfection.
- Mixing bowls (medium & small) – Essential for combining dry ingredients separately from wet ones—and having various sizes means no unnecessary mess either! Opting for glass bowls allows you visibility during mixing which makes measuring easier too!
- Whisk – A must-have tool when creating batters—it helps aerate ingredients quickly leading us toward fluffy outcomes every baker dreams about achieving effortlessly!
- Grater or food processor – For grating those carrots swiftly; trust me—you’ll thank yourself later when saving time becomes paramount especially if preparing multiple dishes simultaneously!
- 8-inch rectangular casserole dish with high sides – This is vital since we’re layering ingredients carefully here; high sides prevent overflow during baking ensuring no sticky situation arises unexpectedly—trust me on this one!
- Baking sheet – Placing underneath casserole dish catches any potential drips making cleanup post-baking so much easier—as someone who loves cooking but dislikes cleaning up afterward—I wholeheartedly endorse investing time finding appropriate tools beforehand!
Step 1: Preheat Your Oven
Let’s kick things off by preheating your oven to 350°F (175°C). This step may seem simple but trust me—it’s absolutely paramount because starting with a hot oven helps ensure even cooking throughout our dessert once assembled! While waiting patiently for those heating elements inside work their magic (and fill your kitchen with anticipation), take this opportunity to gather all ingredients listed above according to their respective measurements—we want everything ready before diving into mixing bowls later on!
Step 2: Combine Dry Ingredients
In a medium-sized bowl, stir together 1 cup flour plus an additional 3 tablespoons along with 2 teaspoons baking powder, ½ teaspoon salt, ¾ cup granulated sugar plus all those beautiful spices: cinnamon (1 tsp), nutmeg (½ tsp), and cloves (½ tsp). Remember—the order matters here: whisking these components creates harmony among them allowing flavors meld together beautifully once added into wet mixtures later down line—this process known as “sifting” promotes uniform distribution preventing clumps whilst providing aeration yielding lighter cakes overall! Set aside once well-combined because soon enough we’ll blend wet elements ensuring fluffy batter forms effortlessly afterward.
Step 3: Mix Wet Ingredients
In another smaller bowl (yes—you guessed it!), combine half-cup unsweetened applesauce followed by quarter-cup milk along side melted butter or vegetable oil (your choice!) plus fragrant vanilla extract (1½ tsp) along finally freshly grated carrot (whole cup!). Whisk together until smooth consistency achieved—don’t worry if mixture appears slightly thicker than expected—that’s precisely what we’re aiming towards since thicker batters tend yield denser cakes which work perfectly beneath bubbling caramel sauce awaiting us shortly thereafter…
Step 4: Create The Batter
Now comes one of my favorite parts—pouring those glorious wet ingredients directly into dry mixture prepared earlier then gently folding them until fully combined means no over-mixing occurs ensuring tender crumb structure remains intact throughout bake cycle ahead! Once blended thoroughly pour entire contents evenly across bottom surface small rectangular casserole dish previously set aside earlier readying ourselves next step which gets even more exciting…
I can’t wait to guide you through pouring hot water over everything next—we’re inching ever closer towards creating magic here together! Stay tuned as we continue crafting this unforgettable dessert experience…
Step 5: Layering the Sweetness
Now that you’ve poured your thick batter into the casserole dish, it’s time to build layers of flavor that will elevate your Carrot Cake Cobbler to something truly spectacular. In a separate bowl, combine the remaining granulated sugar, brown sugar, and chopped walnuts (or pecans if you prefer a softer crunch). The combination of these sugars is essential because it creates not only a delightful sweetness but also an irresistible caramel-like topping as it bakes. The nuts add texture and a nutty depth that complements the soft, moist cake beautifully. You want to ensure this mixture is well blended before gently spreading it evenly over the top of your batter. This step is crucial because it allows for an even distribution of flavors throughout the cobbler as it bakes.
Now here’s the magic: once you’ve spread the sugar-nut mixture over the batter, you’ll pour very hot water over everything. Yes, you read that right—hot water! This may seem counterintuitive at first, but trust me on this one. The hot water will create a luscious sauce at the bottom of your cobbler while the cake rises beautifully above it, forming that perfect contrast between soft cake and gooey caramel sauce. As you pour, make sure not to stir or mix; just let the water cascade over everything. It’s like giving your dessert a warm bath before it heads into the oven! The end result will be a stunning interplay of textures and flavors that will leave everyone swooning.
Step 6: Baking Your Perfect Carrot Cake Cobbler
Once your masterpiece is assembled with all its layers in place, it’s time to slide this beauty into your preheated oven set to 350°F (175°C). Baking is where all those lovely components meld together into one harmonious dessert experience! Bake for about 40-50 minutes, but keep an eye on things during the last ten minutes because oven temperatures can vary widely. You’ll know your cobbler is done when the middle appears set and no longer wobbles when gently shaken—this visual cue is absolutely non-negotiable for ensuring each bite holds its shape while still being moist.
As you wait, your kitchen will be filled with an utterly intoxicating aroma—a sweet symphony of cinnamon and caramel enticing everyone nearby. I can’t tell you how many times I’ve taken this out of the oven only to find family members hovering around, eagerly anticipating their first taste! Just remember to place your casserole dish on a baking sheet; sometimes desserts can bubble over during baking, creating unnecessary messes that we definitely want to avoid! So give yourself peace of mind by placing a simple sheet beneath—all part of making this process enjoyable.
Step 7: Cooling Down Before Indulgence
Once your Carrot Cake Cobbler has baked to perfection and your senses have been thoroughly tantalized by those heavenly smells wafting through the air, don’t rush this critical cooling phase. Allowing your cobbler to cool for about 5-10 minutes before digging in might seem tedious at first glance; however, I promise you this step transforms everything. Cooling gives the sugars time to settle and thicken slightly into that rich caramel sauce we’re all dreaming about. If served too soon, you might find yourself with a delicious mess instead of those delightful layers we worked so hard for!
During this brief waiting period, take a moment to prepare any additional toppings—perhaps some extra chopped nuts or a scoop of cheesecake-flavored ice cream would do wonders? Picture this: warm cake contrasted with cold ice cream melting into every crevice and blending with that luscious hot caramel sauce… Can you see why patience pays off? Trust me; it’s worth every second spent waiting!
Step 8: Serving Up Your Slice of Happiness
Finally, it’s time for what you’ve been eagerly anticipating—serving up slices of this divine Carrot Cake Cobbler! Using a spatula or large spoon (even better if it’s slightly warmed), carefully slice through the layers so each piece contains both cake and that beautiful caramel sauce beneath. The sight alone should send shivers down your spine—the golden-brown top glistening invitingly above pools of dark amber goodness below!
When plating up each serving, consider drizzling a little extra warm caramel sauce from the bottom over top—you’d be amazed at how just one additional drizzle can elevate this dessert from delectable to downright extraordinary! And don’t forget those added toppings: sprinkle on some extra chopped nuts for texture or add that scoop of cheesecake ice cream alongside—it’s like adding an elegant flair that turns comfort food into fine dining right at home!
Every bite is nothing short of profound satisfaction; its warmth envelops you like a cozy hug while vibrant spices dance on your palate. You’ll realize then why sharing recipes like these becomes our cherished traditions—because nothing beats gathering around good food with loved ones. Enjoy every moment—you deserve it!
Storage and Enjoyment Tips for Your Carrot Cake Cobbler
Now that your Carrot Cake Cobbler has emerged from the oven, bubbling with anticipation and wafting an irresistible aroma, it’s time to dig in! But before you do, let’s talk about how to preserve this delightful creation so you can savor every last bite long after the first slice. Trust me, knowing how to store your dessert properly ensures that each taste remains just as delicious as when it was first served.
Storing Leftover Carrot Cake Cobbler
To keep your Carrot Cake Cobbler fresh and flavorful, I recommend transferring any leftovers into an airtight container. This is absolutely paramount; it protects the cobbler from drying out or absorbing unwanted odors lurking in your fridge. Ideally, it would be best to store it in a cool, dark place like the refrigerator where it can stay fresh for up to four days. If you want to maintain its moist texture, consider placing a slice of bread inside the container—this little trick works wonders by keeping things tender! After storage, you’ll find that the flavors have melded beautifully, creating a more profound depth of taste that’s truly magical. When you’re ready to indulge again, simply reheat individual servings in the microwave for about 20-30 seconds or pop them into a warm oven until warmed through. Nothing beats that cozy feeling of enjoying a comforting dessert from your own kitchen!
Freezing Carrot Cake Cobbler for Later
If you want to save some of this heavenly delight for a later date (which I wholeheartedly endorse!), freezing is a fantastic option! Allow the cobbler to cool completely before slicing it into portions and wrapping each piece tightly in plastic wrap or aluminum foil. Then, place them in a freezer-safe container or bag and label with the date—this way, you’ll know exactly how long it’s been tucked away! Properly stored, your Carrot Cake Cobbler will keep well frozen for up to three months. When you’re ready to enjoy a slice from the freezer, simply remove it and let it thaw overnight in the fridge or reheat straight from frozen in the oven at 350°F until warmed through. The convenience factor here is undeniable; imagine having this sweet treasure on hand for unexpected guests or a midnight snack craving. It’s like having a little piece of joy waiting just for you!
Carrot Cake Cobbler
Carrot Cake Cobbler is a delightful dessert that effortlessly combines the comforting flavors of spiced carrot cake with a gooey caramel sauce. This dish offers a warm and inviting experience, perfect for gatherings or cozy evenings at home. Each bite reveals a harmonious blend of cinnamon, nutmeg, and cloves, complemented by the sweetness of grated carrots. The fluffy cake layer rests atop a luscious pool of caramel, making it an unforgettable treat that promises to impress your family and friends. Serve it warm, perhaps with a scoop of ice cream or a drizzle of whipped cream, for an indulgent dessert that celebrates the joy of sharing good food.
- Prep Time: 20 minutes
- Cook Time: 45 minutes
- Total Time: 1 hour 5 minutes
- Yield: Serves 8
- Category: Dessert
- Method: Baking
- Cuisine: American
Ingredients
- 1 cup all-purpose flour (+ 3 tablespoons)
- 2 teaspoons baking powder
- 1/2 teaspoon salt
- 3/4 cup granulated sugar
- 1 teaspoon cinnamon
- 1/2 teaspoon nutmeg
- 1/2 teaspoon cloves
- 1/2 cup unsweetened applesauce
- 1/4 cup milk (or oat milk)
- 1/4 cup melted butter (or vegetable oil)
- 1 1/2 teaspoons vanilla extract
- 1 cup grated carrot
- 1/3 cup granulated sugar (for topping)
- 1/3 cup brown sugar (for topping)
- 1/4 cup chopped walnuts (or pecans)
- 1 1/2 cups very hot water
Instructions
- Preheat your oven to 350°F (175°C).
- In a medium bowl, mix together flour, baking powder, salt, granulated sugar, cinnamon, nutmeg, and cloves.
- In another bowl, whisk together applesauce, milk, melted butter or oil, vanilla extract, and grated carrots until smooth.
- Combine wet ingredients with dry ingredients until just mixed. Pour into an 8-inch rectangular casserole dish.
- In a separate bowl, mix remaining granulated sugar, brown sugar, and chopped nuts; sprinkle evenly over the batter.
- Carefully pour hot water over the top without stirring.
- Bake for 40-50 minutes or until the middle is set.
- Allow to cool for 5-10 minutes before serving.
Nutrition
- Serving Size: 1 slice (125g)
- Calories: 290
- Sugar: 22g
- Sodium: 210mg
- Fat: 11g
- Saturated Fat: 5g
- Unsaturated Fat: 6g
- Trans Fat: 0g
- Carbohydrates: 42g
- Fiber: 2g
- Protein: 4g
- Cholesterol: 20mg