Buttery Lemon Snickerdoodles
There’s something utterly enchanting about the aroma of freshly baked cookies wafting through the air, isn’t there? It’s like a warm embrace that wraps you in nostalgia, evoking cherished moments spent in the kitchen with loved ones. Today, we’re diving into a delightful recipe that will not only tantalize your taste buds but also bring a burst of sunshine into your home: Buttery Lemon Snickerdoodles. These cookies are more than just a sweet treat; they embody a beautiful harmony of flavors, where the zestiness of lemon meets the comforting sweetness of traditional snickerdoodles. I promise you, once you bite into one of these little gems, you’ll understand why they hold such a special place in my heart.
As we embark on this culinary journey together, imagine the sheer joy of rolling each dough ball in sugar before popping them into the oven—it’s like preparing little spheres of happiness! The tangy brightness from fresh lemons elevates these cookies beyond the ordinary, transforming what could be a simple dessert into an experience that stirs the soul. Whether you’re sharing them at a gathering or savoring them during a quiet moment with a cup of tea, Buttery Lemon Snickerdoodles have an uncanny ability to make any day feel extraordinary. So let’s roll up our sleeves and get ready to create something truly special!
Buttery Lemon Snickerdoodles: A Sunshine-Filled Delight
These Buttery Lemon Snickerdoodles are an invitingly cheerful take on the classic cookie we all know and love. With their soft texture and zesty flavor profile, they stand out as a refreshing treat that’s perfect for any occasion. Just imagine biting into one: the slightly crisp edges give way to a soft center that bursts with vibrant lemon flavor. This recipe is straightforward yet immensely rewarding, perfect for both seasoned bakers and beginners alike.
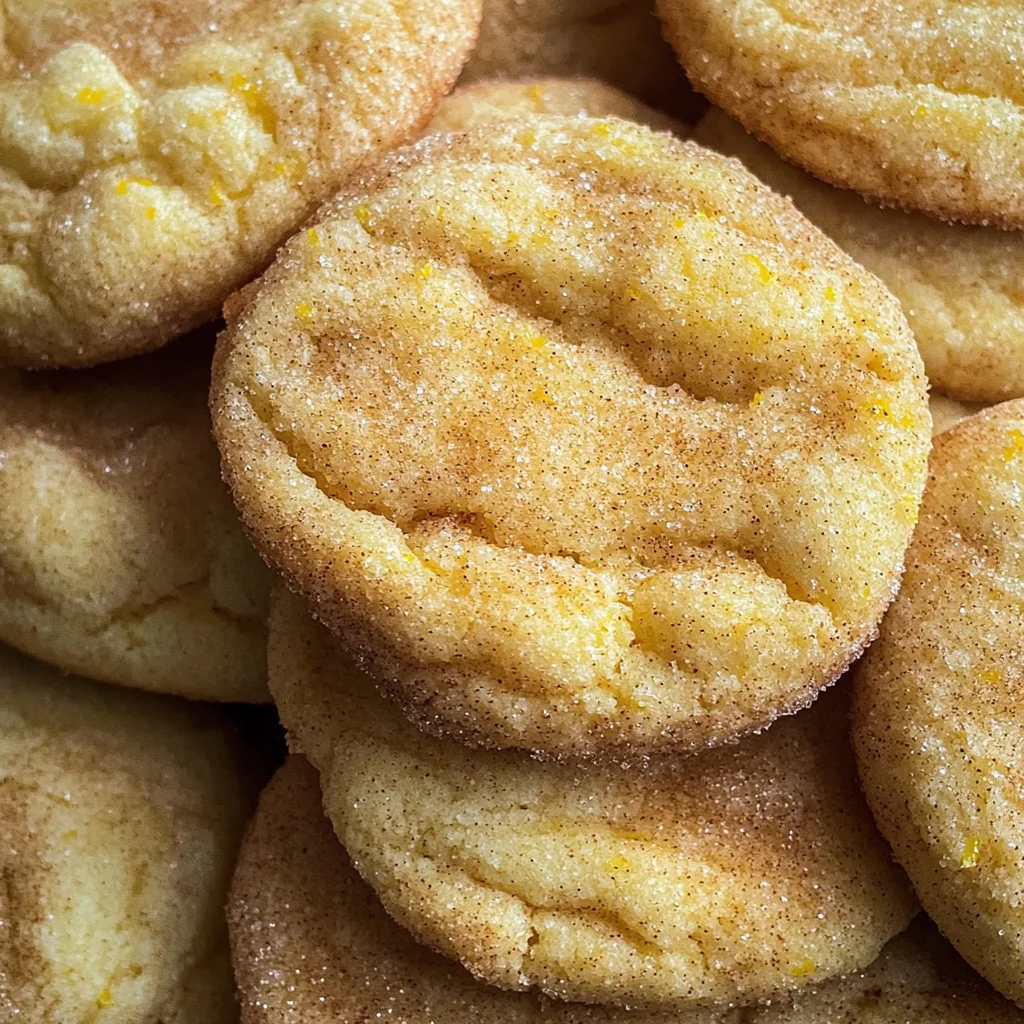
Ingredients:
Before we dive into mixing and baking, let’s gather our ingredients! Each component plays an integral role in crafting these delectable cookies, contributing unique qualities that ensure every bite is nothing short of extraordinary.
- 1 tsp cream of tartar. This little gem is essential; it not only provides that signature tangy flavor but also helps stabilize the egg whites if you were to incorporate them (in other recipes). In our snickerdoodles, it works alongside baking soda to create a wonderfully soft texture by preventing the cookies from becoming too dense. Without it, your cookies might lose some of their delightful chewiness—so don’t skip this step!
- 1.5 cups all-purpose flour (I use King Arthur all-purpose flour). Flour is the backbone of our cookies; it’s what gives them structure and body. I highly recommend using high-quality flour like King Arthur because it has consistent protein content that yields reliable results. When measuring flour, fluff it up first before spooning it into your measuring cup to avoid packing it down—this ensures your cookies won’t turn out too dense or dry.
- 0.25 tsp baking soda. Baking soda is another crucial player in our team; it provides lift and helps achieve that tender crumb we’re aiming for in our snickerdoodles. When combined with cream of tartar here, it creates carbon dioxide bubbles during baking—this is what makes our cookies rise beautifully! Just remember to check your baking soda’s freshness; old baking soda can lead to lackluster results.
- 0.25 tsp salt. Salt enhances flavor—it’s not just an afterthought! A pinch can make all the difference by balancing sweetness and elevating those lovely lemon notes in our cookies. It’s like seasoning a dish; without salt, everything can taste flat or one-dimensional.
- 0.5 tsp baking powder. This ingredient works hand-in-hand with baking soda to ensure our cookies rise perfectly while also providing extra tenderness—think of it as insurance for achieving that melt-in-your-mouth texture! Again, make sure your baking powder is fresh; expired leavening agents can lead to disappointing results.
- 1.5 tsp lemon zest (finely grated from fresh lemons). This is where we capture all that wonderful citrus essence! Zesting releases flavorful oils from the lemon peel which infuse our dough with vibrant brightness—trust me on this! Always opt for fresh lemons over bottled juice—the zest packs so much more flavor and aroma than anything pre-packaged.
- 3/4 cup sugar. Sugar does more than sweeten; it plays multiple roles in cookie-making! It contributes to browning through caramelization and helps create that delightful chewy texture we all crave in a good cookie. For these snickerdoodles, I prefer using granulated sugar since its fine crystals dissolve easily during creaming—a key step to achieving lightness.
- 0.5 tsp vanilla extract. Vanilla is like magic dust—it adds depth and warmth to our cookies’ flavor profile! Always choose pure vanilla extract for its superior quality over imitation varieties; you’ll notice an unmistakable difference in taste that elevates your baked goods.
- 1 tbsp lemon juice (freshly squeezed for best flavor). The acidity from fresh lemon juice brightens up the entire dough while adding moisture—the perfect complement to the zest! Make sure you squeeze those lemons just before using them; you’ll want every drop packed with freshness!
- 1/2 cup butter (softened to room temperature). Butter is absolutely paramount in this recipe since it’s responsible for creating that rich buttery flavor and tender crumb we’re looking for in our snickerdoodles! Ensure it’s softened properly—not melted—to facilitate proper creaming with sugar while incorporating tiny pockets of air which help our cookies rise beautifully.
- 1 large egg (room temperature). Eggs do wonders in binding ingredients together while adding moisture—it’s crucial for achieving that delightful chewy texture we’re after! Room temperature eggs blend more seamlessly into your batter compared to cold ones straight from the fridge—this small detail can significantly improve your cookie’s overall consistency.
- 3 tbsp sugar (optional but recommended for classic snickerdoodle coating). This sugar coating adds an irresistible sparkle along with that signature crunch as you bite into each cookie—so don’t skip this step if you’re aiming for authentic snickerdoodle vibes!

Equipment You’ll Need:
Now that we’ve gathered all our ingredients together, let’s talk about some key tools you’ll need for success! Having the right equipment makes every step smoother and ensures your experience in the kitchen is as enjoyable as possible.
- Mixing bowls – A good set of mixing bowls will be your best friend throughout this process! Opt for sturdy glass or stainless steel bowls—they’re durable and easy to clean while allowing you to see exactly what’s happening inside as you mix everything together.
- Whisk – A whisk is essential for aerating dry ingredients and ensuring even distribution when combining wet elements like butter and sugar! Using a whisk instead of a spoon allows air incorporation which creates lighter textures—a must-have tool when making fluffy snickerdoodles!
- Electric mixer – While you could certainly mix by hand if needed, an electric mixer simplifies things significantly when creaming butter and sugar together—you want those lovely air pockets formed efficiently without too much elbow grease!
- Cookie scoop or spoon – To portion out uniform dough balls easily! A cookie scoop ensures even sizing which translates into even baking—you’ll be thankful later when they all come out perfectly shaped instead of varying sizes!
- Parchment paper – Line your baking sheets with parchment paper—not only does it prevent sticking but also promotes even cooking by allowing heat circulation around each cookie!
Step 1: Prepping Your Kitchen Oasis
To start off this delightful adventure towards making Buttery Lemon Snickerdoodles, first things first—you need to create an inviting space where creativity flows freely! Preheat your oven to 350°F (175°C) because warm ovens are essential for quick-baking treats like these lovely cookies—we want them ready before anyone can resist their alluring scent wafting through every corner of your home! While waiting for those magical temperatures to reach their peak perfection, take time organizing yourself: line a baking sheet with parchment paper so it’s ready when it’s time to showcase those beautiful dough balls later on.
As part of preparation but perhaps one step many overlook: zest those fresh lemons finely until you have about 1.5 teaspoons’ worth set aside because trust me here—the essence captured within each tiny zest will elevate these snickerdoodles beyond expectations! Next comes squeezing out about 1 tablespoon worth of fresh lemon juice—a task best done immediately after zesting since juicy lemons can sometimes slip away if moisture gets involved earlier on…and no one wants frustrated fingers ruining their zen mode right before baking begins!
Step 2: Whisking Dry Ingredients Together
Now let’s move on smoothly by whisking together flour (1.5 cups), cream of tartar (1 tsp), baking powder (0.5 tsp), salt (0.25 tsp), and baking soda (0.25 tsp) within a medium-sized bowl until they’re well combined—this process allows us not only incorporates air into those dry ingredients but also distributes leaveners evenly throughout which ultimately ensures consistent rising throughout every single cookie batch produced today!
Once you’ve achieved homogeneity in texture among these components set this bowl aside momentarily—it’ll be awaiting its glorious union later on when mixed alongside those luscious wet elements we’re soon preparing next!
Step 3: Creaming Butter & Sugar
In another larger mixing bowl now comes one pivotal moment—the creaming stage where you’ll beat together softened butter (1/2 cup) along with sugar (3/4 cup) until light fluffy consistency emerges over approximately two-three minutes time frame devoted completely towards this laborious endeavor filled with excitement as fluffy clouds form amidst golden hues filling up your space with sweet promises lingering ahead…
This crucial technique known as creaming serves dual purposes here: firstly incorporating tiny pockets air gives rise during bake-off while simultaneously blending flavors harmoniously throughout resulting batter mixture so no single bite feels lacking—it matters immensely how long attention devoted here means better outcomes overall!
Step 4: Incorporating Egg & Liquid Gold
After achieving pleasingly airy textures within previous steps add room-temperature egg gently followed closely behind by vanilla extract (0.5 tsp) then whip together lovingly until fully incorporated over roughly one-two minutes’ duration—at times mixture may appear curdled due inclusion liquid components don’t fret this happens often yet smooths itself back out upon introduction dry ingredients shortly after…
Next gently pour freshly squeezed lemon juice(1 tbsp) directly inside bowl letting aromas swirl around enticing everyone nearby drawing interest closer toward kitchen sanctuary filled harmony flavors coming alive slowly but surely piece-by-piece leading us nearer end goal sweetness awaits upon completion…
Step 5: Forming the Dough and Letting It Rest
Now that your wet and dry ingredients are harmoniously combined, it’s time to bring this delightful mixture to life! Gently fold the dry ingredients into the wet mixture using a spatula or a wooden spoon. You want to mix on low speed or with gentle strokes—this is crucial because overmixing can develop gluten in your dough, leading to cookies that are tough instead of tender and melt-in-your-mouth delicious. Aim for a soft, slightly sticky dough that just comes together without any dry flour streaks lingering. This step requires a little patience; trust me when I say that it’s well worth it for the texture you’re aiming for! Once your dough feels right, let it have a brief rest at room temperature for about 5 minutes. This resting period allows the flour to hydrate fully, which will make it easier to handle when you scoop and roll those lovely little cookie balls.
While your dough rests, prepare your sugar coating by pouring those three tablespoons of sugar into a small shallow bowl. This will create a beautiful sugary crust around your cookies, providing that signature snickerdoodle charm we all adore. As you prepare, take in the wonderful aroma of the lemon zest; it’s like sunshine in a bowl! This is the moment where anticipation builds; soon, you’ll be rewarded with fresh-baked cookies that smell as heavenly as they taste.
Step 6: Rolling Into Sweet Perfection
With your rested dough at hand, it’s time to have some fun! Using either a cookie scoop or simply a tablespoon, portion out the dough into 1-inch balls—this size is perfect for achieving that classic cookie shape while ensuring even baking. If you’re using your hands to roll them, be mindful not to press too hard; you want to keep those precious air bubbles from the creaming process intact because they contribute to that lightness we crave in our cookies. Once you’ve rolled each ball, gently roll them in the prepared sugar until they’re coated evenly—think of this as giving each cookie its own cozy winter coat!
Place these beautifully coated balls onto your lined baking sheet with about 2 inches between them. This spacing is absolutely paramount because these cookies will spread during baking; if they’re too close together, you’ll end up with one giant cookie instead of delightful individual treats! Keep an eye on their shape as you work—if at any point you feel like they’re becoming too warm and sticky to handle, pop them back into the fridge for a few minutes. Remember, gentle handling is key here; each cookie should maintain its round shape beautifully.
Step 7: Baking Your Buttery Lemon Snickerdoodles
Now comes one of my favorite parts—the actual baking! Preheat your oven to 350°F (or about 175°C if you’re measuring in Celsius), and once it’s ready, slide those trays into the middle rack. Bake your glorious beauties for about 11-12 minutes. You’ll know they’re done when the edges are set but the centers still appear slightly underbaked—don’t worry if they look a bit soft; they’ll continue cooking on the hot baking sheet after being taken out of the oven.
This is where patience really pays off! Allow them to rest on the baking sheet for 1-2 minutes before transferring them to a cooling rack. That brief resting time is essential—it helps prevent breakage during transfer and lets them firm up just enough so they don’t crumble apart on their way over. You might notice how their edges begin to crisp while their centers stay wonderfully chewy; this contrast will give you that satisfying texture we all adore in a good snickerdoodle!
Step 8: The Cooling Phase – Where Magic Happens
Once you’ve transferred your cookies onto a cooling rack (or whatever surface you choose), take a moment to appreciate this transformative stage—the cooling phase! Allow these buttery lemon snickerdoodles to cool completely before indulging yourself. While this can feel like an eternity when you’re staring at those golden-brown delights, patience truly enhances their flavor and texture.
As they cool down, you’ll notice how the exterior firms up while still maintaining that lovely chewiness inside—a sign of perfectly baked cookies! The flavors meld beautifully during this time as well; the zest from those fresh lemons continues infusing its vibrant essence throughout each bite. If you can resist diving in right away (and I know it’s tough!), I promise you’ll be rewarded with an even more satisfying experience once they’re fully cooled.
Final Touches – Enjoying Your Buttery Lemon Snickerdoodles
At this point, you’ve crafted an extraordinary batch of buttery lemon snickerdoodles that are not only visually stunning but also packed with flavor that dances on your palate! Now comes the best part—enjoying what you’ve created. Whether it’s sharing with friends over coffee or savoring one (or two!) while curled up with a good book, these cookies will undoubtedly bring smiles all around.
If you’re feeling adventurous or want an extra flair for special occasions, consider drizzling some melted dairy-free chocolate over them once they’ve cooled completely or adding sprinkles for fun color and crunch! Each bite holds a story—a tale of love poured into mixing bowls and memories made around warm ovens—and trust me when I say there’s nothing quite like sharing homemade treats made from scratch.
So gather everyone around and watch as these buttery lemon snickerdoodles disappear faster than you can say delicious! Keep this recipe close to your heart; it’s bound to become a cherished favorite among family and friends alike! Happy baking!
Storage and Enjoyment Tips for Your Buttery Lemon Snickerdoodles
Can you feel the excitement in the air? Your Buttery Lemon Snickerdoodles are fresh from the oven, radiating warmth and inviting aromas that make your heart sing! Before you dive into these delightful little clouds of lemony goodness, let’s chat about how to preserve their magic so you can enjoy them even longer. After all, part of the joy of baking is relishing those sweet moments over days to come!
Storing Leftover Buttery Lemon Snickerdoodles
To keep your Buttery Lemon Snickerdoodles as fresh as the moment they were baked, store them in an airtight container at room temperature. This simple step is crucial; it locks in moisture and maintains that lovely softness we adore. If you have a few leftover (trust me, it’s hard to resist), they’ll stay delicious for about 3-5 days. For an extra trick to maintain their freshness, consider placing a slice of bread in the container alongside the cookies; this non-negotiable method draws moisture and keeps your snickerdoodles perfectly tender. Even after storage, these cookies retain their delightful flavor and texture, remaining a profoundly satisfying treat that begs to be savored with every bite. When you’re ready for another indulgence, simply enjoy them as is or warm them slightly in the microwave for a few seconds—this will bring back that just-baked sensation!
Freezing Buttery Lemon Snickerdoodles for Later
If you find yourself with an abundance of these heavenly treats—or if you simply want to prepare ahead—freezing is a fantastic option! To freeze your Buttery Lemon Snickerdoodles properly, allow them to cool completely before placing them in a single layer on a baking sheet. This prevents them from sticking together. Once frozen solid, transfer the cookies into a resealable freezer bag or an airtight container. They’ll keep beautifully frozen for up to three months! Whenever you crave one of these citrus-infused delights, simply take out as many as you’d like and let them thaw at room temperature or pop them in the oven for a quick reheat—this brings back that tantalizing aroma and soft chewiness we cherish. Freezing not only saves time but also ensures that fresh-baked joy is just moments away whenever the craving strikes!
Buttery Lemon Snickerdoodles
Indulge in the sunshine-filled joy of Buttery Lemon Snickerdoodles! These delightful cookies perfectly blend zesty lemon flavor with the warm, comforting essence of traditional snickerdoodles. With their soft, chewy texture and a slightly crisp edge, each bite is a burst of happiness that makes any day feel special. Baking these cookies not only fills your home with enchanting aromas but also creates cherished moments with family and friends. Whether enjoyed during a cozy afternoon tea or shared at festive gatherings, these lemony treats are sure to brighten your spirit. Let’s dive into this simple recipe that guarantees delicious results!
- Prep Time: 15 minutes
- Cook Time: 12 minutes
- Total Time: 27 minutes
- Yield: Approximately 24 cookies 1x
- Category: Dessert
- Method: Baking
- Cuisine: American
Ingredients
- 1.5 cups all-purpose flour
- 1 tsp cream of tartar
- 0.25 tsp baking soda
- 0.25 tsp salt
- 0.5 tsp baking powder
- 1.5 tsp lemon zest
- 3/4 cup sugar (plus 3 tbsp for coating)
- 0.5 tsp vanilla extract
- 1 tbsp lemon juice
- 1/2 cup butter (softened)
- 1 large egg
Instructions
- Preheat your oven to 350°F (175°C) and line a baking sheet with parchment paper.
- In a medium bowl, whisk together flour, cream of tartar, baking soda, salt, and baking powder.
- In a large mixing bowl, cream together softened butter and sugar until light and fluffy.
- Add in the egg, vanilla extract, lemon juice, and lemon zest; mix until well combined.
- Gradually incorporate the dry ingredients into the wet mixture until just combined.
- Chill the dough for about 5 minutes if too sticky.
- Roll dough into 1-inch balls and coat in sugar before placing them on the prepared baking sheet with space between each cookie.
- Bake for 11-12 minutes or until edges are set but centers are slightly underbaked.
- Allow to cool on the baking sheet for a couple of minutes before transferring to a cooling rack.
Nutrition
- Serving Size: 1 cookie (30g)
- Calories: 130
- Sugar: 10g
- Sodium: 70mg
- Fat: 6g
- Saturated Fat: 4g
- Unsaturated Fat: 2g
- Trans Fat: 0g
- Carbohydrates: 18g
- Fiber: <1g
- Protein: 1g
- Cholesterol: 20mg