Loaded Vegetarian Greek Pita Nachos
There’s something profoundly satisfying about gathering around a platter of Loaded Vegetarian Greek Pita Nachos. It’s not just food; it’s an experience that brings people together, igniting laughter and conversation while tantalizing the senses. Imagine warm, pillowy pita slices cradling a vibrant medley of flavors and textures—each bite is a delightful journey through the Mediterranean, where fresh ingredients and bold tastes reign supreme. As the tzatziki drizzles over spicy roasted chickpeas and juicy tomatoes, you can almost hear the chorus of oohs and aahs as your friends dive in, their faces lighting up with each savory morsel. This recipe for Loaded Vegetarian Greek Pita Nachos goes beyond mere sustenance; it’s about creating joyful memories and sharing love through cooking.
Now, let me tell you why this dish holds a special place in my heart. Growing up, my family often celebrated togetherness with meals that invited everyone to participate. These nachos are a beautiful modern twist on traditional Greek flavors—crunchy yet soft, creamy yet spicy. It’s perfect for any occasion—from casual weeknight dinners to festive gatherings where you want to impress without spending hours in the kitchen. Trust me when I say that once you serve these Loaded Vegetarian Greek Pita Nachos, they will quickly become a cherished staple in your cooking repertoire!
Loaded Vegetarian Greek Pita Nachos: A Mediterranean Delight You Can’t Resist
Let’s embark on this culinary journey together! With every ingredient carefully selected to elevate your nacho game, this recipe will have your taste buds dancing with joy. The balance of spices, textures, and freshness makes these nachos not only delicious but also incredibly satisfying. So grab your apron, and let’s whip up something extraordinary!

Ingredients:
As we gather our ingredients for these Loaded Vegetarian Greek Pita Nachos, remember that each component plays a vital role in crafting this masterpiece. Let’s take a closer look at what we’ll need.
- 1 cup plain Greek yogurt. This luscious ingredient serves as the base for our tzatziki sauce, bringing creaminess and tang that perfectly complements the other flavors in our nacho assembly. When selecting Greek yogurt, aim for full-fat varieties if possible; they yield a richer texture and flavor that can elevate your dish from good to utterly intoxicating. I promise you—the difference is palpable!
- 1 cup grated cucumber (unpeeled) (about 1 medium cucumber). Grating cucumbers adds refreshing crunch and moisture to our tzatziki sauce while contributing a subtle sweetness that balances out the rich yogurt beautifully. When choosing cucumbers, opt for firm ones without blemishes for maximum juiciness. Leaving the skin on not only preserves nutrients but also adds a lovely color contrast—absolutely paramount in presentation.
- 1 tbsp extra virgin olive oil. Often referred to as liquid gold in Mediterranean cooking, this high-quality oil enhances the overall flavor profile of our tzatziki by adding depth and richness. Look for olive oil that is cold-pressed and has robust fruity notes—it will make all the difference in taste! A drizzle over your finished nachos will add an inviting sheen too.
- 1 tbsp fresh dill (minced). Dill is one of those herbs that’s simply magical with yogurt-based sauces; its bright flavor cuts through richness while imparting an aromatic quality that feels like sunshine on your plate. Fresh dill can be quite fragrant—use it generously! If you can’t find fresh dill or prefer something milder, feel free to substitute with dried dill; just reduce the amount since dried herbs are more concentrated.
- 1 tbsp lemon juice (about 1/2 a juicy lemon). Freshly squeezed lemon juice offers a zesty pop that brightens everything it touches! Citrus is crucial here—it awakens flavors and provides that zing we crave in Mediterranean dishes. To get the most juice from your lemons, roll them firmly on your countertop before cutting them open; trust me on this one!
- 2 cloves garlic (finely minced). Garlic is an aromatic superstar in many cuisines, infusing dishes with depth and warmth that draws people in like moths to a flame! Finely mincing garlic helps release its oils better than chopping; it ensures even distribution throughout the tzatziki so every bite bursts with flavor. Don’t skip this step—fresh garlic truly transforms our dip into something extraordinary.
- 1/2 tsp kosher salt. Salt is essential—it enhances all the flavors within our tzatziki sauce while balancing sweetness from cucumbers and tartness from yogurt and lemon juice alike. Be mindful of how much salt you use when layering flavors later; remember you can always add more but can’t take it away!
- 1/4 tsp ground pepper. Just a hint of freshly ground black pepper adds complexity without overpowering other flavors; it’s all about balance here! I recommend using whole peppercorns ground just before use for maximum flavor impact—it’s worth it!
- 15 oz can of chickpeas (drained, rinsed and patted dry). Chickpeas bring protein-packed goodness into our nachos while providing hearty texture that contrasts beautifully with softer elements like feta cheese or yogurt sauce! Make sure they’re well-drained to achieve crispy results when roasting—moisture is their enemy here!
- 1 1/2 tsp olive oil (for roasting). Tossing those chickpeas in olive oil before roasting helps them crisp up beautifully while adding rich flavor too! A touch of high-quality extra virgin olive oil will help elevate everything else on the plate as well.
- 1 tsp salt + 1/4 tsp pepper + 1/2 tsp cayenne pepper (for seasoning chickpeas). This trio works wonders together! The salt enhances natural sweetness from chickpeas while cayenne brings delightful heat—a perfect match against cool toppings later on!
- 2 packages pita bread (each cut into 8 triangles)—the canvas upon which we build our masterpiece! Opt for fresh pita if possible; nothing beats warm bread straight out of the oven or toaster! Cutting them into triangles gives us ideal chips ready to hold all those amazing toppings without falling apart under pressure.
- 1 red onion (diced) adds crunch alongside subtle sweetness when cooked—a delightful contrast once roasted chickpeas mingle with cooler elements like tzatziki or cucumbers later on! Aim for finely diced pieces so they blend seamlessly into each bite instead of overwhelming other participants at play here.
- 1 cup roma tomatoes (quartered) provide vibrant color along with juicy bursts throughout each chip—we want those pockets bursting forth as we dive into this dish headfirst! Roma tomatoes are less watery than their counterparts which makes them perfect candidates here—but feel free to experiment based upon what’s ripe at market time!
- 1 cucumber (chopped) brings additional freshness alongside crunchy textures already present within pita chips & tomatoes—like having endless summer vibes right there in every bite too!
- 1 block fresh feta cheese makes everything sing harmoniously—from its salty bites melting into creamy dips down onto crispy chips below—it turns ordinary nachos into something truly extraordinary! Choose feta packed in brine rather than crumbles if possible since they tend toward drier varieties sometimes lacking flavor compared against others found within stores today.
- 1 tbsp fresh dill (roughly chopped) sprinkled over top right before serving gives us another layer freshness boosting brightness overall throughout entire dish by tying everything back together again nicely making sure no single note overpowers others involved here!
Equipment You’ll Need:
Before we dive into preparing these delightful nachos, let’s chat about some essential tools that will make this culinary adventure smooth sailing! Having the right equipment not only simplifies your cooking process but also allows you to focus on enjoying every moment spent creating something wonderful.
- Baking sheet – A sturdy baking sheet is crucial for roasting those chickpeas evenly without fear of scorching or sticking too much during cooking times ahead! Ensure yours has sides high enough so nothing escapes while baking away since chickpea splatter isn’t ideal either…
- Parchment paper or silicone baking mat – Line your baking sheet with parchment paper or use a silicone mat—this helps prevent sticking ensuring easier cleanup later on too! Plus who wants burnt bits clinging stubbornly onto cookware after all hard work put forth?
- Mixing bowls – A few mixing bowls come handy when preparing different components like tzatziki sauce alongside seasoned chickpeas allowing us space needed without cluttering countertops unnecessarily whilst keeping organized throughout entire process ahead too!
- Grater or food processor – For grating those cucumbers faster than my kids can devour snacks—you’ll want either tool handy depending upon preference here: hand grater yields finer shreds whereas food processor speeds things up immensely cutting down prep time significantly!
- Measuring spoons & cups – Accurate measurements matter greatly especially since too much salt could ruin otherwise delightful creation made previously mentioned earlier too already—you don’t want anything overpowering others involved here after all…
Preparing the Loaded Vegetarian Greek Pita Nachos
Step 1: Preheat Your Oven
First things first—let’s kick off by preheating your oven to 400℉ (200℃). This step may seem simple but trust me when I say it sets off an important chain reaction that ensures even roasting later on during next steps ahead! As soon as you turn up that dial expect delicious aromas wafting through kitchen air slowly enveloping home creating anticipation long before anyone lays eyes upon final product itself later down road ahead too… Exciting stuff ahead indeed!!
Step 2: Prepare Roasted Chickpeas
While waiting patiently for oven temperature rise let’s get started prepping those chickpeas shall we? Drain them thoroughly then rinse under cold water until any residual foam disappears completely ensuring maximum crispiness during roasting timeframes ahead soon afterwards too… Once drained pat dry using clean kitchen towel—this crucial step prevents unwanted steam from forming inside oven causing soggy results instead crispy snack perfection desired once cooled down following initial roasting timespan coming shortly thereafter…
In large mixing bowl combine dried-off chickpeas along with olive oil followed closely behind by salt pepper cayenne creating beautiful spice blend capturing essence Mediterranean cuisine wonderfully well—don’t rush this step folks!! Toss gently until evenly coated ensuring each little morsel gets equal love spread across pan beneath… Lay them flat onto prepared baking sheet then slide into preheated oven now patiently awaiting crunchy transformation happen right before very eyes moments away now…
Step 3: Mix Tzatziki Sauce
While those golden nuggets roast away let’s devote attention towards preparing heavenly tzatziki sauce next shall we? In another mixing bowl combine Greek yogurt grated cucumber minced dill lemon juice minced garlic kosher salt ground pepper giving us creamy summery vibe reminiscent sun-kissed days spent lounging outside sipping refreshing drinks under shade trees nearby… It’s absolutely paramount stirring mixture thoroughly until uniform consistency achieved showcasing vibrant colors emerging throughout blending beautifully together showcasing myriad textures present within dish itself overall finally culminating luscious layers await discovery soon afterwards too…
Step 4: Assemble Your Nachos
At last once chickpeas emerge crispy golden brown from oven allow cooling slightly before assembling loaded vegetarian Greek pita nachos next!! Grab one triangle pita chip then dollop generous spoonful tzatziki atop followed immediately behind by handful roasted chickpeas diced red onion quartered roma tomatoes chopped cucumber crumbled feta topped off final flourish freshly chopped dill sprinkling everything beautifully uniting various ingredients seamlessly creating breathtaking visual display sure tantalize taste buds everyone gathered around awaiting eagerly what lies ahead… Repeat until all ingredients utilized making sure no hungry mouths left unattended behind either!!
And there you have it—the start of something truly special awaits just beyond these initial steps taken toward culinary adventure ripe filled wonderment ahead beckoning exploration further still… Are you ready?
Step 5: Roasting the Chickpeas to Perfection
Now that your oven is preheated to a toasty 400℉, it’s time to transform those humble chickpeas into a crunchy, flavor-packed topping that will elevate your Loaded Vegetarian Greek Pita Nachos from ordinary to extraordinary. Start by taking that 15-ounce can of chickpeas—these little legumes are not just packed with protein; they’re also wonderfully versatile. Drain them, rinse them under cool water, and pat them dry with a clean kitchen towel or paper towels. This drying process is absolutely paramount because excess moisture can prevent them from achieving that coveted crispy texture during roasting. Trust me on this step; nobody wants soggy nachos!
Spread your dried chickpeas evenly on a lined baking sheet, making sure they have plenty of space between them. A crowded baking sheet will lead to steaming rather than roasting, which is a no-go for our crunchy aspirations! Drizzle those beauties with 1½ teaspoons of olive oil and sprinkle on 1 teaspoon of salt, ¼ teaspoon of pepper, and a generous ½ teaspoon of cayenne pepper for a delightful kick. Toss everything together gently until the chickpeas are well-coated in the seasonings; this is where the magic begins! Roast them in the oven for about 25-30 minutes, stirring halfway through to ensure even browning. You’ll know they’re ready when they turn golden brown and emit an utterly intoxicating aroma that fills your kitchen with warmth. Keep an eye on them during the last few minutes—burnt chickpeas are not what we’re after!
Step 6: Creating the Creamy Tzatziki
While those chickpeas are dancing away in the oven, let’s turn our attention to crafting a tzatziki sauce that will be the creamy heart of our nachos. Grab your mixing bowl and combine 1 cup of plain Greek yogurt with 1 cup of grated cucumber (about one medium cucumber), which you should’ve peeled beforehand—not only does this add texture but also brings in a refreshing crunch that pairs beautifully with all the other flavors we’re layering into this dish. The Greek yogurt will provide an incredibly rich base for our sauce while adding that lovely tanginess we adore in tzatziki.
Now, mix in 1 tablespoon of extra virgin olive oil, which introduces a silky richness, followed by another tablespoon of minced fresh dill for an aromatic lift—what makes these flavors so special is how they meld together! Add in the juice of half a juicy lemon (this bright acidity balances out the creaminess) along with two finely minced garlic cloves for depth and warmth. Finally, season your tzatziki with ½ teaspoon of kosher salt and ¼ teaspoon of ground pepper; these elements highlight each ingredient’s unique profile without overshadowing their individual contributions. Stir everything together until it’s well-combined and smooth—don’t rush this step! The longer it sits (if you can resist), the more the flavors will develop and meld together into something truly extraordinary.
Step 7: Preparing Your Vegetable Medley
With your tzatziki ready to go and those chickpeas still roasting away, it’s time to prep our vibrant vegetable medley that will crown our nachos in color and freshness. Start by dicing one red onion into small pieces—these onions bring not only a pop of color but also a sharpness that contrasts beautifully against the creamy tzatziki and salty feta cheese we’ll be using later. Next up is one cup of Roma tomatoes; quarter them so they maintain their shape while offering juicy bursts with every bite. The sweetness from these tomatoes will harmonize perfectly amidst all the savory elements we have going on.
Don’t forget about our cool cucumber! Chop another cucumber (about one medium-sized) into bite-sized pieces; this will not only add crunch but also keep things refreshing as you dive into these nachos. Remember, presentation matters too! Layering these colorful veggies enhances visual appeal while inviting everyone at your table to dig in right away. Arrange everything neatly on a large serving platter or board—think about how you want it to look when you serve it up; after all, we eat with our eyes first! You’ll want everything prepped because once those crispy chickpeas come out of the oven, assembly time is upon us!
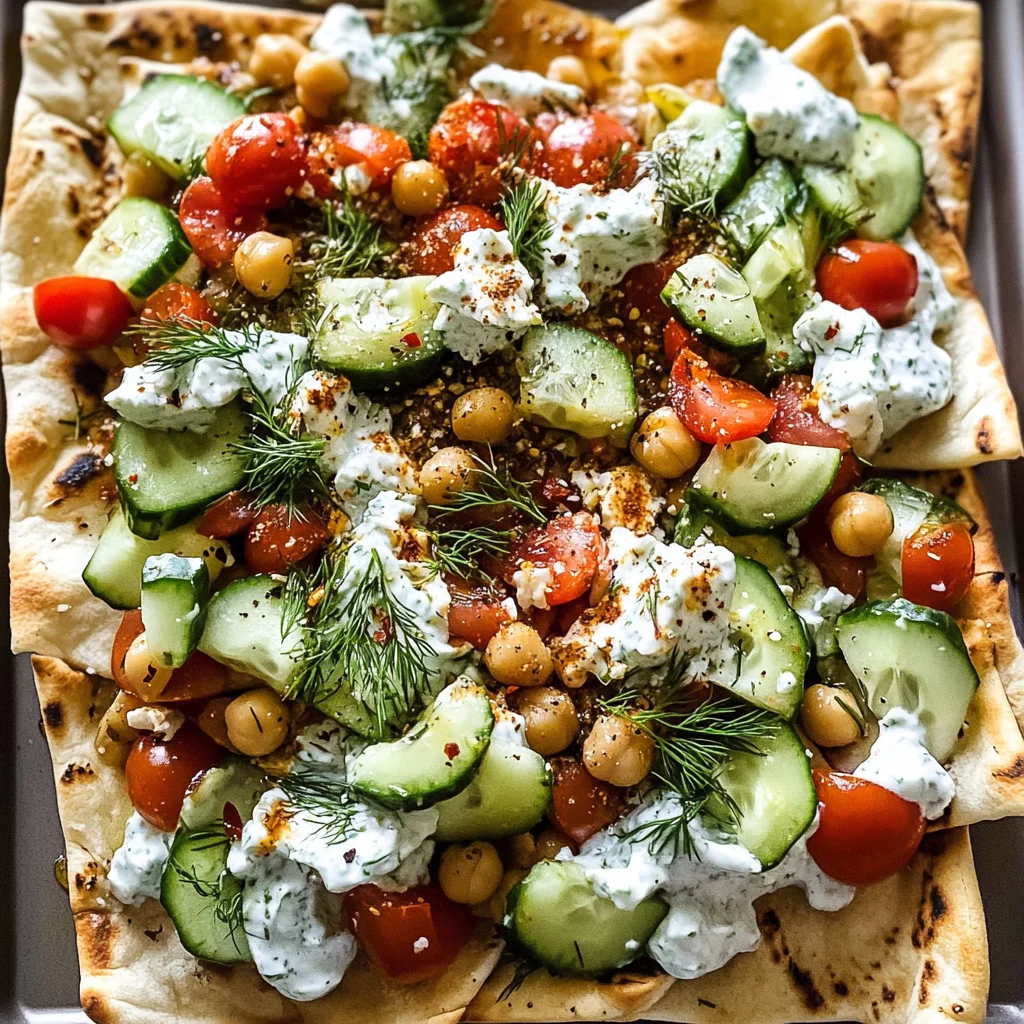
Step 8: Assembling Your Loaded Vegetarian Greek Pita Nachos
At long last, it’s time for the pièce de résistance—the assembly of your gorgeous Loaded Vegetarian Greek Pita Nachos! Take those crispy pita triangles from earlier (remember you cut two packages into eight triangles each?) and scatter them evenly across your serving platter or board as a sturdy base. These pita chips are absolutely essential because they hold up beautifully under all those luscious toppings while delivering just enough chewiness against all that crunch we’ve created.
Once you’ve laid down your foundation, generously spoon dollops of that heavenly tzatziki over the pita chips—don’t be shy here! You want each chip to embrace that creamy goodness. Next comes an equally generous scattering of those roasted chickpeas—those little nuggets are now golden brown and crunchy; they’re like tiny flavor bombs waiting to burst forth when bitten into! Now layer on your diced red onion, quartered Roma tomatoes, chopped cucumbers, and crumbled feta cheese—it’s like an artist layering paint onto canvas!
Finish off with an extra sprinkle of fresh dill on top for both garnish and flavor—it adds such brightness! Allow yourself to take in all those colors before diving in; trust me when I say this dish isn’t just food—it’s an experience bursting with flavors reminiscent of sun-soaked Mediterranean shores. Serve immediately so everyone can indulge in their warm crispy glory before any sogginess sets in from the tzatziki—a fate none deserve!
Conclusion:
As we wrap up our culinary adventure together with these Loaded Vegetarian Greek Pita Nachos, I can’t help but feel giddy about sharing such an extraordinary recipe with you! From the moment those roasted chickpeas hit your palate with their spicy crunch to when the creamy tzatziki dances with the cool cucumber and salty feta—this dish is a symphony of flavors that captivates without fail. It’s truly special how each ingredient complements one another—the vibrant tomatoes bringing sweetness while the dill adds an aromatic freshness that elevates everything beautifully. Each bite feels like a celebration; it’s comfort food reimagined!
I wholeheartedly believe that this recipe is a must-try for anyone who enjoys cooking—or even if you’re new to it! The joy of preparing these nachos becomes part of the experience itself: gathering ingredients, roasting chickpeas until they shimmer with golden perfection, and layering those bright toppings over warm pita bread creates an atmosphere filled with excitement and anticipation. Whether it’s game day with friends or a cozy movie night at home, pulling this dish from the oven fills your space with irresistible aromas that will have everyone rushing to the table.
Imagine savoring one loaded nacho while sipping on a chilled lemonade or perhaps diving into some tangy olives on the side—these pairings enhance the Mediterranean vibe perfectly! For an afternoon pick-me-up after work or as a comforting late-night snack topped with extra herbs and spices—you can easily adapt this dish into various occasions. Feeling adventurous? Why not serve it alongside a refreshing salad bursting with citrus dressings or some warm roasted vegetables? Each variation brings its own delightful twist and ensures there’s always something new to discover.
This recipe is wonderfully adaptable too—feeling adventurous? Consider swapping out toppings based on seasonal produce or personal preferences! You might try adding roasted bell peppers for sweetness or even some avocado slices for creaminess; each change enhances flavor profiles in exciting ways. Remember: cooking is all about creativity and making it your own! So go ahead—give these Loaded Vegetarian Greek Pita Nachos a try; delight in making them yours by exploring flavors that resonate personally. I can’t wait to hear how your journey unfolds!
Loaded Vegetarian Greek Pita Nachos

Experience delicious Loaded Vegetarian Greek Pita Nachos topped with tzatziki & roasted chickpeas—perfect for gatherings or cozy nights in. Try them today!
- Prep Time: 20 minutes
- Cook Time: 30 minutes
- Total Time: 50 minutes
- Yield: Serves 4
- Category: Appetizer
- Method: Baking
- Cuisine: Mediterranean
Ingredients
- 1 cup plain Greek yogurt
- 1 cup grated cucumber
- 1 tbsp extra virgin olive oil
- 2 cloves garlic (minced)
- 15 oz can chickpeas (drained and rinsed)
- 2 packages pita bread (cut into triangles)
- 1 cup roma tomatoes (quartered)
- 1 block feta cheese (crumbled)
Instructions
- Preheat oven to 400℉ (200℃).
- Prepare roasted chickpeas by draining, rinsing, and patting dry. Toss with olive oil, salt, pepper, and cayenne; spread on a baking sheet.
- Roast chickpeas for 25-30 minutes until golden brown.
- In a bowl, mix Greek yogurt, grated cucumber, olive oil, lemon juice, minced garlic, salt, and pepper to create tzatziki sauce.
- Assemble nachos by layering pita chips on a platter. Top with tzatziki sauce, roasted chickpeas, diced onion, quartered tomatoes, chopped cucumber, and crumbled feta.
- Garnish with fresh dill before serving.
Nutrition
- Serving Size: 1 plate (200g)
- Calories: 350
- Sugar: 5g
- Sodium: 600mg
- Fat: 12g
- Saturated Fat: 3g
- Unsaturated Fat: 8g
- Trans Fat: 0g
- Carbohydrates: 45g
- Fiber: 10g
- Protein: 14g
- Cholesterol: 15mg