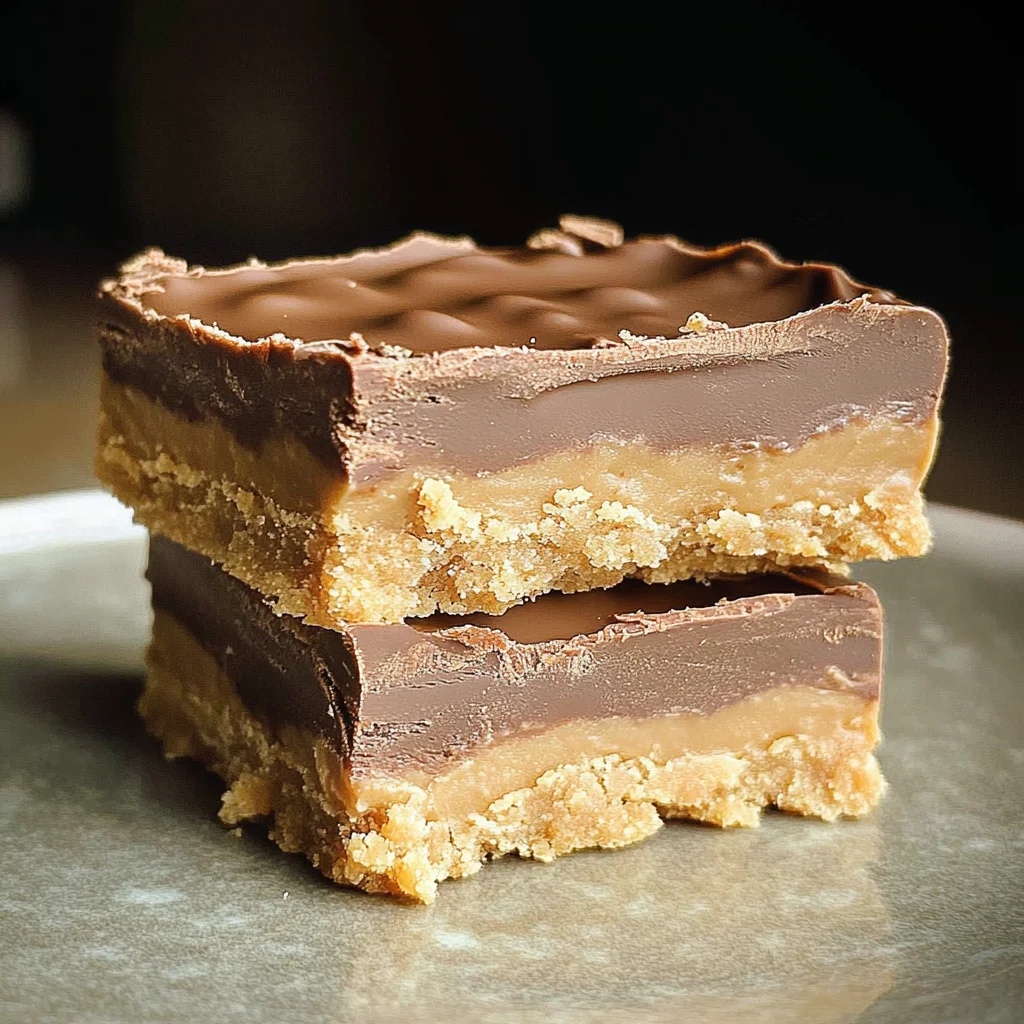
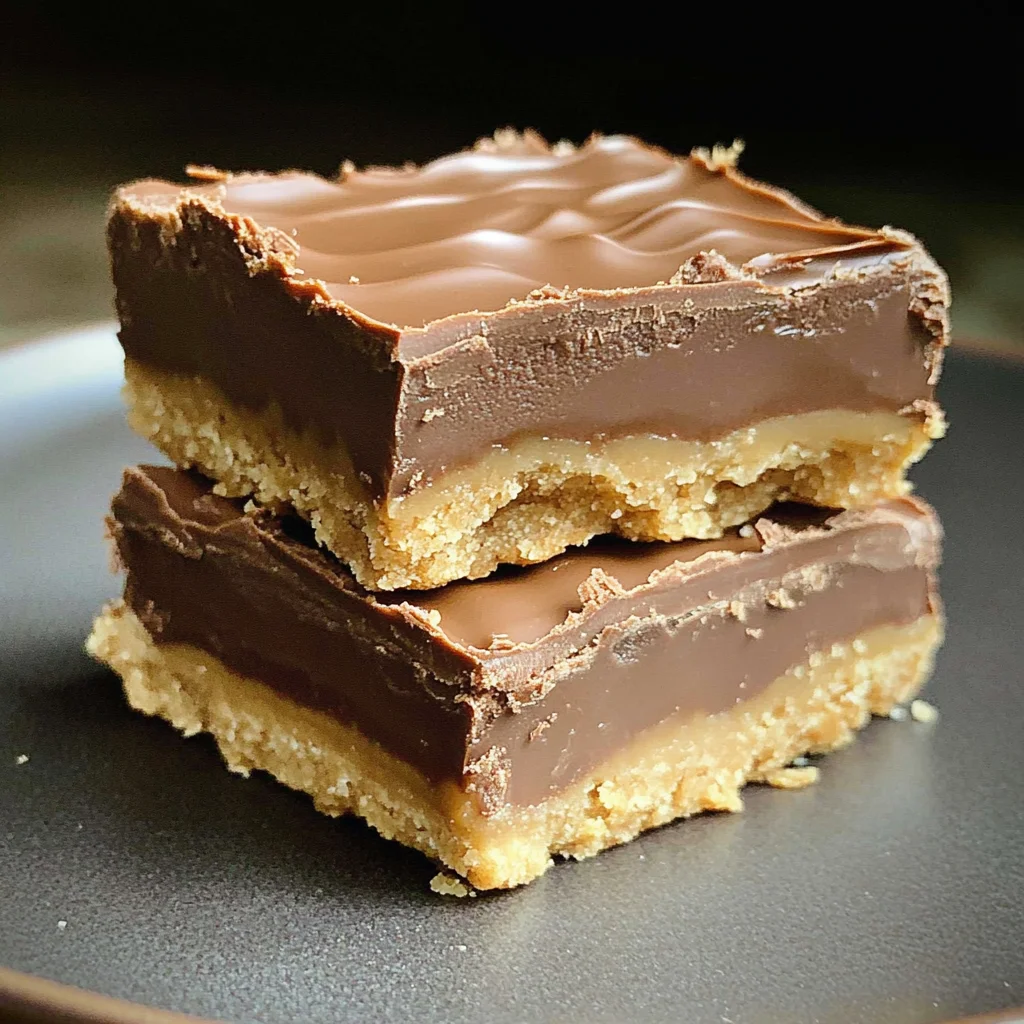
Reese’s Peanut Butter Bars
There’s something incredibly magical about creating a dessert that not only satisfies a sweet tooth but also brings back cherished memories. When I think of Reese’s Peanut Butter Bars, I’m transported back to carefree days with my friends, gathered around the kitchen table, laughter filling the air as we devoured these rich, creamy delights. These bars are more than just a treat; they embody the essence of nostalgia and comfort, combining the irresistible duo of peanut butter and chocolate in a way that feels both familiar and indulgent. If you’re anything like me—someone who can’t resist that sweet-salty combo—then you absolutely must try making these Reese’s Peanut Butter Bars at home! The moment you take your first bite, the creamy peanut butter base will melt in your mouth, perfectly complemented by a silky, decadent chocolate topping. It’s a symphony of flavors that will have you coming back for seconds—and thirds!
What makes this recipe so incredibly special is not just its simplicity but also its ability to transcend generations. The process is quick and straightforward, making it perfect for those busy weeknights when you need something sweet without fussing over complicated techniques. Plus, there’s no baking involved! Trust me when I say that every layer of these bars is crafted with love—from the buttery graham cracker crust that serves as the foundation to the velvety chocolate glaze that crowns it all. Each ingredient plays an essential role in creating this delightful experience, and I can’t wait to guide you through this journey. Let’s grab our aprons and dive into making these Reese’s Peanut Butter Bars together; you’re going to love every moment of it!
Reese’s Peanut Butter Bars: An Irresistible Treat for Any Occasion
These Reese’s Peanut Butter Bars are not just a dessert; they’re a celebration of flavors that evoke joy and warmth with every bite. Perfect for sharing at gatherings or simply indulging on a cozy night in, they bring people together in the sweetest way possible. Whether it’s a holiday party or an impromptu get-together with friends, these bars are sure to be the star of the show.
Ingredients:
As we embark on this culinary journey together, let’s take a moment to appreciate each ingredient we’re about to use. Every single one contributes uniquely to crafting these delectable bars.
- 1 cup graham cracker crumbs: This crunchy base is what gives our bars their delightful texture and subtle sweetness. When selecting graham crackers, look for ones that are made with whole grains for added flavor and nutrition. Crushing them into fine crumbs is crucial; it creates a sturdy foundation for our layers while providing that nostalgic taste reminiscent of childhood desserts.
- 1-1/2 cups creamy peanut butter: Ah, peanut butter—the heart and soul of these bars! Its rich creaminess brings depth and flavor, transforming our mixture into something extraordinarily satisfying. When choosing peanut butter, aim for natural varieties without added sugars or oils; it enhances both taste and health benefits while ensuring we capture that pure peanut essence.
- 4 cups powdered sugar: This ingredient adds sweetness while helping to bind our peanut butter layer together perfectly. Powdered sugar dissolves smoothly into our mixture, creating an ultra-creamy consistency that’s absolutely heavenly! Make sure to sift it if it’s clumpy; we want our bars to have that silky feel without any graininess.
- 1 cup butter, softened: Softened butter is essential here as it melds beautifully with our other ingredients. It adds richness and moisture while ensuring everything comes together harmoniously. For optimal results, let your butter sit out until soft but not melted—this balance is absolutely paramount for achieving the perfect texture.
- 4 cups granulated sugar: A generous addition indeed! Granulated sugar serves two main purposes: it sweetens our chocolate layer and helps achieve that glossy finish we all adore. While we might feel guilty about such indulgence here, remember—we’re creating something extraordinary!
- 1/2 cup milk: Milk acts as the magic elixir for our chocolate layer—it helps dissolve the sugar into a luscious sauce that’ll coat our peanut butter bars perfectly! You can use any type you prefer—dairy or plant-based—just ensure it’s at room temperature before adding it to maintain smoothness.
- 1/2 cup butter (for chocolate layer): Just like before, using softened butter here is critical for whipping up an incredibly smooth chocolate topping! It binds everything together seamlessly while adding richness that’ll make your taste buds dance with joy upon first bite.
- 1 cup chocolate chips: Opting for semi-sweet or dark chocolate chips here will elevate your bars significantly! When melted down into liquid gold atop our peanut buttery goodness, they create an utterly intoxicating combination that’s hard to resist. Choose high-quality brands where cocoa content shines through—trust me on this one!
- 2 teaspoons vanilla: Vanilla extract is often considered the secret weapon in baking; its warm notes enhance all other flavors present in our bars while imparting an inviting aroma throughout your kitchen as they set! Always opt for pure vanilla extract if possible—it makes all the difference!
Equipment You’ll Need:
Having the right tools at hand makes all the difference in your cooking experience! While these equipment pieces aren’t technically ingredients, they serve as essential partners in creating something truly wonderful.
- Mixing bowl: A large mixing bowl allows ample space for all those ingredients to come together harmoniously without overflowing. Opt for glass or metal bowls instead of plastic; they help maintain temperature better during mixing.
- Spatula: A rubber spatula is your best friend when blending ingredients smoothly together and scraping down sides effortlessly—making sure nothing goes to waste!
- 9×13 baking pan: This size pan is ideal for setting up your layers beautifully without them spilling over while keeping them thick enough for cutting later on—the perfect balance!
- Saucepan: A medium saucepan will help us create that wonderfully silky chocolate topping by heating milk and sugar together evenly without burning anything—a non-stick option works best here.
- Whisk: Having a whisk handy allows you to combine ingredients more effectively than stirring alone would—you’ll achieve smoother results faster!
Now we’ve got everything lined up nicely as we prepare ourselves mentally (and physically) to dive into making these Reese’s Peanut Butter Bars!
Preparing the Reese’s Peanut Butter Bars
Step 1: Crushing Graham Crackers
To kick off this delicious adventure, let’s start by crushing those graham crackers into fine crumbs! You can do this either by placing them in a sturdy plastic bag (make sure you remove excess air before sealing) or utilizing a food processor if one happens to be within reach. The goal here is uniformity—small crumbs ensure even distribution throughout our base layer while maintaining structural integrity once baked later on. This step might seem trivial but trust me; achieving those perfect crumb sizes makes all the difference! Once crushed thoroughly (think sand-like consistency), transfer them into your mixing bowl where they’ll soon meet their delightful companions.
Step 2: Mixing Together Heaven
Now comes my favorite part—combining everything into one glorious mixture! In your large mixing bowl filled with graham cracker crumbs awaits creamy peanut butter—a dreamy combination indeed! Add powdered sugar followed by softened butter straight into this heavenly blend before getting ready to dig in with your hands (yes—I said hands!). Mixing manually allows you complete control over consistency; plus feeling those textures come alive under your fingertips is deeply satisfying! Aim for everything being well-combined—no dry pockets left behind—as we pat this mixture firmly onto the bottom of greased 9×13 baking pan gently yet decisively (you want an even layer!). Once you’ve done so successfully… set aside because we’ll return shortly!
Step 3: Crafting Our Chocolate Layer
Now it’s time to turn our attention toward crafting that luscious chocolate layer atop our already magnificent peanut buttery base! In medium saucepan over medium heat combine granulated sugar alongside milk and half cup softened butter; bringing this mixture slowly up until it reaches boiling point requires patience—the bubbling should be consistent throughout after reaching temperature (don’t rush this step!). Allow it boil away fiercely just long enough (about one minute) before whisking furiously until everything melds beautifully into rich sauce before removing from heat entirely (this prevents burning).
Step 4: Incorporating Chocolate Chips
With our saucepan removed from heat source comes another magical moment—we’re adding those glorious chocolate chips along with vanilla extract directly into hot concoction now waiting patiently within its confines! Stirring continuously ensures even melting occurs across every chip present resulting ultimately smoothness akin velvet liquid gold cascading over surface upon final assembly later on…oh my goodness—I can almost taste it already just thinking about how divine it’ll be once poured atop earlier layers described above!
Stay tuned as we continue unraveling more steps leading us ever closer toward indulging ourselves fully…because trust me—we’re almost there!
Creating the Heavenly Layers of Your Reese’s Peanut Butter Bars
Step 5: Pouring on the Liquid Gold
Now that your chocolate mixture is smooth, creamy, and utterly intoxicating, it’s time to pour it over your peanut butter layer. This step might seem simple, but trust me when I say it’s absolutely paramount to achieving that perfect balance between the rich, nutty base and the luscious chocolate topping. As you carefully pour the chocolate onto the peanut butter layer, use a spatula to gently spread it out evenly. You want every bite to be an experience of indulgence; this means ensuring that every corner of your bars is covered with that delightful chocolate goodness. Watch as the chocolate begins to set—this can happen quickly, so be prepared! The surface will start forming a skin almost immediately after pouring; this is completely normal and is a sign that you’re on the right track.
Why is this step so crucial? Well, for one, it helps create that beautiful contrast between textures—the velvety smoothness of the chocolate against the firm peanut butter layer beneath. The heat from the melted chocolate will also slightly warm up the peanut butter base, allowing them to bond beautifully together as they cool. It’s like magic happening right in front of your eyes! Just remember to work quickly but carefully here; we want everything to meld into one harmonious creation without any mishaps.
Step 6: Patience is Key – Letting it Set
After you’ve poured and spread that glorious chocolate layer over your peanut butter base, it’s time for perhaps one of the most critical steps: letting it set. Now, I know patience isn’t always easy in our fast-paced world (trust me, I get it!), but I promise you—this waiting period is worth every second. Allow your Reese’s Peanut Butter Bars to cool at room temperature for about 30 minutes before moving them into the fridge for at least 2 hours. During this time, something truly transformative happens—the layers solidify and meld together into a cohesive unit that’s both visually stunning and tantalizingly delicious.
While they’re chilling in the fridge, take a moment to breathe and appreciate what you’ve created so far. This waiting period allows those flavors to deepen and develop further; it’s during these moments of stillness that your treats become something more than just a dessert—they become a memory in the making! Keep an eye on them as they chill; once you see that glossy top harden just enough to hold its shape when you poke it lightly with a finger, you’ll know they are ready for their grand unveiling.
Step 7: Cutting Into Perfection
Now comes one of my favorite parts: cutting into these divine bars! Once your Reese’s Peanut Butter Bars have chilled completely (and trust me, you’ll know because they will feel firm yet slightly soft), it’s time to slice them into squares or rectangles—whatever shapes make your heart sing! Before diving in with a knife, here’s a little tip: run your knife under hot water for a few seconds and dry it off before cutting. This simple technique helps create clean edges as you slice through those layers without pulling apart or squishing everything together.
As you cut through these bars, take a moment to admire how beautifully the layers have come together—the creamy peanut butter peeking through that luscious chocolate top creates such an enticing visual treat! It’s like unwrapping a present; each piece is filled with anticipation and joy! Don’t rush this step either; allow yourself to enjoy this part of the process because it sets the tone for how people will experience these bars when they take their first bite.
Step 8: The Grand Finale – Serving & Savoring
Finally, once all your pieces are cut and looking enticingly delicious on a platter or serving dish, it’s time for the grand finale: serving them up! There’s something profoundly satisfying about presenting food you’ve lovingly crafted yourself—it becomes an extension of who you are and shares a piece of your heart with others. Whether you’re sharing these Reese’s Peanut Butter Bars at a gathering or simply enjoying them during a cozy night in, remember this moment; it’s where memories are made.
When serving these bars, consider pairing them with a glass of cold almond milk or even some homemade coconut whipped cream for an extra special touch—these additions elevate each bite from merely delicious to utterly extraordinary! Each square promises an explosion of flavor with every taste—a sweet embrace from childhood favorites mixed with adult indulgences that satisfy both body and soul. And don’t forget—these bars can be stored in an airtight container in the refrigerator for up to two weeks (if they last that long!).
So there you have it—your very own batch of Reese’s Peanut Butter Bars that’s ready to impress friends and family alike. Every bite carries not just flavor but love too—a love story between creamy peanut butter and silky chocolate that deserves to be shared again and again. Enjoy every morsel—you’ve earned it!
Storage and Enjoyment Tips for Your Reese’s Peanut Butter Bars
Now that your kitchen is filled with the intoxicating aroma of chocolate and peanut butter, it’s time to savor the fruits of your labor! These Reese’s Peanut Butter Bars not only look stunning but also promise an explosion of flavors that will have your taste buds dancing with joy. But what happens when you have leftovers? Don’t worry; I’ve got you covered with some expert tips to keep these bars fresh and delightful for as long as possible.
Storing Leftover Reese’s Peanut Butter Bars
To preserve the magic of your Reese’s Peanut Butter Bars, storing them properly is absolutely paramount. The best way to do this is by placing them in an airtight container—glass or plastic works beautifully—before tucking them away in the refrigerator. When stored this way, they stay fresh for about a week, so you can indulge at your leisure without any rush. If you want to maintain that creamy texture, consider slipping a slice of bread into the container; it absorbs excess moisture while keeping your bars delectably soft. Trust me on this; every bite after storage tastes just as heavenly as the first! For serving, simply cut out a piece and enjoy it straight from the fridge for a cool treat or let it sit out for a few minutes to come to room temperature, enhancing those rich flavors even more.
Freezing Reese’s Peanut Butter Bars for Later
What if I told you that you could enjoy these scrumptious bars even longer? Freezing them is a fantastic option! To freeze your Reese’s Peanut Butter Bars, simply cut them into squares and arrange them in a single layer on a parchment-lined baking sheet. Once they’re frozen solid—about two hours—transfer them to an airtight container or freezer bag, layering parchment paper between squares to prevent sticking. They’ll keep beautifully in the freezer for up to three months! This flexibility makes them perfect for those unexpected cravings or last-minute gatherings. When you’re ready to enjoy, simply pull out a square and allow it to thaw in the refrigerator or at room temperature. You’ll be amazed at how wonderfully they hold their flavor and texture, making each bite feel like an indulgence even after weeks in the freezer!
Reese’s Peanut Butter Bars

Indulge in the delightful experience of making Reese’s Peanut Butter Bars, a no-bake dessert that brings together the creamy richness of peanut butter and the smooth decadence of chocolate. These bars are perfect for any occasion, whether you’re hosting a gathering or enjoying a cozy night in. With just a handful of simple ingredients, you’ll create a treat that is not only satisfying but also evokes cherished memories with every bite. The layered texture—from the crunchy graham cracker base to the velvety chocolate topping—will have everyone reaching for seconds. Easy to prepare and utterly delicious, these bars are sure to become a favorite in your household.
- Prep Time: 20 minutes
- Cook Time: None
- Total Time: 0 hours
- Yield: Makes approximately 24 servings 1x
- Category: Dessert
- Method: No-Bake
- Cuisine: American
Ingredients
- 1 cup graham cracker crumbs
- 1–1/2 cups creamy peanut butter
- 4 cups powdered sugar
- 1 cup butter, softened
- 1/2 cup butter (for chocolate layer)
- 4 cups granulated sugar
- 1/2 cup milk
- 1 cup chocolate chips
- 2 teaspoons vanilla extract
Instructions
- Crush graham crackers into fine crumbs and combine them in a large mixing bowl with peanut butter, powdered sugar, and softened butter. Mix until well combined and pat the mixture firmly into the bottom of a greased 9×13 baking pan.
- In a medium saucepan over medium heat, combine granulated sugar, milk, and 1/2 cup softened butter. Bring to a boil for one minute while whisking continuously.
- Remove from heat and stir in chocolate chips and vanilla extract until melted and smooth.
- Pour the chocolate mixture over the peanut butter layer, spreading it evenly with a spatula.
- Allow to cool at room temperature for about 30 minutes before refrigerating for at least two hours until set.
- Slice into squares and serve.
Nutrition
- Serving Size: 1 square (45g)
- Calories: 240
- Sugar: 23g
- Sodium: 60mg
- Fat: 12g
- Saturated Fat: 6g
- Unsaturated Fat: 4g
- Trans Fat: 0g
- Carbohydrates: 29g
- Fiber: 1g
- Protein: 3g
- Cholesterol: 15mg