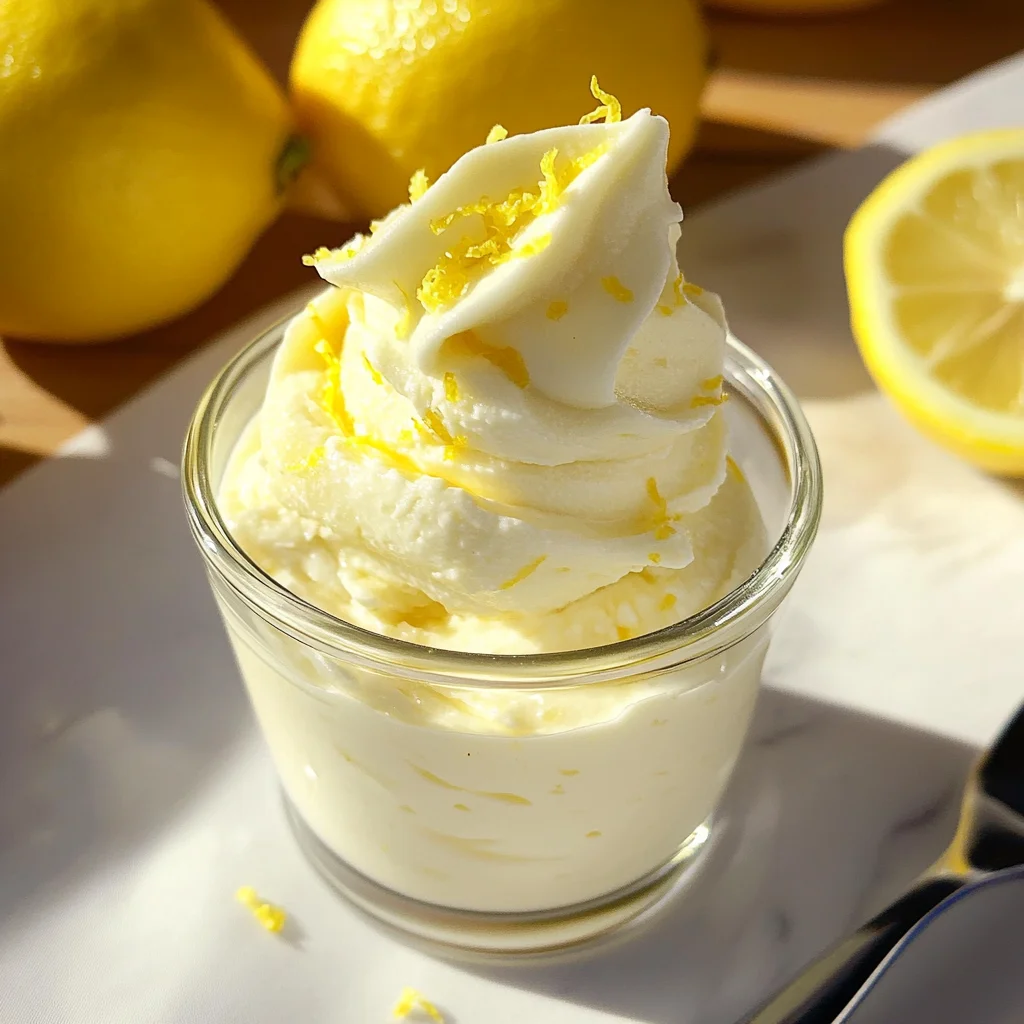
Lemon Mousse
There’s something profoundly magical about creating a dessert that captures the very essence of summer in each luscious bite. When I think of a light, refreshing treat that embodies sunshine and joy, my mind immediately drifts to this Lemon Mousse. With each spoonful, you’re not just tasting a dessert; you’re experiencing a vibrant symphony of flavors, where the bright tang of lemon dances harmoniously with the luxurious creaminess. This recipe is more than just food—it’s an experience that invites family and friends to gather around the table, sharing stories and laughter while savoring every delightful mouthful. The texture is airy yet rich, a juxtaposition that feels utterly intoxicating, making it an unforgettable finish to any meal.
What I adore most about this Lemon Mousse is its simplicity. With only four ingredients, you can whip up this elegant dessert in mere minutes, leaving you with plenty of time to bask in the warmth of your loved ones’ company. This mousse radiates warmth and comfort while maintaining a lightness that makes it perfect for those hot summer days when you crave something sweet but don’t want to feel weighed down. Trust me on this: once you experience the joy of making and sharing this treat, it will become a cherished staple in your culinary repertoire.
Lemon Mousse: A Light and Refreshing Delight
Let’s embark on this culinary journey together! Making Lemon Mousse is straightforward yet so rewarding; it’s perfect for both seasoned cooks and those just beginning their cooking adventures. This delightful dessert will impress everyone at your gathering without requiring hours in the kitchen. So roll up your sleeves, gather your ingredients, and let’s create something truly extraordinary!
Ingredients:
As we dive into our ingredient list for this delicious Lemon Mousse, take a moment to appreciate each component’s role in crafting this beautiful dessert. Each ingredient brings its own magic to the table!
- 2 cups heavy cream. The star of our show! Heavy cream is essential for achieving that luscious texture we all crave in a mousse. When whipped, it transforms into fluffy clouds of creamy delight that serve as the base for our dessert. Look for heavy cream with at least 36% fat content; this high-fat level ensures stability and richness without becoming overly sweet or cloying. Remember that room temperature cream whips more easily than cold, so if possible, let it sit out for about 15 minutes before starting.
- 2 tablespoons confectioner’s sugar. This finely powdered sugar dissolves beautifully into our heavy cream, ensuring a silky-smooth texture without any graininess. Adding a touch of sweetness enhances the flavor profile without overpowering the natural tartness of our lemon curd. If you’re looking for alternatives or wish to reduce sugar intake, feel free to experiment with powdered stevia or monk fruit sweetener—just be sure to adjust amounts according to taste!
- Pinch of salt. Now here’s where things get interesting! A pinch of salt may seem like an insignificant addition, but trust me—it plays a crucial role in elevating the flavors in your Lemon Mousse. Salt serves as a flavor enhancer; it balances sweetness while accentuating the zesty notes from our lemon curd. It’s one of those non-negotiable ingredients that adds depth to your dish.
- 1 cup lemon curd. Ahh, liquid gold! Lemon curd is what gives our mousse its vibrant flavor and sunshine-like brightness. The combination of sweetened egg yolks and freshly squeezed lemon juice creates an intensely flavored custard that melds beautifully with whipped cream. When purchasing lemon curd, opt for high-quality brands or even better—homemade if you’re feeling adventurous! Homemade lemon curd can be made with simple ingredients and offers an unmatched freshness that store-bought versions often lack.
- 1 tablespoon lemon zest. Finally, let’s talk about zest! This simple addition provides aromatic oils from the skin of lemons that elevate our mousse’s flavor profile significantly. It brings forth citrusy brightness without adding extra liquid—a crucial element in keeping our mousse fluffy and light.
Equipment You’ll Need:
Now that we’ve gathered all our ingredients let’s talk about the tools you’ll need to make this delightful Lemon Mousse smoothly come together in your kitchen! Having the right equipment at hand not only streamlines your cooking process but also ensures success every step of the way.
- Mixing bowl – A large mixing bowl is essential for combining all our ingredients effectively while allowing enough room for whipping air into our heavy cream without splattering everywhere! Choose one that’s big enough to hold everything comfortably—glass or stainless steel works wonderfully because they are non-reactive.
- Hand or stand mixer – While you could whip by hand (for those who enjoy an arm workout!), I wholeheartedly recommend using either a hand mixer or stand mixer equipped with whisk attachments for maximum efficiency and ease during whipping! These tools help achieve perfectly aerated peaks quickly—a key element when creating light mousses like ours.
- Spatula – A silicone spatula will be your best friend during this process! It’s perfect for gently folding together ingredients like whipped cream and lemon curd without deflating all that lovely air you’ve worked hard to incorporate into your mousse.
- Dessert glasses – While not strictly necessary, having pretty dessert glasses makes serving feel extra special! Opt for clear glass cups or small ramekins so everyone can admire those beautiful layers within; it’s all about presentation after all!
- Zester or microplane – For zesting lemons effortlessly, having a good quality zester or microplane allows you to capture every bit of aromatic goodness from citrus peels while avoiding any bitter white pith underneath—this little tool is worth its weight in gold!
Preparing the Lemon Mousse
Step 1: Whip Up That Cream!
Begin by pouring the heavy cream into your mixing bowl along with confectioner’s sugar and a pinch of salt—this combination is crucial as it sets up the foundation for our light and airy structure within the mousse itself! Using either your hand mixer or stand mixer fitted with whisk attachments on medium speed, whip everything together until medium peaks form—this should take about 2-3 minutes depending on how powerful your mixer is! Medium peaks mean when you pull out the whisk attachment; there should be soft swirls holding their shape but able to easily fold back down upon themselves—that lightness we strive for!
Step 2: Fold In Liquid Gold
Now comes one of my favorite parts: introducing our luscious lemon curd into this fluffy cloud we’ve created! With gentle precision (you don’t want to deflate all those beautiful air bubbles), use your spatula to fold it into the whipped cream mixture along with your freshly grated lemon zest until evenly incorporated—it should look like sunshine incarnate! Take care not to over-mix here; we want everything blended but still maintaining some volume—the result will be an utterly intoxicating blend bursting with citrus vibrancy!
Step 3: Portion It Out
Once you’ve folded everything together nicely—or should I say ‘delicately’?—it’s time to portion out this dreamy concoction into individual serving glasses (about half a cup per serving). I usually use small dessert glasses; they make such an impressive presentation while showing off those beautiful swirls inside! Feel free also to add dollops of extra whipped cream on top if desired along with additional sprinkles of lemon zest—it adds flair and keeps things visually appealing!
Step 4: Chill Out!
After filling up those lovely glasses brimming with lemon mousse goodness comes perhaps one of my favorite steps—the wait! Cover each glass loosely with plastic wrap before refrigerating them anywhere between one hour up until twenty-four hours if planning ahead—a chilled mousse allows flavors time to meld beautifully together while firming up slightly so they’re perfectly scoopable later on!
And there you have it—a delightful journey towards creating this enchanting Lemon Mousse awaits you! As we continue through these steps together, remember each moment spent preparing is infused with love—and trust me—you’ll taste every ounce when it’s finally time to indulge!
Whipping Up Your Dreamy Lemon Mousse
Step 5: Folding in the Lemon Curds
Now that you have beautifully whipped cream with medium peaks, it’s time to bring in that luscious lemon curd and zesty lemon peel. This is where your mousse transforms into a vibrant, sun-kissed dessert. With a spatula in hand, gently fold the lemon curd into your whipped cream mixture. The key here is to be gentle—think of it as a tender embrace rather than a vigorous mix. This technique, known as folding, helps to maintain the airy texture you’ve worked so hard to create with the whipped cream. You want to gently lift and scoop from the bottom of the bowl while rotating it, allowing the ingredients to combine without deflating the fluffy peaks.
What makes this step truly magical is how the rich, creamy sweetness of the whipped cream melds with the tart, zesty brightness of the lemon curd. It’s an absolute symphony of flavors! As you fold, keep an eye out for streaks of white—those little hints tell you that you’re not quite done yet. Aim for a beautifully blended mixture where you can still see specks of zest floating throughout; this visual cue signifies you’ve achieved that delightful balance of texture and flavor.
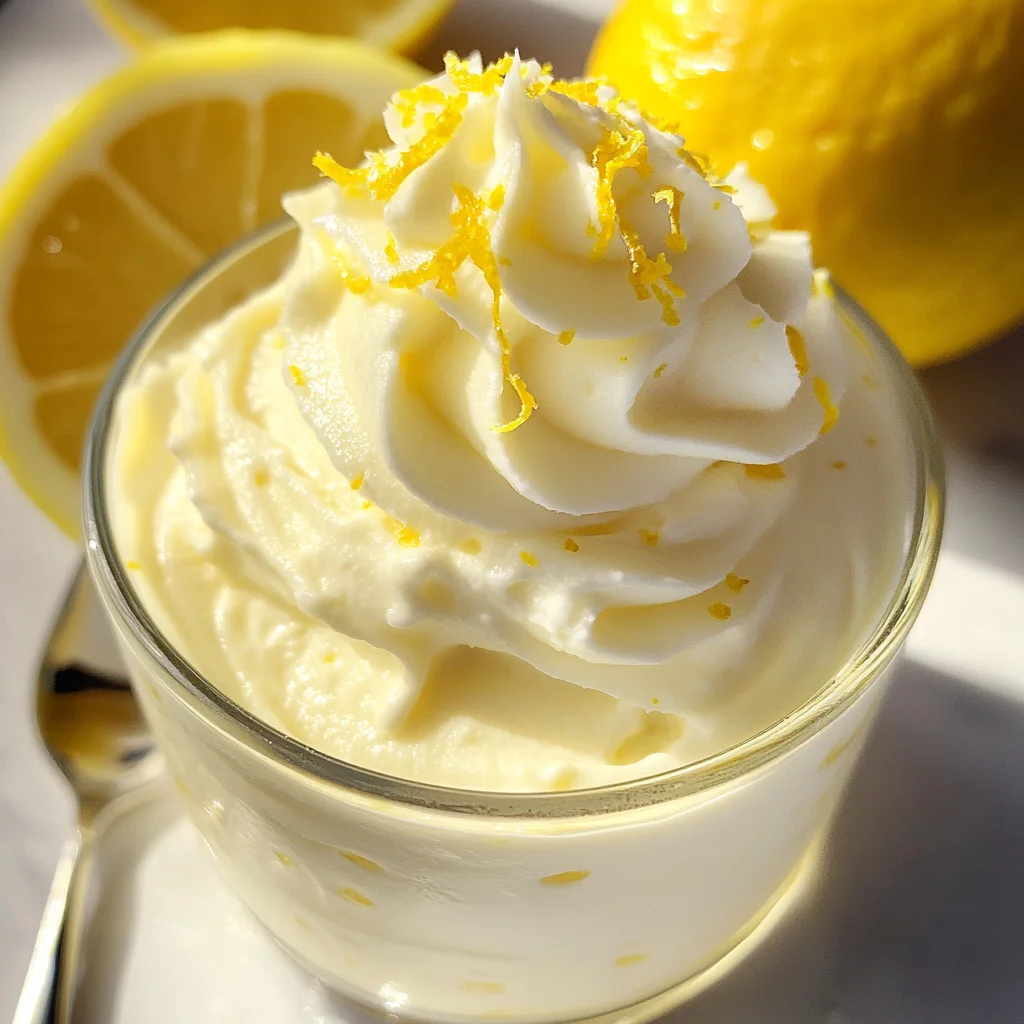
Step 6: Portioning Your Delight
Once your mousse is perfectly blended, it’s time to portion it into those charming dessert glasses! Using a ladle or a spoon, carefully divide the mousse into eight small dessert glasses, filling them about halfway or just over half full for that generous touch we all love. Each glass should hold roughly ½ cup of this velvety goodness; trust me when I say this portion size is just right for indulging without overwhelming your taste buds.
As you scoop and serve, don’t forget to take a moment to admire the lightness and fluffiness of each serving—it’s like capturing sunshine in a glass! The way the mousse sits there, inviting and elegant, sets up an expectation for what’s to come. If you’re feeling particularly creative (and why wouldn’t you?), consider layering some extra lemon zest or even fresh berries at the bottom of each glass before adding your mousse. This little surprise can elevate your dessert both visually and flavor-wise!
Step 7: The Importance of Chilling
Now comes one of my favorite parts—the chilling process! Cover those delightful dessert glasses with plastic wrap or foil (a non-stick option works wonders), and pop them in the refrigerator for at least one hour but ideally up to twenty-four hours if you’re planning ahead. Why chill? Well, allowing our lemon mousse to rest not only firms it up into that perfect creamy consistency but also gives all those amazing flavors time to mingle and deepen. Think about it: just like a good friendship or relationship takes time to develop, so does great food!
During this chilling period, something truly transformative happens—the mousse sets beautifully while maintaining its lightness. It’s as if each component harmonizes together into one cohesive experience waiting patiently until it’s ready to be enjoyed. So resist any temptation to rush this step; I promise you will be rewarded with an utterly intoxicating dessert that’s poised for perfection when served cold.
Step 8: Garnishing Your Creation
Finally, it’s time for that finishing touch! After chilling your lemon mousse has set nicely and is looking absolutely stunning in its glass container—now imagine lifting off that cover and revealing its silky surface! Before serving, consider garnishing each glass with a dollop of freshly whipped cream or a sprinkle of additional lemon zest on top. This isn’t just about aesthetics; these garnishes add layers of flavor and texture that enhance every bite.
When adding whipped cream, think about achieving soft peaks—fluffy clouds waiting to grace your mousse! For zesting lemons, use a microplane or fine grater for delicate shavings that burst with citrus aroma as they hit your dessert like confetti on a celebration cake. These small details are absolutely paramount—they elevate your dish from delightful to extraordinary! Ensure everything is chilled before serving; this maintains the airy texture while offering that refreshing bite when enjoyed straight from the fridge.
Final Touches: Serving Your Lemon Mousse
Gather your friends or family around because it’s finally time to unveil your labor of love! As you serve this luscious lemon mousse, watch their faces transform from curiosity to delight as they taste those vibrant flavors dancing on their tongues. Trust me when I say there’s nothing quite like witnessing someone savor your creation; it’s profoundly satisfying!
Encourage them to take their time with each spoonful—this dessert isn’t just food; it’s an experience meant to be savored slowly, relishing every creamy bite filled with zesty brightness. Whether it’s after dinner on a warm summer night or as an afternoon treat during tea time, your easy lemon mousse is sure to become a cherished staple in everyone’s recipe collection—and perhaps even inspire new memories shared around sweet conversations.
Let this recipe remind us that cooking isn’t merely about following steps but about creating moments filled with joy and love—and I can’t wait for you all to experience it too!
Storage and Enjoyment Tips for Your Lemon Mousse
Now that your lemon mousse is elegantly nestled in its little dessert glasses, it’s time to let the anticipation build. The aroma of fresh lemons wafts through the air, and I can practically see my friends gathering around the table, their eyes lighting up at the sight of this creamy delight. Trust me on this: the waiting only makes each spoonful taste that much sweeter! But what about those precious leftovers? Let’s talk about how to keep this exquisite treat fresh and delightful for as long as possible.
Storing Leftover Lemon Mousse
When it comes to preserving your luscious lemon mousse, I recommend using airtight containers to ensure every bit of that silky goodness stays intact. Glass jars or even plastic food storage containers work beautifully—just make sure they’re sealed tightly to prevent any unwanted odors from seeping in. You can store it in the refrigerator for up to three days, though I doubt it will last that long once your family gets a taste! To maintain its creamy texture, avoid leaving it out at room temperature for too long; instead, pop that container back into the fridge after serving. I’ve found that a simple trick like placing a slice of bread within the container can help absorb excess moisture, keeping your mousse fluffy and divine. After storage, you’ll find that the flavors deepen and mellow, making each bite a profoundly satisfying experience. If you want to serve it again, just scoop it out cold—no reheating necessary!
Freezing Lemon Mousse for Later
If you’re looking to extend the life of your lemon mousse even further, consider freezing it! Yes, this delightful dessert can be frozen with a little care. Just transfer your mousse into freezer-safe containers or silicone molds—this helps maintain its shape while preventing freezer burn. It will keep beautifully in there for about 1-2 months. When you’re ready to indulge again, simply transfer it from the freezer to the refrigerator about 4 hours before serving so it can thaw gradually—a slow thaw ensures that creamy texture remains intact. Freezing is such a convenient option; imagine having this elegant treat ready for impromptu gatherings or surprise guests! It’s like having a little secret stash of joy waiting for you whenever you need a burst of sunshine in dessert form.
Lemon Mousse

Indulge in the refreshing delight of Lemon Mousse, a quick and easy dessert that captures the essence of summer in every light and fluffy bite. With just four key ingredients, this creamy treat combines the zesty brightness of lemon curd with the airy texture of whipped cream, creating an experience that’s both elegant and satisfying. Perfect for gatherings, picnics, or simply as a sweet escape on a warm day, this mousse invites you to savor its vibrant flavors while sharing moments of joy with family and friends. Simple to prepare and utterly delicious, this Lemon Mousse will quickly become a cherished favorite in your dessert repertoire.
- Prep Time: 15 minutes
- Cook Time: 0 minutes
- Total Time: 15 minutes
- Yield: Serves 8
- Category: Dessert
- Method: No-bake
- Cuisine: American
Ingredients
- 2 cups heavy cream
- 2 tablespoons confectioner’s sugar
- Pinch of salt
- 1 cup lemon curd
- 1 tablespoon lemon zest
Instructions
- In a large mixing bowl, combine heavy cream, confectioner’s sugar, and a pinch of salt. Use a hand or stand mixer to whip until medium peaks form (about 2-3 minutes).
- Gently fold in the lemon curd and lemon zest until well combined, taking care not to deflate the whipped cream.
- Portion the mixture into individual dessert glasses (about half a cup each).
- Cover lightly with plastic wrap and refrigerate for at least one hour or up to twenty-four hours before serving.
Nutrition
- Serving Size: 1 glass (120g)
- Calories: 380
- Sugar: 26g
- Sodium: 45mg
- Fat: 36g
- Saturated Fat: 23g
- Unsaturated Fat: 11g
- Trans Fat: 0g
- Carbohydrates: 24g
- Fiber: 0g
- Protein: 2g
- Cholesterol: 110mg