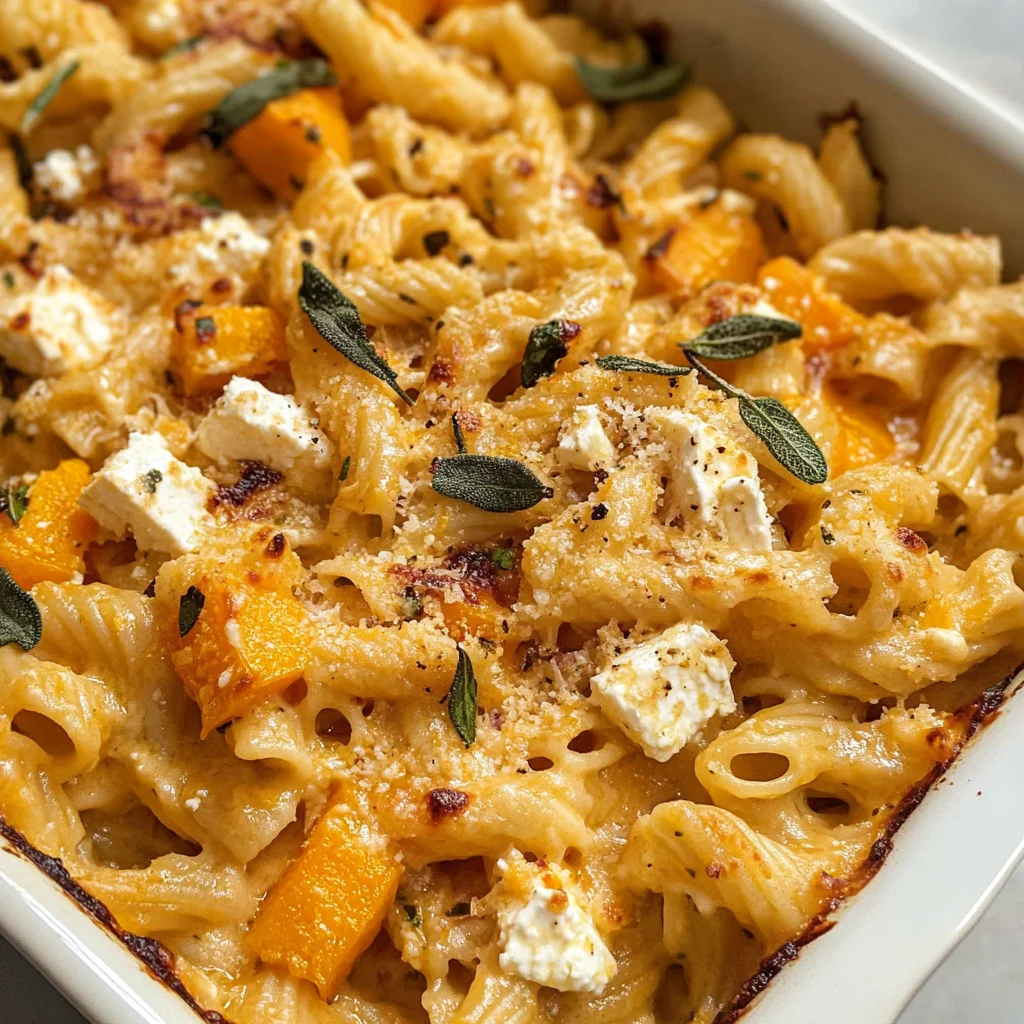
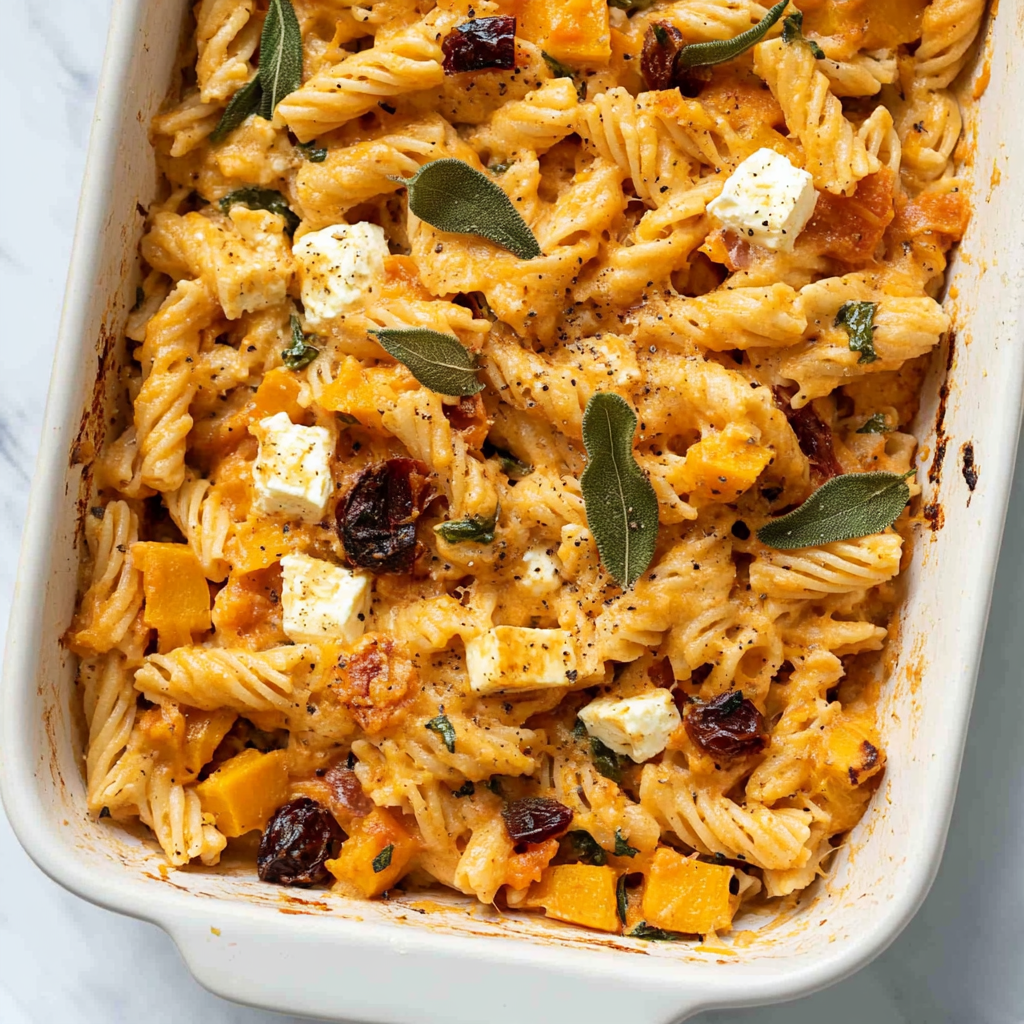
Baked Feta and Butternut Squash Pasta with Sage and Garlic
Ah, my dear friend, let me take you on a delightful culinary journey with one of my all-time favorite recipes: Baked Feta and Butternut Squash Pasta with Sage and Garlic. This dish is not merely a meal; it’s an experience that stirs the senses and warms the heart. Imagine a cozy evening, the crisp autumn air nipping at your cheeks as you gather around the table with loved ones. The aroma of roasted butternut squash mingling with the creamy, slightly tangy feta wafts through the air, inviting everyone to come closer. Each bite is a beautiful symphony of flavors—sweet, savory, and just a hint of spice—that evokes memories of fall gatherings and shared laughter.
There’s something truly magical about how simple ingredients can transform into such a comforting dish. This Baked Feta and Butternut Squash Pasta with Sage and Garlic brings together the richness of feta cheese, the earthiness of roasted squash, and the aromatic allure of sage and garlic. It embodies the essence of fall cooking—hearty yet easy enough for a weeknight dinner. Trust me when I say this dish will be on repeat in your household! It’s not just quick to whip up; it’s also profoundly satisfying. I promise you, each forkful will embrace your taste buds like a warm hug on a chilly evening.
Baked Feta and Butternut Squash Pasta with Sage and Garlic: A Cozy Autumn Delight
Let’s dive into this wonderful recipe together! There’s something incredibly rewarding about taking fresh ingredients and crafting them into a warming plate of pasta that feels like home. The combination of baked feta melting into luscious creaminess paired with tender pieces of butternut squash is simply divine—and oh, how it sings when mingled with minced sage and garlic!
Ingredients:
As we embark on this culinary adventure, let’s explore each ingredient that plays a pivotal role in making this dish sing. Each component contributes its own unique flavor profile and texture to create something truly special.
- 5 cups Butternut Squash (about 1 large butternut squash). Roasting butternut squash transforms its naturally sweet flavor into something utterly intoxicating—caramelized edges that yield to tender flesh when you bite into it. Look for squash that feels heavy for its size with smooth skin; blemishes are signs to steer clear. When cubed and roasted, it becomes golden nuggets that contrast beautifully against the creamy feta.
- 1/2 cup Olive Oil (plus more for drizzling). Olive oil is liquid gold in this recipe; it brings richness while helping to caramelize our vegetables beautifully. A good quality extra virgin olive oil will impart its own fruity notes, enhancing the overall flavor profile. Drizzling some over your feta before baking ensures it browns perfectly while keeping everything moist.
- 2 hefty pinches Kosher Salt (just shy of 1/2 tsp). Salt enhances flavors—it’s non-negotiable in cooking! It draws out moisture from the squash while roasting, creating those delectable crispy bits we all love. Kosher salt is preferred here because its flaky texture easily disperses throughout your ingredients without overwhelming them.
- 1 hefty pinch Red Pepper Flakes (optional). If you enjoy a little heat in your dishes, these red pepper flakes are perfect for adding just enough kick without overpowering the other flavors. They add depth to the dish while balancing out the sweetness of the squash beautifully.
- 1 8 oz block Feta Cheese. Feta cheese is truly extraordinary in this recipe. Its salty tanginess pairs perfectly with our sweet roasted squash, creating that beautiful contrast between flavors. Opt for high-quality Greek feta if possible—the creamier version works wonders when baked! As it melts, it becomes rich and luscious—a true highlight of this meal.
- 1 lb Pasta (such as rotini, orzo, or ditalini). The choice of pasta matters more than you’d think! Short pastas like rotini or ditalini hold onto sauce magnificently—perfect for soaking up every bit of that creamy goodness from our feta mixture! Just make sure to cook it al dente so it retains its shape amidst all those sumptuous flavors.
- 10 leaves Fresh Sage (minced). Fresh sage has an earthy essence that complements our autumnal theme so beautifully! Its aromatic qualities elevate each mouthful while adding depth to our dish—truly one of nature’s gifts during fall cooking!
- 3 cloves Garlic (finely minced). Ahh, garlic—the aromatic superstar! Adding minced garlic at just the right moment infuses our pasta with warmth; it melds seamlessly with both sage and feta for an utterly harmonious flavor experience.
- 1 tbsp Hot Honey (regular honey is fine too). The drizzle of hot honey is optional but oh-so-delicious! It adds a touch of sweetness paired with spice—this unexpected element takes your taste buds on an exciting ride as they dance between sweet and savory.
- Fresh Cracked Black Pepper. Finally, don’t forget freshly cracked black pepper! It rounds out flavors beautifully while adding subtle heat—just enough to keep things interesting without overshadowing our star ingredients!
Equipment You’ll Need:
Now that we have our ingredients ready to go, let’s talk about some essential tools that will make your cooking experience smoother and more enjoyable! While they may not be ingredients, these kitchen companions are crucial partners in creating something wonderful together.
- Large Baking Dish – A sturdy baking dish allows us to roast our butternut squash evenly while providing ample space for all those flavorful ingredients. If you have one that’s slightly deeper than usual, that’s even better—it helps capture any juices from roasting!
- Sharp Knife & Cutting Board – A good quality knife makes cutting through tough butternut squash much easier—and trust me; you’ll want one that slices through smoothly without much effort! Pair this with a solid cutting board for safety as you prep your fresh ingredients.
- Pot for Boiling Pasta – You’ll need a large pot to boil water for cooking pasta properly—this allows each piece to cook uniformly without sticking together. Make sure it’s big enough so there’s plenty of room!
- Colander or Strainer – Once your pasta reaches perfect al dente perfection, you’ll want an effective colander or strainer ready—this helps separate cooked noodles from starchy water seamlessly!
Incorporating these tools into your kitchen routine can make all the difference in how enjoyable cooking becomes—you’ll find yourself breezing through each step effortlessly!
Preparing the Baked Feta and Butternut Squash Pasta with Sage and Garlic
Step 1: Preheat Your Oven
Let’s get started by preheating your oven to 400°F (200°C). Preheating is crucial because it ensures even cooking right from the start; we want our butternut squash to caramelize beautifully rather than steam away in cold air. While we wait for it to heat up, grab that enchanting butternut squash—I find peeling can be tricky; use a sharp vegetable peeler or knife carefully! Cut off both ends first before standing it upright for stability as you slice downwards into manageable cubes about ¾ inch thick. Don’t rush this step; uniformity leads to even roasting!
Step 2: Prepare Your Butternut Squash
In a mixing bowl large enough to accommodate all those cubes comfortably, toss them generously with olive oil—make sure every piece gets coated well! Add two hefty pinches of kosher salt along with several cranks from your pepper mill; these seasonings amplify flavors immensely during roasting time! Now transfer everything onto your chosen baking dish; arrange them evenly across while leaving space around each piece so they can brown nicely without overcrowding their edges—a crucial factor here!
Step 3: Add Feta Cheese
Nestle an unwrapped block of feta cheese right in the center among those vibrant cubes—we want it surrounded by all those gorgeous veggies so they can share their deliciousness during baking time together! Drizzle some extra olive oil over top along with a pinch more salt plus red pepper flakes if desired—this spicy element adds incredible complexity later on when melted harmoniously throughout everything else below! Now gently place this masterpiece into preheated oven where magic shall begin unfolding…
Step 4: Roast & Check Progress
Set your timer for thirty minutes—but don’t walk away completely just yet! At around twenty-five minutes mark check how things are looking by opening oven door slightly (don’t let heat escape too much) gently shift around some pieces without disturbing feta too much underneath—you’re aiming only at ensuring nothing burns below while also allowing moisture escape so they roast instead of steaming away inside there… We want crispy edges here after all!
Stay tuned as we continue crafting this beautiful meal together—it only gets better from here on out!
Step 5: Embracing the Aromatic Symphony of Garlic and Sage
Once that glorious feta has turned a golden brown, it’s time to awaken the dish with two of my favorite flavor enhancers: garlic and fresh sage. As you remove the baking dish from the oven, take a moment to appreciate the intoxicating aroma wafting up from the mixture—it’s truly something special! This is where you’ll introduce your finely minced garlic and those fragrant, vibrant sage leaves. Stir them in gently, allowing the heat from the baking dish to release their essential oils. Trust me on this: this step is crucial because garlic adds a layer of sweetness while sage brings an earthy, almost woodsy note that beautifully complements the butternut squash.
But why do we add these ingredients right now, rather than cooking them beforehand? The answer lies in their ability to retain their fresh flavors when added at this stage. Cooking them too long can lead to bitterness or loss of those bright notes that make this dish sing. As you mix everything together, you’ll notice how the melted feta starts to create a creamy sauce—this is your cue for the next addition!
Step 6: Marrying Pasta and Sauce
Now comes the exciting moment where we bring everything together—your pasta! Ensure that it has been cooked al dente in generously salted water; this is non-negotiable because undercooked pasta will hold its shape better and absorb those delectable flavors without turning mushy. Remember to reserve at least 2 cups of that pasta water before straining. Why save it? This starchy liquid acts as magic potion, helping to bind your sauce and pasta together while adding creaminess without needing heavy creams or dairy.
As you add your drained pasta to the baking dish, envision how all those elements—the sweet roasted butternut squash, creamy feta, aromatic garlic, and sage—will marry with each twist of your spoon. Pour in one cup of reserved pasta water as well; it’s essential for achieving that luxurious texture we’re after. Don’t rush this part—gently fold everything together while keeping an eye on consistency. If it feels too dry or clumpy (which can happen if your pasta was cooked just slightly too long), don’t hesitate to drizzle in more reserved water until you achieve that perfectly silky sauce.
Step 7: Elevating with Seasoning
Now that everything is mixed harmoniously, it’s time for a taste test! Dive in with a fork and see how everything melds together—the richness of the feta should shine through while complementing the sweetness of butternut squash. At this point, it’s paramount to season generously with fresh cracked black pepper and perhaps another pinch of salt if needed; remember that seasoning is the difference between a good dish and an extraordinary one! The interplay between saltiness from the feta, sweetness from the honey (if you choose to use it), and freshness from herbs creates a truly profound flavor experience.
If you feel adventurous—and I hope you do—consider adding another drizzle of hot honey right before serving; not only does it create an enticing contrast against all those savory elements, but it also adds a delightful kick that makes each bite utterly unforgettable. Keep in mind that everyone’s palate varies—so adjust accordingly! This step is about finding balance; culinary creativity thrives here.
Step 8: The Final Flourish
With everything beautifully combined in your baking dish, let’s take a moment for presentation—a critical aspect that elevates any meal into something truly special. Consider garnishing your Baked Feta and Butternut Squash Pasta with additional freshly minced sage leaves or an extra sprinkle of red pepper flakes for those who enjoy a little heat. A light drizzle of high-quality olive oil over the top can transform your dish into something resembling art on a plate!
Before serving, I recommend letting it rest for about five minutes after taking it out of the oven. This allows flavors to settle—a small yet transformative step often overlooked in cooking. During this time, aromas will mingle even further; trust me when I say patience pays off! Use this time to prepare your table or pour some sparkling water for your guests—after all, sharing food is one of life’s greatest joys.
Final Touches on Your Baked Feta and Butternut Squash Pasta
Your masterpiece is now ready for consumption! As you serve up warm bowls of this comforting dish filled with layers upon layers of flavor, take a moment to savor not just what’s on your plate but also what has brought everyone together around it—the love poured into every step reflects deeply in every bite shared with family or friends.
I promise you that once you experience this Baked Feta and Butternut Squash Pasta with Sage and Garlic, you’ll want to keep making it throughout fall (and beyond!). It’s not just easy—it’s profoundly satisfying! So grab your forks; it’s time to dig into comfort food heaven!
Storage and Enjoyment Tips for Your Baked Feta and Butternut Squash Pasta with Sage and Garlic
Ah, the moment has arrived! Your kitchen is filled with the intoxicating aroma of roasted butternut squash mingling beautifully with the creaminess of baked feta, sage, and garlic. It’s a dish that not only fills your belly but warms your heart. Whether you’re gathered around the dinner table with friends or enjoying a quiet evening alone, I promise you this Baked Feta and Butternut Squash Pasta with Sage and Garlic will bring joy to every bite. But what happens when you have leftovers? Let me share some fantastic storage tips that will keep your dish tasting delightful for days to come.
Storing Leftover Baked Feta and Butternut Squash Pasta with Sage and Garlic
To ensure your leftover Baked Feta and Butternut Squash Pasta with Sage and Garlic stays vibrant and delicious, it’s essential to store it properly. Transfer any remnants into an airtight container; glass containers or BPA-free plastic work wonders for preserving flavor. Place it in the refrigerator, where it will keep fresh for about 3 to 5 days. Now, here’s a pro tip: if you’re worried about the texture of your pasta becoming too dry, consider placing a slice of bread inside the container before sealing it. This clever trick helps absorb moisture without compromising the pasta’s taste! When you reheat this comforting dish, I recommend adding a splash of reserved pasta water or a drizzle of olive oil to bring back its creamy goodness—trust me on this, as it makes all the difference.
Freezing Baked Feta and Butternut Squash Pasta with Sage and Garlic for Later
If you find yourself with an abundance of this heavenly pasta or simply want to prepare a meal in advance, freezing is an excellent option. To do so properly, allow your dish to cool completely before transferring it into a freezer-safe container or heavy-duty freezer bag—just make sure you squeeze out as much air as possible to prevent freezer burn! When stored this way, your pasta can last up to three months in the freezer. When you’re ready to enjoy it again, simply thaw it in the refrigerator overnight before reheating. I adore this method because it provides such convenience on busy weeknights; imagine pulling out a homemade meal that just requires warming up while filling your home with inviting aromas once more!
Baked Feta and Butternut Squash Pasta with Sage and Garlic

Indulge in the warmth of Baked Feta and Butternut Squash Pasta with Sage and Garlic, a delightful dish that captures the essence of autumn. This recipe features creamy feta cheese melding beautifully with sweet roasted butternut squash, all enhanced by the aromatic notes of sage and garlic. Perfect for a cozy evening, this pasta dish not only nourishes the body but also warms the heart with each comforting bite. Quick to prepare yet sophisticated enough for gatherings, it’s sure to become a favorite in your household.
- Prep Time: 15 minutes
- Cook Time: 40 minutes
- Total Time: 55 minutes
- Yield: Approximately 6 servings 1x
- Category: Main
- Method: Baking
- Cuisine: Autumn
Ingredients
- 5 cups cubed butternut squash
- 1/2 cup olive oil
- 2 pinches kosher salt
- 1 pinch red pepper flakes (optional)
- 8 oz block feta cheese
- 1 lb pasta (such as rotini or ditalini)
- 10 leaves fresh sage (minced)
- 3 cloves garlic (minced)
- Freshly cracked black pepper
Instructions
- Preheat your oven to 400°F (200°C).
- Toss the cubed butternut squash with olive oil, kosher salt, and red pepper flakes. Spread evenly in a baking dish and place an unwrapped block of feta in the center.
- Roast for 30 minutes until the squash is tender and the feta is golden.
- Remove from the oven and stir in minced garlic and sage.
- Cook pasta according to package instructions until al dente; reserve 1 cup of pasta water before draining.
- Combine drained pasta with roasted mixture, adding reserved pasta water as needed for creaminess.
- Season with freshly cracked black pepper and adjust salt if necessary before serving.
Nutrition
- Serving Size: 1 bowl (about 300g)
- Calories: 420
- Sugar: 6g
- Sodium: 550mg
- Fat: 19g
- Saturated Fat: 4g
- Unsaturated Fat: 15g
- Trans Fat: 0g
- Carbohydrates: 53g
- Fiber: 7g
- Protein: 12g
- Cholesterol: 20mg