Fresh Apricot Crisp
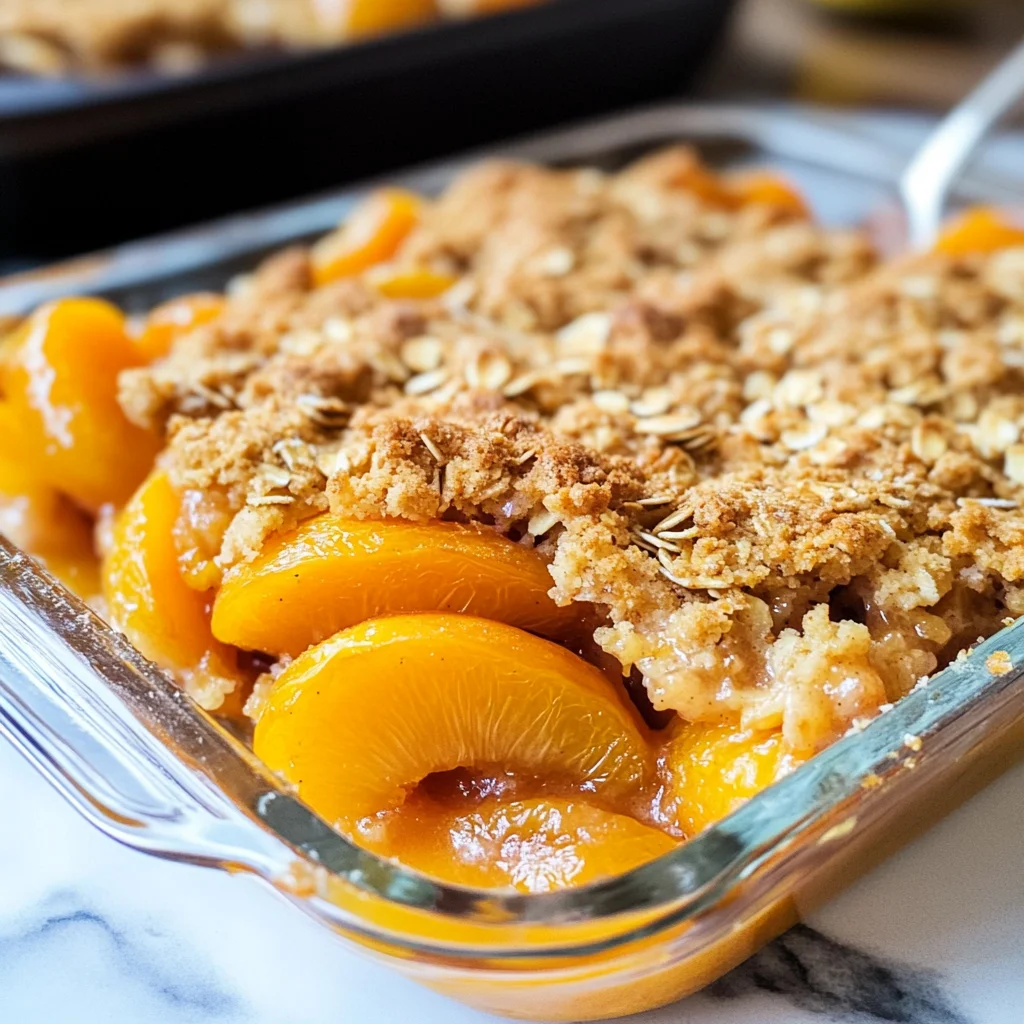
There’s something profoundly magical about the way a fresh dessert can evoke memories, stir emotions, and bring loved ones together. As I sit here thinking about my Fresh Apricot Crisp, I can’t help but remember the sun-drenched afternoons spent in my grandmother’s kitchen, where the air would fill with the tantalizing aroma of freshly baked goods. This isn’t just a recipe; it’s a love letter to those moments—where sweet-tart apricots meet warm spices like cinnamon and ginger, creating a symphony of flavors that dance on your palate. Each spoonful is a reminder of summer’s bounty, capturing that fleeting sweetness and transforming it into an utterly intoxicating treat that you can savor any time of year.
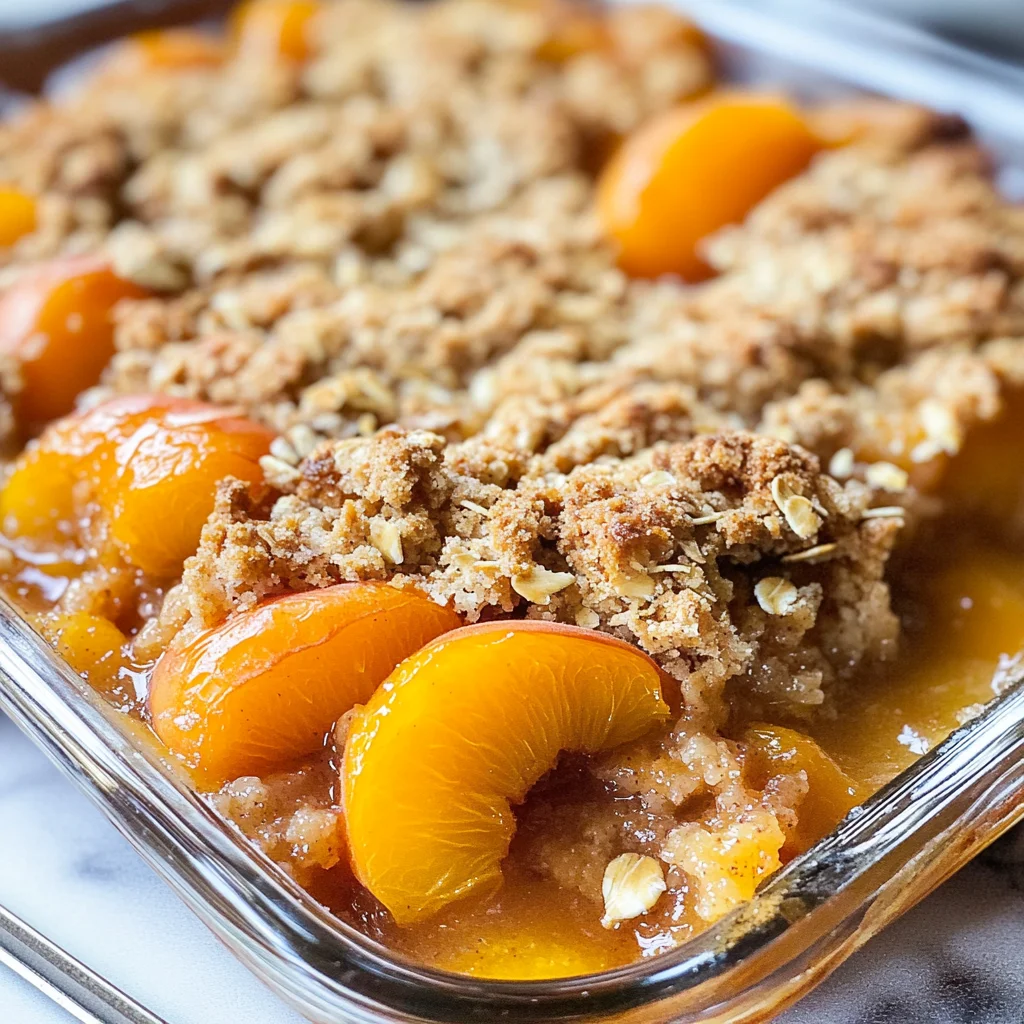
What makes this Fresh Apricot Crisp so special is its incredible versatility. While apricots are undoubtedly the star of the show, you can easily swap them for peaches or nectarines if you find yourself craving a change. The crisp topping, with its crunchy oats and buttery goodness, creates a delightful contrast to the juicy filling beneath. It’s perfect for gatherings, potlucks, or simply as an evening indulgence after a long day. Trust me when I say that serving this dessert will earn you oohs and aahs from your guests—it’s that good!
Fresh Apricot Crisp: A Taste of Summer in Every Bite
I’m truly excited to share this recipe with you! It’s not just about enjoying a delicious dessert; it’s about embracing the process and all the joy that comes along with it. You’ll find that each step brings you closer to creating something exceptional—a dish that will surely become a cherished favorite in your home.
Ingredients:
As we embark on this culinary journey together, it’s essential to gather our ingredients with care and intention. Each component plays an important role in crafting our Fresh Apricot Crisp, so let’s take a moment to appreciate what we’re working with.
- 6 cups fresh apricots (pitted and sliced): These golden gems are at the heart of our crisp. They burst with sweetness and have just enough tartness to create balance in every bite. When selecting apricots, look for fruit that feels slightly soft to the touch but not mushy—this indicates ripeness and juiciness. And guess what? No need to peel them! Their skin adds texture and color to our dish while keeping things simple. If you happen to have an abundance of peaches or nectarines instead, feel free to use those—this recipe embraces substitutions beautifully.
- Zest of one small lemon (about ½ teaspoon): Ah, lemon zest! This tiny addition works wonders by brightening up our filling without overwhelming it. The zest contains aromatic oils that release an invigorating fragrance when grated; it’s like capturing sunshine in your dish! This is crucial because it elevates the flavor profile of those sweet apricots, adding depth that’s simply irresistible.
- 1 tablespoon cornstarch: This unassuming white powder is your secret weapon for achieving that perfect filling consistency. Cornstarch acts as a thickening agent by absorbing excess juices released from the fruit as it bakes. Without it, you might end up with a soggy bottom—a fate we definitely want to avoid! Make sure to mix it well with the apricots before baking.
- ½ teaspoon ground ginger: Ground ginger adds warmth and spice; its distinctive bite complements our sweet-tart fruit perfectly. It infuses warmth into every scoop while enhancing the overall flavor profile without overshadowing the apricots themselves. If you’re feeling adventurous, consider using fresh grated ginger instead—it will give your crisp an extra zing!
- ½ teaspoon ground cinnamon: Cinnamon is another key player here—it wraps around our filling like a cozy blanket on a chilly evening! Its familiar aroma fills your kitchen as it bakes, evoking comforting memories of family gatherings and celebrations. A dash goes a long way in enhancing sweetness while adding complexity to our dish.
- ½ cup honey (or pure maple syrup or granulated sugar): Sweetness binds everything together beautifully in this recipe! Honey lends its floral notes which pair wonderfully with apricots; however, if you’re looking for alternatives, pure maple syrup or granulated sugar work well too—each will impart its unique character into this delightful dessert.
- 1 cup old-fashioned oats: Let’s talk about texture! Old-fashioned oats provide chewiness and heartiness in our crisp topping that contrasts deliciously against the tender fruit layer below. They absorb some moisture during baking while still retaining their shape—giving us both crunch and satisfaction in every bite!
- ¾ cup white whole wheat flour (or all-purpose flour): A bit of flour helps bind our topping while keeping it light enough for those glorious oats to shine through! White whole wheat flour has more nutrients than all-purpose flour yet retains a mild flavor—making it perfect for desserts like this one where we want balance rather than heaviness.
- 1 teaspoon cinnamon: Another sprinkle of cinnamon here enhances our oat topping alongside providing extra warmth throughout each bite! This second dose ensures every element harmonizes beautifully together without missing out on that beloved spice infusion we crave.
- ¼ teaspoon salt: Don’t overlook salt! It intensifies flavors rather than making things taste salty; think of it as nature’s flavor enhancer—it brings out sweetness from fruits while balancing richness from butter later on!
- 6 tablespoons cold unsalted butter, cubed: Butter is non-negotiable when making any type of crisp because its fat content gives us flakiness while browning beautifully during baking—the result? A topping that’s crispy yet melt-in-your-mouth delicious! Make sure it’s cold before using; this helps keep things light rather than greasy.
- 3 tablespoons pure maple syrup (or brown sugar): Just like honey earlier on—the choice between pure maple syrup or brown sugar offers another layer of sweetness plus complexity within our crumble topping itself!
Equipment You’ll Need:
Before diving into preparation mode, let’s chat about some essential kitchen tools that will make crafting your Fresh Apricot Crisp smoother—and trust me when I say they’re worth having at hand!
- Mixing bowls – You’ll need at least two sturdy mixing bowls—one for combining our filling ingredients and another for preparing that deliciously crumbly topping! Choose bowls big enough so you don’t risk spilling anything overboard during mixing sessions since we want every bit incorporated evenly.
- Measuring cups & spoons – Accurate measurements are key here because they ensure balanced flavors throughout each layer within our crisp! Invest in good-quality measuring cups & spoons if possible—they’ll last longer than flimsy ones plus give precision when needed most!
- Baking dish (9×13 inches recommended) – A standard glass or ceramic baking dish works best for evenly distributing heat across layers while allowing gorgeous browning outside edges—aiming for something durable yet lightweight enough so anyone can handle transferring from oven safely afterward!
- Rubber spatula – Essential not only for scraping down sides during mixing but also folding delicate mixtures gently without risking damage—this handy tool helps ensure nothing gets left behind once combined!
Now that we’ve gathered all these wonderful components together—it’s time we start preparing this extraordinary Fresh Apricot Crisp that’s bound to impress everyone around you!
Step 1: Prepping Your Fruit Filling
First things first—we need those luscious apricots ready for action! Start by washing them under cool running water before slicing them into wedges—no peeling required here since their skins add texture plus color appeal visually once baked up nicely together later on. Once sliced into manageable pieces (think quartered), toss them gently in one bowl along with lemon zest, cornstarch mixture mixed until evenly coated throughout—that way each slice gets maximum flavor infusion during cooking time ahead!
This step is critical because coating fruit allows juices released during baking become thickened properly rather than pooling aimlessly underneath—that’s how we achieve an ideal fruit layer consistency inside finished crisp instead soggy mess lurking beneath surface later down line!
Step 2: Creating Your Delicious Topping
While your fruity base awaits patiently offstage—you’ll want to whip together toppings next starting by combining oats along white whole wheat flour along first measure cinnamon salt within large mixing bowl until completely blended well throughout—not too much fuss needed here just simple stirring should do trick nicely enough before adding cubes chilled butter right next over top mixture waiting eagerly…
Now comes fun part—using fingertips work fingers gently rub butter into dry ingredients until resembles coarse crumbs resembling sandy beach shorelines before adding remaining liquid sweetener(s) choosing desired options such honey/maple syrup/brown sugar depending preference level desired…I promise you won’t regret taking time develop better textures achieved through thoughtful mixing processes leading ultimately toward proper results desired finish product expectations met standards prior outlined initially above!!
Step 3: Assembling Your Crisp
With both layers ready now assembled effortlessly side-by-side—we’re approaching finish line quickly now folks!! Grab prepared baking dish then fill bottom evenly spread out fruity mixture followed closely behind crumble spread generously atop ensuring no bare patches remain visible once finished baking later on…Every nook cranny deserves attention especially since those bits usually turn golden brown particularly enticingly caramelized flavors arise during cook cycle bringing aromas wafting through workspace drawing everyone nearer anticipation builds excitement palpable…
Step 4: Baking Bliss Awaits!
Once assembled appropriately preheat oven set temperature around 350°F (175°C)—this allows gentle even heating occur ensuring both layers cooked thoroughly without burning edges prematurely…Set timer roughly thirty-two minutes depending actual size batch created compared previous experiences observed…During final ten minutes check visual cues noticing bubbling edges starting appear throughout crusted surface informing us golden perfection approaching swiftly soon ready enjoy ultimately delights await…
I can’t wait until you experience the joy of pulling this beauty out of the oven yourself—the moment when you’re greeted by mouthwatering aromas wafting through your kitchen is simply unbeatable!
Step 5: Layering the Apricot Symphony
Now that your apricots are beautifully combined with the fragrant spices, it’s time to create a vibrant layer in your baking dish. Take those sweet apricot slices—glistening and juicy—and gently spread them out in an even layer across the bottom of your chosen baking dish. I usually opt for a 9×13 inch glass or ceramic dish, as it allows the heat to distribute evenly, ensuring every slice gets that delightful hug from the oven. The key here is to avoid overcrowding—each piece deserves its space to breathe and caramelize properly. As you lay the fruit, envision how each slice will meld together during baking, transforming into a warm, luscious filling that sings of summer.
This step is crucial because it sets the foundation for our Fresh Apricot Crisp. By layering the fruit evenly, you’ll ensure that every spoonful captures that perfect balance of sweet-tart flavor and buttery goodness. If you make this with peaches or nectarines on another occasion, you’ll find they follow suit beautifully, creating their own unique symphony of flavors. Once your apricots are nestled in their dish, take a moment and appreciate their vibrant orange hue; they’re not just ingredients—they’re little jewels waiting to shine!
Step 6: Crafting the Topping – A Crunchy Delight
Let’s talk about that irresistible topping! In a large mixing bowl, combine your old-fashioned oats, white whole wheat flour (or all-purpose flour if that’s what you have handy), cinnamon, and salt. This mixture is where we create a crunchy contrast to our soft apricots—the kind of texture that makes every bite feel like a cozy hug. Now comes one of my favorite parts: adding in those cold cubed butter pieces. Using your fingertips or a pastry cutter (if you have one), work the butter into the dry ingredients until it resembles coarse crumbs. This technique is known as “cutting in,” and it’s essential because it creates those lovely little pockets of buttery goodness throughout your topping.
Why is this so important? When the butter melts during baking, it coats each oat and crumb, creating a golden-brown crust that’s utterly intoxicating! You want those bits to remain visible rather than blend entirely into the flour; they’ll provide texture and depth when baked. The aroma wafting through your kitchen at this moment will be nothing short of divine! Trust me on this—it’s worth spending those extra moments ensuring each crumb is perfectly mixed before we add our sweetener.
Step 7: Sweetening Things Up
Once you’ve achieved that perfect crumbly texture with your butter and dry mix, it’s time to introduce sweetness into our topping—let’s drizzle in pure maple syrup or sprinkle brown sugar over the oat mixture. Gently toss everything together until it’s well incorporated; you want every bit of oat to get some love from that sweetness without becoming clumpy. This step is non-negotiable because it balances out the tartness of our apricots beautifully—each bite will be a harmonious dance between sweet and tart.
As you mix, take a moment to observe how everything transforms—the oats begin to glisten slightly under that syrupy embrace! If you’re feeling adventurous (and I always encourage adventure), consider adding chopped nuts like walnuts or pecans for an extra crunch! They bring their own nuances of flavor and texture—an addition I promise you won’t regret! Once everything looks well-mixed but still crumbly—think sandy beach rather than dough—you’ll know you’re ready for the next step.
Step 8: Assembling Your Crisp – A Labor of Love
Now comes perhaps my favorite part: assembling this beautiful creation! Preheat your oven to 350°F (175°C) if you haven’t already—it should be warm enough for us to bake our crisp beautifully golden brown by now. Sprinkle your oat topping generously over those luscious apricots in your baking dish; don’t rush this step! Make sure every inch is covered—the more surface area we have exposed to heat, the more crispy goodness we achieve.
As you sprinkle on that topping, think about how vital even distribution is; areas without topping may end up too moist while others could become overly crunchy—it’s all about balance here! I often find myself using my hands for this part; there’s something inherently satisfying about taking time to press down gently on that crumb mixture so it adheres slightly to the fruit beneath. It should feel like you’re tucking them in for a cozy oven nap!
Finally, pop that masterpiece into your preheated oven and let magic happen over approximately 32 minutes or until everything bubbles with excitement and turns golden brown—a sign you’re nearing dessert heaven! Keep an eye on it towards the end; ovens can vary quite a bit! You want those edges crispy but not burnt; if necessary, cover loosely with foil if it browns too quickly while baking.
Conclusion:
As we come to the end of our journey through making this sensational Fresh Apricot Crisp, I can’t help but feel an overwhelming sense of joy. Each step we took together—from slicing those plump apricots to blending the crumbly topping—was filled with love and anticipation. What makes this recipe so special isn’t just its heavenly flavor balance between sweet-tart fruit and crunchy oats; it’s also about creating memories around the kitchen table with loved ones. The scent wafting through your home as it bakes transforms any moment into something profoundly satisfying.
You absolutely must try making this dessert! Not only is it incredibly easy with minimal fuss—that’s always a win—but it is so versatile too! It shines at family gatherings, summer barbecues, or even as a comforting treat at the end of a long day when you need something sweet yet wholesome. Picture yourself taking that first slice out from the oven, watching as steam rises and mingles with hints of cinnamon—it’s an experience you won’t forget.
When serving your Fresh Apricot Crisp, imagine savoring one warm scoop topped with creamy vanilla ice cream or perhaps a dollop of whipped coconut cream for an extra touch of indulgence. For an afternoon pick-me-up, pair it with freshly brewed coffee or tea; I promise you’ll be transported into blissful moments where everything feels just right. Each bite invites memories to dance on your palate, making every gathering more memorable.
Feeling adventurous? This recipe is wonderfully adaptable; you could swap out apricots for peaches or nectarines when they’re in season—each variation brings new flavors and textures that are equally delightful! Or why not add some blueberries for an unexpected burst of sweetness? The possibilities are endless! So go ahead—try out these variations and experiment until you find your perfect twist on this beloved dish. I can’t wait for you to share your experiences; trust me when I say it’s all about connecting over good food.
Fresh Apricot Crisp

Fresh Apricot Crisp is a delightful dessert that captures the essence of summer in every bite. With juicy apricots mingled with warm spices and topped with a crunchy oat layer, this dish not only brings back nostalgic memories but also creates new ones around the table. Perfect for gatherings or a cozy evening treat, this easy-to-make crisp will impress your guests and satisfy your sweet tooth. Whether you choose to stick with apricots or substitute them with peaches or nectarines, this recipe is versatile and bound to become a family favorite. Serve it warm with a scoop of dairy-free ice cream or a dollop of coconut whipped cream for an indulgent experience.
- Prep Time: 15 minutes
- Cook Time: 32 minutes
- Total Time: 47 minutes
- Yield: Approximately 8 servings 1x
- Category: Dessert
- Method: Baking
- Cuisine: American
Ingredients
- 6 cups fresh apricots (pitted and sliced)
- Zest of one small lemon
- 1 tablespoon cornstarch
- ½ teaspoon ground ginger
- ½ teaspoon ground cinnamon
- ½ cup honey (or pure maple syrup or granulated sugar)
- 1 cup old-fashioned oats
- ¾ cup white whole wheat flour (or all-purpose flour)
- ¼ teaspoon salt
- 6 tablespoons cold unsalted butter, cubed
- 3 tablespoons pure maple syrup (or brown sugar)
Instructions
- Preheat your oven to 350°F (175°C).
- In a mixing bowl, combine sliced apricots, lemon zest, cornstarch, ground ginger, ground cinnamon, and honey. Toss until well coated.
- In another bowl, mix old-fashioned oats, flour, salt, and cinnamon. Cut in the cold butter until the mixture resembles coarse crumbs. Stir in maple syrup or brown sugar.
- Spread the apricot mixture evenly in a baking dish (9×13 inches). Top with the oat mixture.
- Bake for about 32 minutes or until golden brown and bubbly around the edges.
- Allow to cool for at least 10 minutes before serving.
Nutrition
- Serving Size: 1/8 of pan (approximately 130g)
- Calories: 210
- Sugar: 18g
- Sodium: 90mg
- Fat: 9g
- Saturated Fat: 5g
- Unsaturated Fat: 4g
- Trans Fat: 0g
- Carbohydrates: 35g
- Fiber: 3g
- Protein: 3g
- Cholesterol: 15mg