Crispy Dill Chicken Sandwich Recipe
The Crispy Dill Chicken Sandwich is not just a meal; it’s an experience that bridges the gap between comfort food and culinary delight. When you take your first bite, the crunch of the perfectly fried chicken melds into a cascade of flavors that dance on your palate, bringing a symphony of sensations that feels almost magical. This isn’t merely about satisfying hunger; it’s about creating moments that linger long after the last bite. The dill-infused coating, paired with the rich creaminess of dill aioli and the freshness of crisp lettuce and pickles, makes every element sing in harmony. Trust me when I say, once you make this Crispy Dill Chicken Sandwich Recipe, you’ll find yourself craving it again and again.
Cooking is one of those rare activities where time seems to stand still, doesn’t it? It’s a chance to escape from our busy lives while indulging our senses in something truly rewarding. The process of marinating the chicken allows it to soak up all those zesty flavors while becoming tender and juicy. And let’s not forget about those toasted brioche buns! They’re like golden pillows ready to cradle all that deliciousness inside. Perfect for a weeknight dinner or a weekend gathering, this sandwich brings people together around the table, sparking joy with every delectable layer. Are you ready to embark on this delightful culinary adventure? Let’s dive in!
Crispy Dill Chicken Sandwich Recipe: A Flavorful Delight
This Crispy Dill Chicken Sandwich is a perfect blend of crunchy satisfaction and creamy goodness, making it an irresistible choice for any meal. The combination of marinated fried chicken with a dill-infused coating creates a flavor explosion that truly elevates your sandwich game.
Ingredients:
As we embark on this culinary journey together, let’s gather our ingredients—each one plays an essential role in crafting something extraordinary! From the marinade to the toppings, every component harmonizes beautifully to create a sandwich experience that will leave you smiling.
- 2 large boneless, skinless chicken breasts (about 6-8 ounces each). These chicken breasts are the stars of our show! Their size ensures that each sandwich is hearty and satisfying without being overwhelming. Look for fresh chicken with a nice pink hue—avoid anything that looks dull or has an off smell. Boneless and skinless means less prep work for you and allows for even cooking throughout.
- 1 cup buttermilk. Buttermilk is magic when it comes to tenderizing chicken! It breaks down proteins while adding moisture and tanginess, leading to juicy results that are hard to resist. If you don’t have buttermilk on hand, simply mix one cup of milk with a tablespoon of lemon juice or vinegar and let it sit for five minutes—that homemade version works wonders too!
- 2 tablespoons dill pickle juice. This might seem like an unexpected addition, but trust me—it’s what gives our chicken its unique flavor profile! The acidity from pickle juice helps tenderize the meat further while infusing it with a subtle tartness that balances out all the richness in this sandwich.
- 1 large egg. Eggs act as both an emulsifier and binder in our marinade; they help everything stick beautifully to our chicken during frying while also contributing richness to the overall dish.
- 1 teaspoon salt. Salt is absolutely paramount in cooking; it enhances flavors while also helping to draw moisture out from foods like our chicken breasts during marination. This step ensures every bite bursts with flavor!
- 1/2 teaspoon black pepper. A dash of black pepper adds warmth without overpowering other flavors—a little goes a long way here!
- 1/2 teaspoon garlic powder. Garlic powder lends an aromatic quality that’s comforting yet sophisticated at once! It complements all other ingredients seamlessly.
- 1/4 teaspoon paprika. Paprika introduces subtle smokiness along with beautiful color—adding visual appeal can elevate your dish from ordinary to extraordinary!
- 2 cups all-purpose flour. Flour forms the basis of our crispy coating—you want high-quality flour for best results here! This will create a crunchy texture when fried that’s utterly addictive.
- 1/2 cup cornstarch. Cornstarch is crucial because it helps achieve maximum crunchiness by allowing steam to escape during frying—this step is non-negotiable if you want that perfect crunch!
- 1 tablespoon dried dill weed. Dried dill weed infuses our coating with deep herbal notes; it’s what ties everything together and reinforces those delightful flavors found throughout this recipe.
- 1 teaspoon baking powder. A little baking powder encourages lightness in our flour mixture as well as creating air pockets during frying—this contributes directly towards achieving crispiness!
- 1 teaspoon salt (for coating). Adding another pinch here ensures even seasoning throughout your crispy exterior—no bland bites allowed!
- 1/2 teaspoon black pepper (for coating). Just like before; we want flavorful layers at every level!
- 1 cup mayonnaise. Mayonnaise serves as the base for our luscious dill aioli; its creaminess is essential for balancing out all those crunchy textures we’ve created.
- 2 tablespoons finely chopped fresh dill. Nothing beats fresh herbs—they provide brightness and freshness while celebrating our main ingredient beautifully!
- 1 tablespoon lemon juice. Fresh lemon juice brightens flavors significantly; it’s like sunshine in your aioli—a must-have element for brightening up any dish!
- 1 clove garlic, minced. Fresh garlic brings additional depth—just think how comforting garlic aromas can be wafting through your kitchen!
- 1 teaspoon Dijon mustard. Dijon adds complexity through its tangy character—it’s understated yet vital for building flavor layers in this dish.
- Salt and pepper to taste: Adjusting seasonings at this stage ensures each element shines through exactly as intended!
- 4 brioche buns, split. Brioche buns are soft yet sturdy enough to hold everything without falling apart—they elevate every bite thanks to their buttery richness.
- 4 slices cheddar cheese (or your favorite cheese). Cheddar melts beautifully over hot chicken while bringing sharpness—a classic pairing that’s hard not to love!
- 1 cup shredded lettuce. Crisp lettuce adds freshness while providing textural contrast against warm components—it also enhances visual appeal!
- 1/2 cup dill pickle chips. Pickles bring crunch alongside tanginess—the perfect finishing touch that brightens up each bite spectacularly!
- 2 tablespoons butter, melted (for toasting buns). Buttering those buns before crisping them up transforms them into golden perfection—they’ll be irresistible when served warm alongside your creation.
- Vegetable oil, for frying (about 4–6 cups). Choosing vegetable oil ensures high smoke points ideal for frying—we want our chicken crispy without burning anytime soon!
Equipment You’ll Need:
Before we dive into preparing this delicious sandwich, let’s take stock of some essential kitchen tools that will make this process smoother and more enjoyable! Having these items on hand not only streamlines your cooking experience but also enhances safety and efficiency as you create something wonderful.
- Deep Dutch oven or heavy-bottomed pot – This type of pot distributes heat evenly across its surface area — which is critical when frying since hot spots can lead uneven cooking or burnt areas on food! Its depth allows ample room for bubbling oil so food stays submerged without overcrowding—a key factor ensuring perfectly cooked pieces every time.
- Slotted spoon or tongs – These tools will become your best friends once those golden-brown beauties start coming out of hot oil! A slotted spoon allows excess oil drainage while tongs keep everything secure during flipping—both are essential partners during frying sessions where safety matters most!
- Wire rack lined with paper towels – Once fried chicken comes out of hot oil, resting them atop this setup allows excess grease runoff while retaining crispiness instead of sogginess—this step preserves texture until serving begins later on!
Preparing the Crispy Dill Chicken Sandwich Recipe
Step 1: Marinating Magic
To kick things off with our Crispy Dill Chicken Sandwich Recipe, let’s prepare the marinade—a pivotal step that sets us on track toward mouthwatering success! In a medium bowl, whisk together buttermilk, dill pickle juice, egg, salt, black pepper, garlic powder, and paprika until smooth—that creamy base wraps around each piece beautifully during marination time ahead! Submerge those lovely chicken breasts fully in this mixture before covering tightly; refrigerate for at least two hours or even better overnight if possible—the longer they soak up those flavors means more pronounced tenderness upon cooking later down line! Don’t rush this step; patience pays off big time here because it will yield juicy results bursting with flavor through each bite once assembled together later on—for me personally? There’s nothing quite like pulling open my fridge door only to see perfectly marinated chicken ready waiting patiently just waiting eagerly awaiting their moment in hot oil bliss below…
Step 2: Creating Crunchy Coating
Once you’re ready to move forward after marinating blissfully has taken place overnight (or even just two hours!), set yourself up for success by combining flour along with cornstarch within large shallow dish alongside dried dill weed followed closely behind by baking powder plus another pinch salt & black pepper mixed thoroughly throughout—all these elements work together magically forming backbone foundation required achieving ultimate desired crispness achieved once fried away shortly thereafter! Whisk gently until fully combined ensuring no lumps remain visible—a smooth dry mixture beckons enticingly calling all attention towards next steps ahead… After removing one marinated chicken breast from fridge now allow excess marinade drip off slowly before pressing firmly into prepared flour mixture—this part isn’t just about getting coated evenly but really embedding goodness fully onto surface area so every inch receives attention needed prior frying process starting soon thereafter… Gently shake off any excess flour carefully before repeating same process until all pieces complete their transformation into crunchy delights awaiting final plunge into bubbling hot oil momentarily ahead…
Step 3: Heating Up That Oil
Now comes one thrilling part—the moment where anticipation builds steadily as oil heats up! Pour vegetable oil into your chosen Dutch oven or heavy-bottomed pot until about two-three inches deep—we want enough liquid gold surrounding each piece ensuring proper frying occurs throughout without overcrowding taking place inside vessel itself disrupting flow needed here… Heat over medium-high until thermometer reads precisely 350°F (175°C)—having accurate temperature matters greatly since too low won’t deliver desired crispness whereas too high leads risk burning outside prematurely before inside cooks fully through… Keep close watch during heating phase allowing no distractions because timing matters significantly here knowing exactly right point where sizzle meets surface marks beginning transformation unfolding before eyes…
Step 4: Frying Time!
With everything prepped properly now it’s finally time drop those coated treasures gently into hot bubbling surroundings below—carefully place one or maybe two pieces only avoiding overcrowding which could lead disastrous results if too many enter simultaneously causing oil temperature drop below ideal range needed here… Fry away happily watching golden brown edges appear over next six-eight minutes per side turning once halfway through—I promise you’ll know exactly when they’re done by observing beautiful color shift taking place visibly transforming plain looking nuggets into stunning creations bursting forth life eagerly awaiting final assembly stage approaching quickly thereafter… As soon as internal temperature reaches safe mark reading at least 165°F (74°C) pull out using slotted spoon/tongs transferring onto wire rack lined paper towels allowing excess grease drain away slowly preserving crispy texture intact right up until serving commences shortly thereafter…
With these steps underway successfully leading us closer towards assembling flavorful sandwiches soon enough I can hear bellies rumbling already anticipating delectable bites awaiting discovery ahead! Let me know how things go so far—I’m eager hear stories feel free reach out anytime share excitement culinary adventures unfold within own kitchens too…
Step 5: Frying to Golden Perfection
Now comes the heart-pounding moment we’ve all been waiting for—frying that beautifully marinated chicken! It’s absolutely crucial to ensure your oil is at the right temperature, around 350°F (175°C). This is where the magic happens; if your oil isn’t hot enough, your chicken will absorb too much oil and become soggy, instead of creating that delightful crispy crust we all crave. To measure this accurately, using a deep-fry thermometer is non-negotiable. If you don’t have one, I recommend dropping a small piece of bread into the oil; if it sizzles and starts browning in about 60 seconds, you’re ready to go!
Carefully lower one or two chicken breasts into the hot oil—avoid overcrowding; this can drastically drop the oil temperature. You’ll want to fry each piece for about 6-8 minutes per side. As they cook, keep an eye on them as they transform into a golden brown marvel. The sizzling sound and intoxicating aroma wafting through your kitchen will be utterly enchanting! Use tongs to gently turn them over halfway through cooking to ensure even browning. The internal temperature of the chicken should reach a safe 165°F (74°C), which you can check with an instant-read thermometer poked into the thickest part of the breast without touching bone. Trust me on this: achieving that perfect crispiness requires patience but leads to profoundly satisfying results.
Step 6: Draining for Crispiness
Once your chicken is fried to glorious perfection, it’s time for a little TLC—Tender Love and Care—for that crispy exterior you’ve worked so hard to achieve. Using a slotted spoon or tongs, carefully transfer each piece onto a wire rack set over paper towels. This step is paramount; it allows excess oil to drain away while also keeping your chicken crispy rather than steaming it on a plate. You might be tempted to dive right in, but hold tight! Letting them rest for just a few minutes not only completes the cooking process but also ensures that those natural juices stay locked inside each bite. You want every mouthful to be packed with flavor—not dry and disappointing!
As they cool slightly, take a moment to appreciate that golden hue and crunchy texture that signals success in the kitchen. I promise you; this waiting game pays off tenfold when you take your first bite later on! If you find any pesky bits of batter floating in the oil while frying, gently skim them out with a slotted spoon before continuing with your next batch; this keeps your oil clean and ensures that every piece gets that beautiful color without any burnt remnants.
Step 7: Whipping Up Dill Aioli
While our gorgeous fried chicken is resting, let’s create something utterly intoxicating—a dill aioli that will elevate our sandwich from ordinary to extraordinary! In a small bowl (a medium-sized bowl works well too if you’re feeling generous), combine one cup of mayonnaise with two tablespoons of finely chopped fresh dill, one tablespoon of lemon juice for brightness, one minced garlic clove for depth, and one teaspoon of Dijon mustard that adds just the right amount of tanginess. The combination creates this luscious spread that complements our crispy chicken perfectly.
Don’t forget to season generously with salt and freshly cracked black pepper; these are essential for balancing all those flavors! Now here’s where patience truly shines again: after mixing everything together, cover it up and let it chill in the refrigerator for at least 30 minutes. Why chill? Well, allowing those flavors to meld together creates an aioli that’s not just good but mind-blowingly delicious! When you’re ready to assemble your sandwich, take another moment to taste it—adjust salt or lemon juice according to your preference. This simple step can make all the difference in how vibrant and lively each bite becomes!
Step 8: Toasting Brioche Buns
With our aioli chilling beautifully in the fridge and our chicken cooling down ever so slightly beside us, let’s turn our attention back to those sumptuous brioche buns! The transformation from plain buns into golden masterpieces is as much about technique as it is about time. Brush melted butter generously on each cut side of the buns—this step not only adds flavor but also creates an irresistible crunch when toasted.
Heat up a skillet over medium heat—this gentle warmth keeps things controlled so we won’t scorch our precious buns. Place them cut-side down onto the skillet carefully; listen closely as they make contact—the sizzle sound should bring you joy! Allow them about 1-2 minutes; keep an eye on their progress because every stove behaves differently. You’re looking for that perfect golden-brown hue—this ensures they’ll hold up beautifully against our aioli and toppings without becoming soggy later on.
When done right, these toasted buns will have an invitingly crisp texture along with buttery goodness seeping into every pore! Once they reach perfection, remove them from the skillet and place them aside—it’s nearly time for assembly!
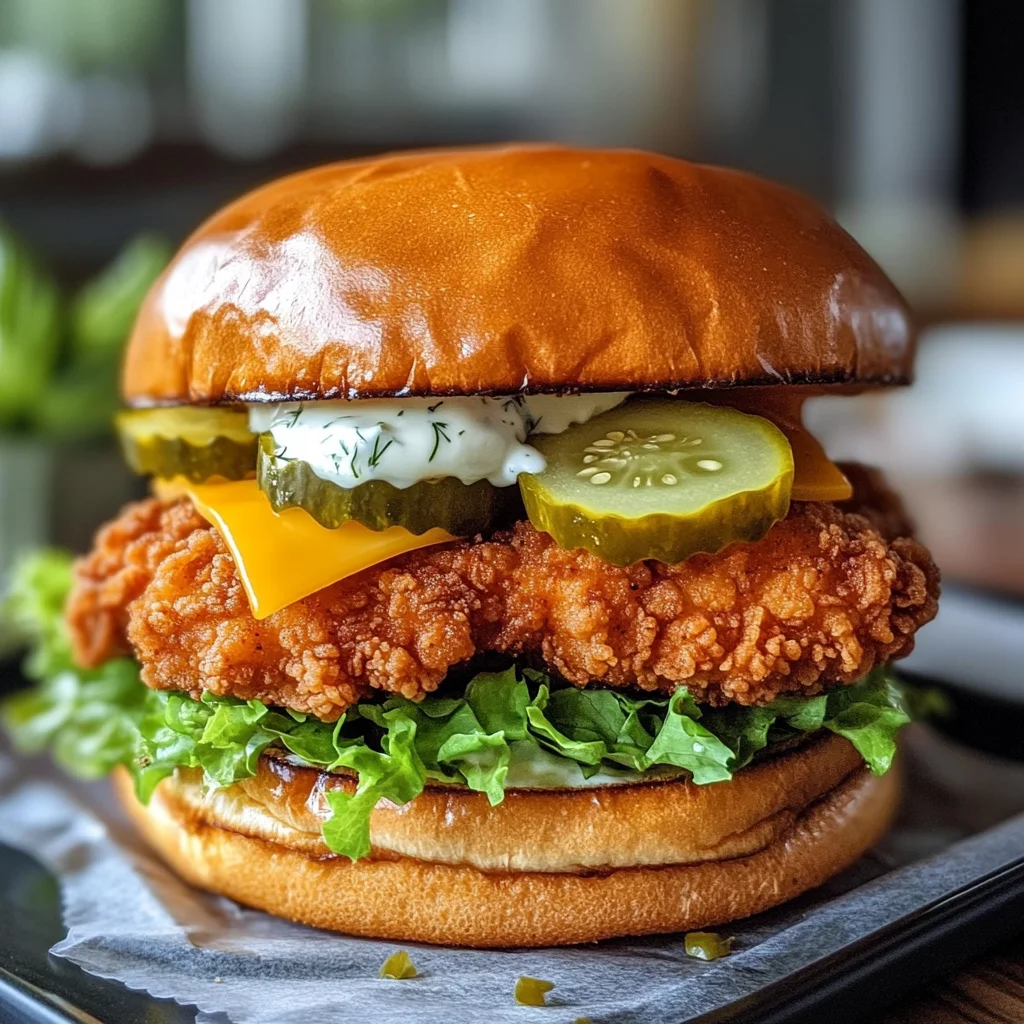
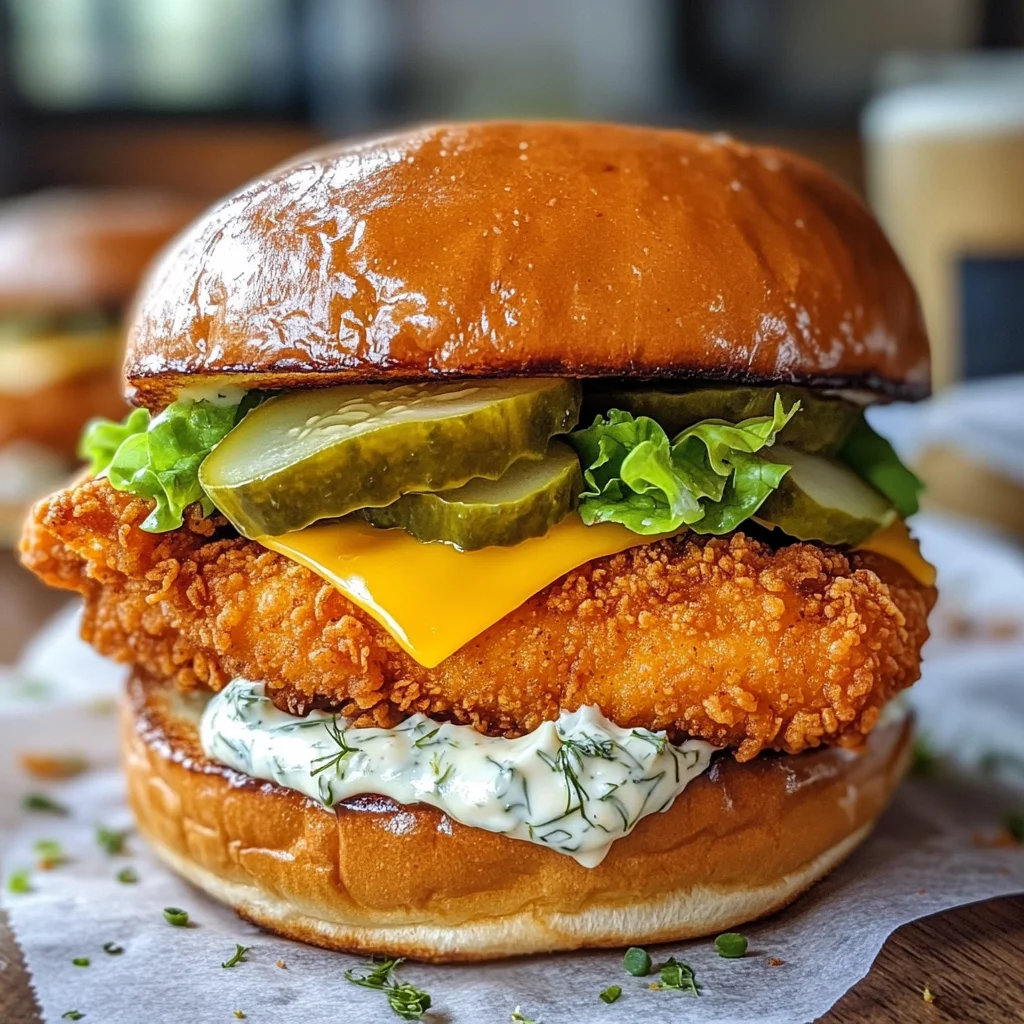
Final Touches: Assembling Your Crispy Dill Chicken Sandwich Recipe
Now we approach the final steps—the thrilling assembly of our Crispy Dill Chicken Sandwich Recipe! This part is where creativity flourishes; feel free to make it uniquely yours while following these essential guidelines.
Step 9: Building Your Culinary Masterpiece
Let’s dive right into assembling these beauties! Start by generously spreading a layer of that chilled dill aioli on both sides of each toasted bun—it’s like adding liquid gold straight from culinary heaven! Don’t skimp here; you want each bite bursting with flavor from this creamy delight.
Next comes a bed of shredded lettuce atop the bottom bun—this adds not only freshness but also gives some lovely crunch against our crispy fried chicken. Then place your perfectly fried chicken breast right atop that vibrant lettuce layer—look at how it glistens in all its glory! Top this off with a slice of cheddar cheese because what never disappoints? Melty cheese cascading over warm chicken is simply divine.
Finally, crown everything with dill pickle chips—their acidity cuts through richness beautifully while offering brightness against savory ingredients. Carefully place the top bun on—and there you have it: a masterpiece worthy of any dinner table or backyard barbecue!
Now before serving these sandwiches hot off their assembly line full of joy and flavor, I encourage you just one more time: take pride in what you’ve created here today. Each component plays its part harmoniously in this Crispy Dill Chicken Sandwich Recipe symphony—a true testament to home cooking’s magic! So gather friends or family around and watch as they revel in bites filled with love and satisfaction—trust me; nothing compares! Enjoy every moment—it was made with passion just for you!
Storage and Enjoyment Tips for Your Crispy Dill Chicken Sandwich Recipe
Now that your kitchen is filled with the delightful aroma of crispy chicken and fresh dill, it’s time to dig in and enjoy every bite! This Crispy Dill Chicken Sandwich is truly a culinary delight that will make your tastebuds dance with joy. But what if you have leftovers? Don’t worry, I’ve got you covered with some fantastic storage tips to ensure you savor this deliciousness even after the initial feast.
Storing Leftover Crispy Dill Chicken Sandwich Recipe
To keep your leftover Crispy Dill Chicken Sandwich as scrumptious as possible, store each component separately. Use airtight containers to prevent moisture from ruining that coveted crunch. The chicken can last for about 3-4 days when refrigerated, while the brioche buns are best consumed within a day or two to preserve their softness. To maintain quality, I recommend placing a slice of bread in the container with any leftover fried chicken; this little trick helps absorb excess moisture and keeps your chicken crispy. When you do decide to indulge in those remnants, you might notice that the flavors have deepened—think of it as a flavor symphony that only gets better with time! For reheating, simply pop the chicken back into a hot skillet for a few minutes until it’s warmed through and crisped up again. You’ll be amazed at how delicious they taste!
Freezing Components for Later
If you want to prepare ahead or simply stock up for future cravings, freezing is an excellent option! Start by allowing your fried chicken to cool completely before wrapping each piece tightly in plastic wrap. Then place them in a freezer-safe bag or container; this method helps prevent freezer burn and keeps them fresh for up to 3 months. When you’re ready to enjoy one of these delectable sandwiches from frozen, simply thaw the chicken overnight in the fridge before reheating it as described above. This way, you’ll always have an easy meal on hand that brings back those warm memories of cooking together. The convenience factor here is just incredible—imagine pulling out a perfectly golden piece of chicken and knowing that it was just moments away from being devoured!
Crispy Dill Chicken Sandwich

Experience comfort food at its finest with this Crispy Dill Chicken Sandwich Recipe. Each bite features perfectly seasoned, crunchy fried chicken enveloped in a dill-infused coating, topped with a creamy dill aioli, fresh lettuce, and crunchy dill pickle chips—all nestled between buttery brioche buns. This sandwich isn’t just a meal; it’s a culinary adventure that combines textures and flavors for an unforgettable dining experience. Perfect for weeknight dinners or weekend gatherings, this dish is bound to become a family favorite. Let’s dive into making this delectable sandwich that everyone will crave!
- Prep Time: 15 minutes
- Cook Time: 20 minutes
- Total Time: 35 minutes
- Yield: Serves 4
- Category: Dinner
- Method: Frying
- Cuisine: American
Ingredients
- 2 large boneless, skinless chicken breasts
- 1 cup buttermilk
- 2 tablespoons dill pickle juice
- 1 large egg
- 2 cups all-purpose flour
- 1/2 cup cornstarch
- 1 tablespoon dried dill weed
- 1 cup mayonnaise
- 4 brioche buns
- Shredded lettuce
- Dill pickle chips
Instructions
- Marinate the chicken: In a bowl, whisk together buttermilk, pickle juice, egg, salt, black pepper, garlic powder, and paprika. Submerge chicken breasts in the mixture and refrigerate for at least 2 hours or overnight.
- Prepare the coating: In a shallow dish, combine flour, cornstarch, dried dill weed, baking powder, salt, and black pepper.
- Heat the oil: Pour vegetable oil into a deep pot to a depth of about 3 inches and heat to 350°F (175°C).
- Coat the chicken: Remove marinated chicken from the fridge. Shake off excess marinade and coat in the flour mixture.
- Fry the chicken: Carefully place coated chicken into hot oil and fry for about 6-8 minutes per side until golden brown and cooked through (internal temperature should reach 165°F/74°C). Drain on a wire rack lined with paper towels.
- Make the dill aioli: In a bowl, mix mayonnaise with chopped fresh dill, lemon juice, minced garlic, Dijon mustard, salt, and pepper.
- Toast brioche buns: Brush cut sides of buns with melted butter and toast in a skillet until golden.
- Assemble the sandwich: Spread aioli on both bun halves. Add shredded lettuce followed by fried chicken breast and top with dill pickle chips.
Nutrition
- Serving Size: 1 sandwich
- Calories: 680
- Sugar: 3g
- Sodium: 980mg
- Fat: 34g
- Saturated Fat: 8g
- Unsaturated Fat: 24g
- Trans Fat: 0g
- Carbohydrates: 54g
- Fiber: 2g
- Protein: 30g
- Cholesterol: 160mg