Easy Homemade Reese’s Cups
There’s something profoundly satisfying about creating a treat that not only brings me back to my childhood but also fills the room with the intoxicating aroma of melting chocolate and creamy peanut butter. When I think of Easy Homemade Reese’s Cups, I’m reminded of lazy afternoons spent in the kitchen, where laughter mingled with the sweet scent of confectionery magic. This is more than just a recipe; it’s a celebration of simple pleasures, a nostalgic journey filled with warmth and love. Each bite delivers a symphony of flavors that effortlessly dances on your palate—rich chocolate enveloping smooth, salty-sweet peanut butter is nothing short of divine. I promise you, once you’ve made these little cups of joy, you’ll find yourself lost in their creamy embrace time and again.
Now, let’s talk about why this treat holds such a special place in our hearts. It’s that irresistible combination of sweet and salty that seems to unite people across generations. The allure of Easy Homemade Reese’s Cups isn’t just in their taste; it’s also about sharing them with friends during movie nights or surprising loved ones on special occasions. They’re simple enough for a quick after-school snack yet elegant enough to impress guests at dessert parties. Trust me when I say that whether you’re indulging solo or sharing with others, these homemade delights will bring smiles all around.
Easy Homemade Reese’s Cups: A Nostalgic Delight
Gather around, my friend! Today we’re going to embark on a delightful culinary adventure as we create Easy Homemade Reese’s Cups together. This recipe is so straightforward, yet the end result is extraordinarily satisfying—like holding pure happiness in your hands. With just a handful of ingredients and minimal fuss, you’ll be able to craft these delectable treats that are sure to leave everyone asking for more!
Ingredients:
As we dive into this delicious recipe, let’s take a moment to appreciate each ingredient we’re using. Every element plays an essential role in crafting our sweet masterpiece.
- 1 cup (175g) semi-sweet or dark chocolate chips (at least 60% cacao). This ingredient is absolutely paramount because it forms the luscious outer shell of our Reese’s cups. Opting for semi-sweet or dark chocolate not only enhances the flavor profile with its rich cocoa notes but also balances beautifully against the sweetness of peanut butter. When shopping for chocolate chips, look for high-quality brands that list cocoa as one of the first ingredients—this ensures you’re getting a product that will melt smoothly and taste divine.
- 1/2 cup (125g) creamy peanut butter. Ah, peanut butter—the heart and soul of our treats! Its creamy texture provides an exquisite mouthfeel that pairs perfectly with chocolate. Additionally, peanut butter adds protein and healthy fats to this dessert. Always choose a brand that’s free from unnecessary additives; this way, you’ll enjoy pure nutty goodness without any surprises!
- 1/4 cup (30g) powdered sugar or 2 tablespoons (30g) brown sugar. Sweetening our peanut butter filling is essential for achieving that perfect balance of flavors—it’s what makes each bite feel indulgent! Powdered sugar dissolves instantly into the peanut butter mixture, creating an effortlessly smooth consistency. If you prefer brown sugar instead, you’ll add subtle caramel notes that enhance the depth of flavor even further.
- 2 tablespoons (28g) butter (optional). While this addition is non-negotiable for some recipes, here it’s simply optional—and let me tell you why! Including melted butter gives our filling extra creaminess and richness while ensuring it spreads easily within the chocolate shells. However, if you’re looking for a lighter version or have dietary restrictions, feel free to skip it; your cups will still be utterly delicious!
- Sea salt flakes for finishing. Now this is where things get exciting! A sprinkle of sea salt flakes at the end isn’t just decorative; it elevates the entire flavor experience by enhancing both the chocolate and peanut butter layers. The contrast between savory salt and sweet sweetness creates an addictive quality that makes these cups truly unforgettable.
- Mini muffin liners or silicone molds. These little helpers are crucial for shaping our cups perfectly! They allow easy removal after chilling and give us those charming cup shapes we adore so much. Silicone molds can be particularly handy since they’re flexible and make it effortless to pop out your creations without damaging them.
Equipment You’ll Need:
Having the right tools can make all the difference when preparing your Easy Homemade Reese’s Cups! Equip yourself with these essentials so your baking experience flows seamlessly:
- Microwave-safe bowl: This will be your go-to vessel for melting chocolate chips—a crucial step in achieving that velvety ganache-like coating we love so much! Ensure it’s heat-resistant so you can safely use it in the microwave without worrying about any mishaps.
- Baking tray: A trusty baking tray will serve as our foundation for placing those mini muffin liners or silicone molds neatly side by side as we create our delightful cups.
- Spoon or small cookie scoop: Use one to dollop melted chocolate into each liner with precision—it helps keep everything neat and uniform! Plus, having a small scoop makes filling your cups easier without causing too much mess.
- Spatula: A flexible spatula is essential when mixing your peanut butter filling together smoothly—it ensures every last bit gets incorporated without leaving any clumps behind!
With all your ingredients prepped and tools gathered, you’re ready to dive into creating these beautiful Easy Homemade Reese’s Cups!
Preparing Easy Homemade Reese’s Cups
Step 1: Prepare Your Baking Tray
The first step may seem simple but trust me—it sets the stage for everything else we’re about to create! Start by lining your baking tray with mini muffin liners or silicone molds; this allows us to shape our treats beautifully while making clean-up afterward a breeze. If you’ve chosen silicone molds—oh my goodness—they’re such a joy! Their flexibility means you won’t have any trouble releasing your finished cups later on; you’ll literally pop them right out like magic! Don’t rush this step; taking time to ensure everything is lined up properly will help ensure uniformity in size and appearance once we fill them up.
Step 2: Melting Chocolate Chips
Now comes one of my favorite parts—melting those gorgeous chocolate chips! In a microwave-safe bowl, combine approximately two-thirds of your measured chocolate chips; using bursts of 20 to 30 seconds at medium power ensures gentle heating without scorching them—a surefire way to maintain their rich flavor profile! After each burst in the microwave, give them a good stir until they’re smooth and glossy like liquid gold—this step is crucial because it helps incorporate residual heat from fully melted pieces into un-melted ones effectively.
Step 3: Combining Remaining Chocolate Chips
Once you’ve achieved that beautiful melted state you’re looking for, add in the remaining third of your chocolate chips directly into your warm bowl—this technique is known as “tempering.” Stir continuously until they melt fully into that luscious mixture we crave; what happens here is magical—the warmth from melted chocolate gently melts down those remaining chunks while keeping everything silky-smooth and glossy at just the right temperature!
Step 4: Spoon Chocolate into Liners
Time to mold those lovely little cups! Grab your spoon or small cookie scoop—and begin doling out about one teaspoon—or whatever feels comfortable—to fill each mini liner evenly without overflowing too much over edges (unless you want extra chocolaty goodness!). As you spoon in melted chocolate, gently rotate/travel along sides ensuring even coverage throughout—you want each cup coated nicely before popping them into freezer bliss! This chilling phase allows everything firm up beautifully while preventing air pockets later on where fillings could escape during assembly—it truly lays groundwork for success ahead!
I hope you’re feeling excited because we’re just getting started on this delightful journey together! Next up are steps involving our creamy peanut butter filling that’ll take these treats over-the-top deliciousness-wise… Stay tuned!
Creating Your Easy Homemade Reese’s Cups
Ah, the moment has arrived! We’re about to dive into the delightful world of assembling our Easy Homemade Reese’s Cups. I can’t stress enough how satisfying it feels to create something so nostalgic and utterly delicious right in your own kitchen. This is where the magic truly happens, where creamy peanut butter meets rich chocolate in a dance of flavors that will have you savoring each bite. Let’s get started!
Step 5: The Art of Chocolate Coating
Now that we’ve prepared our mini muffin liners or silicone molds, it’s time for the first layer of that luxurious chocolate shell. Take those melted chocolate chips—about two-thirds of your total—and let them tumble into a microwave-safe bowl. It’s crucial to melt them slowly; using 20- to 30-second bursts allows you to keep an eye on the consistency without risking any scorched chocolate. Stirring in between these intervals is not just a suggestion; it’s an essential part of ensuring your chocolate becomes velvety smooth and glossy, a real treat for the eyes as well as the taste buds.
Once you achieve that luscious liquid gold, fold in the remaining chocolate chips while gently stirring until everything is fully incorporated and shiny. This step is paramount because it helps cool down the melted chocolate and ensures a thicker, more stable consistency when coating our cups. It’s like giving your chocolate a little hug to bring it together! Now, grab your spoon and measure out about a teaspoon of this divine mixture into each muffin liner, rotating the tray gently as you go. The key here is to coat the edges—this creates a beautiful shell for our peanut butter filling to nestle inside, keeping everything perfectly balanced and not too top-heavy.
Step 6: Firming Up for Perfection
Once you’ve filled all your liners with that tempting chocolate goodness, it’s time to play the waiting game just a bit! Pop that tray into the freezer for 5–7 minutes. I know waiting can be tough, especially when you’re so close to tasting these delights, but trust me on this one—the chilling process is absolutely critical here. When you freeze them briefly, it solidifies the chocolate just enough so that when we add our peanut butter filling later, it won’t sink or disrupt that beautiful shell.
What you’re looking for after those few minutes in the freezer is a set outer layer that’s firm but not rock-hard; think of it like a gentle little hug around each cup. If you skip this step or rush through it, you may end up with cups that don’t hold their shape properly or mix together in an unappealing way—and we definitely want to avoid that! So take a deep breath, maybe pour yourself a cup of tea while you wait, and enjoy this moment of anticipation.
Step 7: Crafting Your Creamy Peanut Butter Filling
Now comes perhaps my favorite part—the peanut butter filling! In another bowl, combine half a cup of creamy peanut butter with 1/4 cup of powdered sugar (or brown sugar if you’re feeling adventurous). This sweetening agent isn’t just there for flavor; it helps create that perfectly spreadable texture we’re after. If you’re using brown sugar instead, you’ll find its molasses notes add an extra dimension to your filling—think of it as giving your Reese’s Cups a little personality!
As you mix everything together—perhaps with a spatula or even better yet, with your trusty wooden spoon—you’ll want to incorporate just a pinch of salt into the mix. Why salt? Well, let me tell you—it does wonders by enhancing the natural sweetness of the peanut butter while balancing out those rich flavors. If at any point this mixture feels too dense or hard to work with (and sometimes peanut butter can be quite stubborn), feel free to melt two tablespoons of butter and fold it in until everything becomes beautifully smooth and spreadable.
Step 8: Building Your Flavor Layers
With your peanut butter filling ready and waiting like an eager friend to dive into this dessert adventure, it’s time for assembly! Carefully spoon about a small dollop—think about one tablespoon—of that luscious peanut butter mixture into each prepared chocolate shell. Remember to press down slightly; this helps eliminate any pesky air pockets that might disrupt our perfect layers later on. It also means you’ll get more indulgent peanut butter goodness in every single bite!
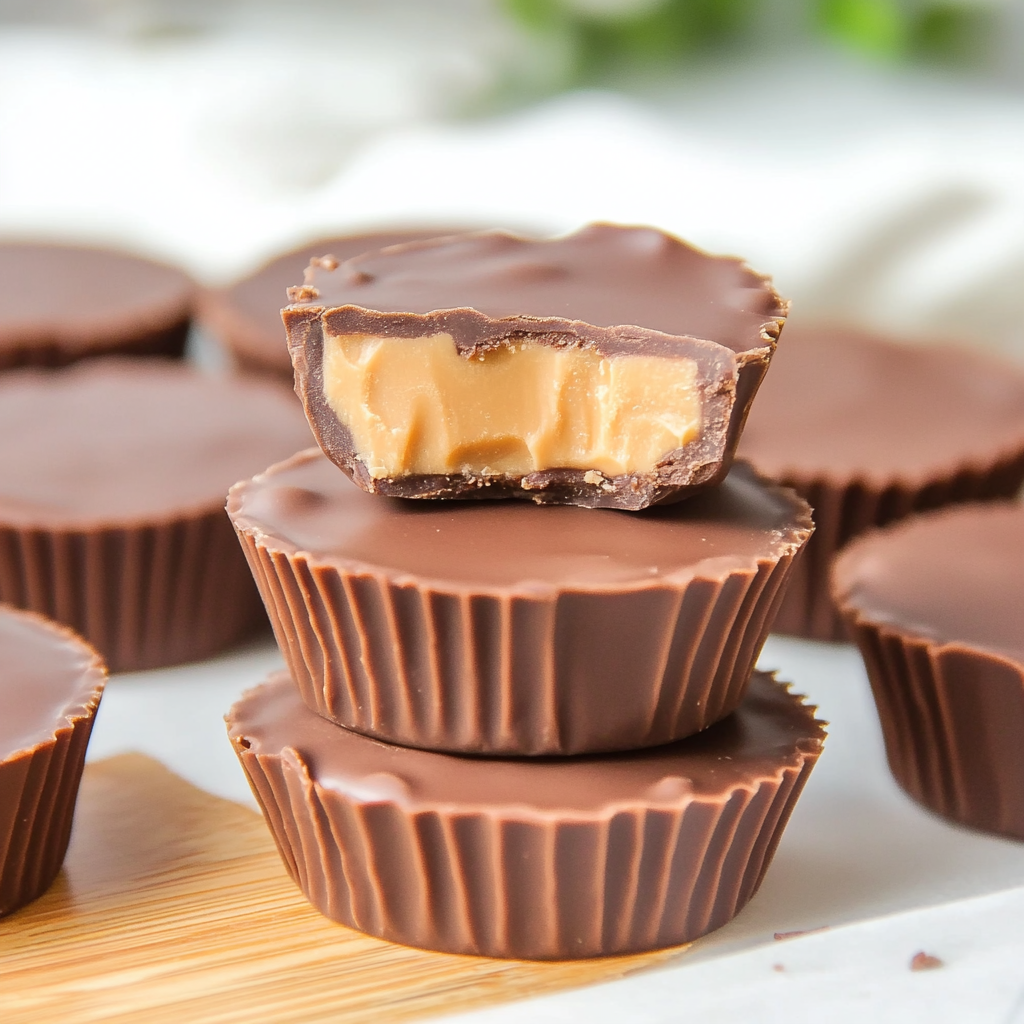
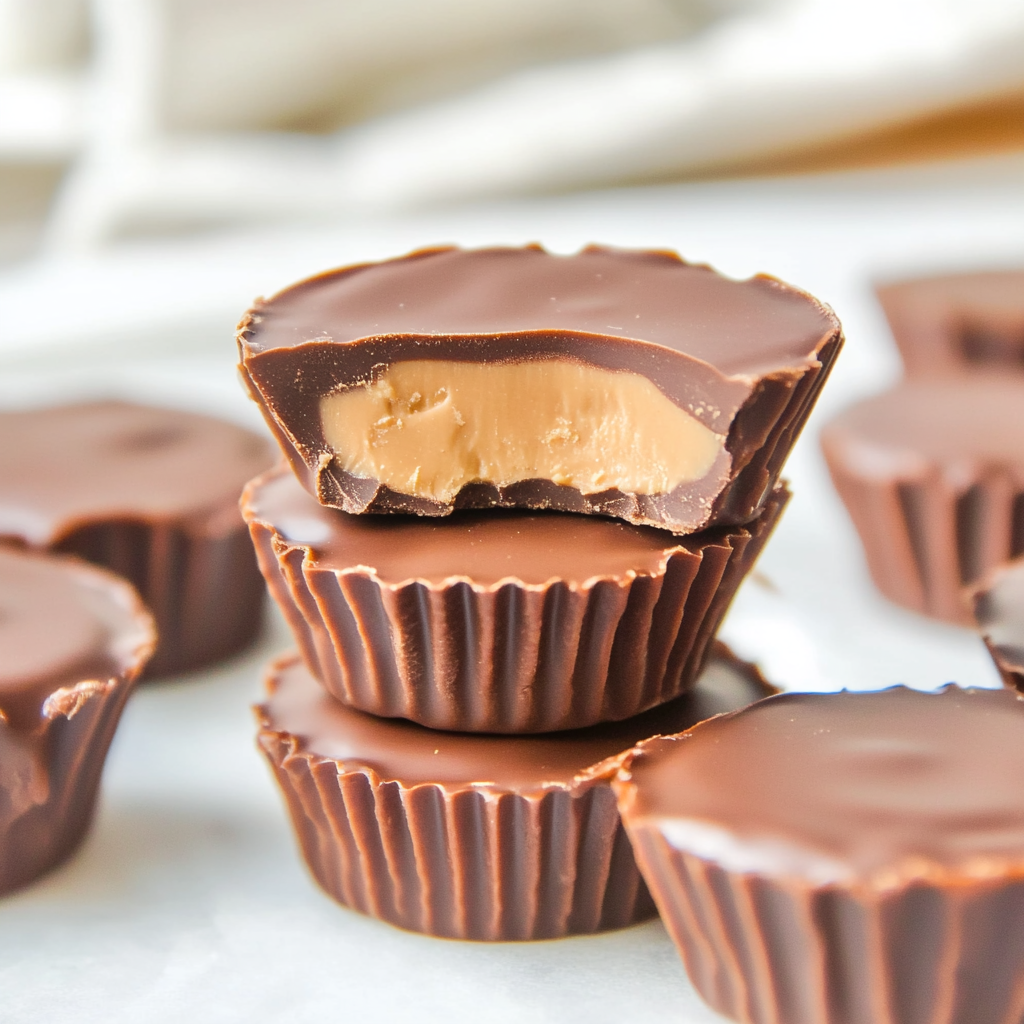
The visual cue here is crucial; once you’ve filled all your shells with peanut butter goodness, they should look like little dollops nestled snugly within their chocolate coats—just beautiful! Now let’s finish them off by topping each one with another one or two teaspoons of melted chocolate—a gentle drizzle will do wonders here as we seal in all that creamy delight beneath its protective layer. Take care as you pour; aim for completely covering the top so no filling peeks through—that’s non-negotiable if we want beautifully formed cups!
After you’ve topped them off with that silky smooth finish, tap the tray gently on your countertop—a practice which flattens those tops perfectly and helps remove any air bubbles trapped inside. Finally, sprinkle some sea salt flakes on top while they’re still warm; this finishing touch not only elevates flavor but adds such an inviting texture contrast when you finally take a bite!
Conclusion:
As we wrap up our delicious journey through making Easy Homemade Reese’s Cups together, I hope you’re feeling as excited as I am about this wonderful recipe! It truly embodies everything we love about desserts: the luscious combination of creamy peanut butter and rich chocolate creates a symphony of flavors that dances on your tongue. And let’s not forget about that perfect texture—the smooth filling encased in crisp chocolate brings an utterly satisfying experience that’s hard to beat. Each bite is like a warm hug from your favorite childhood memories; it’s no wonder this treat has captured hearts (and taste buds) for generations.
This recipe is an absolute must-try—not just because of its taste but also due to the sheer joy it brings while making it. Imagine gathering around with friends or family while whisking together ingredients; laughter fills the air as everyone eagerly anticipates those sweet morsels coming from the kitchen. Whether it’s a cozy movie night or a festive gathering where everyone brings their favorite dessert, these cups shine brightly among all options. Picture pulling out that container filled with homemade goodness—everyone’s eyes light up with excitement!
And now let’s talk pairings! Imagine savoring one of these delectable cups with a piping hot cup of coffee in the morning or alongside a glass of cold almond milk after school—it’s an utterly divine combination! For an afternoon pick-me-up or even after dinner indulgence, consider pairing them with fresh berries or even some crunchy pretzels; that contrast elevates each flavor note beautifully. You could even crumble one over vanilla ice cream for an irresistible sundae experience—trust me; your taste buds will thank you!
Feeling adventurous? This recipe is wonderfully adaptable! You could swap out classic peanut butter for almond or cashew butter if you’re craving something different—each nutty flavor adds its own unique twist! Or maybe drizzle some melted dark chocolate over the top instead of regular chocolate for an extra dose of richness—it makes each cup feel special and tailored just for you! So go ahead—experiment in your kitchen! I can’t wait to hear how your own versions turn out; be sure to share your experiences and connect with fellow food lovers who will surely appreciate this blissful treat.
Easy Homemade Reese’s Cups
Indulge your sweet tooth with these Easy Homemade Reese’s Cups, a delightful treat that combines creamy peanut butter enveloped in rich chocolate. Perfect for sharing or enjoying solo, these no-bake delights are reminiscent of childhood favorites and are simple to prepare with just a few ingredients. Whether you’re hosting a gathering or simply treating yourself, this recipe promises to deliver smiles and satisfaction in every bite. The balance of sweet and salty flavors makes for an irresistible snack that everyone will adore. Get ready to create memories in the kitchen while savoring the joy these homemade treats bring!
- Prep Time: 15 minutes
- Cook Time: 10 minutes
- Total Time: 25 minutes
- Yield: Approximately 12 cups 1x
- Category: Dessert
- Method: No-bake
- Cuisine: American
Ingredients
- 1 cup semi-sweet or dark chocolate chips
- 1/2 cup creamy peanut butter
- 1/4 cup powdered sugar (or brown sugar)
- 2 tablespoons butter (optional)
- Sea salt flakes for finishing
- Mini muffin liners or silicone molds
Instructions
- Line a baking tray with mini muffin liners or silicone molds.
- Melt two-thirds of the chocolate chips in a microwave-safe bowl using 20-30 second bursts, stirring until smooth.
- Stir in the remaining chocolate chips until fully melted and glossy.
- Spoon about one teaspoon of melted chocolate into each liner, coating the sides evenly. Freeze for 5–7 minutes until set.
- In another bowl, mix peanut butter with powdered sugar and salt until smooth; add melted butter if desired.
- Spoon one tablespoon of the peanut butter mixture into each chocolate shell, pressing down slightly to eliminate air pockets.
- Top each filled cup with another teaspoon of melted chocolate to seal, tapping gently on the counter to flatten tops.
- Chill in the freezer for another 20-30 minutes until fully set.
Nutrition
- Serving Size: 1 serving
- Calories: 150
- Sugar: 10g
- Sodium: 50mg
- Fat: 10g
- Saturated Fat: 4g
- Unsaturated Fat: 5g
- Trans Fat: 0g
- Carbohydrates: 14g
- Fiber: 1g
- Protein: 3g
- Cholesterol: 5mg