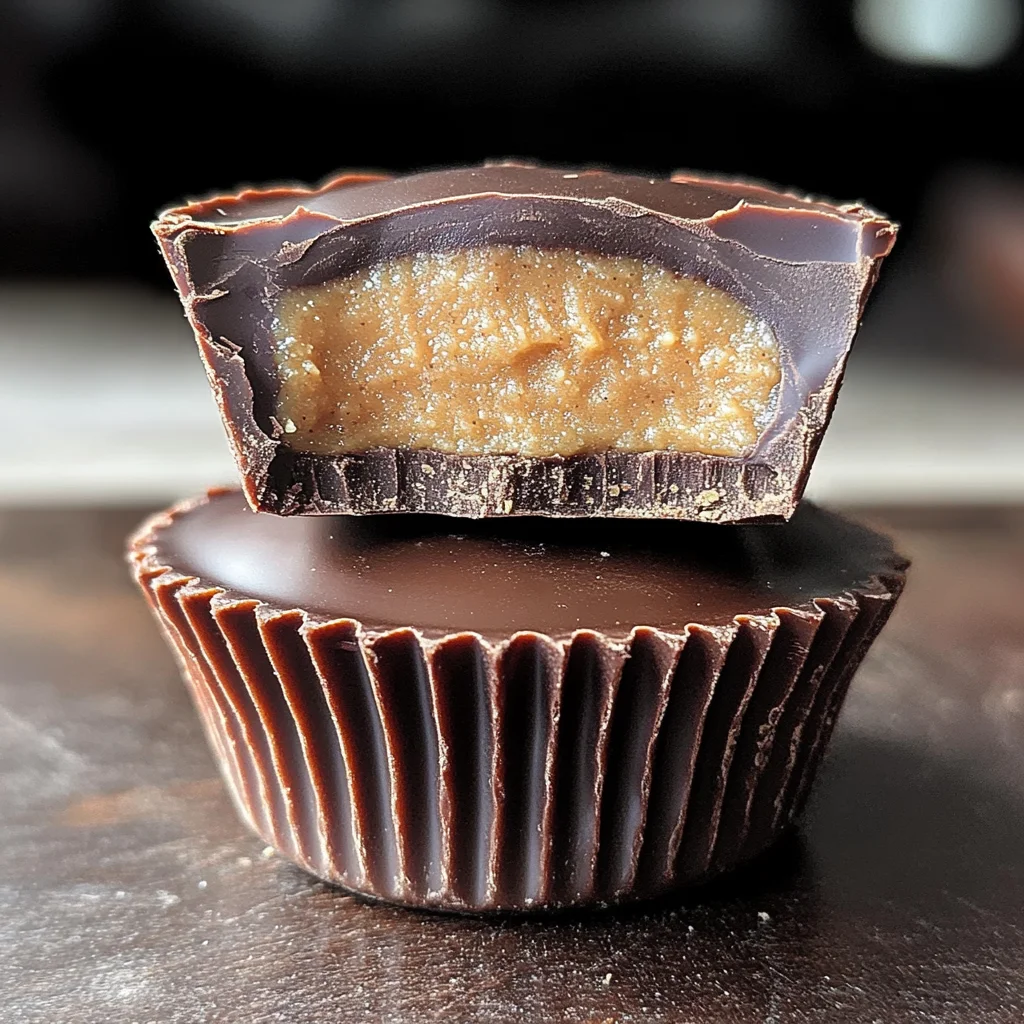
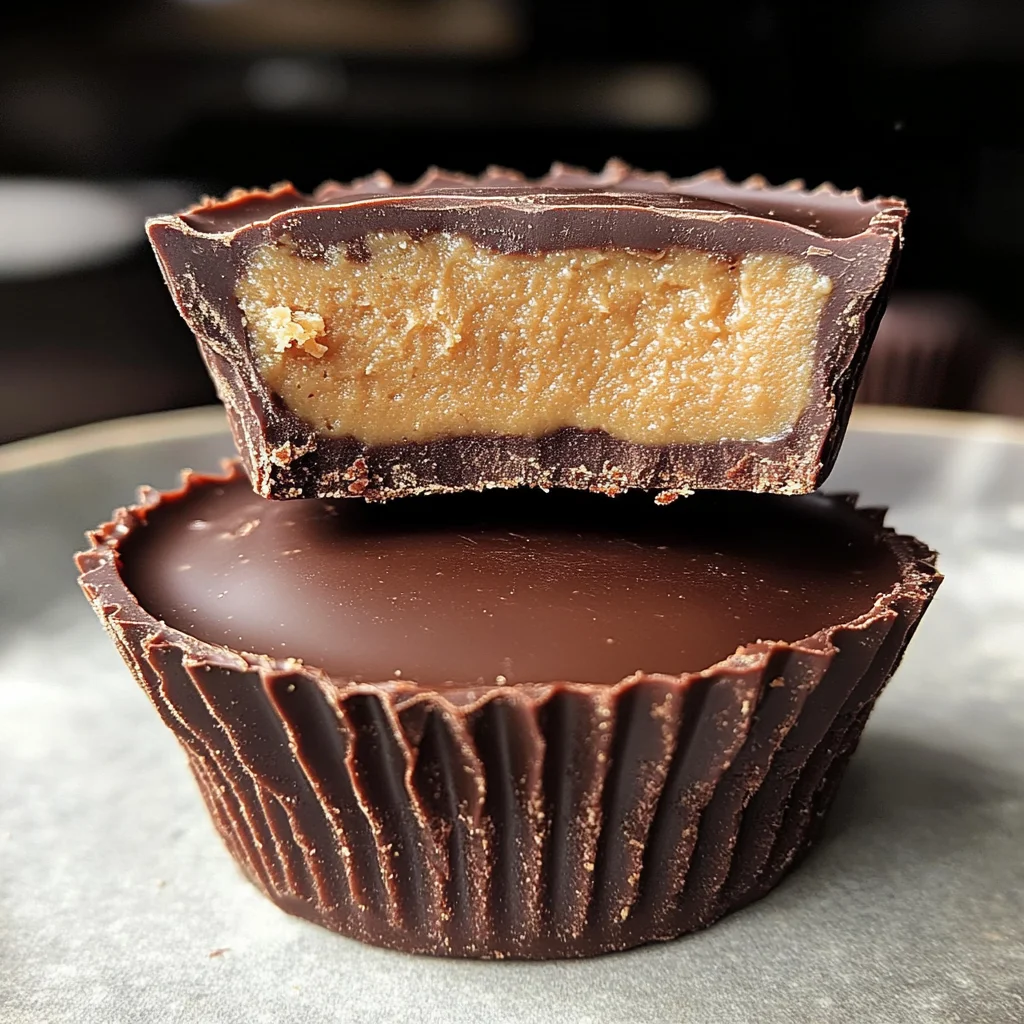
Reese’s Peanut Butter Cups recipe
There’s something utterly magical about creating your own Reese’s Peanut Butter Cups at home. This isn’t just another dessert recipe; it’s a delightful journey into the realm of flavor, where creamy peanut butter meets the rich embrace of chocolate in a way that seems almost divine. Picture this: as you unwrap one of these homemade cups, the soft, velvety chocolate gives way to a luscious peanut butter filling that is both sweet and slightly salty—it’s a symphony of taste and texture that will transport you right back to childhood. Each bite is not just satisfying; it’s an experience that evokes joy and nostalgia. I promise you, once you try this Reese’s Peanut Butter Cups recipe, you’ll never look at store-bought versions the same way again!
What makes this treat truly special is how simple yet rewarding it is to create. The balance between the crunchy graham cracker base, the smooth peanut butter, and the glossy chocolate coating comes together beautifully. These cups are perfect for sharing at gatherings, or simply enjoying on a cozy evening with a good movie. It’s an opportunity not just to indulge but to connect with those around you—because when you share food made with love, you share a piece of yourself.
Reese’s Peanut Butter Cups recipe: A Homemade Delight
Let’s dive into the wonderful world of making these indulgent treats! They’re surprisingly easy to whip up and require just a handful of ingredients you probably have in your pantry already. Trust me when I say that your friends and family will be absolutely amazed when they taste these delectable bites.
Ingredients:
As we embark on this culinary adventure together, let’s explore each ingredient that brings our homemade Reese’s Peanut Butter Cups recipe to life!
- 10 graham crackers. These little rectangles are not just a supporting player; they serve as the foundation for our peanut butter mixture. When crushed into fine crumbs, they add an essential texture and subtle sweetness that balances perfectly with the rich peanut butter. Look for graham crackers that are made with whole grains if possible—they’ll provide a deeper flavor profile and more nutrition than their refined counterparts.
- 1¼ cups powdered sugar. This ingredient acts like magic dust in our recipe! Powdered sugar blends seamlessly into our peanut butter filling, giving it that signature sweetness without any grittiness. It’s crucial for achieving the right consistency—too little sugar means your filling won’t hold together well, while too much can make it overly sweet. Make sure to sift it before adding if it’s clumpy; nobody wants that in their creamy center!
- 1½ cups melted peanut butter. Ah, liquid gold! The star of our show—peanut butter adds not only creaminess but also depth of flavor that is irresistible. Opt for natural peanut butter if you can; it’s free from additives and has a lovely nutty taste that shines through in every bite. Melt it gently so it becomes smooth and pourable; this step ensures it combines beautifully with the dry ingredients without becoming too thick or hardening prematurely.
- 2 cups milk chocolate chips. This is where we get our beautiful exterior! Melting chocolate chips creates a luscious coating that seals in all that tasty goodness beneath. I recommend using high-quality milk chocolate chips for optimal richness and sweetness; they should melt smoothly without seizing up when heated. Keep an eye on them in the microwave—stirring every 30 seconds ensures they reach that perfect velvety consistency without scorching.
Equipment You’ll Need:
Now that we’ve gathered our ingredients, let’s talk about the tools we’ll need to make this process smooth sailing! Having the right equipment makes all the difference between a joyful cooking experience and one filled with frustration.
- Food processor or blender: This tool is indispensable for transforming those graham crackers into fine crumbs. A food processor will give you uniformity quickly, while a blender works just as well if you’re careful not to overprocess them into dust.
- Large mixing bowl: You’ll need a spacious bowl for combining your dry ingredients before bringing everything together with the melted peanut butter. A sturdy glass or ceramic bowl works best because it can handle heat if needed during mixing.
- Microwave-safe bowl: To melt those glorious chocolate chips without burning them—a critical step in ensuring we have smooth chocolate for coating! Ensure it’s large enough to allow for stirring as well.
- Cupcake liners: These little paper wonders are essential for shaping our Reese’s cups! They help maintain form while allowing easy removal once everything has set up nicely.
Step 1: Preparing Graham Cracker Crumbs
First things first—let’s turn those graham crackers into crumbs! Place your graham crackers in your trusty food processor or blender and pulse until they resemble fine sand or powder. This step is crucial because the texture plays an important role in holding everything together later on; we want them finely ground so they blend effortlessly with the other ingredients without clumping together awkwardly later on. If you don’t have either appliance handy, don’t worry—putting them inside a zip-top bag and crushing them with a rolling pin works beautifully too! Just make sure to crush them thoroughly so there aren’t any larger pieces lurking around.
Step 2: Combining Dry Ingredients
Next up, let’s bring those lovely graham cracker crumbs into action! Transfer them into your large mixing bowl and sprinkle in the powdered sugar like confetti at a celebration—it adds sweetness while helping bind everything together later on. Mix until fully combined; I find using my hands often helps here because you can feel when everything is evenly distributed—it needs to feel cohesive yet crumbly at this point since we’ll be adding liquid soon!
Step 3: Incorporating Peanut Butter
Now comes one of my favorite moments—the moment we add our melted peanut butter into this mix! Pour it directly over your dry ingredients and stir until everything comes together into one glorious mass of dough-like consistency—it should feel pliable enough to mold but still hold its shape well when pressed between fingers. This step is absolutely paramount because if your mixture isn’t combined thoroughly, some cups may end up having less filling than others—and trust me when I say nobody wants to skimp on such deliciousness!
Step 4: Preparing the Chocolate Layer
With our filling ready, let’s shift gears back toward melting those decadent milk chocolate chips! Place them in your microwave-safe bowl and begin melting them gently by microwaving on high power in increments of 30 seconds at first—this control prevents any potential scorching which would ruin their glossy shine later on (and who wants dull chocolate?). Stir after each interval until completely smooth; what you’re looking for here is pure silkiness—a beautiful melted texture that’s ready to envelop every delicious bite underneath.
Stay tuned as we continue bringing these delightful treats together—I promise you won’t want to miss out on these next steps where assembly takes place!
Crafting Your Dreamy Reese’s Peanut Butter Cups Recipe
Oh, my dear friend, are you ready to embark on a delightful adventure that will whisk you back to the cozy comforts of childhood? Making your own Reese’s Peanut Butter Cups is not just a treat; it’s a journey filled with nostalgia, warmth, and pure joy. The way the smooth peanut butter melds with the creamy chocolate is nothing short of magical. Trust me, once you take that first bite, you’ll know this is not just any dessert—it’s a hug in food form! So let’s dive right in together!
Step 5: Assemble the Cups Like a Master Chocolatier
Now comes the moment we’ve all been waiting for—the assembly! Start by placing 15 cupcake liners on your trusty baking sheet. This step is crucial because these liners will cradle our heavenly concoction and help maintain their shape as they chill out in the fridge. You want to ensure they’re evenly spaced so each cup has room to shine. With your melted chocolate ready and oh-so-glossy from the gentle heating we did earlier, grab a tablespoon and spoon a heaping scoop into each liner. As you do this, imagine spreading liquid gold across the base of each cup—this layer acts as a protective barrier for that satisfying crunch we all love.
It’s essential to spread the chocolate evenly across the bottom of each liner; this ensures every bite will deliver that perfect balance of chocolate and peanut butter. Use the back of your spoon for precision—don’t rush this step! You want it to be about 1/8 inch thick, providing just enough foundation for our star ingredient. Once all liners are filled and looking gorgeous, it’s time to move on to adding our beloved peanut butter mixture!
Step 6: Layering on That Irresistible Peanut Butter Filling
With your chocolate bases now set and ready, it’s time to add that utterly intoxicating peanut butter filling. Take that heaping tablespoon of the peanut butter mixture we prepared earlier and place it right on top of the chocolate layer in each liner. I can’t stress enough how important this layer is—it’s where all those flavors come together in harmony! As you gently press down with your spoon, you’re creating a delightful contrast between creamy and crunchy textures that will make your taste buds sing.
What makes this step so special? It’s all about building layers of flavor! As the peanut butter melds with the warm chocolate below, it creates an experience that’s both comforting and utterly extraordinary. Make sure to leave enough room at the top for our final layer of chocolate; we want these cups nicely sealed in their chocolaty embrace. If you’re feeling adventurous (and why wouldn’t you be?), consider sprinkling a hint of sea salt on top of each peanut butter mound—it adds an exciting depth that will have everyone asking for seconds!
Step 7: Sealing It All In With More Chocolate
Now let’s finish off these divine treats by crowning them with yet another heaping tablespoon of melted chocolate! This final layer not only seals in all that deliciousness but also gives our cups that classic Reese’s look we crave. Carefully spoon your melted chocolate over each peanut butter mound, ensuring it covers every inch without spilling over too much into those beautiful liners—after all, we want them to look as good as they taste!
As you spread it out gently with the back of your spoon or even a small spatula if you’re feeling fancy, watch as everything comes together into one glorious masterpiece! It’s like watching an artist bring their canvas to life. Before moving on to chill them out in the refrigerator, double-check that you’ve used enough chocolate to create a nice thick seal—this is non-negotiable because it keeps everything inside moist and flavorful while preventing any unsightly mess when you unearth them later.
Step 8: The Transformative Chill
Ahh, now comes one of my favorite parts—the chilling! Place your baking sheet delicately in the refrigerator and allow those beauties to firm up for about an hour. I promise you; this time spent chilling is absolutely paramount! Not only does it allow the layers to set beautifully together—transforming them from gooey mixtures into perfectly formed cups—but it also gives time for those rich flavors to mingle and deepen.
While you’re waiting (and trust me, patience is key here), take a moment to revel in anticipation—the aroma wafting through your kitchen will be nothing short of enchanting! After about 60 minutes, sneak a peek; they should feel firm yet slightly soft when pressed gently at their centers—a sign they are ready for unwrapping. If they still feel too soft or wobbly, don’t hesitate to give them another 10-15 minutes in the fridge.
Conclusion:
As we wrap up this delightful journey through crafting your very own Reese’s Peanut Butter Cups recipe, I hope you feel just as excited as I do about this cherished creation. There’s something profoundly satisfying about combining simple ingredients into such an extraordinary treat—who knew graham crackers could transform into something so decadent? The interplay of smooth chocolate with that rich peanut butter filling creates an unforgettable symphony of flavors that dances on your palate, making each bite feel like a warm hug from within.
This recipe isn’t just about taste; it’s about the joy of making something wonderful from scratch—a perfect blend of nostalgia and creativity that invites everyone into the kitchen. Whether it’s a rainy afternoon or you’re hosting friends for game night, these treats shine brightly at any occasion. Picture pulling these out from the fridge or freezer—the anticipation builds as you unwrap one, revealing its glossy exterior and heavenly aroma wafting through the air. It’s bound to spark smiles all around!
For serving suggestions that elevate this experience even further, imagine savoring one alongside a steaming cup of coffee or tea—it’s like pairing old friends at brunch! For an afternoon pick-me-up during those sluggish moments at work, enjoying one with a glass of cold almond milk is simply divine. And let’s not forget how sensational they would be nestled on a dessert platter next to fresh strawberries or drizzled with honey; every bite becomes an adventure when paired harmoniously with other flavors.
Feeling adventurous? This Reese’s Peanut Butter Cups recipe is wonderfully adaptable! You can swap out dark chocolate for milk chocolate if you’re seeking deeper notes or even try adding crushed pretzels into the peanut butter mixture for that perfect salty-sweet crunch! Want some zing? A hint of sea salt sprinkled atop before chilling takes it over the top! Whatever variation speaks to you, I wholeheartedly encourage you to dive in and create your own culinary twist on this classic delight. So go ahead—try it, share your experience with loved ones, and connect over the magic of homemade treats because food has an incredible way of bringing us together!
Reese’s Peanut Butter Cups
Indulge in the joy of creating your very own Reese’s Peanut Butter Cups right at home! This recipe takes you on a delightful journey where creamy peanut butter meets rich chocolate in a surprisingly simple yet utterly rewarding process. With just a handful of everyday ingredients, you’ll be crafting these delectable treats that are sure to impress friends and family alike. Each bite is a heavenly combination of crunchy graham cracker base, smooth peanut butter filling, and luscious chocolate coating—perfect for sharing or savoring during a cozy movie night. Once you experience the homemade version, you may never reach for store-bought again!
- Prep Time: 20 minutes
- Cook Time: 10 minutes
- Total Time: 30 minutes
- Yield: Approximately 15 servings 1x
- Category: Dessert
- Method: No-bake
- Cuisine: American
Ingredients
- 10 graham crackers
- 1¼ cups powdered sugar
- 1½ cups melted peanut butter
- 2 cups milk chocolate chips
Instructions
- Crush graham crackers into fine crumbs using a food processor or blender.
- In a large mixing bowl, combine crushed graham crackers and powdered sugar until well mixed.
- Add melted peanut butter to the dry mixture and stir until fully combined.
- Melt chocolate chips in a microwave-safe bowl, stirring every 30 seconds until smooth.
- Spoon melted chocolate into cupcake liners to form the base layer, then add a layer of the peanut butter filling, followed by another layer of melted chocolate on top.
- Chill in the refrigerator for about an hour until set.
Nutrition
- Serving Size: 1 cup (30g)
- Calories: 130
- Sugar: 12g
- Sodium: 55mg
- Fat: 8g
- Saturated Fat: 3g
- Unsaturated Fat: 5g
- Trans Fat: 0g
- Carbohydrates: 15g
- Fiber: 1g
- Protein: 2g
- Cholesterol: 0mg