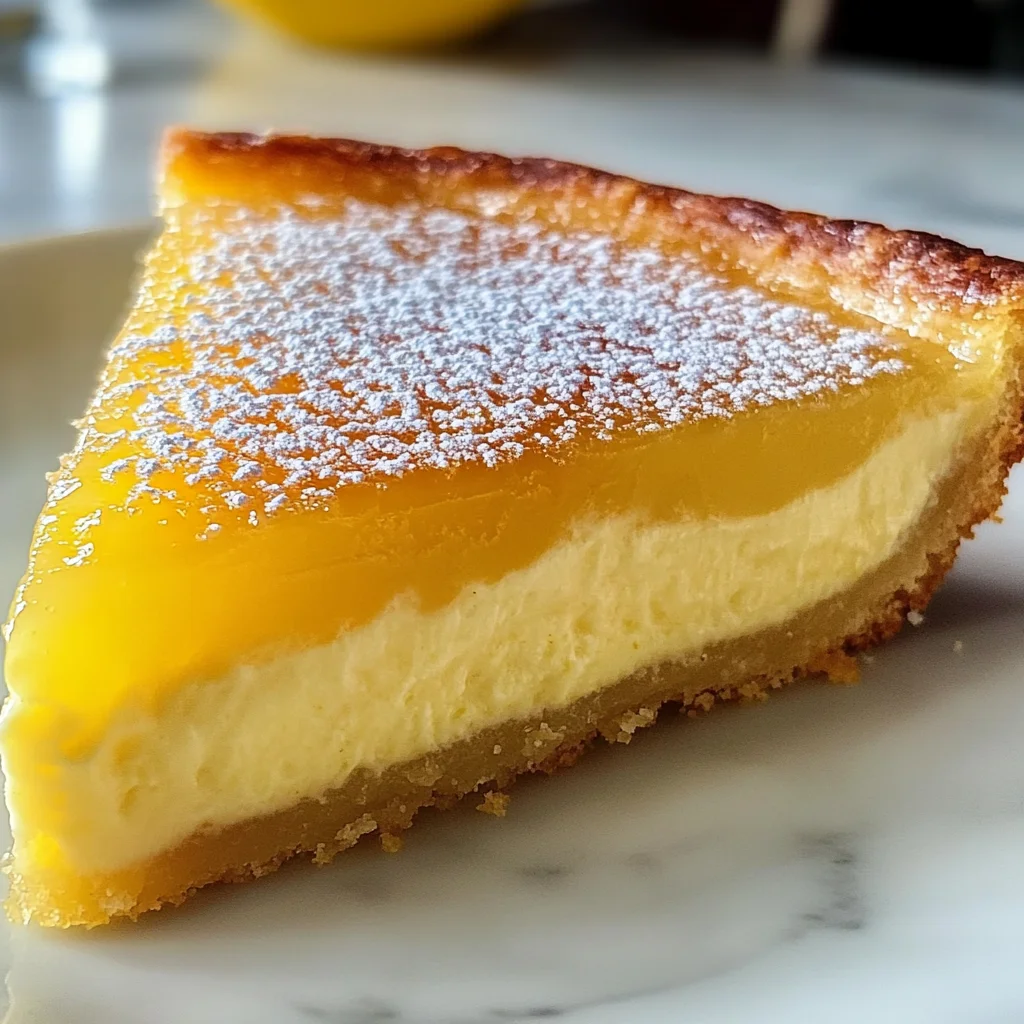
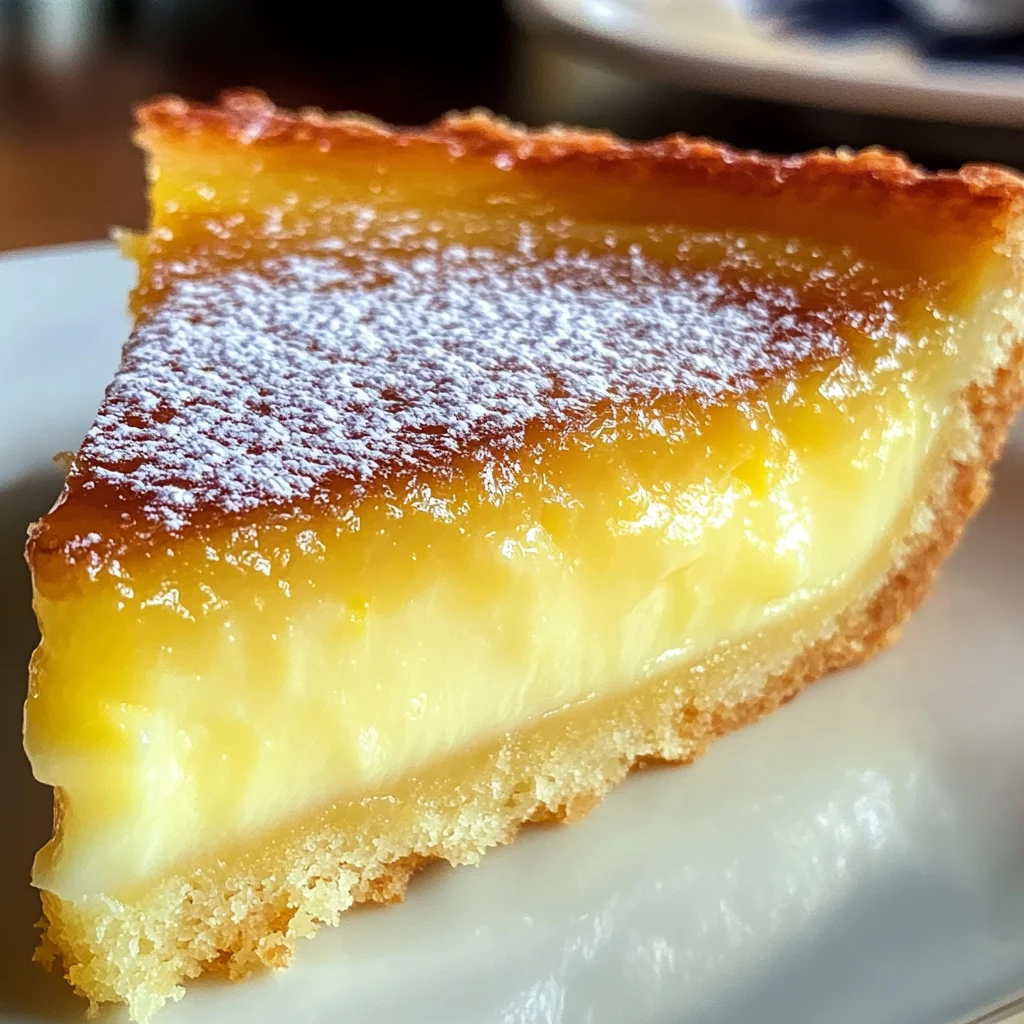
Italian Grandma’s Lemon Custard Cake – Classic Recipe
There’s something profoundly beautiful about sharing a beloved family recipe, isn’t there? It’s like passing down a piece of history wrapped in warmth and flavor, where every bite tells a story. This Italian Grandma’s Lemon Custard Cake is more than just a dessert; it’s an experience that brings together the sunshine of fresh lemons and the cozy embrace of buttery crust. Imagine cutting into this cake, your knife gliding through the silky custard, revealing its golden hue. The scent of citrus dances in the air, mingling with the comforting aroma of baked dough. Each slice invites you to savor not just the taste but also the love that went into making it—a true testament to what home cooking is all about.
As we embark on this culinary journey together, let me assure you: this lemon custard cake is an expression of simple elegance that can elevate any occasion. Whether you’re hosting a spring gathering or simply enjoying a quiet afternoon with a cup of tea, this cake whispers comfort and joy. It evokes memories of Nonna bustling around her kitchen, mixing ingredients and sharing stories with loved ones—an image I hold dear to my heart. Trust me when I say this recipe will become one of your favorites; it delivers sunshine in every bite and creates moments worth cherishing.
Italian Grandma’s Lemon Custard Cake – Classic Recipe: A Slice of Sunshine
This delightful dessert is not just about flavors; it’s about creating connections and memories around the table. With its creamy lemon custard nestled in a flaky crust, each slice carries the essence of Italian tradition merged beautifully with modern simplicity. This cake is utterly intoxicating, perfect for satisfying those sweet cravings while still feeling light enough for any occasion.
Ingredients:
Let’s gather our ingredients for this delicious journey! Each component plays a vital role in creating that luscious lemon custard cake that we’re all dreaming about.
- 1½ cups all-purpose flour. This ingredient forms the backbone of our crust and provides structure to our cake. When choosing flour, look for a brand labeled all-purpose as it has the right balance of protein content to create an ideal texture—crumbly yet supportive enough to hold our custard filling. Sifting it before use can help aerate it further, ensuring our crust remains tender rather than dense.
- ¼ cup granulated sugar. Sugar does so much more than sweeten our crust; it also contributes to browning and creates that lovely contrast between the crunchy exterior and soft interior. When selecting sugar, go for fine granulated as it dissolves easily during mixing, ensuring even sweetness throughout your crust.
- Pinch of salt. Don’t be tempted to skip this vital ingredient! Salt enhances flavors by balancing sweetness and bringing out the natural tartness of our lemon custard. It’s like a secret handshake between flavors—just enough to elevate everything without being noticeable on its own.
- ½ cup unsalted butter, cold and cubed. Cold butter is absolutely paramount for achieving that flaky texture we crave in pie crusts and cakes alike! By keeping it cold until you’re ready to mix, you ensure that when baked, those little bits create steam which puffs up your crust beautifully. Look for high-quality butter—European-style with higher fat content will yield richer results.
- 1 egg yolk. This little gem adds richness and helps bind everything together while giving our crust a beautiful color post-baking. Remember to separate the yolk gently from the egg white; using room temperature eggs can make blending easier as they emulsify better into your mixture.
- 2–3 tbsp cold water. This isn’t just any water—it’s what helps bring our dough together without making it tough! Start with two tablespoons; if you find your dough crumbling apart too much when mixed, gradually add more until you achieve that perfect consistency where everything holds together beautifully.
- 1½ cups whole milk. Whole milk lends creaminess to our lemon custard while helping achieve that silky texture we desire. The fat content in whole milk gives depth without overpowering the delicate lemon flavor we’re highlighting here—feel free to use lactose-free options if needed!
- ¾ cup granulated sugar (for the custard). Just like before, sugar plays an essential role here by sweetening our tangy filling while also assisting with thickening during cooking thanks to caramelization processes happening at play—this results in balanced flavors throughout!
- 3 large egg yolks (for the custard). These yolks are key players for both richness and stability in your custard filling—they act as emulsifiers helping bind all components together smoothly while providing an unctuous mouthfeel every bite deserves.
- ¼ cup cornstarch. Cornstarch serves as our thickening agent here—it transforms when heated alongside liquid ingredients creating that luxurious custardy texture we aim for! Make sure it’s well mixed with dry components first before adding liquids for even distribution later on!
- Zest of 1 lemon. Ahh—the zest is where we capture all those aromatic oils from citrus peels! It adds vibrant flavor notes without extra liquid—as zest contains no bitterness found elsewhere on fruit skins—and allows us to extract maximum essence from our lemons effortlessly!
- ½ cup fresh lemon juice (about 2 lemons). Fresh juice provides both acidity and brightness essential for balancing sweetness in our dessert beautifully—it cuts through richness resulting in layers upon layers of flavor which makes each bite feel refreshing yet indulgent! Always opt fresh over bottled whenever possible—trust me on this!
- 2 tbsp unsalted butter (for finishing). Adding butter at the end ensures extra creaminess enriching overall texture while elevating flavors further—this step guarantees nothing less than extraordinary once combined!
- 1 tsp vanilla extract. Vanilla adds warmth balancing out tartness from lemons perfectly; consider using pure extract instead of imitation since quality makes quite a difference here enhancing overall depth within your final creation.
Now that we have gathered all these delightful ingredients together, let’s move on to assembling everything beautifully!
Equipment You’ll Need:
Having the right tools makes this culinary adventure smoother and more enjoyable—you wouldn’t want to embark on a journey without proper gear after all! Here are some essential partners for crafting your Italian Grandma’s Lemon Custard Cake:
- Mixing Bowls: A good set of mixing bowls is crucial—from small ones for whisking egg yolks to larger bowls for combining dry ingredients—they help keep everything organized during preparation allowing you focus solely on enjoying each moment spent baking!
- Tart Pan or Square Cake Pan: Choose whichever suits your preference best; both work wonderfully for achieving appealing presentation—but do ensure they’re well-greased beforehand as this helps release baked goods effortlessly once cooled!
- Whisk: A sturdy whisk will become your best friend especially when blending eggs into mixtures or stirring up creamy textures—it allows air incorporation leading towards delightful results making dishes lighter overall!
- Rubber Spatula: Perfectly designed for scraping down sides eliminating waste during batter transfers plus folding delicate mixtures without deflating them—a non-negotiable tool everyone should have handy in their kitchen arsenal!
Now equipped with knowledge about ingredients plus tools needed—it is time we dive into preparing this marvelous cake together!
Step 1: Crafting Our Flaky Crust
Let’s start by making that buttery crust which serves as home base for our luscious lemon custard filling! In a medium-sized bowl (preferably metal or glass), combine your flour, sugar, and pinch of salt using a whisk—this ensures everything blends evenly before introducing any fats into mixture later on which could lead towards clumps forming otherwise! Next comes one important technique: cutting in cold butter cubes using either fingertips or pastry cutter until mixture resembles coarse crumbs resembling sandy texture throughout—that means tiny pieces remain visible still contributing towards flakiness later on once baked perfectly golden brown outside but tender inside!
Once you’ve reached desired consistency (think gravel-like!), add egg yolk followed by 2 tablespoons cold water; gently stir until dough begins forming—a process known as “bringing dough together.” Don’t rush this step—watch closely because too much water turns things sticky while too little leads towards crumbly disaster instead—we want something perfectly pliable yet not overly wet at all! If necessary add remaining tablespoon slowly until cohesive ball forms nicely without excessive handling.
Step 2: Pressing & Chilling
Now comes my favorite part: pressing dough into prepared pan! Lightly flour surface beneath dough before rolling out slightly larger than size needed then gently transfer onto tart/square pan pressing evenly along edges/corners nicely so nothing spills over later during baking process—we want neatness here folks! Once shaped appropriately allow chilling time within refrigerator (20–30 minutes) so gluten relaxes allowing optimal flakiness upon baking—you’ll thank yourself later when biting into crisp layers filled with creamy goodness!!
Step 3: Pre-Baking Our Crust
Preheat oven now while waiting patiently—set temperature at 350°F (175°C) which allows gentle heat circulation throughout cavity ensuring even browning occurs across surface area without burning edges prematurely either—which would ruin entire experience altogether right? While oven gets cozy prick base thoroughly fork preventing bubbling up during baking process leading towards flat structure instead—nobody wants uneven layers here friends! Bake uncovered roughly 12–15 minutes or until edges turn lightly golden brown indicating readiness—let cool slightly afterward before proceeding onto next step where magic truly begins unfolding…
Step 4: Creating Silky Lemon Custard
In another saucepan over medium heat combine granulated sugar along cornstarch whisking continuously till lumps dissolve entirely before adding zesty elements like lemon juice & zest along with egg yolks mixed separately beforehand ensuring smooth incorporation happens seamlessly without curdling occurring due sudden temperature changes—all crucial details folks!! Slowly introduce whole milk whilst stirring constantly enabling gradual heating process occurs gently helping thicken mixture gradually till arrives at pudding-like consistency—don’t rush this step either since patience rewards us richly yielding silky-smooth result instead clumpy mess left behind if overheated carelessly!!
Remove from heat once thickened sufficiently then fold softened butter plus vanilla extract ensuring final touches bring harmony amongst flavors before pouring warm lusciousness directly over cooled pre-baked crust ready awaiting deliciousness coming ahead…
Step 5: Preparing the Lemon Custard — The Heart of the Cake
Now that your crust is perfectly pre-baked and has cooled slightly, it’s time to dive into the creation of the lemon custard, which is truly the heart of this Italian Grandma’s Lemon Custard Cake. I can’t stress enough how important this step is; a well-made custard brings all the elements of this cake together in a gloriously creamy embrace. In a medium saucepan, you’ll start by whisking together ¾ cup of granulated sugar, ¼ cup of cornstarch, and the zest of one bright, fragrant lemon. This blend will not only sweeten but also thicken your custard beautifully. The cornstarch acts as a stabilizer, ensuring that your final dessert has a lovely, silky texture without being overly runny.
As you whisk these dry ingredients together, you’ll want to take a moment to appreciate the fresh lemon zest’s vibrant aroma that fills your kitchen; it’s like capturing sunshine in a bowl! Gradually pour in 1½ cups of whole milk while continuing to whisk vigorously. This slow incorporation helps avoid lumps and ensures that everything blends seamlessly. Next, place your saucepan over medium heat and keep stirring gently but consistently until the mixture begins to bubble and thicken – this process usually takes about 5-7 minutes. You’re looking for it to coat the back of a spoon; if it’s thick enough to hold a line when you swipe your finger through it, congratulations! You’ve achieved custard perfection!
Step 6: Adding Lemon Magic — Brightness and Depth
Once your custard has thickened beautifully, it’s time to remove it from the heat — but don’t rush! Letting it cool for just a moment is crucial before adding in our star ingredients: ½ cup of fresh lemon juice, 2 tablespoons of unsalted butter, and 1 teaspoon of vanilla extract. Trust me on this; allowing the custard to cool slightly prevents cooking the egg yolks further and maintains their rich flavor profile. The addition of lemon juice is where all that tanginess comes from; it brightens up the custard and balances out the sweetness.
After stirring in the lemon juice, watch as the mixture transforms into something utterly intoxicating—it’s like pouring liquid sunshine into your bowl! The butter adds richness and gives your custard that luxurious mouthfeel we all adore. Finally, finish with vanilla extract; this seemingly simple ingredient ties all those flavors together harmoniously. At this point, if you’re anything like me, you’ll be tempted to sneak a taste (or two)! Just remember: patience is key here because what you’re creating will be worth every moment spent waiting!
Step 7: Filling Your Crust — A Match Made in Heaven
Your beautiful custard is now ready to be poured into that lovingly prepared crust! But before you do that, allow me to emphasize an important tip: make sure your crust has cooled completely after pre-baking. This cooling period prevents any melting or sogginess from occurring when you pour in that warm custard—an absolute non-negotiable if you want the best results! Gently pour your luscious lemon custard into the pre-baked crust; use a spatula to ensure even spreading across every corner. Watching that velvety filling settle into its buttery shell is downright mesmerizing.
Now comes an exciting part — baking this masterpiece! Preheat your oven again to 350°F (175°C) if you haven’t already done so during these steps; this ensures an even bake throughout. Carefully place your filled tart pan or cake pan back into the oven and set your timer for about 25-30 minutes. Keep an eye on it during baking because here’s where you’ll witness some magic happen—the edges will set firmly while the center remains just slightly jiggly when done. It’s normal for it not to be fully firm at this stage as it’ll continue setting up while cooling later on.
Step 8: Cooling Down — The Secret Ingredient
Once baked, let your cake cool completely at room temperature before attempting to slice into it—this step is absolutely paramount! The cooling process allows flavors to meld beautifully while giving everything time to settle properly so each slice maintains its integrity. It can be tempting (believe me!) to cut right into it while it’s still warm because who could resist? However, if you give it adequate time—at least an hour—you’ll end up with clean slices and a more refined presentation.
After cooling at room temperature for about an hour or so, pop it into the refrigerator for another chill session—around two hours should do nicely—before serving. Why chill? It not only enhances flavor but also solidifies that luscious custard filling so every bite feels indulgent rather than runny or messy. Plus, there’s something so satisfying about slicing into a chilled dessert on a warm day; it’s like taking a bite out of summer itself!
Conclusion:
As we wrap up our journey through making Italian Grandma’s Lemon Custard Cake, I hope you’re filled with as much excitement as I am about this timeless recipe! From mixing that buttery crust to watching the custard thicken beautifully on the stove, each step is infused with love and anticipation. The way that tart lemon meets sweet creaminess creates an unforgettable flavor profile that truly elevates it beyond just any dessert—this cake is an experience, one rich with nostalgia and warmth reminiscent of cherished family gatherings.
This recipe is not just about indulging in something delicious; it’s about creating memories—whether you’re baking for a spring gathering with friends or simply treating yourself after a long day. Imagine yourself pulling this golden beauty from the oven, letting the intoxicating aroma fill your kitchen as everyone gathers around, eager to taste what you’ve created. With its light yet indulgent texture and vibrant flavor, it deserves to be celebrated on any occasion—be it birthdays, afternoon teas, or simply because life is too short not to enjoy a slice of happiness.
Serving suggestions abound! Imagine savoring one slice while sipping on your favorite herbal tea—a perfect pairing for those tranquil afternoons when you need a moment just for yourself. For an afternoon pick-me-up, consider serving this cake alongside fresh berries that burst with flavor upon each bite; their sweetness complements the tanginess of the lemon custard perfectly! And let’s not forget how delightful it would be topped with a dollop of whipped coconut cream—a twist that adds extra decadence while keeping everything plant-based!
Feeling adventurous? This recipe is wonderfully adaptable! You could incorporate other citrus fruits like grapefruit or orange zest into the custard for an exciting twist on flavors. Want something even more unique? How about adding some finely chopped fresh herbs like basil or mint to elevate those citrus notes? The possibilities are endless! I encourage you to explore these variations and make this recipe your own; each adaptation brings forth new stories and memories waiting to unfold. So roll up your sleeves, gather your loved ones around the kitchen counter, and dive into this joyous baking adventure together—trust me; you’ll create not just a dessert but an experience worth sharing!
Italian Grandma’s Lemon Custard Cake – Classic Recipe

Experience the warmth and nostalgia of Italian Grandma’s Lemon Custard Cake – Classic Recipe, a delightful dessert that brings the bright flavors of fresh lemons to life. This cake features a buttery, flaky crust cradling a silky custard, creating a harmonious balance between sweet and tangy. Ideal for spring gatherings or quiet afternoons with tea, each slice serves as a reminder of cherished family moments spent in the kitchen. Easy to prepare and bursting with flavor, this cake is sure to become a beloved classic in your home.
- Prep Time: 30 minutes
- Cook Time: 45 minutes
- Total Time: 1 hour 15 minutes
- Yield: Approximately 10 servings 1x
- Category: Dessert
- Method: Baking
- Cuisine: Italian
Ingredients
- 1½ cups all-purpose flour
- ¼ cup granulated sugar (for the crust)
- ½ cup unsalted butter, cold and cubed
- 1 egg yolk
- 2–3 tbsp cold water
- 1½ cups whole milk
- ¾ cup granulated sugar (for the custard)
- 3 large egg yolks (for the custard)
- ¼ cup cornstarch
- Zest of 1 lemon
- ½ cup fresh lemon juice (about 2 lemons)
- 2 tablespoons unsalted butter (for finishing)
- 1 teaspoon vanilla extract
Instructions
- Prepare the crust: In a bowl, mix flour, sugar, and salt. Cut in cold butter until crumbly. Add egg yolk and cold water until dough forms. Chill for 20 minutes.
- Pre-bake the crust at 350°F for about 12–15 minutes until golden.
- Make the custard: Whisk together granulated sugar, cornstarch, and lemon zest in a saucepan. Gradually add milk while whisking; heat over medium until thickened.
- Remove from heat; stir in lemon juice, butter, and vanilla extract.
- Pour custard into cooled crust; bake at 350°F for an additional 25–30 minutes until edges are set.
- Cool completely before slicing; refrigerate for at least two hours before serving.
Nutrition
- Serving Size: 1 slice (100g)
- Calories: 272
- Sugar: 23g
- Sodium: 92mg
- Fat: 14g
- Saturated Fat: 8g
- Unsaturated Fat: 5g
- Trans Fat: 0g
- Carbohydrates: 33g
- Fiber: 0g
- Protein: 4g
- Cholesterol: 65mg