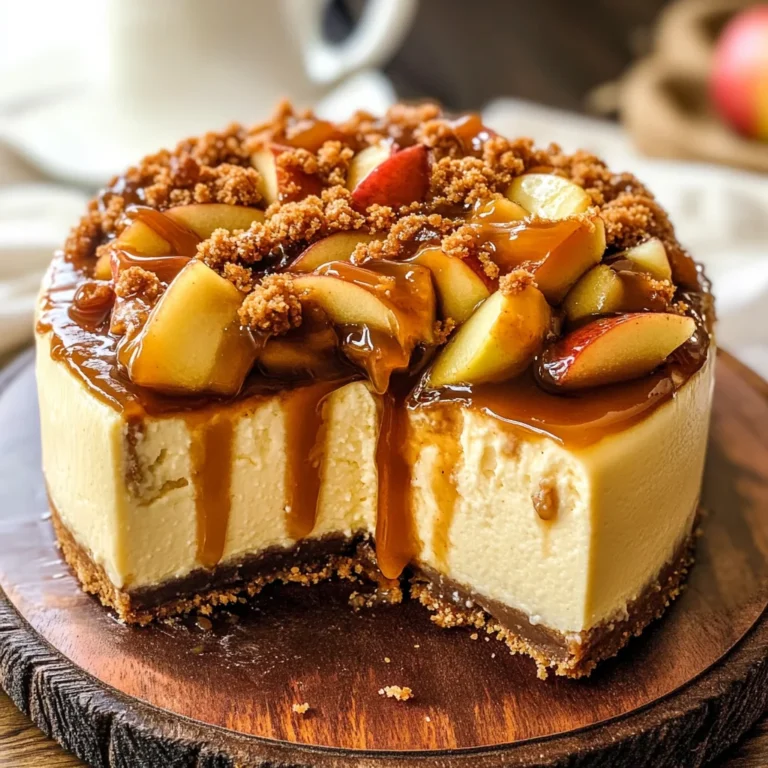
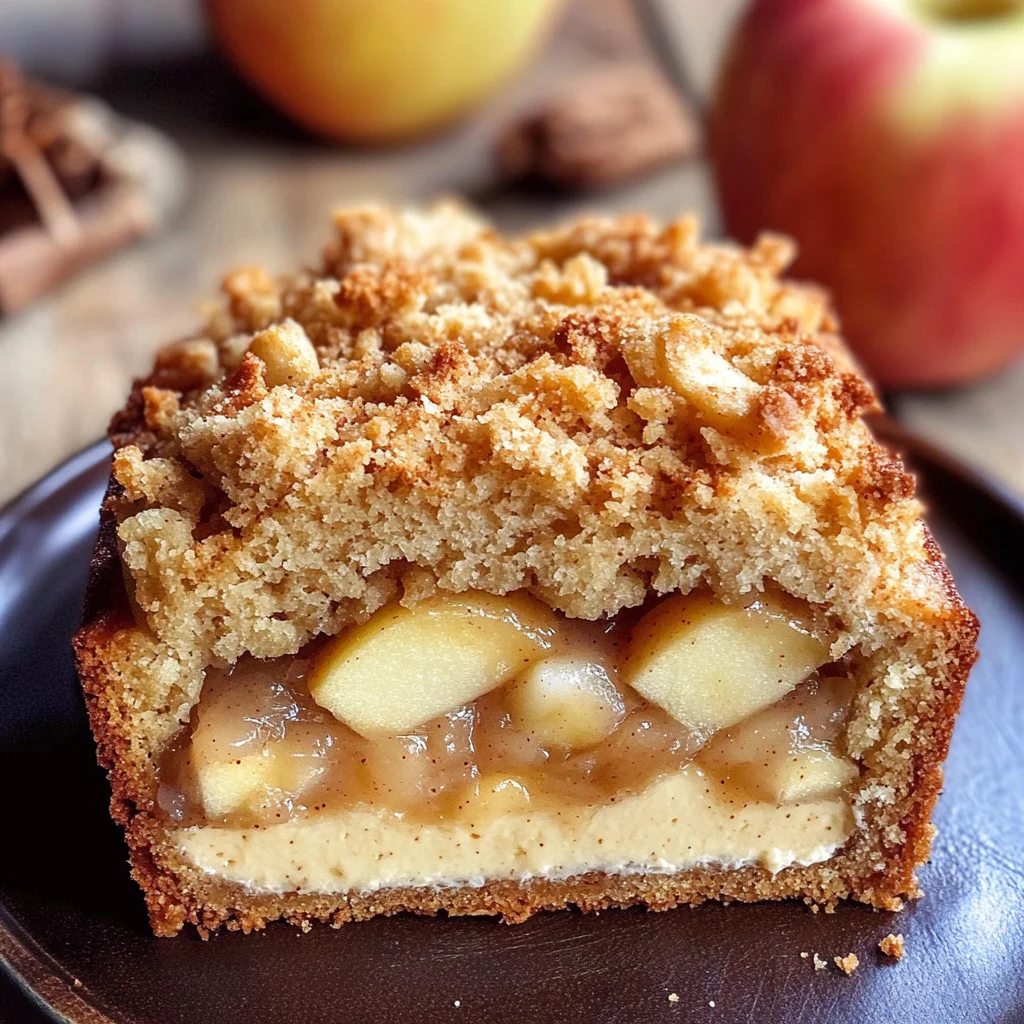
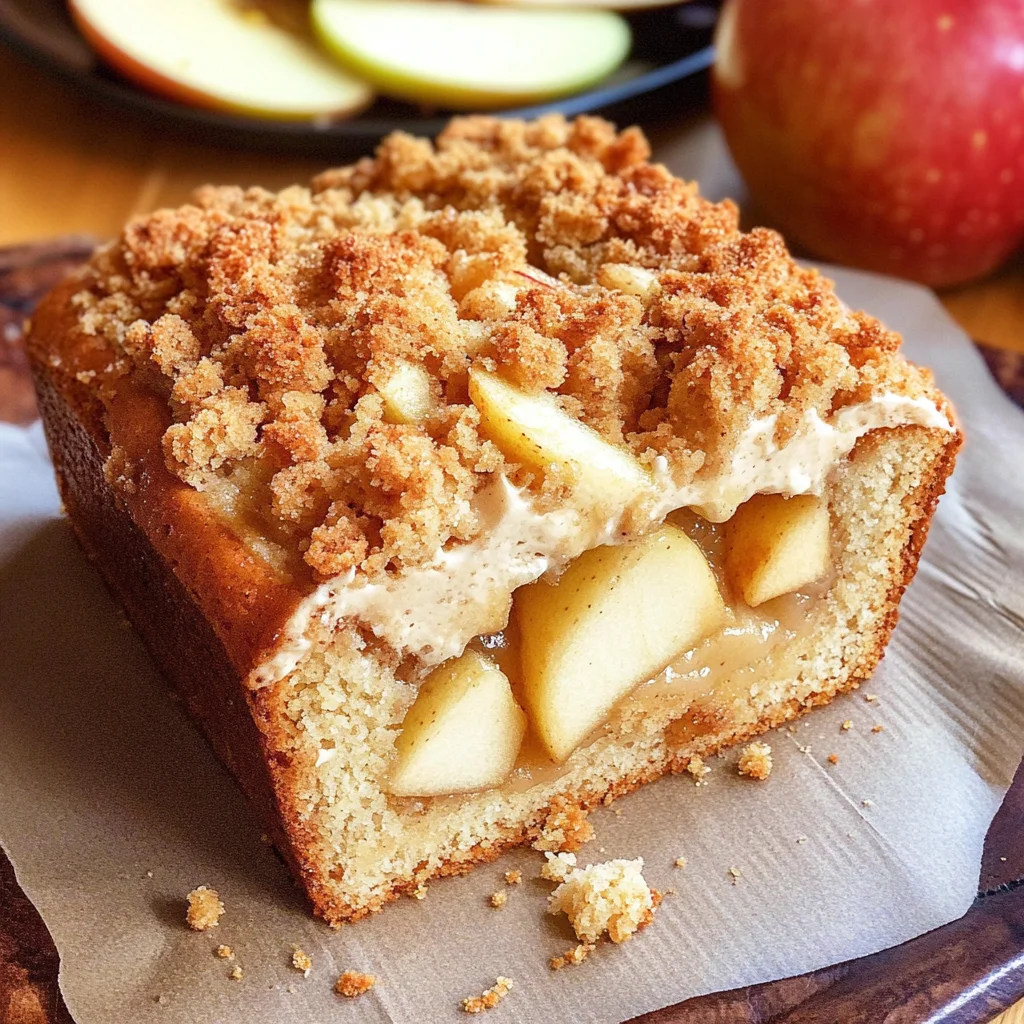
Apple Crisp Cheesecake Bread
When I think of fall, I’m immediately transported to the warmth of my kitchen, where the comforting aroma of spices mingles with the sweetness of ripe apples. There’s something magical about this time of year—the vibrant colors of leaves falling from trees, the crisp air that invigorates your senses, and the undeniable urge to bake something that warms both heart and home. That’s why I’m so excited to share my cherished recipe for Apple Crisp Cheesecake Bread with you. Imagine a loaf that tastes like cake yet has the delightful texture of bread—each slice bursting with juicy apple chunks and creamy cheesecake filling, all topped with a crunchy, irresistible crisp. It’s not just a recipe; it’s an experience that brings together tradition and innovation in the most delicious way.
I promise you that this Apple Crisp Cheesecake Bread will become a staple in your baking repertoire. Whether it’s a cozy breakfast on a lazy Sunday morning or a sweet treat to share at gatherings with family and friends, this loaf is versatile enough to shine on any occasion. The layers of flavors—warm cinnamon, sweet apples, and velvety cream cheese—dance together beautifully, creating a symphony of taste that captures the essence of autumn. Each bite is profoundly satisfying and utterly intoxicating—a reminder that some recipes hold stories within them. Let’s embark on this culinary journey together; I can’t wait for you to experience it!
Ingredients:
Before we dive into the magic of baking, let’s gather our ingredients! Each one plays an important role in crafting this divine Apple Crisp Cheesecake Bread.
- 1/3 cup all-purpose flour: This flour serves as the backbone of our crisp topping and adds just the right amount of structure without making it too heavy. When selecting flour, look for one that’s finely milled; this helps achieve a lighter texture that complements our fluffy bread perfectly.
- 1/3 cup quick cooking oats: These oats add heartiness and chewiness to our topping. They soak up moisture while baking but still retain some texture—a wonderful contrast to the soft bread below. If you’re out of quick oats, you can use rolled oats; just give them a little chop if they’re too large.
- 1/3 cup light brown sugar: Ah, the sweet allure of brown sugar! It infuses our topping with rich molasses flavors and creates a lovely caramelization during baking. Always pack your brown sugar tightly in the measuring cup for accurate sweetness.
- ¾ teaspoon ground cinnamon: Cinnamon is the quintessential spice for fall baking; its warm aroma alone brings comfort! This amount will give just the right hint without overpowering other flavors. For an extra kick, consider using freshly ground cinnamon—it really elevates your dish!
- ¼ teaspoon ground nutmeg: Just a whisper of nutmeg enhances the flavor profile beautifully—it’s warm and slightly sweet without being overwhelming. Trust me on this one; it adds depth that makes your bread truly special.
- 3 Tablespoons unsalted butter (melted): Butter is crucial here for adding richness and moisture. Melting it ensures it combines seamlessly into our dry ingredients without any lumps. Always opt for unsalted butter so you can control the saltiness in your recipe.
- 3 Tablespoons light brown sugar: We’ll utilize more brown sugar here for our apple filling, which not only sweetens but also adds moisture content to keep those apples tender as they bake.
- ¾ teaspoon ground cinnamon: Yes—you’ll see cinnamon again! It pairs beautifully with apples and brings out their natural sweetness when combined in our filling.
- 2 medium apples (Granny Smith or Gala)—peeled and diced into ½-inch pieces: Apples are undoubtedly the stars of this show! Granny Smith apples offer tartness that balances perfectly against sweetness while holding their shape during baking. Gala apples provide gentle sweetness; feel free to mix varieties for added complexity!
- 2 Tablespoons granulated sugar: This small addition brightens up our apple filling even further, coaxing out their juices as they soften in the oven.
- 1 teaspoon ground cinnamon: Once again! But here it’s essential—this additional layer builds flavor in every bite through each luscious apple chunk.
- 1 ½ cups all-purpose flour: This ingredient forms our cake-like base for this bread—it provides structure while keeping everything moist and fluffy. Use unbleached flour if possible; it has better flavor characteristics than bleached varieties.
- 1 ½ teaspoons baking powder: This leavening agent is non-negotiable—it’s responsible for giving our bread that lovely rise! Be sure it’s fresh; expired baking powder won’t give you those satisfying results we crave.
- ½ teaspoon salt: A pinch amplifies flavors throughout! Salt may seem simple but trust me when I say it enhances sweetness without taking center stage.
- ½ cup unsalted butter (room temperature): Softened butter creates an airy batter when creamed with sugar—this step is crucial for achieving that light texture we love in baked goods!
- 2/3 cup sugar: Regular granulated sugar sweetens up our bread base significantly while contributing to browning during baking—a beautiful golden crust is what we aim for!
- 2 eggs (room temperature): Eggs bind everything together while providing moisture—room temperature eggs incorporate easier into batters than cold ones straight from refrigeration.
- 1 ½ teaspoons vanilla extract: Pure vanilla extract adds depth and warmth—a non-negotiable ingredient if you’re aiming for flavor perfection!
- ½ cup milk: Milk contributes moisture to achieve our desired consistency; whole milk gives richness but feel free to swap out what suits your dietary preferences best!
- 8 oz. brick-style cream cheese (room temperature): Cream cheese is what makes this cheesecake filling luxuriant—it needs to be softened beforehand so whisking becomes effortless without leaving lumps behind!
- 1/3 cup granulated sugar: To sweeten our cream cheese mixture just right—balance is key here!
- 3 Tablespoons all-purpose flour: Flour helps stabilize the cheesecake filling so it holds its shape while remaining creamy—not too much though or it’ll lose its velvety quality!
- 1 teaspoon vanilla extract: Another splash here ties flavors together beautifully within our creamy center—we can’t have too much vanilla now, can we?
- 1 egg: One more egg ensures stability within our cream cheese mixture as well as creaminess during baking—don’t skip this step either!
- ¾ cup powdered sugar: Powdered sugar creates a silky-smooth glaze over top once cooled down—it’s an elegant finishing touch everyone will love!
- 2 Tablespoons milk or crème: This liquid thins out your glaze just enough so it drizzles gracefully over each slice without being runny—choose based on personal preference!
- ½ teaspoon vanilla extract: A final flourish enhances overall flavor—we want everything balanced after all that hard work creating these layers!
Equipment You’ll Need:
Now let’s gather some essential tools before we begin! Having reliable equipment makes all the difference in ensuring each step goes smoothly—it turns cooking into pure joy rather than chaos.
- 9 x 5-inch loaf pan – A sturdy loaf pan allows even heat distribution throughout while providing ample room for rising action—the ultimate partner in creating perfectly baked bread every time!
- Parchment paper – Lining your pan guarantees safe removal post-baking without losing any precious crust! It’s especially handy when dealing with gooey batters like ours—it ensures no sticky disasters occur during liftoff from their cozy home inside!
- Mixing bowls (various sizes) – Ensure you have multiple mixing bowls available—one for dry ingredients, another for wet ones—and perhaps even one more dedicated solely towards combining them later on! Keeping things organized keeps stress levels down as well.
Having these tools ready means less scrambling around mid-recipe—you want everything within reach when those delicious aromas start wafting through your kitchen!
Stay tuned as we continue crafting this delightful Apple Crisp Cheesecake Bread together; there’s still much more magic ahead!
Step 5: The Apple Filling Magic
Now that your loaf pan is ready and waiting, it’s time to create the heart of our Apple Crisp Cheesecake Bread—the apple filling. This step is where the magic begins, as we transform those humble apples into a fragrant, syrupy delight that will intersperse every slice with pockets of sweetness. Start by peeling and dicing your two medium-sized apples into ½-inch pieces; I recommend using Granny Smith for their tartness or Gala for a sweeter vibe. In a large mixing bowl, combine the diced apples with 2 tablespoons of granulated sugar and 1 teaspoon of ground cinnamon. This mixture will not only sweeten the apples but also draw out their natural juices, creating a lovely, caramel-like texture when baked. Allow this to sit for about 10-15 minutes while you work on the next steps—trust me, giving the sugar time to work its magic makes all the difference!
The sugars help soften the apples, so don’t rush this step! As they sit, you’ll notice the apples releasing some of their juices—a crucial element that will keep your bread moist and flavorful. You want that beautiful balance between sweetness and acidity from the apples to shine through in every bite. Once they’re ready, set them aside and let their flavors meld while you prepare the batter.
Step 6: Crafting the Cream Cheese Filling
Next up is the luscious cream cheese filling that adds an utterly intoxicating richness to our bread. In a medium bowl (make sure it’s at room temperature!), combine 8 oz. of brick-style cream cheese with 1/3 cup granulated sugar, 3 tablespoons all-purpose flour, and 1 teaspoon of vanilla extract. Using a hand mixer or a whisk (if you’re feeling adventurous!), blend these ingredients until smooth and creamy. You want to achieve a velvety consistency; this filling is what elevates your bread from delightful to truly extraordinary!
Don’t forget to add one egg into this mixture—you’re creating that luscious texture that will set beautifully as it bakes. A common mistake here is overmixing; just blend until everything is combined because incorporating too much air can lead to cracks in your cheesecake layer later on. This filling is key; it provides contrast against the sweet apple filling while adding moisture throughout the loaf. Set this aside when finished, and let those flavors mingle just like you would with good friends—allowing time for magic to happen!
Step 7: The Batter Base
With your fillings prepared, we now turn our attention to crafting the moist batter that acts as a comforting hug around all those delicious components. In a separate large mixing bowl, cream together ½ cup of softened unsalted butter with 2/3 cup of sugar until it’s light and fluffy—this process usually takes about 2-3 minutes with an electric mixer. This step is absolutely paramount because it incorporates air into the mixture; that air will expand during baking and create a tender crumb that you’ll be craving after just one slice.
Once your butter and sugar are perfectly combined, add in two room-temperature eggs one at a time, mixing well after each addition—this ensures proper emulsification which contributes to that dreamy texture we’re going for in our Apple Crisp Cheesecake Bread. Follow this with 1½ teaspoons of vanilla extract—a splash of liquid gold that enhances overall flavor—and then blend in half a cup of milk until everything is just incorporated. Finally, sift together the dry ingredients: 1½ cups all-purpose flour, 1½ teaspoons baking powder, and ½ teaspoon salt before gradually folding them into your wet mixture using a spatula or wooden spoon. Watch for lumps; it’s normal but avoid overmixing as well! You want everything blended just enough so there are no dry patches left behind.
Step 8: Layering It All Together
This is where excitement reaches its peak! Preheat your oven if you haven’t already done so—the anticipation adds another layer of joy! Starting with half of your batter at the bottom of your prepared loaf pan creates a solid foundation for all those wonderful fillings we’ve worked on so diligently. Spoon half of the batter into the pan and spread it evenly using an offset spatula or back of a spoon—this ensures each slice gets an even distribution when cut later.
Now comes the fun part: take half of those beautifully caramelized apple chunks and sprinkle them over this first layer followed by dollops of that creamy cheesecake filling we made earlier—don’t worry about being perfect here; rustic charm is what we’re going for! Gently swirl them together using a knife or skewer for visual interest while maintaining distinct layers—trust me when I say this creates such an enticing presentation once baked! Finish by pouring over the remaining batter carefully covering everything completely.
As you finish layering it up, pause for dramatic effect! Look at what you’ve created—a beautiful masterpiece filled with textures and flavors just waiting to unfold during baking! Take a moment to appreciate how far you’ve come in this process; trust me when I say it’s worth every second spent.
Conclusion:
As we wrap up this delightful journey through crafting the perfect Apple Crisp Cheesecake Bread, I can’t help but feel an overwhelming sense of joy and anticipation for all of you who are about to embark on making this recipe yourselves! There’s something profoundly satisfying about taking simple ingredients and transforming them into something so extraordinary—a symphony of flavors nestled within each slice. The marriage of tender apples enveloped by creamy cheesecake filling, topped with that perfectly crunchy crisp layer is what makes this treat truly unforgettable. It’s not merely bread; it’s an experience that invites warmth, comfort, and togetherness into our homes.
This recipe is more than just a delicious dish; it’s a celebration of creativity in baking that anyone can partake in. I promise you’ll find joy not only in devouring this scrumptious bread but also in creating it with love and care. Whether shared at breakfast gatherings with friends or savored alone during cozy evenings with tea by your side, this bread shines brightly on any occasion. Imagine pulling a warm loaf from the oven as laughter fills your kitchen—this moment becomes etched in memory as one filled with love and deliciousness.
For serving suggestions that elevate your enjoyment even further: imagine savoring one slice alongside a steaming cup of chai tea or pairing another with a scoop of dairy-free ice cream on top for an indulgent dessert experience that’s sure to impress! Each taste transports you deeper into autumn’s embrace while offering comfort like no other food can provide. And don’t forget about those little touches—perhaps drizzle some caramel sauce over each slice for added decadence or sprinkle some nuts for an extra crunch!
Feeling adventurous? This recipe is wonderfully adaptable; consider experimenting with different fruits like pears or berries instead of apples, or even swapping out spices based on your preferences! You could turn up the heat with some ginger or add citrus zest for an invigorating twist that’ll surprise your taste buds beautifully! I invite you all to dive into this culinary adventure—share your experiences with me once you’ve tried making this recipe yourself because nothing excites me more than hearing about how it transforms others’ kitchens into realms of wonderful aromas and joyful hearts!
Apple Crisp Cheesecake Bread
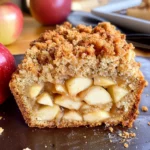
Indulge in the warmth of fall with our Apple Crisp Cheesecake Bread—a delightful fusion of moist apple bread and creamy cheesecake filling, crowned with a crunchy crisp topping. Imagine biting into a slice that perfectly balances the sweetness of apples with rich cream cheese, all enhanced by comforting autumn spices. This recipe is not only easy to make but also versatile enough for breakfast, dessert, or a cozy gathering with friends and family. With layers of flavor and texture, this bread is bound to become a beloved addition to your baking repertoire.
- Prep Time: 25 minutes
- Cook Time: 55 minutes
- Total Time: 1 hour 20 minutes
- Yield: Serves approximately 12 slices 1x
- Category: Dessert
- Method: Baking
- Cuisine: American
Ingredients
- 1/3 cup all-purpose flour
- 1/3 cup quick cooking oats
- 1/3 cup light brown sugar
- ¾ teaspoon ground cinnamon
- ¼ teaspoon ground nutmeg
- 3 Tablespoons unsalted butter (melted)
- 3 Tablespoons light brown sugar
- ¾ teaspoon ground cinnamon
- 2 medium apples (Granny Smith or Gala)—peeled and diced into ½-inch pieces
- 2 Tablespoons granulated sugar
- 1 teaspoon ground cinnamon
- 1 ½ cups all-purpose flour
- 1 ½ teaspoons baking powder
- ½ teaspoon salt
- ½ cup unsalted butter (room temperature)
- 2/3 cup sugar
- 2 eggs (room temperature)
- 1 ½ teaspoons vanilla extract
- ½ cup milk
- 8 oz. brick-style cream cheese (room temperature)
- 1/3 cup granulated sugar
- 3 Tablespoons all-purpose flour
- 1 teaspoon vanilla extract
- 1 egg
- ¾ cup powdered sugar
- 2 Tablespoons milk or crème
- ½ teaspoon vanilla extract
Instructions
- Preheat your oven to 350°F (175°C) and prepare a 9 x 5-inch loaf pan by greasing it and lining it with parchment paper.
- In a bowl, mix flour, oats, sugars, cinnamon, nutmeg, and melted butter for the topping; set aside.
- Dice apples and toss them with granulated sugar and cinnamon; let sit for 10 minutes.
- In another bowl, cream softened butter and sugar until fluffy; add eggs one at a time along with vanilla extract and milk.
- Combine dry ingredients in a separate bowl then fold into the wet mixture until just combined.
- Layer half the batter in the prepared pan, followed by half the apple filling and dollops of cream cheese filling; repeat layers.
- Top with the crisp mixture and bake for 50–55 minutes or until golden brown.
Nutrition
- Serving Size: 1 slice (85g)
- Calories: 230
- Sugar: 14g
- Sodium: 150mg
- Fat: 10g
- Saturated Fat: 6g
- Unsaturated Fat: 3g
- Trans Fat: 0g
- Carbohydrates: 33g
- Fiber: 1g
- Protein: 3g
- Cholesterol: 50mg