Wild Forest Classic Dirt Pudding Cake
If you’re looking for a dessert that brings joy to every gathering, you’ve come to the right place! This Wild Forest Classic Dirt Pudding Cake is a nostalgic treat that never fails to delight. It’s rich, creamy, and perfect for both kids and adults alike. I love how it can turn an ordinary day into something special, whether it’s a busy weeknight or a family celebration. Plus, it’s easy to whip up—you’ll be enjoying this deliciousness in no time!
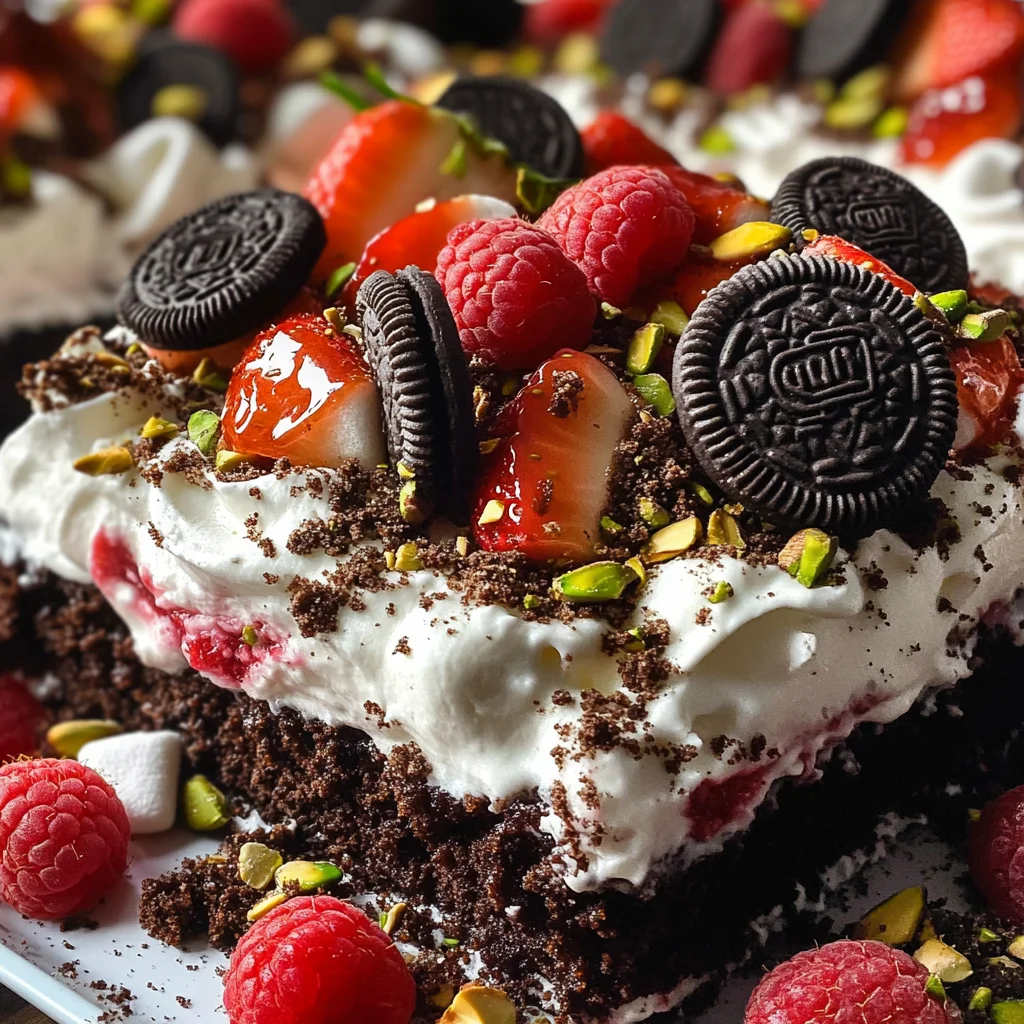
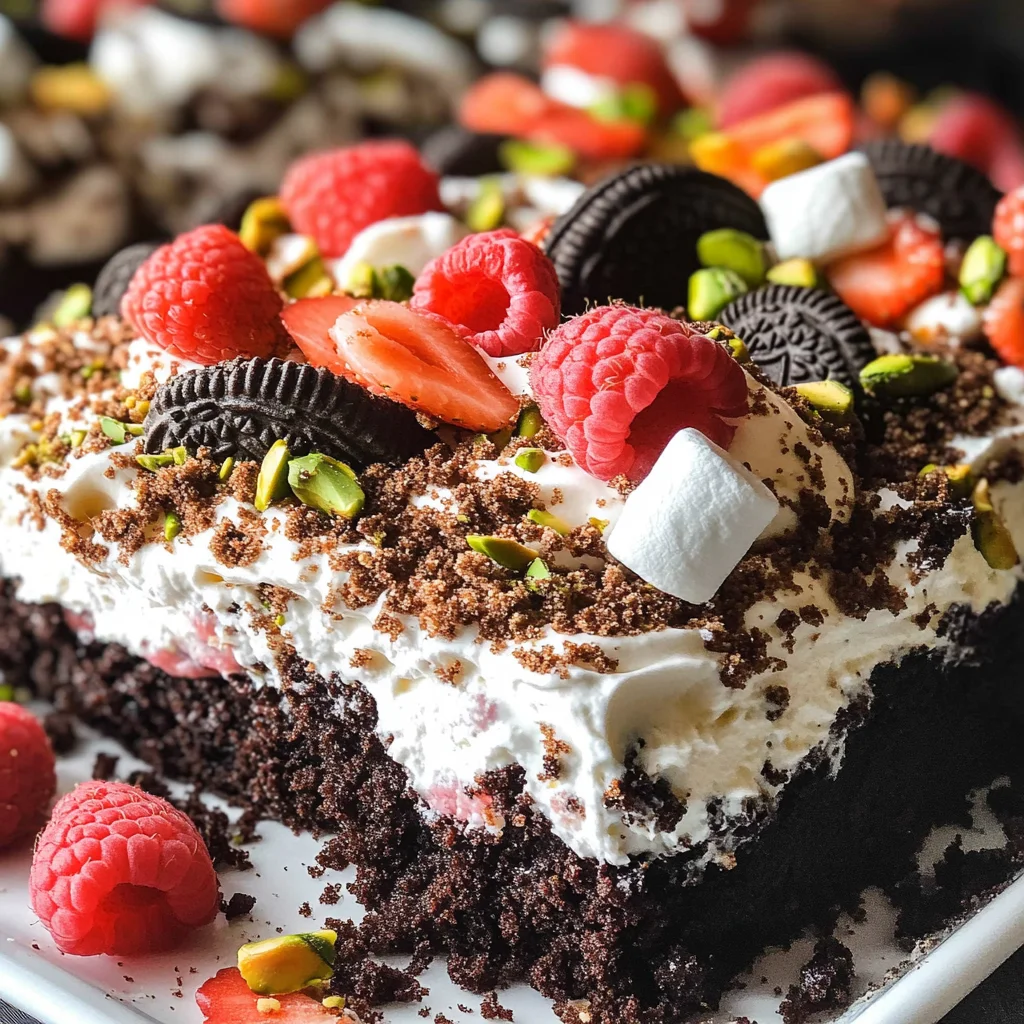
This dessert is not just about taste; it’s about creating memories. Picture this: a beautiful layered cake that looks like it’s straight from the forest floor, adorned with fresh strawberries and playful mini marshmallows. It’s sure to impress your guests and spark joy in every bite.
Why You’ll Love This Recipe
- Easy to make: With simple steps and minimal cooking involved, you’ll have this dessert ready in just 40 minutes.
- Family-friendly: Everyone from little ones to grandparents will love digging into this delightful treat.
- Make-ahead convenience: Prepare it ahead of time for parties or gatherings, so you can enjoy your event stress-free.
- Deliciously adaptable: Customize it with your favorite flavors or toppings—there’s no wrong way to enjoy this cake!
Ingredients You’ll Need
To make this Wild Forest Classic Dirt Pudding Cake, you’ll need some simple and wholesome ingredients that you might already have at home. Here’s what you’ll gather:
For the Cake Base
- 14 oz package of oreos
- 3 & 1/2 cups cold whole milk
For the Creamy Filling
- 8 oz cream cheese (softened)
- 2 3.4 oz boxes french vanilla pudding (you can also use plain vanilla or chocolate)
- 1 cup heavy whipping cream (you can also replace this with cool whip)
- 3/4 cup powdered sugar
- 1 tsp vanilla extract (or vanilla bean)
For the Toppings
- 1 lb fresh strawberries
- 1/4-1/2 cup fresh raspberries
- Pretzel sticks
- Mini vegan marshmallows
- 4-6 oz white chocolate
- 2 tsp coconut oil (for melting)
- Crushed pistachios for moss in dirt & rocks
Variations
One of the best things about the Wild Forest Classic Dirt Pudding Cake is its flexibility! You can easily switch things up based on your preferences or what you have at home. Here are a few fun ideas:
- Swap the pudding flavor: Use plain vanilla or chocolate pudding instead of French vanilla for a different taste!
- Add different fruits: Try using blueberries or blackberries for a berry medley look!
- Go nutty: Sprinkle some crushed nuts like walnuts or almonds on top for added crunch.
- Change up the toppings: Instead of marshmallows, consider adding gummy worms for a fun twist!
How to Make Wild Forest Classic Dirt Pudding Cake
Step 1: Make the Pudding & Crush Oreos
Start by whisking together the cold milk and instant pudding mix in a large bowl. Let it sit aside as it thickens—this is where all that creamy goodness begins! While that’s happening, take your oreo package and crush them into coarse crumbs using either a food processor or by placing them in a ziplock bag and rolling over them with a pin. I love leaving some larger chunks for texture!
Step 2: Make the Whipped Cream
In another large bowl, use either a hand mixer or stand mixer with a whisk attachment to whip your heavy cream until soft peaks form. Gently fold in the vanilla extract; this step adds extra flavor that makes all the difference! Once done, set this aside—no need to wash your bowl just yet.
Step 3: Whip Cream Cheese & Finish Pudding
In the same bowl used before, beat your softened cream cheese until creamy and smooth. Gradually add in powdered sugar and mix until fully combined. Now it’s time for the magic—add in your thickened pudding mixture and beat again until everything is well blended. Finally, gently fold in your whipped cream until combined—this gives our cake its light texture.
Step 4: Assemble Dirt
Now comes the fun part! Grab any dish you like—an 8 or 9-inch circular dish works great—or even smaller mugs for individual servings. Start by layering crushed oreos at the bottom of your dish followed by generous spoonfuls of the creamy filling. Repeat these layers until you reach just below the top of your dish, finishing off with more crushed oreos on top.
And voilà! You’ve created an enchanting Wild Forest Classic Dirt Pudding Cake that everyone will adore! Enjoy serving it chilled with fresh fruit and other delightful toppings!
Pro Tips for Making Wild Forest Classic Dirt Pudding Cake
Creating the perfect Wild Forest Classic Dirt Pudding Cake is all about the little details, so here are some pro tips to ensure your dessert turns out delicious and visually appealing!
- Use a Food Processor for Oreos: Crushing Oreos in a food processor gives you a consistent crumb texture. This not only makes layering easier but also enhances the overall presentation of the cake.
- Chill Your Cream Cheese: Make sure your cream cheese is softened but slightly chilled before you beat it. This helps achieve that smooth and creamy texture without lumps, making your filling delightful to eat.
- Don’t Skip the Folding: When combining your whipped cream with the pudding mixture, fold gently with a rubber spatula. This keeps the whipped cream light and airy, ensuring your cake has that fluffy texture we all love.
- Layer Creatively: Feel free to get creative with your layers! Alternate between cookie crumbs and filling in various patterns to create an attractive visual appeal when you cut into it, impressing everyone at the table.
- Let It Set: Allowing your cake to chill in the fridge for at least a few hours (or overnight if possible) helps all those flavors meld together beautifully. Plus, it makes cutting cleaner and easier!
How to Serve Wild Forest Classic Dirt Pudding Cake
Serving Wild Forest Classic Dirt Pudding Cake can be as fun as making it! With its rich layers and playful toppings, this dessert can be both a showstopper and a comfort classic on any table.
Garnishes
- Fresh Fruit: Adding fresh strawberries or raspberries on top gives a burst of color and freshness that beautifully contrasts the rich chocolatey layers.
- Mini Vegan Marshmallows: Scatter mini marshmallows on top for an extra sweet touch that adds to the “dirt” look of this dessert while giving it an enjoyable chewy texture.
- Crushed Pistachios: Sprinkle crushed pistachios on top for a pop of color and a crunchy contrast that enhances both aesthetics and flavor.
Side Dishes
- Fruit Salad: A refreshing fruit salad made with seasonal fruits provides a light balance alongside the richness of the dirt pudding cake. The natural sweetness of fruits complements the dessert perfectly.
- Vanilla Ice Cream: Serve scoops of vanilla ice cream on the side for those who enjoy a classic pairing with their cake. The cold creaminess contrasts nicely with the layered textures of the dirt pudding.
- Coffee or Tea: A warm cup of coffee or herbal tea pairs wonderfully after dessert. The bitterness of coffee or soothing qualities of tea can help cut through the sweetness while enhancing your meal experience.
- Cheese Platter: Create a small cheese platter with mild cheeses and crackers for those who enjoy savory bites after their sweet treat. It adds variety to your serving table and caters to different tastes!
Enjoy creating this wonderful Wild Forest Classic Dirt Pudding Cake, and watch it disappear at gatherings—it’s sure to become a favorite!
Make Ahead and Storage
This Wild Forest Classic Dirt Pudding Cake is not only a delightful dessert to enjoy, but it also makes for fantastic meal prep! You can easily prepare it in advance, making it a perfect treat for gatherings or weeknight indulgences.
Storing Leftovers
- Store any leftovers in an airtight container in the refrigerator.
- It’s best enjoyed within 3-4 days to maintain its freshness and texture.
- If you notice the layers separating, give it a gentle stir before serving again.
Freezing
- While this cake can be frozen, it’s best to freeze only the unassembled components.
- You can freeze the whipped cream mixture and pudding separately for up to one month.
- When ready to use, allow them to thaw in the fridge overnight before assembling.
Reheating
- Since this dessert is typically served cold, no reheating is necessary!
- If you prefer a warmer version, consider warming individual portions in the microwave for about 10 seconds—just don’t overdo it!
FAQs
Here are some common questions that might pop up while making your Wild Forest Classic Dirt Pudding Cake!
Can I make Wild Forest Classic Dirt Pudding Cake without heavy cream?
Absolutely! You can replace heavy whipping cream with Cool Whip if you prefer a lighter option. Just follow the same steps for folding it into the pudding.
How long does Wild Forest Classic Dirt Pudding Cake last in the fridge?
This delicious cake will stay fresh in your fridge for about 3-4 days when stored properly in an airtight container. Enjoy it while it’s at its best!
Can I use different flavors of pudding in this cake?
Yes! While the recipe calls for French vanilla pudding, feel free to experiment with other flavors like chocolate or plain vanilla to suit your taste.
What can I use instead of mini marshmallows?
If you’re looking for alternatives, try using vegan marshmallows or even leaving them out completely. The cake will still be scrumptious!
Is there a way to make this cake healthier?
You can lighten up this dessert by using lower-fat cream cheese and reducing the sugar slightly. You can also incorporate more fruits like berries for added nutrition!
Final Thoughts
I hope you’re as excited about making this Wild Forest Classic Dirt Pudding Cake as I am! This recipe brings together delightful flavors and textures that remind us of childhood treats while being simple enough for anyone to master. Whether you’re serving it at a party or enjoying it with family during a cozy night in, I’m sure it will bring smiles all around. Happy baking, and don’t forget to share your creations with friends and family—they’ll love you for it!
Wild Forest Classic Dirt Pudding Cake

Indulge in the delightful Wild Forest Classic Dirt Pudding Cake, a creamy dessert that brings joy to every occasion! This nostalgic layered treat, reminiscent of childhood favorites, is perfect for both kids and adults alike. Made with crushed Oreos and a luscious filling, this cake is not only visually appealing but also incredibly easy to prepare. With fresh strawberries and mini vegan marshmallows adorning the top, it’s sure to become the star of your next gathering. Whether you’re celebrating a special event or simply enjoying a sweet weeknight treat, this make-ahead dessert will leave everyone smiling.
- Prep Time: 20 minutes
- Cook Time: 0 minutes
- Total Time: 20 minutes
- Yield: Serves approximately 12 people 1x
- Category: Dessert
- Method: No-bake
- Cuisine: American
Ingredients
- 14 oz package of Oreos
- 3 ½ cups cold whole milk
- 8 oz cream cheese (softened)
- 2 3.4 oz boxes French vanilla pudding
- 1 cup heavy whipping cream
- ¾ cup powdered sugar
- Fresh strawberries for topping
- 1/4–1/2 cup fresh raspberries for topping
- Mini vegan marshmallows
Instructions
- In a large bowl, whisk cold milk with instant pudding mix and set aside to thicken.
- Crush Oreos into coarse crumbs using a food processor or rolling pin.
- In another bowl, whip heavy cream until soft peaks form; gently fold in vanilla extract.
- Beat softened cream cheese with powdered sugar until smooth; mix in thickened pudding and fold in whipped cream.
- Layer crushed Oreos and creamy filling in a serving dish, finishing with more Oreos on top.
- Chill before serving and garnish with fresh fruit and mini vegan marshmallows.
Nutrition
- Serving Size: 1/12 of the cake (approximately 112g)
- Calories: 350
- Sugar: 22g
- Sodium: 160mg
- Fat: 22g
- Saturated Fat: 12g
- Unsaturated Fat: 7g
- Trans Fat: 0g
- Carbohydrates: 36g
- Fiber: 2g
- Protein: 4g
- Cholesterol: 50mg