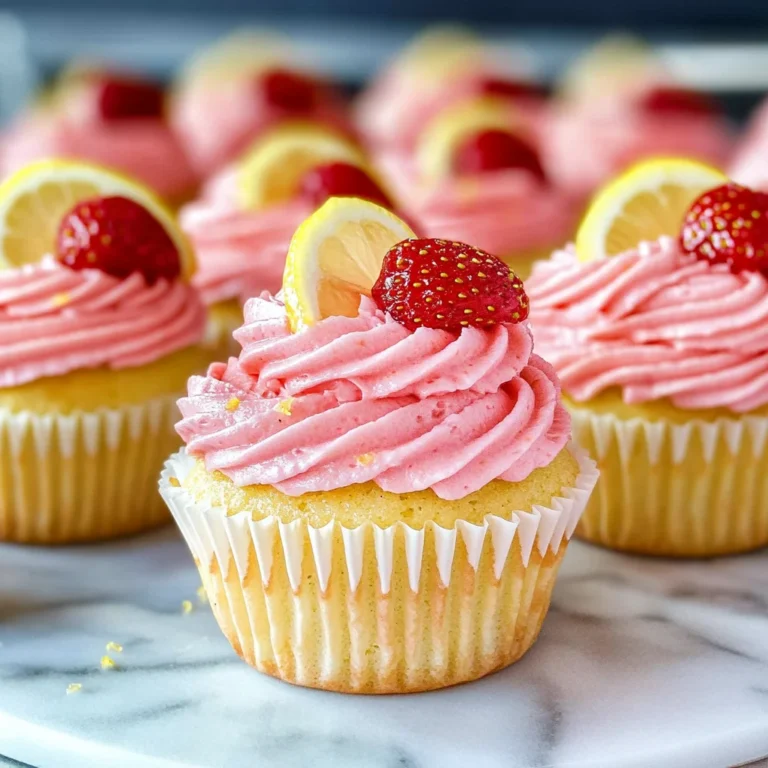
Sugar Cookie Cups
If you’re looking for a delightful treat that brings smiles to everyone’s faces, let me introduce you to my beloved Sugar Cookie Cups! These sweet little cups are not just adorable; they’re a perfect blend of buttery sugar cookie goodness and creamy frosting. Whether it’s a busy weeknight, a family gathering, or just a moment to indulge, these cookie cups fit right in. They’re easy to make and even more fun to decorate, making them a hit for any occasion!
What I love most about Sugar Cookie Cups is their versatility. You can whip them up for birthdays, holidays, or simply when you need a little sweetness in your life. Trust me, once you take that first bite of the soft cookie and rich frosting, you’ll understand why they hold such a special place in my heart.
Why You’ll Love This Recipe
- Quick and Easy: With just 15 minutes of prep time, you can have these delightful treats ready to bake!
- Family-Friendly Fun: Kids love helping out in the kitchen, especially when it comes to decorating these cookie cups with sprinkles.
- Customizable Delight: You can easily change up the frosting flavors or colors to match any occasion or personal preference.
- Perfectly Portable: Made in muffin pans, these mini desserts are easy to take along for picnics or parties.
- Deliciously Sweet: Who can resist the combination of sugar cookies and creamy frosting? It’s a flavor match made in heaven!

Ingredients You’ll Need
These Sugar Cookie Cups use simple, wholesome ingredients that you likely already have at home. Gather these goodies, and let’s get baking!
For the Cookie Base
- 3/4 cup salted butter (softened)
- 3/4 cup granulated sugar
- 1 large egg
- 1 1/2 teaspoons vanilla extract
- 1/2 teaspoon almond extract
- 2 cups all-purpose flour
- 1 teaspoon baking powder
- 1/2 teaspoon baking soda
For the Frosting
- 2 ounces cream cheese (softened)
- 3 cups powdered sugar
- 1/4 cup butter (softened)
- 2 tablespoons milk
- 1/4 teaspoon vanilla extract
- Pink or red food coloring gel (optional)
- Sprinkles (for decoration)
Variations
One of the best things about this recipe is how flexible it is! Feel free to get creative with different flavors and decorations to make these Sugar Cookie Cups uniquely yours.
- Change the Frosting Flavor: Try swapping cream cheese for lemon zest or chocolate frosting for a fun twist!
- Add Fillings: Consider placing a dollop of fruit preserves inside each cookie cup before adding the frosting for an extra surprise.
- Make It Festive: Use seasonal food coloring and themed sprinkles to match holidays or celebrations.
- Go Gluten-Free: Substitute all-purpose flour with your favorite gluten-free blend for an equally delicious option.
How to Make Sugar Cookie Cups
Step 1: Preheat Your Oven
Start by preheating your oven to 350°F and greasing two regular muffin pans with nonstick cooking spray. This step ensures that our delicious cookie cups come out easily without sticking.
Step 2: Cream Together Butter and Sugar
In a large bowl, use an electric mixer to cream together the softened butter and granulated sugar until it’s light and fluffy. This process usually takes around three minutes. Don’t forget to scrape down the sides of your bowl—it helps everything mix evenly!
Step 3: Add Egg and Extracts
Once your butter mixture is fluffy, add in one large egg along with the vanilla and almond extracts. Beat everything together until smooth. This is where those lovely flavors start coming together!
Step 4: Combine Dry Ingredients
In another medium bowl, whisk together your flour, baking powder, and baking soda. Mixing these dry ingredients separately helps ensure they are well combined before adding them to your wet mixture.
Step 5: Form the Dough
Now it’s time to bring it all together! Gradually add your flour mixture into your wet ingredients until a dough forms. Be careful not to over-mix; we want our cookie cups tender and delicious!
Step 6: Shape Your Cookie Cups
Take about two tablespoons of dough and press it into each muffin cup—making sure it goes halfway up the sides as well. This forms our cute little cups that will hold all that frosting.
Step 7: Bake Them Up!
Bake your cookie cups for around 12 minutes. Once they’re golden brown on top, remove them from the oven and let cool for at least 15 minutes. To create that perfect cup shape, gently press down the center using a spoon or jar lid while they’re still warm.
Step 8: Prepare Your Frosting
While your cookie cups cool completely, it’s time to make the frosting! In a medium bowl, beat together softened cream cheese and butter until smooth. Gradually add powdered sugar along with milk and vanilla extract until you’ve reached a thick yet spreadable consistency.
Step 9: Decorate Your Cookie Cups
Transfer your frosting into a piping bag fitted with a star tip (or simply use a spoon!). Swirl that creamy goodness into each cooled cookie cup. Top them off with sprinkles if you like!
And there you have it! Enjoy every bite of these delightful Sugar Cookie Cups—they’re bound to bring joy wherever they go!
Pro Tips for Making Sugar Cookie Cups
Making Sugar Cookie Cups is a delightful experience, and with these helpful tips, you’ll ensure they turn out perfectly every time!
- Room Temperature Ingredients: Always use room temperature butter and cream cheese. This will help them blend smoothly into the batter and frosting, resulting in a light and fluffy texture.
- Don’t Overmix the Dough: Mixing just until combined prevents the cookies from becoming tough. Overmixing activates the gluten in the flour too much, which can lead to dense cookies instead of soft, tender cups.
- Press Down to Create a Cup Shape: After baking, it’s essential to press down in the center of each cup while they’re still warm. This ensures you get that perfect indentation for the frosting.
- Experiment with Frosting Colors: Have fun with food coloring! Use different colors to match your occasion—pastels for spring events or rich colors for holidays. It adds a festive touch!
- Store Properly: If you have leftovers, store them in an airtight container at room temperature for up to 3 days. This keeps them fresh and delicious!
How to Serve Sugar Cookie Cups
These Sugar Cookie Cups are not only tasty but also visually appealing and versatile for any occasion. Here are some ideas on how to present your delightful treats!
Garnishes
- Fresh Berries: Small strawberries or raspberries can add a pop of color and freshness that complements the sweetness of the cookie cups beautifully.
- Drizzle of Chocolate: A simple chocolate drizzle over the frosting can elevate the presentation and add an extra layer of flavor.
- Edible Glitter: For special occasions, sprinkle some edible glitter on top for that extra sparkle that will wow your guests!
Side Dishes
- Fruit Salad: A refreshing mix of seasonal fruits provides a light contrast to the sweetness of the cookie cups. It’s colorful and full of vitamins!
- Yogurt Parfait: Layer yogurt with granola and fruit for a creamy side that balances out sugar with protein and fiber.
- Ice Cream: Pairing these cookie cups with your favorite non-dairy ice cream creates a delightful dessert combo that’s hard to resist.
- Chocolate-Covered Pretzels: The salty crunch of pretzels dipped in chocolate makes for a fun snack alongside your sweet cookie cups, adding more texture to your dessert table.
With these serving suggestions and pro tips, your Sugar Cookie Cups are sure to impress friends and family alike! Enjoy every bite!

Make Ahead and Storage
These delightful Sugar Cookie Cups are not only a joy to make but also perfect for meal prep! You can easily whip up a batch ahead of time and store them for later enjoyment. Here’s how to keep them fresh:
Storing Leftovers
- Store cooled cookie cups in an airtight container at room temperature.
- If you’ve already frosted them, place parchment paper between layers to prevent sticking.
- Enjoy them within 3-5 days for the best flavor and texture.
Freezing
- Freeze unbaked cookie dough balls in a single layer on a baking sheet before transferring them to an airtight container.
- Alternatively, freeze the baked cookie cups without frosting for up to 2 months.
- To thaw, place in the refrigerator overnight or at room temperature for a few hours.
Reheating
- If you want to enjoy your frozen cookie cups warm, preheat your oven to 350°F (175°C).
- Place the cookie cups on a baking sheet and heat for about 5-7 minutes until warmed through.
- Avoid microwaving as it can make the cookies tough.
FAQs
I know you might have some questions about making these scrumptious Sugar Cookie Cups, so let’s tackle a few common ones!
Can I use different flavors of frosting for Sugar Cookie Cups?
Absolutely! While cream cheese buttercream is delicious, feel free to experiment with other flavors such as chocolate buttercream or even fruit-flavored frostings. The versatility of this recipe allows you to get creative!
How should I decorate my Sugar Cookie Cups?
Decorating is part of the fun! You can top your Sugar Cookie Cups with sprinkles, edible glitter, or even mini chocolate chips. For special occasions, consider adding themed decorations that match your celebration!
What occasion are Sugar Cookie Cups best for?
Sugar Cookie Cups are perfect for any occasion! Whether it’s birthdays, holidays, or just a fun dessert night, they add a delightful touch. Their cute presentation makes them ideal for parties and gatherings.
Can I make smaller versions of these Sugar Cookie Cups?
Certainly! You can use a mini muffin pan instead of a regular one. Just be sure to adjust the baking time accordingly; they may need only about 8-10 minutes in the oven.
Final Thoughts
I hope you’re as excited as I am about trying out these charming Sugar Cookie Cups! They’re not just easy to make but also bring smiles to everyone who enjoys them. Remember that baking is all about having fun and being creative—so don’t hesitate to put your spin on this recipe. Happy baking, and may your kitchen be filled with love and sweet aromas!
Sugar Cookie Cups

Indulge in the sweet charm of Sugar Cookie Cups, a delightful dessert that will brighten any occasion! These adorable mini cookie cups are made from a buttery sugar cookie base, perfectly baked to create a soft and tender treat. Topped with a rich, creamy frosting, they are not only delicious but also incredibly fun to decorate—making them perfect for birthdays, holidays, or just because! The best part? They’re easy to whip up and customizable to suit your taste. Whether you prefer classic vanilla frosting or something more adventurous like lemon or chocolate, these treats will surely bring smiles all around!
- Prep Time: 15 minutes
- Cook Time: 12 minutes
- Total Time: 27 minutes
- Yield: Approximately 24 servings 1x
- Category: Dessert
- Method: Baking
- Cuisine: American
Ingredients
- 3/4 cup salted butter (softened)
- 3/4 cup granulated sugar
- 1 large egg
- 2 cups all-purpose flour
- 1 teaspoon baking powder
- 2 ounces cream cheese (softened)
- 3 cups powdered sugar
- Sprinkles (for decoration)
Instructions
- Preheat your oven to 350°F and grease two muffin pans.
- Cream together the softened butter and sugar until light and fluffy.
- Add the egg and extracts, mixing until smooth.
- In a separate bowl, whisk together flour, baking powder, and baking soda.
- Gradually combine dry ingredients with the wet mixture until a dough forms.
- Press about two tablespoons of dough into each muffin cup.
- Bake for approximately 12 minutes until golden brown; cool for at least 15 minutes.
- For frosting, beat cream cheese and butter until smooth; gradually add powdered sugar, milk, and vanilla.
- Decorate cooled cookie cups with frosting and sprinkles.
Nutrition
- Serving Size: 1 cookie cup (45g)
- Calories: 177
- Sugar: 12g
- Sodium: 116mg
- Fat: 8g
- Saturated Fat: 5g
- Unsaturated Fat: 2g
- Trans Fat: 0g
- Carbohydrates: 26g
- Fiber: <1g
- Protein: 2g
- Cholesterol: 23mg