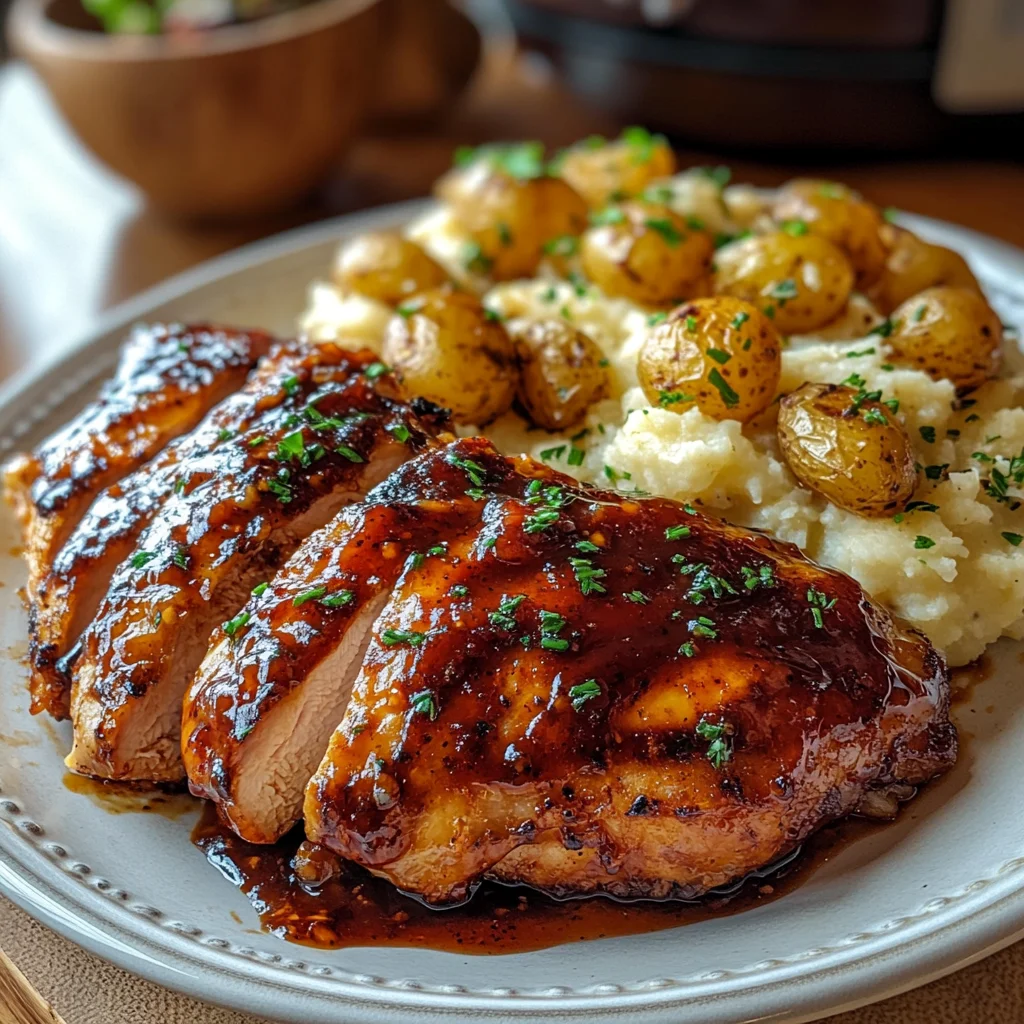
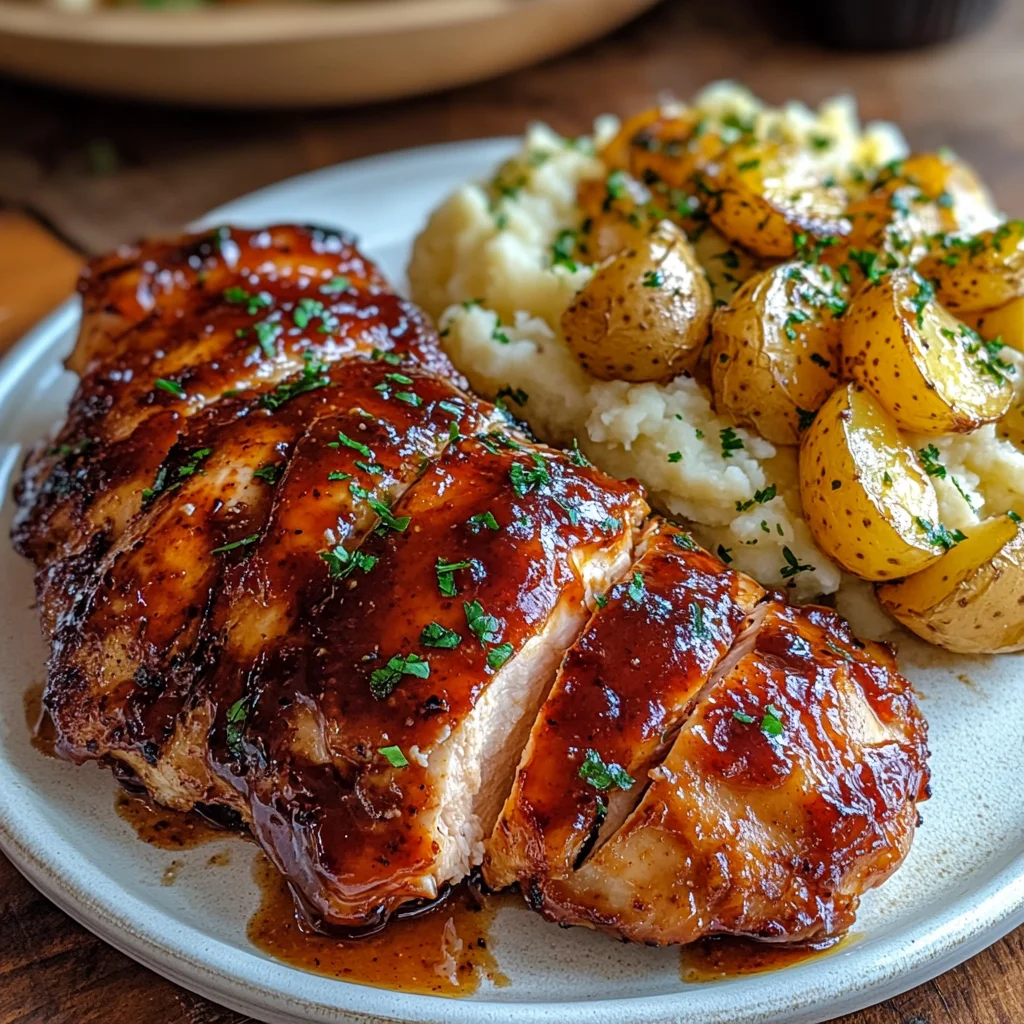
Honey Bbq Chicken & Creamy Garlic Parmesan Potatoes
There’s something truly magical about cooking that transcends mere sustenance; it’s an opportunity to connect with our roots, relive cherished memories, and even create new ones. Picture this: the rich aroma of honey mingling with smoky barbecue sauce wafting through your kitchen, wrapping you in a warm embrace, beckoning you to gather around the table with loved ones. My friends, this is not just a meal; it’s an experience that infuses every bite with nostalgia and comfort. The Honey BBQ Chicken & Creamy Garlic Parmesan Potatoes recipe is more than just food; it’s a celebration of flavors that come together to create something profoundly satisfying. With each mouthful, you’re not only tasting deliciousness but also feeling a connection to home-cooked love.
As I reminisce about family dinners filled with laughter and storytelling, I can’t help but remember how this dish often took center stage. The sweet and tangy notes of honey barbecue balance beautifully with the creamy richness of garlic parmesan potatoes—a symphony of flavors that dances on your palate. Whether it’s a weeknight dinner or a special gathering, this recipe is perfect for any occasion when you want to feel the warmth of home without spending all day in the kitchen. Trust me, once you try it, you’ll understand why my family requests it time and again.
Honey BBQ Chicken & Creamy Garlic Parmesan Potatoes: A Heartwarming Feast
Let’s dive into this delightful culinary adventure together! The combination of tender chicken thighs glazed in a luscious honey BBQ sauce paired with velvety garlic parmesan potatoes creates an unforgettable meal that’s easy enough for any night of the week yet impressive enough for guests. So roll up those sleeves; it’s time to bring some love into your kitchen!
Ingredients:
Embarking on this culinary journey requires a handful of quality ingredients that work in harmony to elevate your dish from simple to extraordinary. Each component plays its part like musicians in an orchestra, contributing unique flavors and textures that create a masterpiece on your plate.
- 4 pieces bone-in, skin-on chicken thighs (About 2 lbs.): These chicken thighs are absolute stars in our recipe. Their rich flavor and juicy texture come from the bone and skin, which keep the meat moist during cooking. When selecting chicken thighs at the store, look for plump pieces with a vibrant color and firm texture—this indicates freshness. If you’re looking for alternatives, skinless chicken breasts can work too but may require adjustments in cooking time and moisture levels.
- 1 cup BBQ sauce: This ingredient is truly liquid gold! It brings sweetness, tanginess, and depth to our chicken as it caramelizes under heat. When choosing BBQ sauce, opt for one without artificial preservatives or excessive sugar—homemade versions can be fabulous if you have the time! The sauce will mingle beautifully with the honey for an utterly intoxicating glaze.
- 1/4 cup honey: Ah, honey—the sweet nectar that ties this dish together! It not only adds sweetness but also helps create that sticky glaze we all crave in barbecue dishes. Look for raw or local honey if possible; its floral notes can enhance the overall flavor profile of your chicken remarkably.
- 1 tablespoon olive oil: This unsung hero will help our spices adhere beautifully to the chicken while also adding healthy fats. Extra virgin olive oil is ideal due to its robust flavor profile; however, feel free to substitute with avocado oil if you’re aiming for a higher smoke point during roasting.
- 1 teaspoon garlic powder: While fresh garlic is delightful, garlic powder provides a concentrated punch that melds well into our marinade without overpowering other flavors. It’s perfect for creating depth without requiring chopping—a win-win!
- 1 teaspoon smoked paprika: This spice adds an alluring smokiness reminiscent of summer barbecues—not too spicy but deeply flavorful. The warmth from smoked paprika contributes beautifully to our dish’s overall complexity.
- to taste salt & pepper: Don’t underestimate these simple seasonings! Salt elevates flavors across the board by enhancing natural tastes while pepper adds that subtle kick we all enjoy. Adjust according to your palate for optimal satisfaction.
- 2 lbs small Yukon Gold potatoes: These beauties are perfect for mashing due to their creamy texture and buttery flavor! Look for small ones so they cook evenly; their thin skins make peeling easy while retaining all those delightful nutrients.
- 1/2 cup heavy cream: Here’s where things get irresistibly creamy! Heavy cream ensures our potatoes achieve a luxurious consistency that feels like a hug on a plate. If you’re looking for lighter alternatives, half-and-half or even coconut cream could work—just adjust seasoning accordingly!
- 1/2 cup grated Parmesan cheese: This cheese brings umami goodness along with its nutty flavor profile! Freshly grated cheese outshines pre-packaged options both in taste and melting quality—plus it feels oh-so-satisfying to grate it yourself.
- 4 cloves garlic, minced: Fresh garlic brings vibrant life into our potatoes! Mince finely so it disperses easily through our mash—you’ll appreciate its aromatic intensity once those potatoes are whipped together!
- 2 tablespoons unsalted butter: Butter adds richness we simply can’t resist—it enhances both flavor and texture while ensuring everything melds seamlessly together into dreamy perfection!
- to taste salt & pepper (for potatoes): Just as before—seasoning makes all the difference! Taste as you go; you want every bite to be perfectly balanced.
- optional Fresh parsley for garnish: A sprinkle of fresh parsley adds color and brightness—plus it’s always nice when something looks beautiful on the plate!
Equipment You’ll Need:
Equipping yourself with essential tools makes cooking smoother and more enjoyable—think of them as your trusty sidekicks in creating something wonderful together! While they might not be ingredients themselves, having the right equipment can ensure success at every step along this flavorful journey.
- Baking dish (9×13-inch) – A good-quality baking dish will hold all those glorious chicken thighs snugly while allowing plenty of room for sauce distribution as they roast beautifully in the oven. Choose glass or ceramic dishes because they retain heat well—perfect for achieving golden-brown skin!
- Mixing bowl – You’ll need at least one sturdy mixing bowl where we’ll whisk together our marinade like an artist blending colors on their palette! Opt for stainless steel or glass; they’re durable and easy to clean afterward.
- ** saucepan (for potatoes)** – A medium-sized saucepan is essential here since we’ll boil those Yukon Gold beauties until tender before transforming them into creamy perfection! Look for one with thick bottom construction so heat distributes evenly.
- Potato masher or ricer – To achieve those luxuriously smooth mashed potatoes we dream about (and deserve!), choose either a masher or ricer depending on your preference! A ricer gives an ultra-creamy finish while traditional mashers provide rustic charm—both work wonderfully!
With these tools ready at hand along with our beautiful ingredients prepped and primed…
Preparing the Honey Bbq Chicken & Creamy Garlic Parmesan Potatoes
Step 1: Preheat Your Oven – Setting The Scene
Before anything else happens in your kitchen magic realm, let’s preheat that oven to 400°F (200°C). This step is crucial because starting off at the right temperature allows your chicken skin to crisp up beautifully while locking in juices during cooking time—you want every bite bursting with flavor! While waiting patiently (don’t rush this step!), take this moment to gather all other necessary ingredients close by so everything flows seamlessly once we start mixing things up.
Step 2: Create Your Honey BBQ Glaze
In a mixing bowl large enough to accommodate everything comfortably—whisk together BBQ sauce, honey, olive oil alongside those spices we’ve gathered earlier like garlic powder and smoked paprika along with generous pinches of salt & pepper until combined into one harmonious mixture resembling liquid gold ready for transformation! This process facilitates even coverage over each thigh resulting in undeniable flavor infusion when baked later on—you’ll thank yourself later when everyone asks what secret ingredient made it so delectable!
Step 3: Coat Your Chicken Thighs
Now comes perhaps my favorite part—the glazing action! Place each piece of bone-in chicken thigh snugly within your prepared baking dish like soldiers awaiting their flavorful battle ahead then pour this luscious honey BBQ mixture generously over them making sure every inch gets lovingly coated—it’s essential here because this seals moisture inside whilst providing gorgeous caramelization throughout baking time ahead; trust me…you won’t want just plain old baked chicken after tasting these beauties!
Step 4: Bake Until Golden Brown
Slide those delectable thighs into your preheated oven carefully—and set timers accordingly because patience pays off here folks…you’re aiming for around 35–40 minutes total bake time until internal temperatures reach safe levels (165°F/75°C) ensuring crispy skin emerges gleaming from beneath its glaze while fragrant aromas fill your home inviting everyone closer toward dinner’s arrival; keep peeking occasionally but refrain from opening oven doors too frequently as heat escapes easily leading results less than ideal…that said don’t hesitate checking towards end point when golden brown perfection beckons invitingly around edges!
I can almost hear those delightful sounds coming from your kitchen already…Let’s keep going from here!
Step 5: Preparing the Potatoes – A Comforting Foundation
While your chicken is basking in that glorious honey BBQ mixture, it’s time to turn your attention to the Yukon Gold potatoes. These little gems are not just a side dish; they are the creamy, dreamy foundation that elevates this meal to something truly extraordinary. Start by peeling them—yes, I know it’s a bit of a chore, but trust me on this; the silky texture of mashed potatoes is worth every second spent! Once peeled, cut each potato into halves or quarters. The size you choose can affect cooking time, so aim for uniform pieces—about two inches in size works beautifully. This ensures they cook evenly and become tender all at once.
Now, place those lovely potato pieces into a saucepan and cover them with cold water. This might seem like a minor detail, but starting with cold water helps them cook more uniformly; otherwise, you risk having mushy outsides and hard centers. Sprinkle in a generous pinch of salt—this is your chance to infuse flavor right from the start! Bring the pot to a vigorous boil over medium-high heat. As it bubbles away, keep an eye on them; you want those potatoes to be fork-tender but not falling apart. This usually takes about 15-20 minutes, depending on their size. When you can pierce them easily with a fork but they still hold their shape, that’s your cue to drain them and move on!
Step 6: Creating Creamy Garlic Parmesan Bliss
Once your Yukon Gold potatoes are perfectly tender and drained, return them to the saucepan. This step is where we transform simple potatoes into creamy garlic Parmesan bliss! Add in half a cup of heavy cream—this is where the magic happens. Heavy cream will help create that luscious texture we’re after; it adds richness that makes every bite feel like a warm hug. Then toss in half a cup of grated Parmesan cheese alongside four cloves of minced garlic; this aromatic addition is key to infusing your mashed potatoes with an utterly intoxicating flavor.
Now here comes my favorite part: butter! Add two tablespoons of unsalted butter into the mix—it’s non-negotiable for achieving that velvety mouthfeel everyone craves in creamy mashed potatoes. Season generously with salt and pepper; remember that simple seasoning goes a long way in enhancing the overall taste without overpowering it. As you mash everything together—don’t skimp on this step!—you’ll want to use either a potato masher or even a hand mixer if you’re feeling adventurous. Mash until everything is beautifully combined and creamy but still has some texture; nobody wants gluey potatoes! Feel free to adjust any seasonings as necessary because every palate is different.
Step 7: Letting Your Chicken Rest – Patience is Key
As your potatoes come together in that mesmerizing creamy concoction, it’s important to check on your chicken one last time before serving. Once the internal temperature reaches 165°F (75°C) and the skin has taken on that mouthwatering golden brown hue—a sign that all those sugars from the honey BBQ sauce have caramelized beautifully—it’s time to pull it from the oven. But wait! Before diving into this glorious dish, give your chicken some TLC by letting it rest for about five minutes on a cutting board or plate covered loosely with aluminum foil.
This resting period may seem unnecessary, but trust me—it’s absolutely essential for juicy chicken! Allowing it to rest gives those flavorful juices inside the meat time to redistribute throughout each piece instead of spilling out when you cut into it immediately after cooking. The result? Every bite will be succulent and packed with flavor—a truly satisfying experience for anyone at your table! While waiting, I encourage you to take deep breaths and savor those enticing aromas wafting through your kitchen—they’re an essential part of building anticipation!
Step 8: Plating Your Masterpiece – The Final Flourish
The moment has finally arrived—you’ve put in so much love and care into crafting this Honey BBQ Chicken & Creamy Garlic Parmesan Potatoes feast! Now let’s make sure it looks as delightful as it tastes because presentation matters just as much as flavor does, my friends! Start by placing one or two pieces of glazed honey BBQ chicken onto each plate; look at how that sauce glistens like liquid gold under the light! It practically beckons you closer with its sweet aroma mingling with smokiness from the paprika.
Next up are those luxurious creamy garlic Parmesan potatoes—which should be spooned generously beside or underneath the chicken for maximum impact visually and texturally. You want your guests (or family) to see all those delectable elements working together harmoniously—the contrast between crispy skin and velvety potatoes should have their mouths watering before they even take their first bites! For an extra touch of color and freshness, consider sprinkling some freshly chopped parsley over everything—a pop of green adds vibrancy that makes any dish look restaurant-worthy.
As you serve up this incredible meal, take a moment to appreciate what you’ve created together—the comforting harmony between flavors and textures will wow everyone at dinner tonight while warming hearts around your table. Enjoy every single delicious bite because this Honey BBQ Chicken & Creamy Garlic Parmesan Potatoes dish isn’t just food; it’s love served on plates ready for sharing!
Conclusion: Celebrate Every Flavorful Moment
Cooking isn’t just about following recipes; it’s about creating experiences infused with love and joy shared among family and friends around the dinner table. Each step brings us closer not only to delicious food but also memorable moments filled with laughter and connection over shared meals—the true essence of life itself! So whether you’re making this Honey BBQ Chicken & Creamy Garlic Parmesan Potatoes dish for a special gathering or simply treating yourself after a long week, know that you’ve crafted something genuinely remarkable here today. Bon appétit!
Storage and Enjoyment Tips for Your Honey Bbq Chicken & Creamy Garlic Parmesan Potatoes
Now that you’ve created this incredible Honey BBQ Chicken paired with those creamy garlic Parmesan potatoes, it’s time to dig in and relish every single bite! But what if you have leftovers? Trust me, there’s no need to worry because this dish keeps beautifully, allowing you to enjoy its deliciousness even after the initial feast. Let’s dive into how to store these culinary treasures so they remain as mouthwatering as when they first graced your table.
Storing Leftover Honey Bbq Chicken & Creamy Garlic Parmesan Potatoes
To ensure your Honey BBQ Chicken and Creamy Garlic Parmesan Potatoes stay fresh and flavorful, I recommend using airtight containers. Glass containers with tight-fitting lids are my go-to, but any well-sealed container will do the trick. Stored properly in the refrigerator, your leftovers can last about 3-4 days—plenty of time to revisit this delightful meal! A little insider tip: if you want to maintain the potatoes’ creaminess and avoid them drying out, consider placing a slice of bread in the container with them; it absorbs moisture and keeps everything nice and tender. When you’re ready to enjoy again, simply reheat in the oven or microwave until warmed through. I promise you’ll find that the flavors only deepen and meld further after a day or two—making each bite just as satisfying as the first.
Freezing for Later
If you’ve made more than you can eat in one sitting (which can happen given how irresistible this dish is!), freezing is an excellent option. To freeze your Honey BBQ Chicken and Creamy Garlic Parmesan Potatoes properly, allow them to cool completely before transferring them into freezer-safe bags or airtight containers. Make sure to remove as much air as possible—this helps prevent freezer burn and keeps your meal tasting fresh! When stored this way, your dish can last up to three months in the freezer without losing its charm. When you’re ready for a quick dinner, simply thaw in the refrigerator overnight before reheating. This convenience factor is absolutely paramount; it means you can have a hearty meal on hand at a moment’s notice—perfect for busy weeknights or surprise guests!
Honey BBQ Chicken & Creamy Garlic Parmesan Potatoes

Discover the delightful flavors of Honey BBQ Chicken paired with Creamy Garlic Parmesan Potatoes, a dish that transforms any dinner into a heartwarming feast. This recipe combines tender, juicy chicken thighs glazed in a luscious honey BBQ sauce with velvety mashed potatoes infused with rich garlic and cheese. Perfect for weeknight dinners or special gatherings, this meal offers comfort and nostalgia with every bite. Gather your loved ones around the table to share in the joy of homemade goodness that warms both the heart and the palate.
- Prep Time: 15 minutes
- Cook Time: 40 minutes
- Total Time: 55 minutes
- Yield: Serves approximately 4 people 1x
- Category: Dinner
- Method: Baking
- Cuisine: American
Ingredients
- 4 pieces bone-in, skin-on chicken thighs (About 2 lbs.)
- 1 cup BBQ sauce
- 1/4 cup honey
- 1 tablespoon olive oil
- 1 teaspoon garlic powder
- 1 teaspoon smoked paprika
- to taste salt & pepper
- 2 lbs small Yukon Gold potatoes
- 1/2 cup heavy cream
- 1/2 cup grated Parmesan cheese
- 4 cloves garlic, minced
- 2 tablespoons unsalted butter
- optional Fresh parsley for garnish
Instructions
- Preheat your oven to 400°F (200°C).
- In a mixing bowl, whisk together BBQ sauce, honey, olive oil, garlic powder, smoked paprika, salt, and pepper.
- Place chicken thighs in a baking dish and coat them evenly with the honey BBQ mixture.
- Bake chicken for 35–40 minutes or until internal temperature reaches 165°F (75°C).
- Meanwhile, peel and cut potatoes into uniform pieces. Boil in salted water until fork-tender (about 15–20 minutes), then drain.
- Return potatoes to saucepan; add heavy cream, Parmesan cheese, minced garlic, butter, salt, and pepper. Mash until creamy yet textured.
- Let chicken rest for 5 minutes before serving alongside creamy potatoes.
Nutrition
- Serving Size: 1 thigh with potatoes (350g)
- Calories: 540
- Sugar: 16g
- Sodium: 780mg
- Fat: 27g
- Saturated Fat: 11g
- Unsaturated Fat: 14g
- Trans Fat: 0g
- Carbohydrates: 42g
- Fiber: 4g
- Protein: 36g
- Cholesterol: 155mg