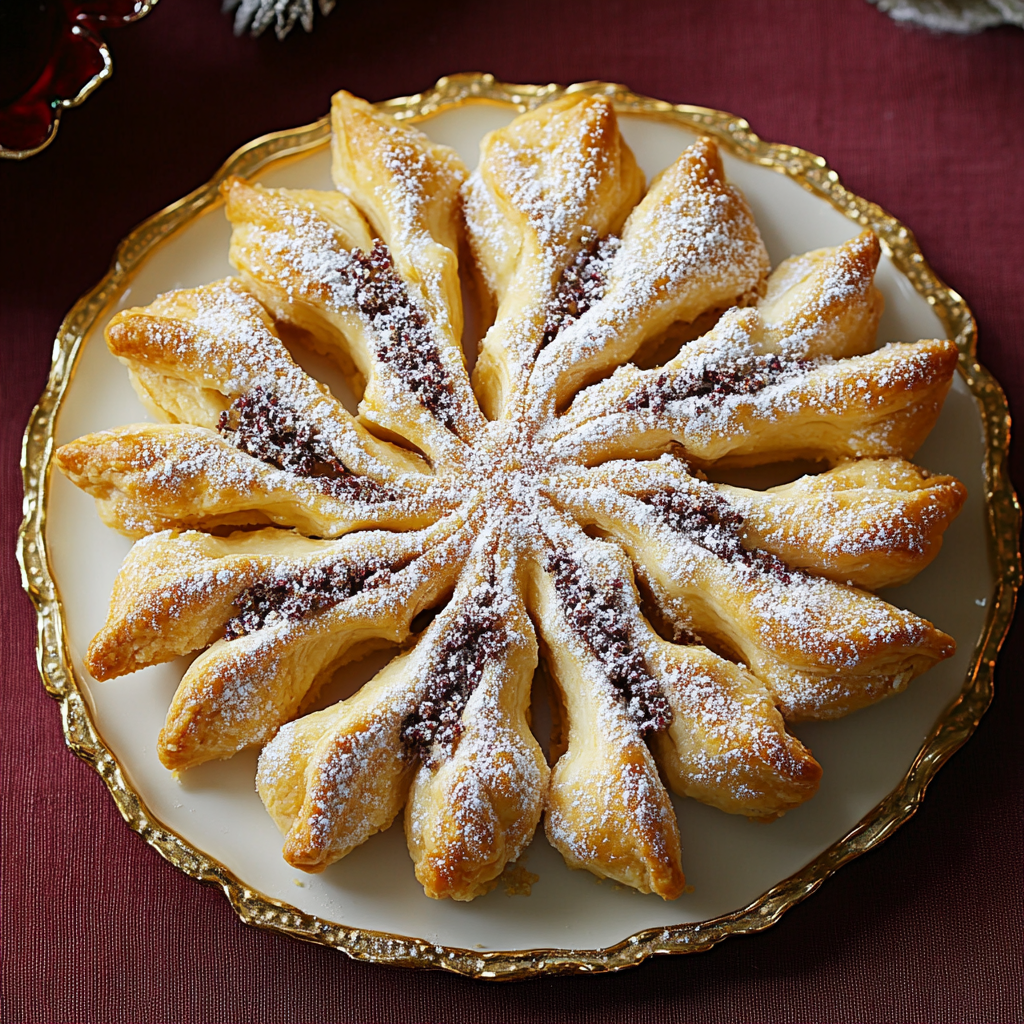
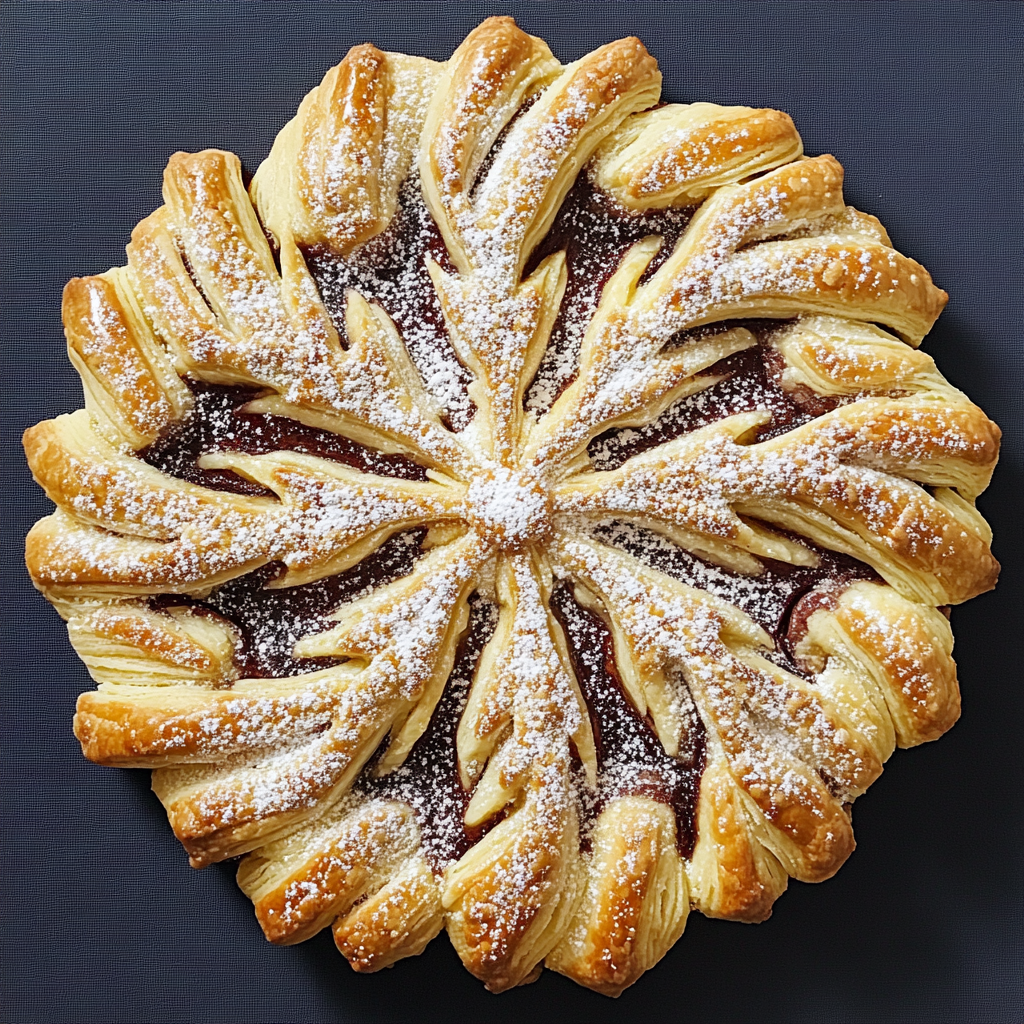
Easy Puff Pastry Snowflake
If you’re looking for a show-stopping dessert that’s surprisingly simple to make, then this Easy Puff Pastry Snowflake is just what you need! This delightful treat transforms four basic ingredients into a beautiful centerpiece that will impress your family and friends. Whether it’s a busy weeknight or a festive gathering, this recipe fits right in, bringing joy and sweetness to any occasion.
I love this recipe not just for its stunning presentation but also for its versatility. You can fill it with your favorite chocolate spread or jam, making it customizable to fit everyone’s taste. It’s perfect for those moments when you want something quick yet special!
Why You’ll Love This Recipe
- Quick and Easy: With just four ingredients and straightforward steps, you’ll have a delicious dessert ready in no time.
- Family-Friendly: Kids will love helping to twist the snowflake points, making it a fun activity for everyone.
- Customizable Fillings: Use Nutella, fruit preserves, or even a mix of both to create a unique flavor every time!
- Impressive Presentation: This dessert looks fancy enough for a party but is easy enough for everyday baking.
- Make-Ahead Option: Prepare it in advance and bake it fresh when you’re ready to serve.
Ingredients You’ll Need
Let’s gather our simple and wholesome ingredients! With just a few items from the pantry and freezer, you can whip up this festive treat in no time.
Ingredients:
– All-purpose flour, for dusting work surface
– 1 (17.3-oz.) package frozen puff pastry (2 sheets), thawed
– 1/3 cup Nutella or jam
– 1 large egg, beaten with 1 Tablespoon water
– Crystal sanding sugar, for topping (optional)
– Confectioners’ sugar, for dusting
Variations
The beauty of the Easy Puff Pastry Snowflake lies in its flexibility! Here are some fun variations you can try:
- Try Different Fillings: Experiment with peanut butter or caramel sauce instead of Nutella or jam for a new flavor twist.
- Add Spices: Sprinkle some cinnamon or nutmeg into the filling to give it an extra warmth and depth.
- Make It Savory: Swap out sweet fillings for cheese and herbs to create a savory version perfect as an appetizer.
- Decorate Differently: Use colored icing or edible glitter instead of sanding sugar to make your snowflake even more festive!
How to Make Easy Puff Pastry Snowflake
Step 1: Preheat the Oven
Start by preheating your oven to 400°F. This ensures that your puff pastry will puff up beautifully as it bakes. While the oven heats up, prepare your baking sheet by lining it with parchment paper—this helps prevent sticking.
Step 2: Prepare the Pastry
Lightly flour your work surface before unfolding both sheets of puff pastry. Using a rolling pin, gently roll each sheet just enough to seal any perforations; this keeps the filling from leaking out during baking.
Step 3: Cut Circles
Now it’s time to cut! Use a large bowl as a guide and trace around it to cut each sheet into a 9-inch circle. Place one circle on your lined baking sheet; this will be the base of your snowflake.
Step 4: Add Your Filling
Spread Nutella or jam right in the center of the pastry circle, leaving about a 1/2-inch border around the edges. This step is crucial because it allows us to seal the edges later without making a mess.
Step 5: Layer and Seal
Place the second puff pastry circle on top of the filled base. Gently press them together at the edges; this creates a seal that will keep all that delicious filling from escaping while baking.
Step 6: Create Wedges
Use a small glass or bowl as a guide again; place it in the center of your layered circles. With a sharp knife, cut from the edge of the glass outward into 16 wedges around the circle. Be careful not to cut all the way through—leave that center intact!
Step 7: Brush with Egg Wash
Remove the glass and brush your pastry all over with egg wash. This step adds shine and encourages browning during baking, giving your snowflake that gorgeous golden color.
Step 8: Twist and Pinch
Now comes the fun part! Twist two wedges toward each other at their tips and pinch them together to seal. Repeat this process until all wedges are twisted and sealed, forming eight beautiful points like a snowflake!
Step 9: Bake Your Creation
Sprinkle sanding sugar on top if you like—it adds sparkle! Bake in your preheated oven until golden brown and puffed up, about 20 to 25 minutes. The aroma will fill your kitchen!
Step 10: Dust with Sugar & Serve
Once baked, remove your pastry snowflake from the oven and let it cool slightly before dusting with confectioners’ sugar. Then gather friends and family around as you slice into this delightful creation—a true showstopper!
Step 11: Share Your Experience!
Did you make this recipe? Don’t forget to give it a star rating below! I’d love to hear how yours turned out!
Pro Tips for Making Easy Puff Pastry Snowflake
Creating an impressive dessert can be a breeze with these simple tips to help you achieve that perfect snowflake shape and taste!
- Use cold puff pastry: Make sure your puff pastry is nice and cold when you start. This helps the layers remain distinct, resulting in a puffier and flakier texture when baked.
- Don’t overfill: While it might be tempting to add more filling, sticking to the 1/3 cup of Nutella or jam ensures the pastry seals properly and bakes evenly without spilling out.
- Twist gently: When twisting the wedges, be gentle. A light twist allows the pastry to maintain its structure while creating beautiful points that resemble a snowflake.
- Experiment with flavors: Feel free to swap out Nutella for other spreads like almond butter or fruit preserves. This adds variety and lets you personalize your snowflake for different occasions.
- Let it cool before serving: Allowing the snowflake to cool slightly before dusting with confectioners’ sugar helps prevent it from melting into the warm pastry, keeping your presentation neat and festive!
How to Serve Easy Puff Pastry Snowflake
This delightful dessert is not only delicious but also visually stunning. Presenting it beautifully can make it feel even more special for any occasion!
Garnishes
- Fresh berries: Adding a handful of fresh strawberries, raspberries, or blueberries on the side enhances color and provides a refreshing contrast to the rich chocolate or jam.
- Mint leaves: A few sprigs of mint can brighten up the plate and add a touch of elegance, making your dessert look even more inviting.
- Chocolate drizzle: Drizzling some melted dairy-free chocolate over the top can elevate the dessert’s appearance while adding an extra layer of chocolaty goodness.
Side Dishes
- Vanilla ice cream: The creaminess of vanilla ice cream pairs perfectly with the warm chocolate or jam-filled snowflake, creating a delightful contrast in temperature and texture.
- Fruit salad: A light fruit salad made with seasonal fruits offers a refreshing balance to this rich dessert and adds a pop of color to your plate.
- Hot cocoa: Serve alongside a steaming mug of hot cocoa for an indulgent treat that complements the flavors in your puff pastry snowflake wonderfully.
- Coffee or tea: A warm beverage like coffee or herbal tea makes for a cozy pairing, enhancing the overall experience as you enjoy each bite.
Now that you’re armed with these tips and serving suggestions, get ready to impress your family and friends with this charming Easy Puff Pastry Snowflake! Enjoy every festive bite!
Make Ahead and Storage
This Easy Puff Pastry Snowflake is not only delightful to make, but it also holds up beautifully for meal prep. Whether you’re planning a festive gathering or simply want a sweet treat on hand, this recipe can be prepped in advance and stored for later enjoyment.
Storing Leftovers
- Store any leftover pastry in an airtight container at room temperature for up to 2 days.
- If you prefer a crisp texture, it’s best to consume the snowflake within the first day.
Freezing
- To freeze, allow the baked snowflake to cool completely.
- Wrap it tightly in plastic wrap and then in aluminum foil to prevent freezer burn.
- It can be frozen for up to 1 month.
Reheating
- For best results, reheat the snowflake in a preheated oven at 350°F for about 10 minutes until warmed through and crispy.
- Avoid using the microwave as it may make the pastry soggy.
FAQs
Have questions? Here are some common inquiries about the Easy Puff Pastry Snowflake:
Can I use different fillings for the Easy Puff Pastry Snowflake?
Absolutely! While Nutella or jam are great choices, feel free to experiment with other fillings like almond paste, cream cheese, or even fruit preserves. The possibilities are endless!
How do I know when my Easy Puff Pastry Snowflake is done baking?
The snowflake is ready when it’s golden brown and puffed up. Keep an eye on it during the last few minutes of baking to ensure it doesn’t overcook.
Is there a way to make this recipe vegan-friendly?
Yes! You can substitute the egg wash with a plant-based milk or aquafaba (chickpea brine) for brushing. Use a vegan chocolate spread or jam as your filling.
What should I serve with my Easy Puff Pastry Snowflake?
This dessert pairs well with fresh fruit or a scoop of dairy-free ice cream. It can also be served alongside a warm beverage like coffee or tea for a cozy treat.
Final Thoughts
I hope this Easy Puff Pastry Snowflake brings joy and sweetness to your kitchen! It’s such a versatile dessert that works wonderfully for any occasion. Enjoy making it and sharing it with those you love; I’m sure they will appreciate your effort! Happy baking!
Easy Puff Pastry Snowflake
If you’re looking for a stunning dessert that’s easy to make, the Easy Puff Pastry Snowflake is your go-to recipe! With just four simple ingredients, this delightful treat transforms into a beautiful centerpiece that will wow your family and friends. Perfect for busy weeknights or festive gatherings, this customizable pastry can be filled with Nutella, jam, or even savory options, bringing joy and sweetness to any occasion. Kids will love helping twist the snowflake points, making it a fun activity for everyone. Impress your guests with this dazzling dessert that is as simple as it is delicious!
- Prep Time: 15 minutes
- Cook Time: 25 minutes
- Total Time: 40 minutes
- Yield: Serves approximately 4 people 1x
- Category: Dessert
- Method: Baking
- Cuisine: Various
Ingredients
- All-purpose flour (for dusting)
- 1 package frozen puff pastry (2 sheets), thawed
- 1/3 cup Nutella or jam
- 1 large egg (beaten with 1 tablespoon water)
- Optional: Crystal sanding sugar (for topping) & confectioners’ sugar (for dusting)
Instructions
- Preheat oven to 400°F and line a baking sheet with parchment paper.
- Lightly flour your work surface and roll out the puff pastry sheets to seal perforations.
- Cut each sheet into a 9-inch circle; place one on the baking sheet.
- Spread Nutella or jam in the center, leaving a ½-inch border.
- Place the second circle on top and seal the edges gently.
- Use a small glass to cut 16 wedges from the center outward while keeping the center intact.
- Brush with egg wash and twist each wedge toward each other and pinch to seal.
- Sprinkle with sanding sugar if desired and bake for 20-25 minutes until golden brown.
- Dust with confectioners’ sugar before serving.
Nutrition
- Serving Size: 1 pastry snowflake (60g)
- Calories: 250
- Sugar: 8g
- Sodium: 150mg
- Fat: 15g
- Saturated Fat: 6g
- Unsaturated Fat: 8g
- Trans Fat: 0g
- Carbohydrates: 24g
- Fiber: 1g
- Protein: 3g
- Cholesterol: 30mg