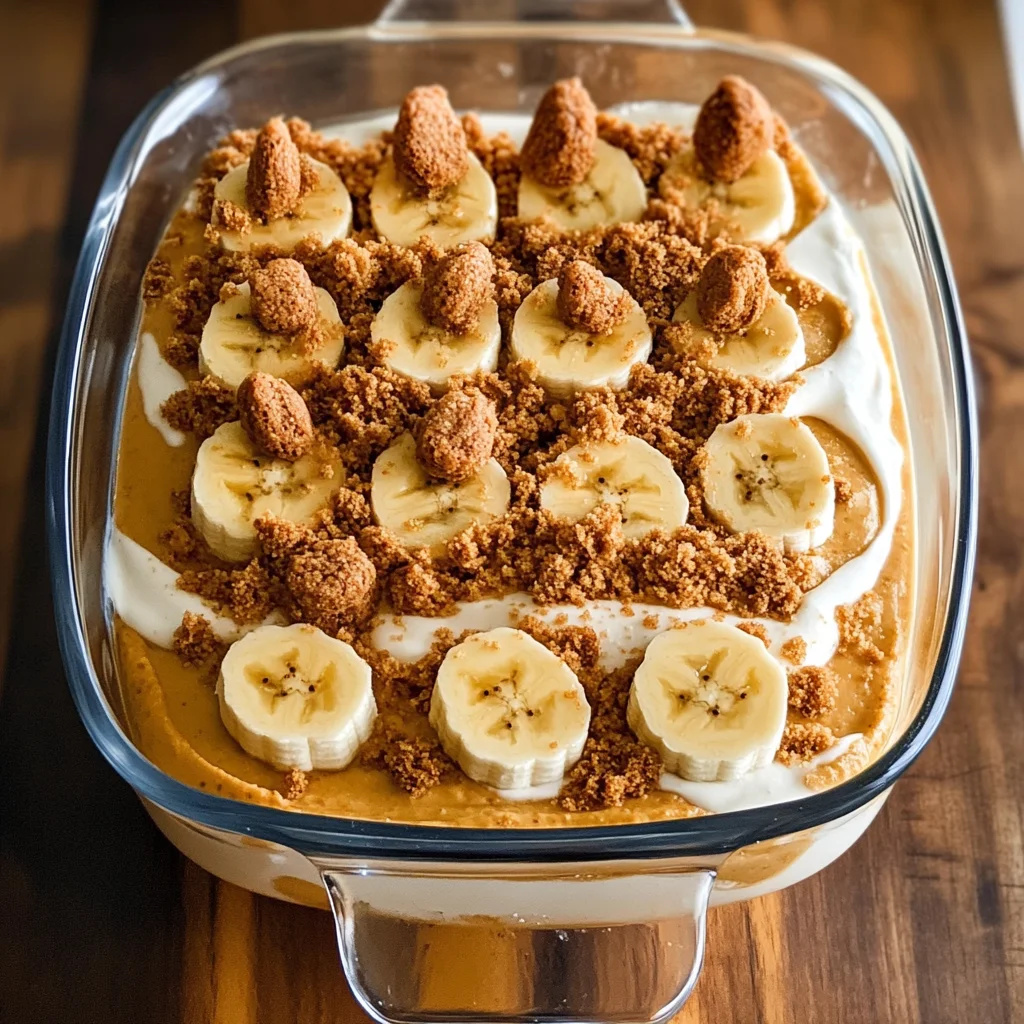
Biscoff Banana Pudding
The aroma of sweet spices, the luscious creaminess that beckons you to indulge, and the comforting sensation of nostalgia – these are just a few reasons why my heart sings every time I make Biscoff Banana Pudding. This isn’t just a dessert; it’s an experience, a celebration of flavors that come together in a way that feels like a warm embrace from an old friend. Imagine layers of velvety vanilla pudding mingling with rich Biscoff cookie butter, perfectly ripe bananas, and clouds of whipped cream, all nestled between crispy Biscoff cookies. Each spoonful is an invitation to savor life’s simple pleasures, reminding us that even the most ordinary moments can be transformed into something truly extraordinary.
As I whip up this no-bake delight, I’m reminded of summer gatherings with family and friends where laughter fills the air and sweet treats are always the highlight. This Biscoff Banana Pudding has become a beloved staple on our dessert table, effortlessly stealing the spotlight. It’s a bridge between tradition and innovation, where classic banana pudding meets the deliciously spiced allure of Biscoff cookie butter. Trust me when I say this dessert will not only satisfy your sweet tooth but also create lasting memories around your own table.
Biscoff Banana Pudding: A Sweet Escape
Let’s dive into this enchanting recipe together! If you’ve ever thought of banana pudding as just another dessert, think again. With its unique twist featuring Biscoff cookie butter, it transforms the familiar into something that feels fresh yet comforting. Imagine the delightful crunch of cookies paired with creamy pudding and soft banana slices – it’s an irresistible combination that brings joy to every gathering. So grab your mixing bowls and let’s create this beautiful masterpiece that is bound to impress!
Ingredients:
Embarking on this culinary journey requires some essential ingredients that will come together like a beautiful symphony of flavors. Each one plays a crucial role in crafting our dreamy Biscoff Banana Pudding.
- 1 (14 ounce) can sweetened condensed milk. This liquid gold adds both sweetness and richness to our pudding base; it provides a luxurious texture that’s hard to replicate with any other ingredient. When choosing sweetened condensed milk, look for high-quality brands; you want it to be thick and creamy because it forms the backbone of our dessert’s flavor profile. The sweetness balances perfectly with the other components without being overly saccharine.
- 1½ cups cold water. While it may seem simple, this cold water is vital for achieving the right consistency in our pudding mixture. When combined with the instant vanilla pudding mix, it helps activate those magical thickening properties that turn our blend into something wonderfully creamy rather than runny or clumpy. Using cold water ensures that we don’t compromise on texture – trust me on this one!
- 1 (3.4 ounce) box instant vanilla pudding mix. Instant pudding mix is a lifesaver in this no-bake recipe; it allows us to achieve that silky-smooth texture without needing any stovetop cooking! The vanilla flavor is subtle yet impactful, providing a comforting backdrop to our other ingredients while enhancing their natural sweetness. Just ensure you select instant pudding rather than cook-and-serve varieties so we get that perfect consistency we’re after.
- ½ cup Biscoff cookie butter, melted. Ahh, the star ingredient! This spiced cookie butter is absolutely paramount for infusing our pudding with warm notes of cinnamon and caramelized sugar goodness that make each bite taste like pure bliss. Melting it before adding ensures it’s seamlessly incorporated into our mixture rather than clumping up; look for well-known brands at your local grocery store for optimal flavor.
- 3 cups heavy whipping cream. The heavy whipping cream is where we find our clouds of dreamy whipped topping! Whipping cream not only adds an airy lightness but also enriches our pudding with its creamy decadence – what could be better? Make sure your cream is chilled before whipping; this step is crucial for achieving those stiff peaks we desire for folding into our batter later.
- 32 Biscoff cookies. These delightful cookies provide both crunch and flavor layers in our dessert! Crushing them creates tiny bursts of spice throughout the dish, enhancing each mouthful as you dig deeper into your bowl. You can use more or less depending on your love for texture – I promise you won’t regret having extra on hand!
- 5 large bananas. Bananas bring freshness and natural sweetness to balance out all those rich elements – plus they add beautiful color! Choose ripe bananas with just a few speckles; they should be firm yet slightly soft to touch for maximum flavor impact while preventing mushiness in your layers!
Equipment You’ll Need:
Having the right tools makes all the difference in creating this marvelous dessert! Think of them as essential partners in creating something wonderful; they help streamline your process and elevate your cooking experience.
- Mixing bowls – A good set of mixing bowls allows you to combine ingredients comfortably without worrying about spills or messes. Opt for glass or stainless steel options as they’re easy to clean and won’t retain odors; larger sizes are great for blending thicker mixtures like our pudding base while smaller ones work well when whipping cream.
- Whisk – A sturdy whisk is non-negotiable here! It’s crucial for blending together ingredients smoothly while incorporating air when needed (like when we whip cream). If you don’t have one handy or prefer an electric option instead, using a hand mixer works beautifully too!
- Trifle dish or large serving bowl – Presentation matters! Layering your ingredients beautifully offers both visual appeal and makes serving easier later on; choose either an elegant trifle bowl or any deep glass dish where everyone can marvel at those gorgeous layers before diving in.
- Rubber spatula – This versatile tool is key for folding whipped cream into mixtures gently without deflating all that lovely air we’ve painstakingly whipped in! It’s also handy when scraping down bowl edges during prep so nothing goes wasted!
Now you’re equipped with everything you’ll need to create this indulgent treat! Let’s move forward – I can hardly wait to share how we’ll bring all these glorious components together into one heavenly dessert masterpiece!
Preparing the Biscoff Banana Pudding
Step 1: Whisking Up Creamy Magic
In a large bowl, take your sweetened condensed milk along with cold water and instant vanilla pudding mix – now let’s whisk them together vigorously until everything is beautifully blended and starts thickening up nicely! You’ll want to see those bubbles forming as air gets incorporated—this step creates such a rich foundation for our pudding layer! Once combined thoroughly (about two minutes should do), gently drizzle in your melted Biscoff cookie butter while continuing to whisk steadily until it’s completely integrated into that luscious mixture we’ve created.
Step 2: Creating Fluffy Whipped Cream
Now comes one of my favorite parts: whipping up heavy whipping cream until it’s transformed into fluffy clouds of happiness! Pour your chilled cream into another bowl—this makes all the difference—as colder temperatures allow air bubbles to form quickly without melting away what you’ve worked hard for already! Start at low speed then gradually increase until soft peaks begin appearing (think billowy meringues). You want those peaks standing tall but still smooth enough so they don’t break down too soon during folding—this process known as ‘soft peaks’ gives us just enough stability while keeping things airy!
Step 3: Folding Flavors Together
Once you’ve reached stiff peaks (the kind that hold their shape firmly), take about a third of this whipped creation and gently fold it into your earlier prepared pudding mixture using slow circular motions—this encourages incorporation without losing volume from all those lovely bubbles trapped inside each dollop! Repeat until everything looks harmoniously united—don’t rush here; patience pays off big-time by ensuring each spoonful maintains its perfect balance between richness from both components blending beautifully together!
Step 4: Layering Delightfully
With our creamy filling ready at last, it’s time to assemble this stunning masterpiece! Grab either a trifle dish or serving bowl first, then start layering: begin by spreading some luscious pudding across the bottom followed by neatly arranged slices from fresh bananas (aiming roughly equal size pieces) before adding crushed Biscoff cookies next—repeat these steps until reaching desired height but always finish off on top with leftover pudding layer—it seals all flavors underneath perfectly while providing smooth finish everyone will adore once served chilled after resting hours ahead!
Stay tuned as we’ll conclude assembling shortly so let’s keep building excitement towards enjoying every bite together soon!
Crafting Your Luscious Biscoff Banana Pudding
Step 5: The Whip That Makes It All Come Together
Now, let’s focus on that heavenly whipped cream — this is where the magic really starts to happen! In a separate large mixing bowl, pour in three cups of heavy whipping cream. You want to use cold cream for the best results because cold cream whips to a thicker volume and creates that luxurious texture we’re aiming for. Using an electric mixer, begin whipping the cream on medium speed. As it starts to thicken, gradually increase to high speed until you reach stiff peaks. This means when you lift the beaters out of the cream, the peaks should stand tall without folding over. Trust me on this; it’s absolutely paramount for achieving that airy lightness in your pudding.
It’s crucial not to over-whip at this stage; otherwise, you’ll end up with butter instead of delicious whipped cream! Watch closely as that transformation takes place — you’ll notice it begins to froth, then thickens, and finally forms those beautiful peaks. This whipped cream will add an ethereal quality to your pudding, making each layer feel indulgently soft and creamy. Once you’ve reached stiff peaks, gently fold the whipped cream into your pudding mixture using a spatula. When folding, be delicate! You want to maintain all that airiness you just created while combining them perfectly. Remember, the goal here is a smooth and fluffy blend of flavors that will embrace every bite.
Step 6: Layering with Love
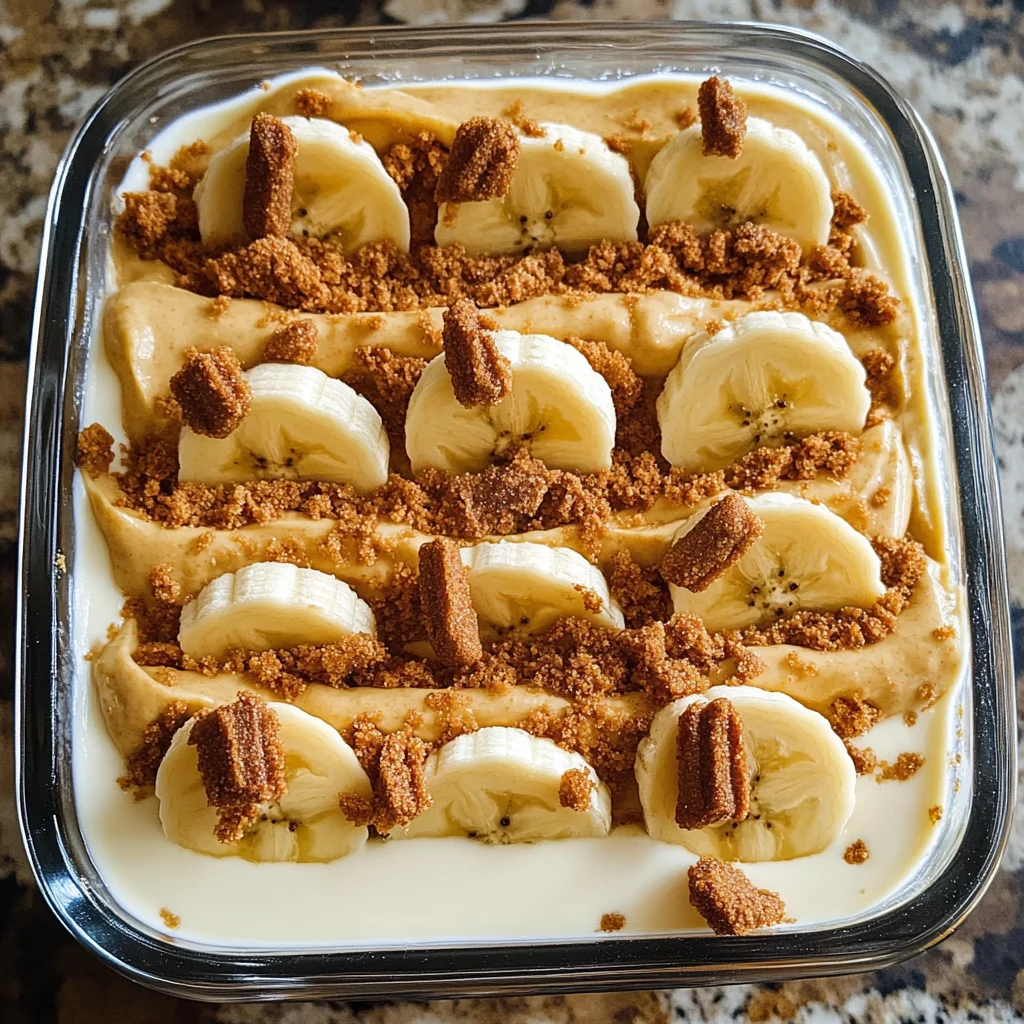
Now comes one of my favorite parts: layering! Grab a beautiful dish or a trifle bowl if you’re feeling fancy — presentation is key here because we eat with our eyes first! Start by spooning a generous layer of the luscious pudding mixture onto the bottom of your dish. This will act as a base for our layers and ensure there’s plenty of creamy goodness in every scoop. Next, take 32 Biscoff cookies, and gently crush some while leaving others whole; this variety adds depth and texture as you build those layers. Trust me when I say that these spiced cookies complement the banana like they were meant for each other.
After placing down your first layer of pudding, sprinkle half of those crushed Biscoff cookies over top — give them room to soak up all that creamy goodness! Then slice five large bananas into rounds and scatter them over the cookie layer. The sweetness of ripe bananas paired with the spiced notes from Biscoff creates a symphony of flavors that is utterly intoxicating! Repeat these layers until all ingredients are used up or until your dish is filled to your liking, ending with another layer of pudding on top. This careful arrangement not only looks stunning but ensures everyone gets a taste of every component in each serving.
Step 7: The Power of Patience
Once you’ve completed your masterpiece of layers, it’s time for one final act before you dig in: chilling! Cover your creation tightly with plastic wrap or a lid and pop it into the refrigerator for at least 3-4 hours—though overnight is even better if you can resist temptation! Why chill? During this time, those layers meld together beautifully; the cookies soften just enough to create a delightful contrast with the creamy pudding and fresh bananas. This step is transformative — flavors deepen as they interact with one another, creating an experience that’s profoundly satisfying.
While it’s tempting to sneak a spoonful before it sets (believe me, I’ve been there), I promise you that waiting makes all the difference. The chilling process allows everything to come together harmoniously; think about how much more delicious an overnight infusion can be compared to eating something right away — it’s like letting fine wine breathe! If you’re feeling impatient during this time (and who wouldn’t?), remind yourself that these few hours are what elevate your Biscoff Banana Pudding from simply good to truly extraordinary.
Step 8: The Grand Finale – Toppings Galore
Finally, we reach what I like to call “The Grand Finale.” After patiently waiting through those hours in the fridge, it’s time for those finishing touches that will make your dessert shine even brighter! Once chilled and set perfectly, remove your Biscoff Banana Pudding from the refrigerator and unwrap it carefully — oh, just breathe in that aroma; isn’t it intoxicating? To prepare for serving, take some extra Biscoff cookies and crush them coarsely; these will provide a delightful crunch on top.
For an added touch of decadence, drizzle some additional melted Biscoff cookie butter over the top along with fresh banana slices arranged artfully around or on top as well. Not only does this enhance visual appeal but also adds layers upon layers of flavor — imagine digging into this rich dessert only to find more cookie butter waiting beneath its surface! Just remember: presentation matters here; don’t rush this step because you want everyone at the table eagerly anticipating their first bite!
Conclusion:
What a journey we’ve embarked on together through this delightful recipe! From whisking together that velvety pudding base infused with luscious Biscoff cookie butter to layering those beautiful bananas and crunchy cookies—every step has been steeped in love and passion for good food. The way each bite melts in your mouth is nothing short of magical; it’s truly remarkable how such simple ingredients can come together to create something profoundly satisfying and utterly extraordinary.
This Biscoff Banana Pudding is not just another dessert; it’s an experience waiting to unfold at your next gathering or family meal. Imagine serving it at a backyard barbecue where laughter fills the air or bringing it out during a cozy movie night with friends—its versatility makes it shine on any occasion. Not only do you get to relish each bite filled with rich flavor and creamy texture but also cherish the joy of sharing something homemade that warms hearts and ignites smiles.
When it comes time to serve this delightful treat, picture yourself dishing up generous portions alongside a hot cup of coffee or maybe even a scoop of vanilla ice cream—what a match made in dessert heaven! For an afternoon pick-me-up, consider pairing it with some fresh berries; their tartness complements the sweetness beautifully. And if you’re feeling adventurous? A drizzle of caramel sauce would add another layer of decadence that will leave everyone coming back for seconds!
Speaking of adventure, let’s talk about variations! Feeling adventurous? You can easily swap out bananas for other fruits like ripe peaches or strawberries for a twist on flavor and texture while keeping everything else intact. Or perhaps sprinkle some crushed nuts between layers for added crunch and richness! This recipe is wonderfully adaptable, able to cater to whatever flavor profile excites you most. I wholeheartedly invite you to experiment with different toppings or mix-ins until you’ve discovered your own perfect rendition. So go ahead—try making this Biscoff Banana Pudding today, share your creations with loved ones, and let me know how they turn out! There’s nothing quite like connecting over food made from scratch.
Biscoff Banana Pudding

Indulge in this luscious Biscoff Banana Pudding—a no-bake delight that combines creamy layers with spiced cookie butter goodness! Try it today!
- Prep Time: 20 minutes
- Cook Time: No cooking required
- Total Time: 0 hours
- Yield: Approximately 10 servings 1x
- Category: Dessert
- Method: No-bake
- Cuisine: American
Ingredients
- 1 (14 ounce) can sweetened condensed milk
- 1½ cups cold water
- 1 (3.4 ounce) box instant vanilla pudding mix
- ½ cup Biscoff cookie butter, melted
- 3 cups heavy whipping cream
- 32 Biscoff cookies, crushed
- 5 large bananas, sliced
Instructions
- In a large bowl, whisk together sweetened condensed milk, cold water, and instant vanilla pudding mix until thickened.
- Stir in melted Biscoff cookie butter until fully incorporated.
- In another bowl, whip heavy cream to stiff peaks. Gently fold half into the pudding mixture until combined.
- In a trifle dish or serving bowl, layer half of the pudding mixture, followed by half of the crushed Biscoff cookies and banana slices. Repeat layers and finish with remaining pudding on top.
- Cover and refrigerate for at least 3-4 hours before serving.
Nutrition
- Serving Size: 1 piece (about 150g)
- Calories: 450
- Sugar: 33g
- Sodium: 120mg
- Fat: 27g
- Saturated Fat: 16g
- Unsaturated Fat: 10g
- Trans Fat: 0g
- Carbohydrates: 45g
- Fiber: 2g
- Protein: 5g
- Cholesterol: 60mg