Thai Chicken Salad
I’m absolutely thrilled to share a recipe that has become a staple in my home: Thai Chicken Salad. This dish is more than just a collection of ingredients; it’s an explosion of flavors, colors, and textures that dance together in perfect harmony. Picture yourself enjoying a bowl brimming with vibrantly shredded cabbage, succulent chicken, and crunchy peanuts, all drizzled with a homemade peanut dressing that’s simply liquid gold. Each bite transports you to the bustling streets of Thailand, where the air is rich with the scent of fresh herbs and spices, and the atmosphere buzzes with life. The beauty of this salad lies not only in its taste but also in its versatility—it can be served as a refreshing dinner idea or as a delightful side dish at gatherings. I promise you, once you try this Thai Chicken Salad, it will become your go-to recipe for any occasion.
What makes this salad truly special is its beautiful balance between the sweet and savory elements, combined with an array of textures that keep every bite interesting. The creamy peanut dressing wraps around the crisp vegetables like a warm embrace, while the added crunch from honey roasted peanuts and slivered almonds elevates the experience to new heights. It’s a vibrant celebration of flavors that mingles seamlessly on your palate—sweet from the honey and mandarin oranges, tangy from lime juice, and just enough heat from sriracha to awaken your senses without overwhelming you. Whether you’re preparing for a cozy family dinner or meal prepping for the week ahead, this salad brings joy to any dining table.
Thai Chicken Salad: A Colorful Symphony of Flavor
Let’s dive into this delightful recipe together! This Thai Chicken Salad not only satisfies your hunger but also nurtures your soul with each nourishing ingredient. The combination of fresh vegetables paired with shredded chicken creates a refreshing yet satisfying meal that will have everyone at your table asking for seconds.
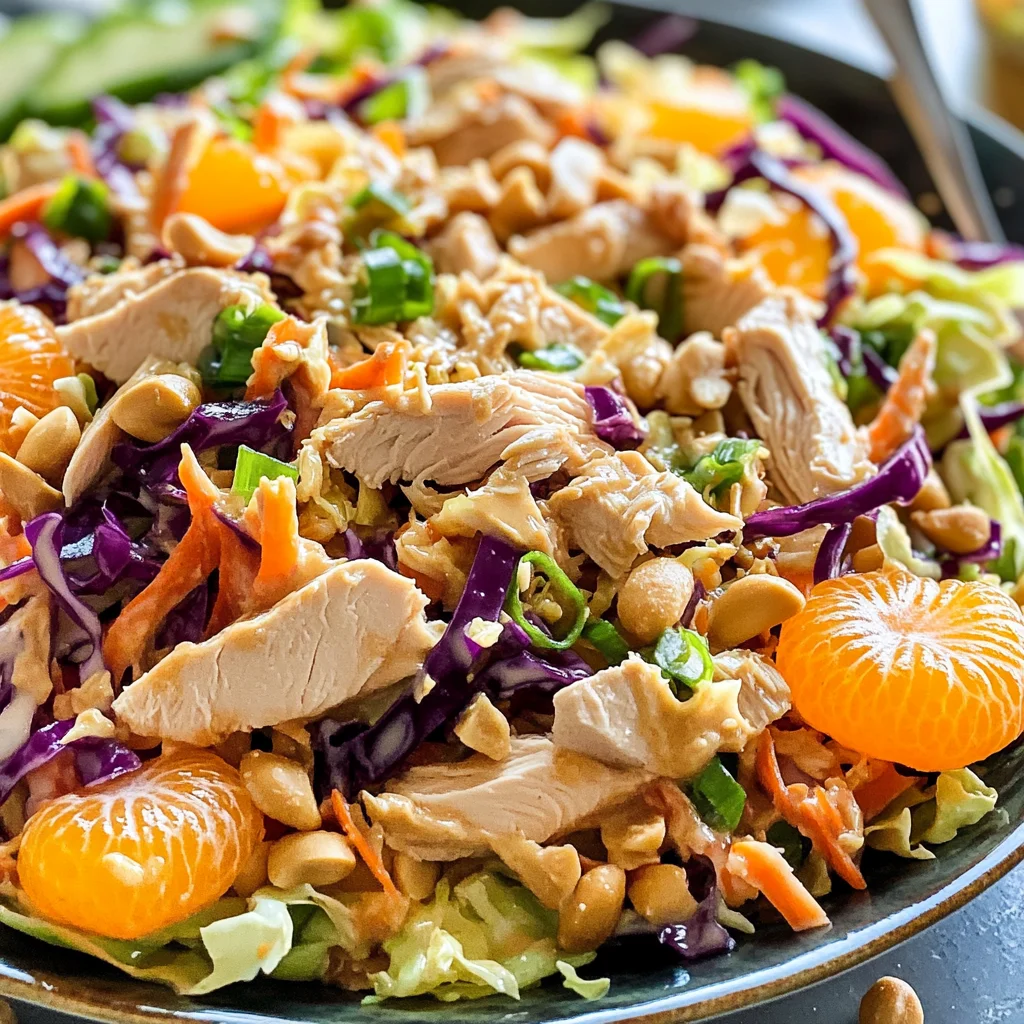
Ingredients:
Embarking on this culinary journey requires gathering some wonderful ingredients. Each one plays an integral role in creating the magic that is this Thai Chicken Salad.
- ½ cup peanut butter: This delicious nutty spread serves as the base for our creamy peanut dressing—it’s rich and utterly intoxicating! When selecting peanut butter, aim for natural varieties that contain just peanuts and salt; avoid those laden with sugars and preservatives. The creaminess will lend itself beautifully to the dressing’s texture while providing healthy fats that leave you feeling satisfied.
- ¼ cup soy sauce: This ingredient is essential for infusing depth and umami flavor into our dressing. It adds a savory richness that complements the sweetness of other components beautifully. If you’re watching sodium intake, consider low-sodium soy sauce as an alternative. Trust me on this—this salty kiss transforms everything!
- ¼ cup chicken broth: Using chicken broth enhances the flavor profile of our dressing while also making it lighter in consistency. You can use homemade broth or store-bought options; just be sure to check for low-sodium varieties if salt intake is a concern. It acts as an excellent diluter too—ensuring our dressing isn’t too thick when it’s time to toss everything together.
- 2 tablespoons lime juice: Freshly squeezed lime juice is non-negotiable here! The bright acidity cuts through the richness of the peanut butter and balances out flavors beautifully. Don’t rush to use bottled lime juice—it lacks that zesty freshness we crave! A good rule of thumb: one medium lime yields about 2 tablespoons.
- 2 tablespoons honey: Honey adds a gentle sweetness that complements both our dressing and salad ingredients wonderfully. It acts as a bridge between flavors while contributing moisture to our sauce—making it luscious without being cloyingly sweet! Feel free to adjust according to your taste; pure maple syrup is also an excellent substitute if you prefer something plant-based!
- 1 teaspoon sriracha: This spicy condiment brings just enough heat to elevate our dish without overpowering it. If you’re sensitive to spice levels (or cooking for kids), feel free to adjust or substitute with your favorite hot sauce instead! Just remember—it’s easier to add more heat than it is to take it away!
- ¾ teaspoon garlic powder: Garlic powder provides aromatic depth without overwhelming other flavors—perfect for those moments when you want garlic essence without visible pieces! If you prefer fresh garlic, use about one clove minced; however, be cautious as it can be more potent.
- ½ teaspoon toasted sesame oil: This ingredient adds complexity and richness with its nutty flavor profile—it’s absolutely paramount! A little goes a long way; ensure you’re using toasted sesame oil rather than regular sesame oil for maximum flavor impact!
- ½ teaspoon ground ginger: Ground ginger offers warmth and subtle spice; it rounds out our dressing brilliantly! Look for high-quality ground ginger—it makes such a difference in flavor compared to lower-quality versions.
- 4 cups shredded chicken: Use rotisserie chicken or leftover grilled chicken here; it adds heartiness and protein while saving you time in preparation! Shredded chicken integrates well into salads like ours—and trust me when I say convenience doesn’t compromise flavor!
- 4 cups green cabbage (shredded): Crisp green cabbage provides texture and crunch—it’s incredibly refreshing! When shredding cabbage at home, cut it thinly so each bite remains tender yet satisfying—a crucial tip!
- 1 cup red cabbage (shredded): Adding red cabbage not only enhances visual appeal but also contributes additional nutrients like antioxidants! Its subtly sweet flavor pairs beautifully with green cabbage while offering variety in texture.
- 1 red bell pepper (diced): Sweet red bell pepper adds color along with juicy bites bursting forth from every morsel—their sweetness perfectly contrasts against savory elements present throughout!
- 1 cup carrots (julienned): Carrots introduce crunchiness while adding vibrant orange hues—who doesn’t love colorful food? Plus, they bring natural sweetness balancing out richer flavors nicely!
- 1 (11 oz.) can mandarin oranges (drained and patted dry): These little gems are nature’s candy—they infuse pops of brightness throughout our salad experience! Be sure they’re drained well; excess liquid could water down our lovely dressing.
- ½ cup green onions: These provide mild onion flavor alongside freshness—they’re an essential garnish here too! Their vibrant green tops elevate presentation while offering delightful crunchiness between bites!
- ¼ cup cilantro (roughly chopped): Fresh cilantro not only adds herbaceous notes but also enhances aromatic qualities within this dish—I find myself instinctively reaching for extra handfuls every time! If you’re not fond of cilantro though? Parsley works wonderfully here too!
- ½ cup honey roasted peanuts: Crunchy honey-roasted peanuts bring amazing texture along with delightful sweetness—they’re non-negotiable if you’re looking for ultimate satisfaction nestled between crisp veggies!
- ⅓ cup slivered almonds: A handful of slivered almonds adds nuttiness alongside additional crunch factor—a great complement paired against softer textures found elsewhere within salad’s mix!
Optional Add-ins:
If you’re feeling adventurous or want extra crunchiness in your salad experience? Consider adding chow mein noodles or crispy wonton strips atop before serving—their crispy delight makes every bite even better! Toasted sesame seeds could enhance presentation too while introducing undeniable umami vibes into mix!
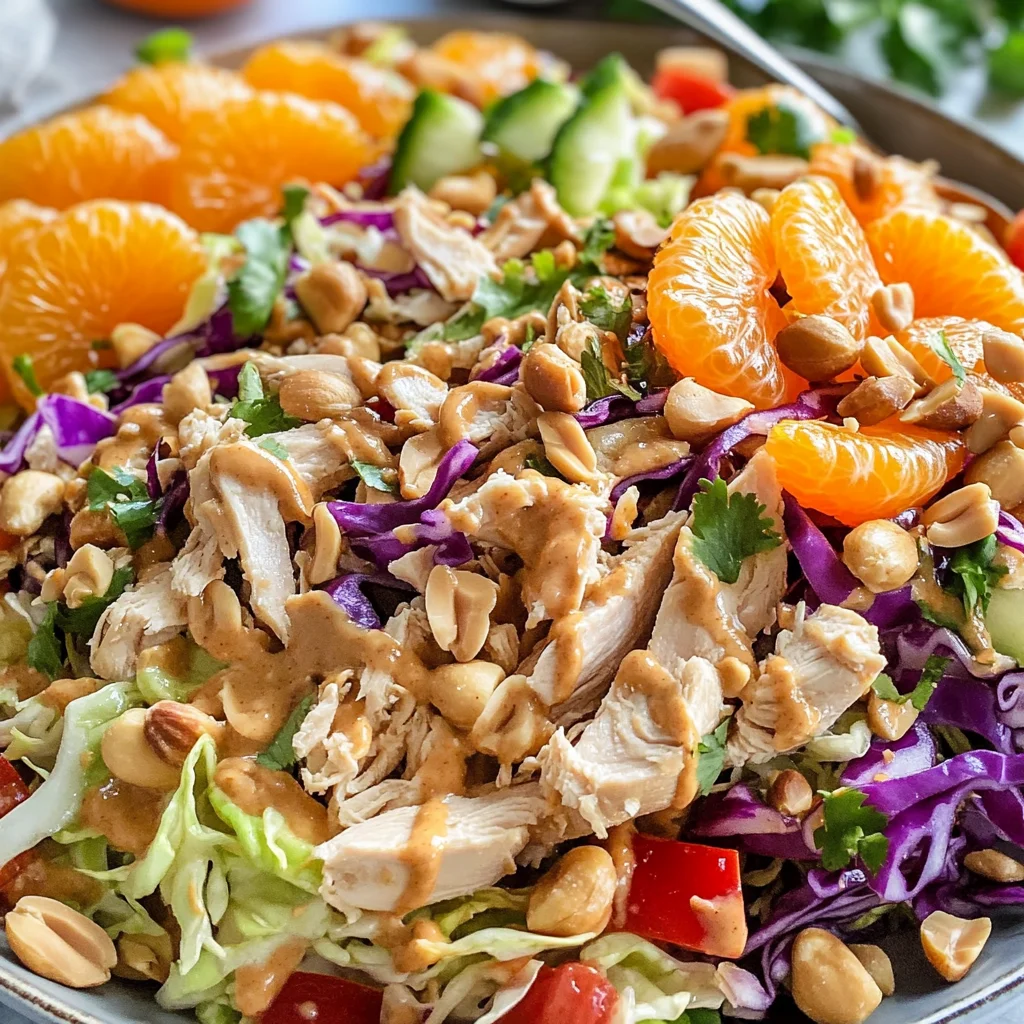
Equipment You’ll Need:
Before we dive into assembling our magnificent salad, let’s talk about some essential tools that will make your cooking experience smoother and more enjoyable. Having these handy ensures everything comes together seamlessly—you’ll wonder how you ever cooked without them!
- Food processor or whisk – While either tool will do wonders when mixing up our peanut dressing, I highly recommend using a food processor if available—that way you’ll achieve velvety smoothness effortlessly! However if whisking by hand suits your fancy? Go ahead—it builds character…and arm muscles too!
- Large mixing bowl – You’ll want something spacious enough to accommodate all those lovely toppings without spilling chaos everywhere (trust me!). A sturdy glass bowl works great because it’s easy on the eyes—as well as providing room during tossing stage later on!
- Sharp knife & cutting board – Essential items when chopping veggies like bell peppers & cabbages—we need precision here folks! Investing in quality kitchen knives pays off over time since they make prep work faster & safer overall.
Now let’s get ready to prepare this sensational Thai Chicken Salad together—I promise you won’t regret diving into such vibrant flavors!
Preparing the Thai Chicken Salad
Step 1: Whipping Up That Irresistible Dressing
First things first—the key to achieving maximum flavor lies within our creamy peanut dressing! In either a food processor or large mixing bowl (whichever suits your fancy), combine all those glorious ingredients designated for dressing—peanut butter, soy sauce, chicken broth…you know what they are already from earlier discussions! Blend until uniformly smooth—don’t rush this step because achieving perfect consistency matters immensely here—a luscious dressing coats each ingredient evenly later on during assembly phase. After blending thoroughly? Cover up tightly & chill until ready—it’ll deepen flavors significantly through marination process while remaining cool when tossed over greens later on!
Step 2: Prepping Our Vibrant Veggies
With our dressing chilling happily away? Let’s turn attention towards prepping those fabulous veggies waiting patiently nearby—the heart & soul behind this incredible dish awaits attention now! Start by shredding green cabbage finely as well as red cabbage—you’re aiming for delicate ribbons here so they remain tender upon mingling throughout final assembly stage later down line…plus visually appealing too—who doesn’t love beautiful plates? Next up chop up red bell pepper into small bite-sized pieces alongside julienning carrots precisely—the goal being showcasing freshness through contrasting colors amongst what would otherwise appear mundane if left whole/large chunks uncut during serving process.
Step 3: Shredding That Succulent Chicken
Alright friends—we’ve prepped everything else beautifully thus far…now onto shredding succulent cooked chicken meat which has been eagerly awaiting starring role since beginning journey today! Grab whatever rotisserie version tickles taste buds most before tearing apart meat using fingers or forks until achieving desired texture—you want tender shreds full-bodied enough yet small enough so everyone gets equal portions amongst mix later down road…but don’t stress if there are larger bits either—they’ll blend wonderfully once tossed together ultimately enhancing overall heartiness factor present throughout entire salad experience post-completion stages ahead!
Step 4: Tossing Together Our Masterpiece
Finally…the moment we’ve all been waiting eagerly towards arrives at last…it’s time for assembly phase where everything transforms magically into one glorious creation filled vibrancy galore before us now waiting eagerly upon plates ready-to-be-devoured shortly thereafter!. In large bowl combining prepared veggies alongside shredded chicken previously made…no need holding back folks—let those textures meld cohesively throughout entire mixture ensuring even distribution across board whilst giving special care ensuring none fall victim unto bottom depths unnoticed later on during tasting phase ahead after coating generously employing chilled dressing prepared earlier atop prior assembled mixture…this final stage proves pivotal establishing harmonious balance achieved effortlessly amongst all components involved leading up into delectable bites served directly onto plates before dining parties gathered ’round tables tonight sharing laughter stories reminiscing good times spent relishing delicious offerings shared close friends loved ones alike enjoying every last crumb afterward…what could possibly bring greater joy?
And there you have it—the enchanting world of Thai Chicken Salad awaits right at your fingertips—all bursting forth simultaneously enticing palates everywhere indulged willingly exploring new depths culinary adventures await next chapters written within kitchens across globe daily…but let’s savor momentarily first shall we? Enjoy each mouthful knowing love poured into creation spark joy wherever served next occasion arises celebrating life’s delicious journeys together whether intimate gatherings larger feasts shared openly surrounded cherished company…happy cooking friends!
Step 5: Whisking Up Liquid Gold
Now that your dressing ingredients are gathered and ready, it’s time to transform them into an utterly intoxicating sauce that will elevate our Thai Chicken Salad to new heights. For this step, you can either use a food processor or a large bowl with a whisk—whichever feels most comfortable to you. If you’re using a food processor, simply add the peanut butter, soy sauce, chicken broth, lime juice, honey, sriracha (or your hot sauce of choice), garlic powder, toasted sesame oil, and ground ginger into the bowl. If you’re whisking by hand, begin by combining the peanut butter and soy sauce first; this helps to create a smoother base. Trust me on this! As you gradually incorporate each ingredient, you’ll notice how they meld together into a creamy concoction that looks like liquid gold.
Once everything is in one place, give it a good blitz or vigorous whisking for about 30 seconds until the mixture is uniformly smooth and glossy. You want to achieve a consistency that’s not too thick—think of it as the perfect balance between pourable and clingy. This texture is crucial because it allows the dressing to coat every ingredient in your salad evenly. After achieving this lusciousness, cover your dressing with plastic wrap or transfer it to an airtight container and pop it in the fridge while you prepare the rest of your salad. Chilling is non-negotiable here; not only does it enhance the flavors as they mingle and deepen, but it also allows the dressing to thicken slightly—a change that makes all the difference when drizzled over your fresh salad.
Step 6: Prepping Your Garden of Freshness
While your dressing is chilling blissfully in the fridge, let’s shift gears and prepare our vibrant array of salad ingredients. Begin by shredding your green cabbage; I recommend using a sharp knife or mandoline for even slices—the crunchier, the better! Aim for thin shreds that can easily mingle with other components without overwhelming each bite. Similarly, take your red cabbage and slice it into delicate ribbons that add both color and crunch. The combination of these two cabbages brings a delightful textural contrast that’s absolutely paramount in creating a salad that has layers of flavor and sensation.
Next up are those beautiful bell peppers and carrots! Dice your red bell pepper finely so that its sweetness bursts forth with every forkful; its bright color not only adds visual appeal but also contributes to the symphony of flavors we’re crafting here. For carrots, julienning them creates those elegant little strips that will add both sweetness and crunch—just like with the cabbages, aim for uniformity in size so they blend seamlessly into our medley. Finally, don’t forget about our juicy mandarin oranges! Drain them well and pat them dry so they don’t water down our lovely salad; their citrusy zing will be an extraordinary contrast against the earthy peanut dressing. Once everything is prepped—green cabbage, red cabbage, bell pepper, carrots, and mandarin oranges—toss them gently in a large mixing bowl like you’re orchestrating a grand dance; this step ensures all those vibrant colors are beautifully interspersed.
Step 7: Shredding Chicken Like A Pro
Now let’s talk about one of my favorite ingredients: shredded chicken! If you’re using rotisserie chicken (which I highly recommend for ease), simply peel away the skin and shred the meat using two forks—it’s such an easy technique that yields tender pieces without any fuss! If you’re feeling adventurous or want to control every aspect of flavor from scratch, you can poach chicken breasts in seasoned water or broth until fully cooked—which typically takes around 15-20 minutes depending on thickness. When it’s done cooking (don’t rush this step!), let it rest for five minutes before shredding; resting is essential because it allows juices to redistribute throughout the meat instead of running out when you cut into it.
As you’re shredding the chicken breast with those forks—or even your hands if you’re feeling bold—remember to keep an eye on texture; you want tender shreds that can soak up all that glorious dressing without turning mushy. The reason we focus on this technique is simple: each bite should have some chicken along with those crisp veggies—a perfect balance between protein-rich goodness and crunchy freshness! Once you’ve shredded enough chicken (about four cups), toss it gently with your rainbow of vegetables in that large mixing bowl we used earlier; just imagine how satisfying it’s going to be when we bring all these elements together!
Step 8: The Moment of Truth
Now comes perhaps my favorite part—the assembly! Take out that chilled dressing from the fridge; you’ll notice how beautifully thickened it has become while those flavors have intensified during their time together. Grab your salad bowl filled with all those gorgeous ingredients—you should have a vibrant mix of colors just waiting to come together harmoniously. Start by drizzling a small amount of dressing over your salad mixture first—this way you can gauge how much coating you’ll need without overwhelming everything right off the bat!
Using tongs (or clean hands if you prefer), gently toss everything together until each piece gets kissed by that rich peanut sauce—don’t rush this step! This gentle motion ensures that every bite will be perfectly coated but still maintain its individual character. What makes this moment truly special is seeing how every ingredient shines through while being elevated by its companions; trust me when I say it’s incredibly rewarding! Keep adding more dressing incrementally until you’ve reached your desired level of flavor saturation—it’s all about personal preference here.
Once you’ve tossed everything beautifully together and achieved an inviting look that’s absolutely drool-worthy, let your Thai Chicken Salad sit for about 5-10 minutes at room temperature before serving if time permits. This brief pause allows flavors to mingle even more deeply—a transformative effect that enhances each component’s taste profile! And remember: while serving up this masterpiece at dinner or as a side dish at gatherings will undoubtedly impress everyone around you—it’s genuinely comforting knowing how simple yet extraordinary this recipe is!
Final Touches: Elevating Your Salad Experience
Step 9: Garnishing Like A Pro
As we approach the final stages of creating our masterpiece Thai Chicken Salad, let’s talk about garnishing—a step often overlooked but utterly essential for both presentation and flavor enhancement! Take a moment to sprinkle those honey-roasted peanuts atop our vibrant creation; their buttery sweetness combined with delightful crunch provides not just texture but also elevates every bite into sheer indulgence. Don’t hesitate to get generous with these beauties since their role cannot be overstated—they’re like little nuggets of joy scattered across our dish!
In addition to peanuts, consider adding slivered almonds for another layer of nuttiness or even crispy chow mein noodles if you’re looking for extra crunch—imagine biting into those crispy bits amidst all those fresh veggies! And if you’re feeling fancy? A light sprinkle of toasted sesame seeds will bring an aromatic note that’s simply divine while enhancing visual appeal with their subtle sparkly finish. Lastly—with just moments before serving—I always love adding freshly chopped cilantro on top; trust me when I say its herbaceous brightness complements everything perfectly.
With these final touches completed—and perhaps even a squeeze more lime juice over everything—you now have an incredible Thai Chicken Salad ready for devouring either solo or alongside friends at gatherings! Remember: this isn’t just any ordinary salad—it’s packed full of nourishing ingredients bursting with flavor while bringing warmth through every bite shared around tables filled with laughter and love. Enjoy making memories as much as enjoying delicious food because truly… nothing brings people together quite like sharing good meals made from heartwarming recipes passed down through generations.
Embrace experimentation as well—don’t shy away from adding seasonal produce or swapping out ingredients based on what catches your eye at farmers’ markets or grocery stores! Cooking should always feel personal—a reflection not only of tastes but experiences woven together into something meaningful…and oh-so-delicious too! So gather everyone around & dig in—you’ll soon discover why this Thai Chicken Salad could very well become everyone’s new favorite dish!
Storage and Enjoyment Tips for Your Thai Chicken Salad
Now that you’ve skillfully whipped up this vibrant and utterly delightful Thai Chicken Salad, I can just feel the excitement radiating from you! It’s like a burst of sunshine on a plate, ready to be savored. But let’s talk about what happens if you find yourself with leftovers (which, let’s be honest, is often a blessing!). Proper storage is key to ensuring every bite remains as fresh and delicious as when you first tossed it together. You’ll want to grab an airtight container — preferably glass, as it helps maintain flavor integrity — and place your salad in the refrigerator. This dish is best enjoyed within three days, but trust me, the flavors only deepen over time. Just remember, if you have added any crunchy components like chow mein noodles or crispy wonton strips, keep those separate until you’re ready to serve. This ensures that they remain wonderfully crisp and don’t turn soggy as they mingle with the dressing. The beauty of this salad is that while it may lose a bit of its vibrant crunch after storage, the flavors will still sing with that delightful harmony of sweet, savory, and tangy notes.
Storing Leftover Thai Chicken Salad
When it comes to storing leftover Thai Chicken Salad, I recommend using a sturdy airtight container to seal in all that deliciousness. If you’re looking for the freshest experience possible, consider adding a slice of bread inside the container — this little trick can help absorb excess moisture and keep your greens crispier for longer! Typically, your salad will stay fresh in the fridge for about three days, although I suspect it might disappear faster than that! After chilling in the fridge, you might notice that the dressing has thickened slightly; give it a good toss before serving — this rejuvenates those flavors beautifully! While I wouldn’t suggest reheating this salad (it’s best enjoyed cold), feel free to take out what you need for lunch or dinner and enjoy it straight from the bowl; trust me on this one!
Freezing Components for Later
Now let’s talk about freezing some components of your Thai Chicken Salad for convenience! If you’ve made a big batch or simply want to prep ahead for those busy weeknights (we’ve all been there), consider freezing your shredded chicken separately. To do this properly, place it in a freezer-safe bag or container; removing as much air as possible is crucial here because we want to prevent freezer burn from stealing away flavor! Your chicken can be kept frozen for up to three months without losing its quality. When you’re ready to use it again (maybe for another glorious salad or even a wrap), simply thaw it overnight in the refrigerator or use the defrost setting on your microwave if you’re short on time. The ease of having prepped ingredients at your fingertips makes meal planning so much more manageable — plus, knowing that mouthwatering Thai Chicken Salad is only moments away? Pure bliss!
Thai Chicken Salad
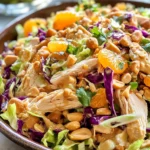
Thai Chicken Salad is a vibrant and refreshing dish that brings the essence of Thailand right to your dinner table. This delightful salad features succulent shredded chicken, crisp green and red cabbage, sweet mandarin oranges, and crunchy honey-roasted peanuts, all enveloped in a luscious homemade peanut dressing that’s bursting with flavor. It’s perfect as a light dinner or meal prep option, ensuring you enjoy every bite whether dining solo or sharing with loved ones. The balance of sweet, savory, and tangy elements makes this salad an exciting culinary adventure that can easily be customized to suit your tastes.
- Prep Time: 20 minutes
- Cook Time: None
- Total Time: 0 hours
- Yield: Serves 6
- Category: Salad
- Method: Mixing
- Cuisine: Thai
Ingredients
- ½ cup peanut butter
- ¼ cup soy sauce
- ¼ cup chicken broth
- 2 tablespoons lime juice
- 2 tablespoons honey
- 1 teaspoon sriracha
- ¾ teaspoon garlic powder
- ½ teaspoon toasted sesame oil
- ½ teaspoon ground ginger
- 4 cups shredded chicken
- 4 cups green cabbage (shredded)
- 1 cup red cabbage (shredded)
- 1 red bell pepper (diced)
- 1 cup carrots (julienned)
- 1 (11 oz.) can mandarin oranges (drained and patted dry)
- ½ cup honey roasted peanuts
- ⅓ cup slivered almonds
Instructions
- In a food processor or large bowl, combine peanut butter, soy sauce, chicken broth, lime juice, honey, sriracha, garlic powder, toasted sesame oil, and ground ginger. Blend or whisk until smooth.
- Prepare the vegetables: shred green and red cabbage; dice the bell pepper; julienne the carrots; drain and pat dry the mandarin oranges.
- Shred cooked chicken using two forks or your hands.
- In a large mixing bowl, combine shredded chicken with all prepared vegetables.
- Drizzle dressing over the salad and toss gently until evenly coated.
- Garnish with honey-roasted peanuts before serving.
Nutrition
- Serving Size: 1 bowl (approximately 250g)
- Calories: 380
- Sugar: 10g
- Sodium: 580mg
- Fat: 22g
- Saturated Fat: 4g
- Unsaturated Fat: 18g
- Trans Fat: 0g
- Carbohydrates: 32g
- Fiber: 5g
- Protein: 19g
- Cholesterol: 55mg